Planning new brewery room

Homebrew Talk - Beer, Wine, Mead, & Cider Brewing Discussion Forum

Help Support Homebrew Talk - Beer, Wine, Mead, & Cider Brewing Discussion Forum:

This site may earn a commission from merchant affiliate links, including eBay, Amazon, and others.

kpr121

Well-Known Member
Joined
Jul 30, 2009
Messages
3,117
Reaction score
138
Location
Pittsburgh
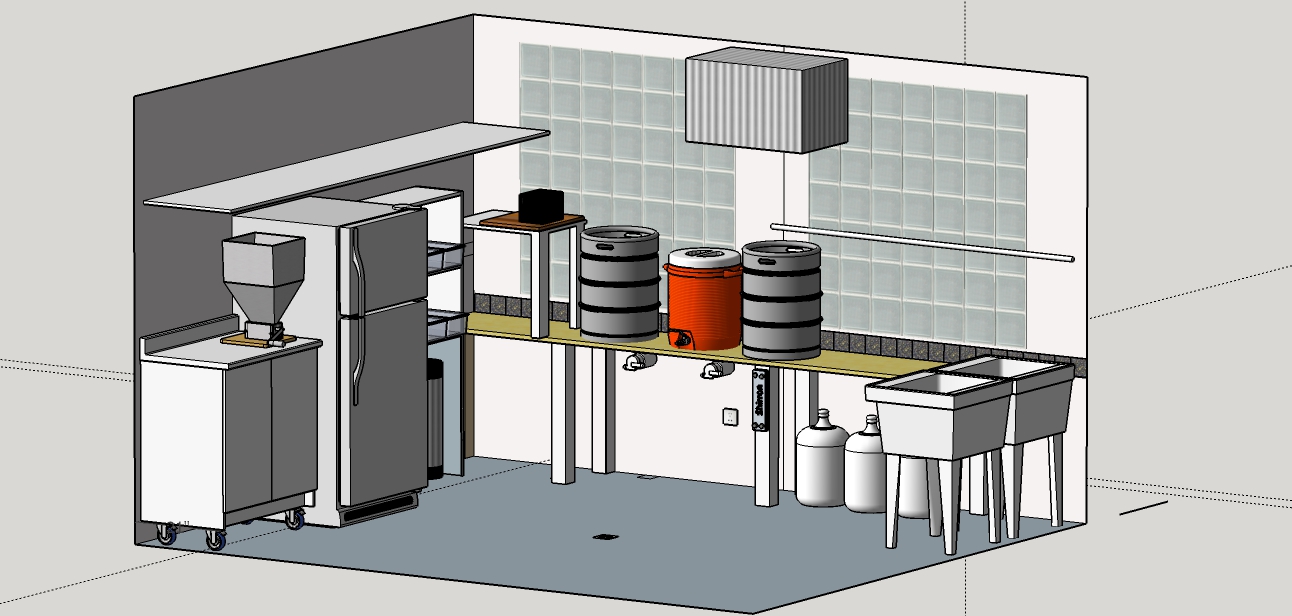
Hey all, Im going to be closing on a new house at the end of Sept and one of the first priorities (for me, maybe not so much SWMBO) is setting up the brewery. So I've been messing around with Google Sketchup trying to come up with a good layout. Would appreciate any input and ideas, I am kind of setting this up with the same layout I had before because it feels more comfortable, but figured if there was ever a good time to makes some tweaks now would be the time.

A couple points:

This is an all electric, 220, 5500 w elements in HLT and BK setup. Existing room has dryer hookup on wall that brewstand is shown. Black box in pictures is my control panel.

Sink is fairly set in place. It is already there, and is cast iron.

Wall that brewstand is shown on is on exterior wall.

There is a floor drain in center of room, not sure if I'll be able to use this or not but would love to. Floor is concrete.

James Brewery.jpg
 
I agree about the shorter run to the sink. That was the biggest issue when I started brewing inside because moving 5-6 gallons of boiling wort closer to the sink is 100% impossible for me to do on my own. I would move the brew table down more. I like the idea of having some kind of surface just next to the sink for the dirty stuff.

I would love a room like that with a drain that I could use. I don't know about anyone else but my floor is murdered sometimes after a brew day as well as a bottling/kegging day.
 
Thanks for the replies! Good points regarding the proximity to the sink. I think I will shift the entire brewstand/counter to the right wall, leaving space between the BK and the corner for dirty stuff, maybe a drying rack even. Then put the table on the far left wall. Would be more consistent looking then too. Far left wall will be my prep/grain milling area.

I’m not 100% sure on all the dimensions other than the overall room size. I.E. there may actually be more room between the sink and the exterior wall than I have pictured here.

I use a Shirron plate chiller for chilling, and in my old setup I just connected a garden hose to it and ran the water out to my backyard. But there is obvious benefits to getting the kettles closer to the sink/water source. One of which will be plumbing a water filter above the HLT so that I can fill it up easily.

I am hoping/praying/crossing my fingers that the floor drain works well. Would be so nice to be able to just rinse spills and mop into the drain.
 
BTW, I plan on using butcher block for the countertop. I got what I thought was great deal on a 79” x 40” piece of 1 inch thick butcher block at a construction recycling center - $45!!! I plan to rip the piece in two 20” wide pieces for the counter. That would be just enough to take up that entire wall, me thinks.
It will probably get a dark stain and heavy coating of polyurethane.

I will probably do some kind of tile backsplash to help with any spills I get on the countertop.


I have the next month or so before we even get into the house so this thread should have plenty of google sketchup goodness until then.
 
Heres updated sketch. After doing some reading I realized its not entirely necessary to vent all three vessels, only really need to vent the BK. Also would like to get my Control Panel up and 'out of the way' a little bit. Want to limit the chance of any spills occuring on the enclosure. I'll probably mount the SPA panel above the control panel.

James Brewery2.jpg
 
Good point regarding grain milling. Actually I might think about moving the grain milling station to the garage or outside just to keep down on the dust. My previous brewery was in an old unfinished garage/workshop so the grain dust just kind of accumulated along with sawdust until shopvac day (maybe once a month). This will be a little more of finished/showcase room that I want to keep clean for sanitary and aesthetic purposes.

Maybe one of the projects will be to build a wheeled cart that houses the grain mill. Like one of the double cabinets shown on the left wall with casters. Large covered hopper on top and grains drop below inside the cabinet. I know I’ve seen those builds on HBT somewhere…

One thing that this brewery is not going to be is expensive (at least in terms of money spent from here on out), so it should be interesting to see what I can come up with on a budget.

After some discussions (and few glasses of wine), SWMBO has given me the verbal go-ahead to ‘takeover’ the entire basement if I wanted. In addition to the future brewery, there is a finished gameroom {~20x20ish} off to the right of brewery, a large walk in storage closet {~6 x 15ish} to the front, and garage on other side of house). The large storage closet will house all my brewing gear, bulk grains, and likely a DIY fermentation chamber.

There will be a bar somewhere downstairs as well, I’m just not sure where we want to build it yet. I would actually love it if the bar could be in the brewery room, would be great to show off the system (and a cool place way to hang out on brewdays). Although that has already got the wheels spinning on how I need to clean up/polish the keggles.

Yeah, this could turn into an epicly long build thread…
 
I love the layout now but I could not agree more about somehow getting the grain milling separate from where you pitch yeast. I know starters have been lost because they sat where grain was milled. Perhaps some acrylic type barrier that you can close when you hit the power button for the drill?

In terms of money, if your electrical isn't set up then rest assured, you'll be spending more money.
 
In terms of money, if your electrical isn't set up then rest assured, you'll be spending more money.

This room is currently used as the laundry room. There’s 220V on the wall that the brewstand will be. Wife wants the laundry on the first floor. THAT is where the more money will be spent.... ;)
 
You need more cabinets and drawers for all the cleaners, spare o-rings, extra tubing, camlocks, funnels, poppets, paint strainers, cleaning brushes, etc., etc., etc. that you accumulate over the years. You can never have enough spare parts or storage for those spare parts. And don't forget the shelving for your library of brewing books.
 
Agreed on that. I was planning to try to keep all the "spare parts" - bottles, tubing, etc. in the storage closet. But I definitely want to have at least a couple shelves under the brewstand, and probably upper cabinets on the left and right wall to keep things that are used on an every-brewday basis. I'll get those sketched up tonight. Thanks for the input.
 
I like your first layout better, but minus the wooden table in the corner. I'd replace the table with a small shelf rack to the left of the sink. Or better yet, make a custom shelf rack the same height and width of the sink, so I'd have a place to allow equipment to dry on top and a place to rest the kegs on their side while I'm rinsing them out.
 
I too like the first setup better. I love having tons of space next to the sink to set cleaned items. I would make sure to leave space around the sink for any future sink upgrades. The sink is by far my most used tool in my brewery. Keep an eye out for pre-rinse sprayers on ebay. They are worth their weight in gold and will speed up and make any cleaning easier. It wouldn't bee too hard to T off of the water line and run it along the wall to add water wherever you need it. What I have done in my old dungeon basement is add a ball valve with a cam lock fitting on the end and run a drinking water hose to that. It allows me to fill the kettles and then I use it for chilling. I wish I had a better drainage solution in mine, but my brewery is kind of split between two small adjacent rooms. I would recommend getting the panel off the counter. Personally I don't worry too much about big spills, but even that little bit of counter top will be nice to have back. And finally, epoxy paint the floor. You won't regret it, it's easy to do, doesn't cost that much in the grand scheme, much easier to do before you get all your stuff in there.

In my future dream home I am already planning the brewery out in my head as well. Most of what I have now can easily be moved, and that's how I justified most of it to myself. I am currently using salvaged counter tops. You can find used ones or many times blemished ones at the big box stores for next to nothing. I have seen large stainless counter worktops go for next to nothing on craigslist, but they won't fit in the current setup. That is definitely the way I'm going for the next build someday. I agree with being frugal and watching expenses. If you have patience you can usually find everything very affordably. And if it is well laid out, not that expensive, clean and neat looking, you may find you will get the go ahead a lot easier.
 
I updated the sketchup quite a bit last night, but forgot to grab a snapshot to upload.

Wife told me that the sink is a lot closer to the far wall based on her recollection the last time she was in the house. She thinks it actually abuts the far wall. Knowing her attention to detail and my tendency to have a selective memory she is probably right.

So I moved the BK to basically the center of the wall, leaving 6 feet or so from the edge of BK to the wall that the sink is on. That will be enough room to put in a drying rack at sink level and any other shelving I need there. Now thinking back to the old house, the majority of my brewing gear ended up sitting on the washer and dryer next to the utility sink in the laundry room, so I can definitely agree with the points about the sink being the most used tool in the brewery.

I like the idea of trying to use salvaged old countertops. The place that I bought that butcher block had a ton of counters in all different shapes and sizes that I could use, for dirt cheap. Maybe I’ll go that route instead of ‘wasting’ the nice BB on a surface that is going to constantly be a mess. I’m sure we can find a great use for the BB somewhere else.

One other thing about cleaning. I would like to clean in place, not move the kettle over to the sink after every brewday. The reason for this is I don’t want to be banging the element housing off of stuff, and having to unplug the cord from the CP all the time. So if the floor drain works that will be great - connect a hose to the output of BK and go to town. If not, I’ll probably be doing some pumping over to the sink, which is fine, but a little more effort.

Love the epoxy idea. I actually think the room was epoxied previously so I’ll have to check out what condition it is in.

Thanks to everyone chiming in with your thoughts and following along. I know I’m a bit long winded but I want to have a solid plan that will limit the amount of ‘I should have done this that way’ moments in the future.

Seems like I need to find an excuse to get the owners to let us take a look and some pictures. Or I could wait. Ehhh.
 
Looking for a new house right now and dreaming up my ultimate brewing space as well. Renting in the meantime, so I've had plenty of time to work on projects and think up different ways of doing things. If you do have a grain milling station in the space, I have an idea I think I'm going to implement when I find my house. The idea is to add work-bench like counter space that is attached to an existing table or workbench with hinges, so it folds down when not in use. It would have a hole cut in it the circumference of a 5 gallon bucket just beneath the top lip, so that it stays in place while you crank the mill with a drill. I got the idea from a "this old house" video about building a garage workspace where they did the same thing but for a power tool. Anyway, your plan looks great - good luck and happy brewing!
 

Looks really cool man. If it were me I wouldn't worry about the distance between brew stand & sink for the purposes of draining the chiller's waste water. It would be a pretty simple/inexpensive little project to run some PEX along the walls from the brew stand area over to the sink. I did something similar in my shop (PEX line from brew stand to a barrel outside where I capture chiller waste for reuse) and it was no big deal. Kinda fun actually.

Anyway, best of luck on the system. By the looks of your diagram it's going to be a fantastic setup.

Cheers.
 
I like that you have casters on the milling station. That's exactly what I do, and I would highly recommend wheeling it away from your brewing space while milling, and vacuuming up before wheeling it back in. Malt is full of lacto. Call me paranoid, but you don't need that dust near your fermenters.

Nice sketch. Modelling is the half the fun!
 
Thanks. Modeling is half the fun. Or in my case, nearly all the fun since we aren’t in the house yet! It took me a little while to gather the ‘component’ concept so sketchup wizards would probably laugh at my file. But that’s the fun in learning.

I like the idea of a dedicated pex return line to the sink. I could attach a male camlock fitting to it so I can just quick connect any hose I need to. Thanks for the input! I guess I would try to put it below my kettles but above the sink and some slope to it so it would drain. Sounds possible/reasonable.

I definitely am on board with milling outside of the brewery. The milling cart will probably be one of the last tasks I do since I already get by with a corona in a bucket system, a la Revvy. I’ll just carry my MLT cooler out to the garage or outside and fill it up there, keep the dust out of the brewery.
 
Latest idea/dream is to build a fermentation chamber right underneath the brew stand.... Hmm that would be awesome!
 
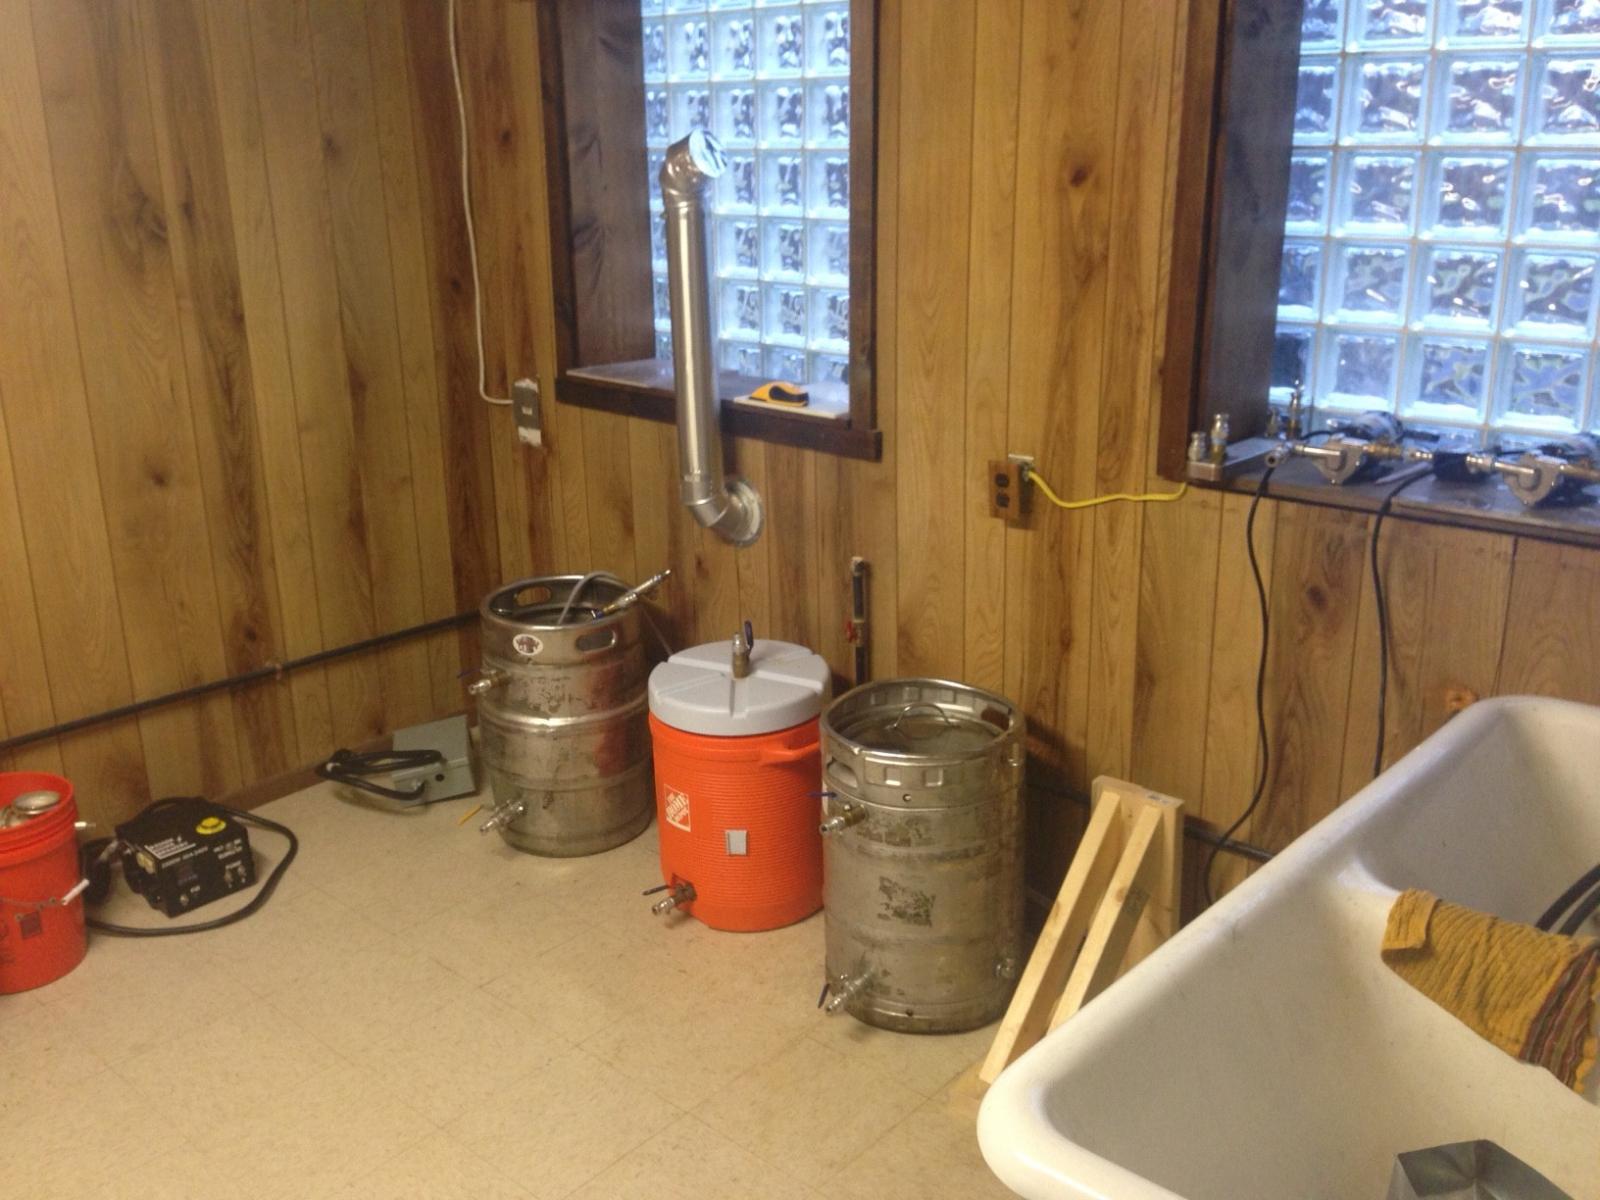
Well its been quite a while and im finally getting around to starting the brew room. Heres a picture.

First issue is that the 240 line is only 3 wire. My CP is setup for 4 wires in. I've done a ton of reading on the subject and theres a lot of contention about whether you can convert 3 to 4 wires inside of SPA Panel. My gut is telling me to re-rig my CP to have a separate 110 line for pumps and PID power and be independant of the 220 stuff. But I havent decided fully yet.

Anyway, I'll be posting more frequently here. Just purchased a 8" active air vent fan and controller too. You can see the existing 4 inch duct for the dryer in the picture. That needs updated.

IMG_2191.jpg
 
Love the copper!!


Thanks! Not quite sure how I'm going to finish/trim I out... Ended up with a seam right down the middle horizontally... I tried my best to keep the two runs butted exactly against each other but it's noticeable if you look. Original plan was to just add trim to bottom to cover up j channel and silicone but I might add a piece of trim in the middle too. Or...I could get a custom decal or some sort of thin sign to cover it up but then it takes away from the rest of copper.
 
Oh and I think I'm going to replace the pex piping with hard copper lines to complement the hood. Also have plans for a copper HLT kettle filler so I don't have to worry about connecting hoses during startup.
 
I think a strip of copper trim across the middle would look good. Maybe use some copper headed nails too?
 
I think a strip of copper trim across the middle would look good. Maybe use some copper headed nails too?


That's a great idea... Wonder if a craft store like michaels would be best to get that? I also have some leftover foil I could maybe fold it up into a strip and then attach with the copper nails.
 
Took half day at work so I could come home and get some things done around the house. soldered (not the prettiest part of the brewstand that's for sure) and no leaks!

Flushed all the crap out and now filling the HLT for tomor brew day.
 
Great update. In my experience it's super hard to make clean solder joints unless you're experienced. Which I'm not :drunk:

What'd you end up doing with the hood?
 
Thanks, yea I'm not too worried about the soldering, as long as it doesn't leak. Haven't done anything with the hood, fell into the trap of having everything be functional. So filling the pipeline gets automatically pushed to the top of the priority list.

I did buy some copper nails and plan to fold up the remaining flashing and nailing it on. Then wood trim around the top and bottom, stained same color as brew stand (gun stock)
 
I've been enjoying the progress you've been making. I'll be building my own basement brewery soon and find it interesting how others approach the project.
 
Thanks for the compliments! It's been fun getting all of this stuff put together. Here's a couple additional pictures: closeup of the HLT filler, closeup of the pre-filter water supply (picked a good height for filling/rinsing kegs), and one progress shot of my chest keezer/ferment chamber combo box (gotta come up with a better name than that).

View attachment ImageUploadedByHome Brew1423499654.838198.jpgView attachment ImageUploadedByHome Brew1423499669.742080.jpgView attachment ImageUploadedByHome Brew1423499690.721680.jpg
 
Back
Top