Pandemonium's 3 Vessel, Single Tier, eHERMs Build!

Homebrew Talk - Beer, Wine, Mead, & Cider Brewing Discussion Forum

Help Support Homebrew Talk - Beer, Wine, Mead, & Cider Brewing Discussion Forum:

This site may earn a commission from merchant affiliate links, including eBay, Amazon, and others.

Mountainsax

Well-Known Member
Joined
Aug 21, 2014
Messages
371
Reaction score
68
Location
Durango
I know, I know, we need another build thread like we need more macro breweries! Hopefully I'll be able to come up with some useful tidbits that others can use. But if not, at least we all like pictures!

So here's the story, the Christmas bonus came, SWMBO is awesome, and the build begins! :ban:

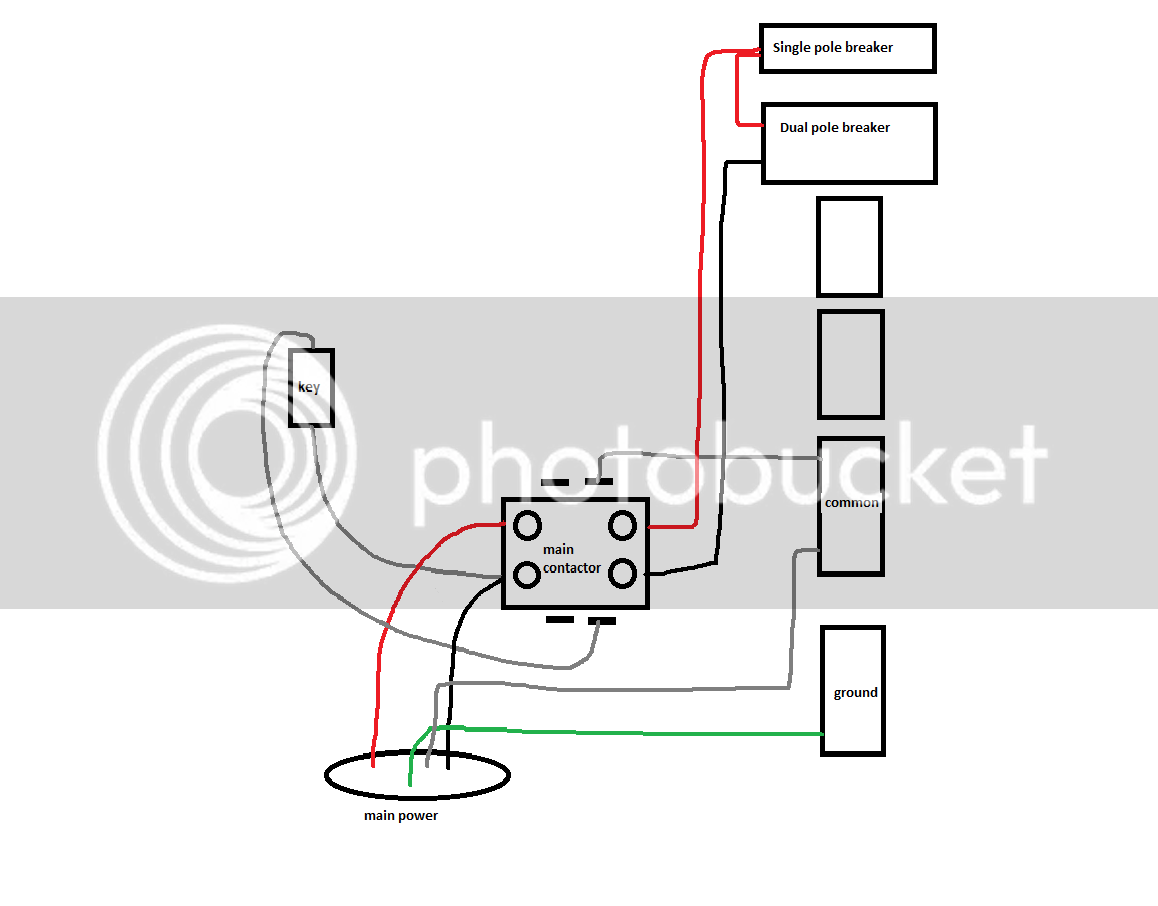
I'm planning a system based on Kal's design using keggles.

View attachment ImageUploadedByHome Brew1449061943.225124.jpg

The progress so far. The stand is pretty budget right now. Eventually I want to weld one out of stainless!

View attachment ImageUploadedByHome Brew1449062023.090796.jpg

The whole thing slides under my existing work bench. It does have wheels on it now.
 
I got the trusty volt meter out and found that there are 240 volts to the left side (main power in) of the main contactor and 0 volts on the right. Maybe it has something to do with how I wires in the key?
View attachment ImageUploadedByHome Brew1449146790.815872.jpg
Main power coming from plug on the left (black and red), second 10AWG wire on the left from the key, black wire w/ yellow connector is the other key wire.
 
Can you get a wider shot or do a quick MS paint of how its connected?

When your key is turned on you should see 120V going into your black w/ yellow end cable going to your contactor coil. When its off there should be 0V.
 
I got 0 volts with the key on or off across the contactor coil. I'll try to get you a wider shot tonight. Basically looks like this...
Untitled_zpsxmfc6ove.png
 
It's alive!!!!
View attachment 320441

Turns out it was just that the screws were missing in the connector bars on the blocks. Gotta love easy fixes!!

One benefit to all this was that I learned how the contactor coil functions as the switch for the contactor. Gotta love feeding by the brain!

Good work, one question though what are the blue lights for the BK/HLT? I assumed it was for "Selected" and the Orange/Yellow as for "Is Powered"...Im curious why both are on if that is the case...

Actually in any case im wondering what purpose those two lights would have being on at the same time. Or are those the power lights for the PID's?
 
I knew someone would notice that! [emoji12] The top white lights are 220v and show the elements heating. The lower yellow lights are 110v and are supposed to show the selected element. I'm not sure why both white lights are coming on. I'll have to look into it.
 
Building temperature probe cables, per Kal's instructions. I got the DIY kits from www.theelectricbrewery.com. Since my bench is 6 ft long, I got a 6ft, 8ft, and 12ft cable. Probably a little overkill but better too long than too short!

Here is what comes in the kit. Plus the detachable probe tip (not pictured).
View attachment ImageUploadedByHome Brew1450103079.317263.jpg

I don't have a heat gun for the shrink tube, but I've found that a soldering iron works good if you just keep moving it on the shrink tube.

View attachment ImageUploadedByHome Brew1450103063.301698.jpg

Here is a finished cable.
View attachment ImageUploadedByHome Brew1450102997.470751.jpg
 
Installed the weldless bulkhead with compression fittings from BrewHardware on the HERMs coil. I really like these fittings! They are super solid and well built, definitely worth the couple extra bucks! When you figure in the cost of the stainless compression fitting, adaptor, and weldless bulkhead it's about the same cost.
View attachment ImageUploadedByHome Brew1450103263.667624.jpg

In case anyone was wondering, a properly sized HERMs coil for a keggle fits nicely around a 7 year old!
View attachment ImageUploadedByHome Brew1450103318.901629.jpg
I don't recommend using the 7 year old to wrap the tubing though, they wiggle too much!!:D
 
Started working on the boxes for the heating elements.

Punched holes on outlet box covers.
View attachment ImageUploadedByHome Brew1450369612.973016.jpg

Punched hole in keggle.
View attachment ImageUploadedByHome Brew1450369678.589745.jpg

Learned how cheap Harbor Freight bits are!! This 1/8" bit just bent and snapped when I was trying to drill the pilot for the knockout punch. I didn't think I was pushing that hard but once it started bending I leaned more on it as I lost my balance and, SNAP!!
View attachment ImageUploadedByHome Brew1450369779.189751.jpg
 
I fab'd up the mount for the control panel today. The basic design uses 1" OD pipe inside 1-1/4" ID square tube to allow the panel to turn and for the mount to fold flush with the side of the stand.

The rusted "I" is where he control panel will be mounted.
View attachment ImageUploadedByHome Brew1450488470.536590.jpg

The panel will come off for storage and the mount folds in.
View attachment ImageUploadedByHome Brew1450488515.870706.jpg

I did all the welding myself and I am definitely not a welder!
 
Made some more progress this weekend. Got the heating element boxes built and installed, and installed the HERMs coil and some other various fittings.

View attachment ImageUploadedByHome Brew1450708023.674136.jpg
View attachment ImageUploadedByHome Brew1450708036.558911.jpg

The temp probe in the boil kettle seems a little close to the heating element (about 1/2"). I'm wondering if this is going to create an issue with inaccurate readings?
View attachment ImageUploadedByHome Brew1450707843.759842.jpg
 
Did a leak test and tested the heating element out this weekend in the boil kettle.

7.5 gallons from 45 F to 155 F in 20 minutes. 155 - boil in 12 minutes! Very happy with that!

Now I just have to figure out how to set/calibrate the MyPin PID so that it reads accurately. It about 65 when the water was 45 and reading 68 when it was 108. Working in deciphering the instructions!

View attachment ImageUploadedByHome Brew1451936871.335042.jpg
 
I figured out the PID issue! I started thinking it might be a wiring issue, so with power on (and no, I don't recommend working in the control panel with it energized!) I started trying different combinations for the wiring from the temp probe to the PID. I was able to find the right configuration, the interesting thing is that it doesn't match either the wiring diagram for the PID, or the wiring on theelectricbrewery.com for the temp probes.

All I care about is that it works!!
 
So everything is basically finished! I'm just waiting on two elbows, two valves, and a tee that I made the mistake of ordering off fleebay from China, over two months ago!:mad: After they were supposedly shipped twice, I have re-ordered them from bargainfittings.com and should have them in a week.

I thought some who were thinking about a similar build might be interested in my costs. I may have missed a few little pieces here and there, but this covers 95% of what it took me to put it together. I still need the pH meter and some water addition staples.

 
It's ready!!


I wanted something to keep all the cables and wires neat and organized. So, going along with the budget stand, I found a piece of 1-1/2" PVC pipe I had, cut a channel and some notches out, applied a little spray paint and attached it to the back of the stand. It works great! The only thing I didn't think about is the blue temp probe wire from the mash tun isn't long enough to go into the cable tray.


If the tax return comes in time (still need a pH meter and small scale), the plan is to make the first brew a clone of my wife's favorite local beer; Ska's Modus Hoperandi IPA!
 

Latest posts

Back
Top