Need black pipe tap tower advice

Homebrew Talk - Beer, Wine, Mead, & Cider Brewing Discussion Forum

Help Support Homebrew Talk - Beer, Wine, Mead, & Cider Brewing Discussion Forum:

This site may earn a commission from merchant affiliate links, including eBay, Amazon, and others.

dlutter

Supporting Member
HBT Supporter
Joined
Jun 7, 2011
Messages
124
Reaction score
35
Location
Wamego, KS
Hi all,

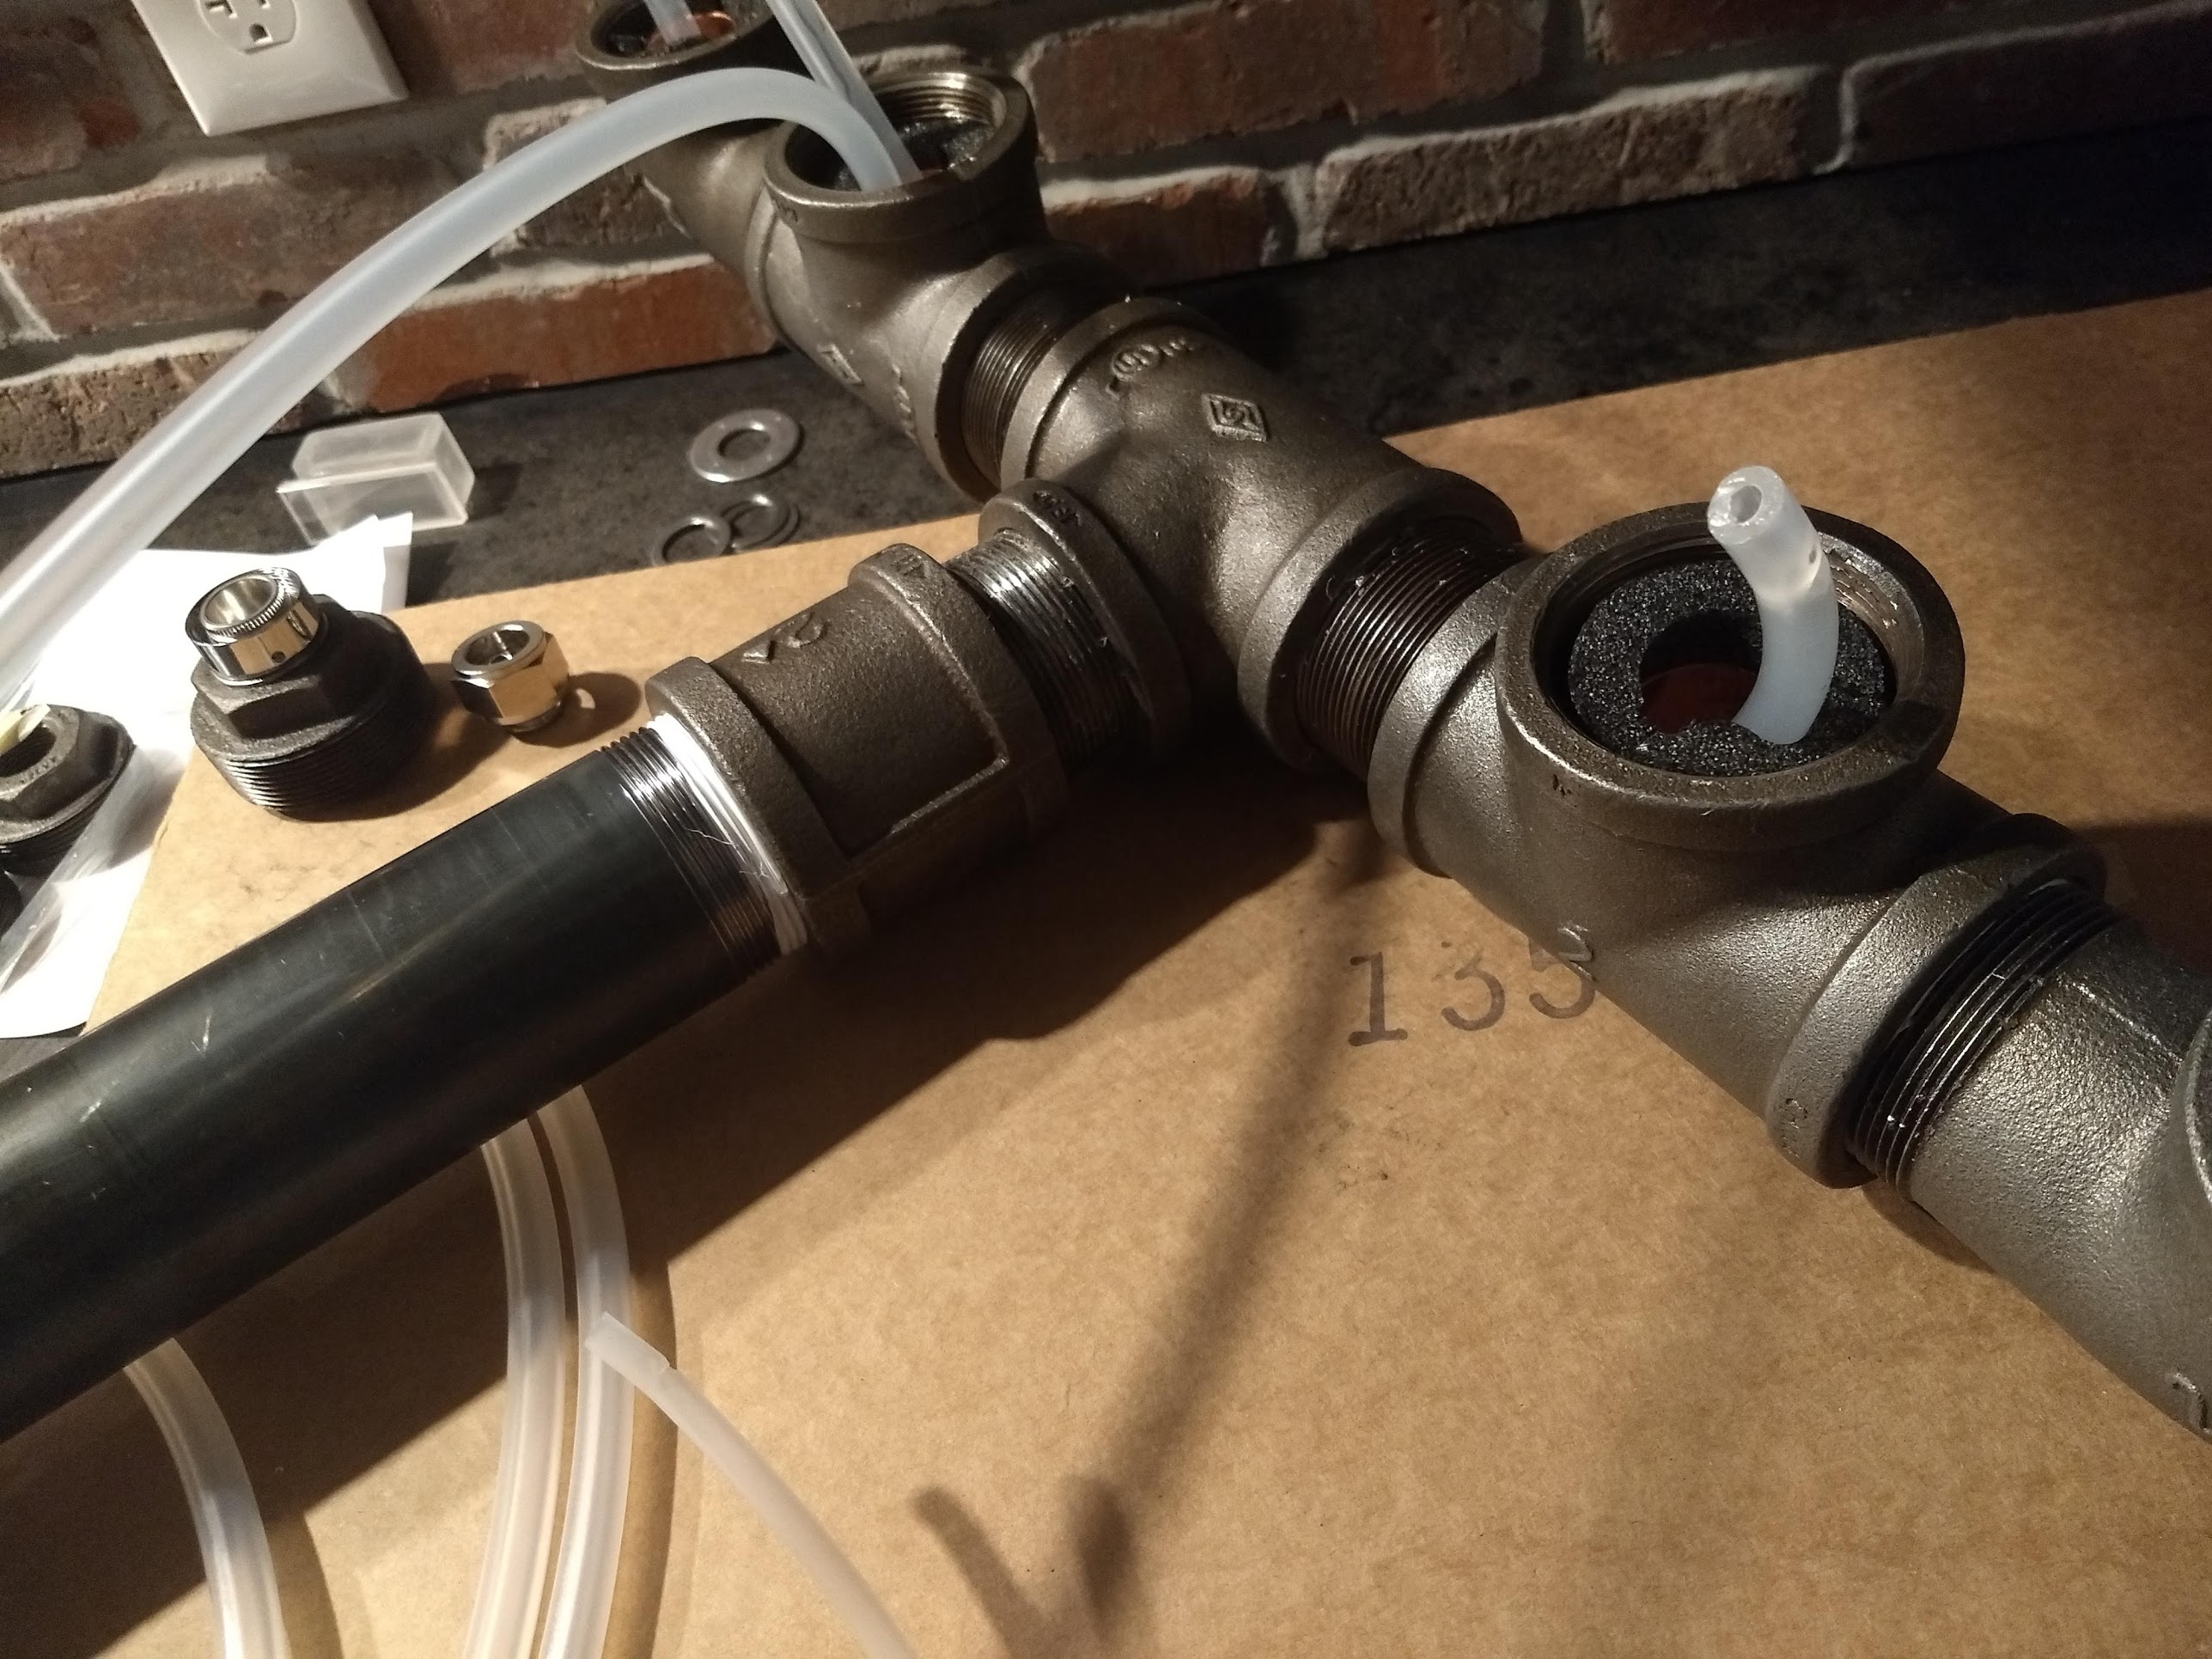
I am building between at least one but as many as 3 "T" style 2 tap black pipe tap towers using 2" pipe for my new keezer and am looking for some advice that most/all of the threads, blogs, and posts don't cover. I'd appreciate hearing from anyone ranging from newly built to those who have had their black pipe towers for a while.

I am building this 2 taps at a time instead of a big 6 tap tower so that I can slowly add capacity and learn from past experiences. Also I'm considering attempting a polished copper tap tower but might be a pipe dream....

Anyway. Here are my questions :

1. I plan on using 1.5" copper pipe inside for cooling and adding insulation between the copper and black pipe. Any thoughts on using spray foam vs the wrap-around insulation?

2. I have read of rust issues on the surface of the black pipe. What has been successful in dealing with or preventing the rust? Any experience with the Rustoleum rust inhibitor https://www.homedepot.com/p/Rust-Ol...ikqOAQ5OSo1rTrIVoe4aAhdiEALw_wcB&gclsrc=aw.ds
vs the Rustoleum High Performance wheel clear coat
https://www.homedepot.com/p/Rust-Ol...loss-Clear-Wheel-Spray-Paint-248929/205751548


3. What size thread are most tap shanks? What size bushing would work best? I have read both drilling and retapping smaller (1/2 or 3/4" to 2" reducer bushings) to directly thread the shank or using 1" to 2" reducers and sandwiching the shank in with washers and a nut on the shank. I have easy access to 3/4 and 1" bushings

4. What height of nipple seems to be most versatile between the floor flange and the T fitting? I see 6 and 10" commonly in posts but my local Menards only stocks 6 & 12". 6 seems too short and 12 seems very tall, although it does fit a gallon growler with plenty of room.

5. Is a single fan to circulate air enough to keep the copper cold and prevent foaming? Or is a dedicated blower for each tap a better solution? I'm toying with an idea in my head using 1 fan and pvc to send cold air to all 3 towers.

6. What have you done to prep the pipe before assembly and how has it worked out? Nothing? Wash with soap and water? I have even seen one post that used some sort of navy/marine cleaner that seemed to completely strip off the black.

7. Is Teflon tape the best route for the threads?
 
Last edited:
So dlutter I am building my black pipe tower keezer and ran into your thread on search. Four taps in a row with a U-shape. Slightly different configuration but since you haven't gotten any replies I can answer some of your questions. Perhaps you have figured all this out already.

2. I went with the Rustoleum satin clear https://www.lowes.com/pd/Rust-Oleum...pray-Paint-Actual-Net-Contents-12-oz/50376758. It left the color as is and adds just a little shine. I like it, I was hesitant to put a gloss on it. I thought about a hammer black coating but I wanted a more raw look. I used painters tape on the threads and put on two coats on the inside and one on the outside of fittings. Then I assembled and coated one last time. I was worried that the threads might gum up is why I used the tape. It was a PITA to get on the interior threads.

3. Shanks are 1/2"-14 BSP British Standard Pipe threads. These are straight pipe threads. US black pipe threads, NPT, are tapered but the thread count is the same. They are not interchangeable as far as I know. You can buy BSP fittings but they are real hard to find in the US and not as cheap as they should be. I was reading a different thread where the builder tapped out the bushing. I have just purchased the tap for that but haven't tried it out yet.

4. I went with a 10" nipple in between the flange and an elbow. I think 12" is too tall personally.

5. Yeah you could put a cross-tee in.

6. So there is manufacturing residue on the pipes. I took the plunge and washed in a light solution of PBW making sure to tilt the fittings so that water would dry quickly. I still got little surface rust spots but these cleaned up with a wire brush. This did not strip off the coating but I was gentle with the brush.

7. So these are tapered threads as are stainless steel fittings and you could potentially lock the threads without teflon tape I suppose. (I think there is a special term for that.) Anyway, I hand tightened only for future disassembly if needed. I was kind of hoping the Rustoleum would add a little stick to the connections but it is rather thin stuff. If you use teflon tape it may stick out. Use the teflon tape if the orientation of the fittings will not hand tighten to the position you want them. Teflon tape is a lubricant and can get your fitting that extra 1/4 turn you need. Maybe don't wrap as flat. I did then cut off the visible with a utility knife. I only needed it in one spot thankfully. I also didn't want to have to use a pipe wrench on it, too easy to scratch. Plus you need two bigger sized pipe wrenches.
 
Thanks for replying. I mostly had my mind made up when I posted this but wanted to post what I had been wondering in case it helps someone else.

Here's what I went with

1. The closed foam pipe insulation made for 1" copper pipe fits perfectly inside the 2" pipe (looks like a black pool noodle). They don't make it for 1.5" copper so I downsized to 1".

2. I had both the inhibitor and the enamel you used on hand but went with the inhibitor. It works fine but I have already had to reapply it bc I noticed a little rust showing up on the threads. Good to know that the clear enamel works and looks good.

3. Great explanation. I used a 3/4 to 1.5 inch and a 1.5 inch to 2 inch bushing to be able to easily downsize from the 2" pipe. The shanks fit with just a little wiggle through the 3/4 but I had to dremel out the inside so that the shank nut would fit. I also ended up using a 7/8 lock washer to keep it tight.

4. I went 12" just bc it was available locally. It is a little tall but still looks good.

5. I used a single fan and it seems to be working well. I didn't want the pvc taking up space.

6. Dawn dish soap did the trick with goo gone for the sticker adhesive.

7. Teflon is definitely required, like you said. I got one fitting stuck even when I didn't use enough Teflon and marred up one of the pipes. I ended up using pipe wrenches bc I didn't think hand tight was snug enough.
 
Any tower pics? Curious how they turned out. Was kind of thinking galvanized for a future backyard project.
 
I'm missing tap handles on the center one otherwise this is the finished product. Pretty easy and well worth it, IMO
20200511_064748.jpg
20200511_064756.jpg
20200511_064817.jpg
 
Lovely. How is the inside insulation.

For outside I am thinking to apply tung oil. It's polymerizes and is water repelant and is food grade too!

I am interested in inside insulation, rust prevention inside and pushing air inside. Also I have a 4 tap setup, not U, a T like with two shanks each side(2 elbows, 3 Tees, 2 nipples for connections)

For inside insulation I am thinking to put all the lines in a plastic tubing and fill on the outside of it with expanding foam...

Oh, what is this shank you all talking about(1/2"-14 BSP British Standard Pipe) :)
I got the these shanks, the issue there is the curved barb but I can straighten them up.
https://www.morebeer.com/products/intertap-beer-shank-short-tower.html?chan=dod
 
I considered spray foam and think it would work but is messier, more permanent and more expensive than what I went with. The pipe insulation cost $3 and was enough to do 2 of my towers. I attached some pictures of building my last tower.

I didn't do anything for rust prevention inside. Didn't even think about it. As for pushing air, I just went with a fan mounted on the collar to circulate air past the copper pipe that runs up the tower and sticks down into the keezer about 9 inches. I insulated the arms of the T but didn't use any copper there. I've had zero issues with foamy pours or exterior condensation, but it is in my fully finished climate controlled basement. I do have water/ice pooling issues inside the keezer that I control with rechargeable desicant dehumidifiers.

Post back here if your results if you use the tung oil or your plastic pipe/expanding foam idea.

Here is the shank I used. Faucet Shank 2'' Stainless Steel

If bending your barbs doesn't work you could it off grind it off and use the duotight/EVA Barrier system. I highly recommend it.

20200519_070402.jpg
20200519_070331.jpg
20200426_084245.jpg
20200426_084240.jpg
20200426_084253.jpg
20200426_084228.jpg
20200426_084407.jpg
20200426_084420.jpg
 
Lovely. How is the inside insulation.

For outside I am thinking to apply tung oil. It's polymerizes and is water repelant and is food grade too!

I am interested in inside insulation, rust prevention inside and pushing air inside. Also I have a 4 tap setup, not U, a T like with two shanks each side(2 elbows, 3 Tees, 2 nipples for connections)

For inside insulation I am thinking to put all the lines in a plastic tubing and fill on the outside of it with expanding foam...

Oh, what is this shank you all talking about(1/2"-14 BSP British Standard Pipe) :)
I got the these shanks, the issue there is the curved barb but I can straighten them up.
https://www.morebeer.com/products/intertap-beer-shank-short-tower.html?chan=dod
So I coated the inside of mine with the same clear (satin) Rustoleum I used on the outside. Mine is not operational yet though, I just finished the framing surrounding the keezer. I too would be interested in how the tung oil works out.

I have the same shank dlutter used. I had considered whether the tower specific one you selected would work and I was thinking the bend would be too soon. The British Standard Pipe threads appears to be a fairly common standard for the faucets in the US. I'm guessing it is used here because of the ability to just screw it in without needing teflon or paste. Black iron pipe in the US uses NPT National Pipe Tapered threads for plumbing and heating applications. When I was looking for a complete set of BSP pipes, it seemed like the BSP standard is used for plumbing applications in England but I don't know any English plumbers to ask about it. Maybe when I visit, I can't imagine not running into a plumber at an English pub! (I have an American plumber for a brother.)
 
Thanks for replying. I mostly had my mind made up when I posted this but wanted to post what I had been wondering in case it helps someone else.

Here's what I went with

1. The closed foam pipe insulation made for 1" copper pipe fits perfectly inside the 2" pipe (looks like a black pool noodle). They don't make it for 1.5" copper so I downsized to 1".

2. I had both the inhibitor and the enamel you used on hand but went with the inhibitor. It works fine but I have already had to reapply it bc I noticed a little rust showing up on the threads. Good to know that the clear enamel works and looks good.

3. Great explanation. I used a 3/4 to 1.5 inch and a 1.5 inch to 2 inch bushing to be able to easily downsize from the 2" pipe. The shanks fit with just a little wiggle through the 3/4 but I had to dremel out the inside so that the shank nut would fit. I also ended up using a 7/8 lock washer to keep it tight.

4. I went 12" just bc it was available locally. It is a little tall but still looks good.

5. I used a single fan and it seems to be working well. I didn't want the pvc taking up space.

6. Dawn dish soap did the trick with goo gone for the sticker adhesive.

7. Teflon is definitely required, like you said. I got one fitting stuck even when I didn't use enough Teflon and marred up one of the pipes. I ended up using pipe wrenches bc I didn't think hand tight was snug enough.
Nice build, the wood top came out really nice, it has a lot of character and I like the finish. I had been wondering whether the insulation on the 1"copper would fit inside the 2" pipe. I was also wondering about whether the shank would pass through a 3/4" fitting, so that info is helpful. I purchased a 1/2" by 2" because I was wanting to put the flanges over the 1/2" hex side. I was hoping the flange would fit over but it does not. There's a small gap. I may leave the gap or purchase a SS washer to fill it but then I would have to cut the inside of the washer. I will post pics eventually with whatever I end up doing. I think your first bushing looks fine too and it sort of acts like a flange. What I needed was a 1/2"x 2" bushing where there is no hex on the 1/2" side, just flush. I think I have seen bushings like that but couldn't find one with the dimensions I needed.

Dawn is probably a better a choice actually, faster really. I had Dawn sitting on the sink too!

A trick I learned from my brother for using pipe wrenches and channel locks is to put a cloth in the teeth between the pipe to prevent marring the finish. However, I rarely have any luck with it myself, I still usually slip, maybe a piece of foam would work better. That's why I am staying away from it if at all possible, simply too many fittings. I'll have to see in use though whether my faucets on the tees will droop.
 
Awesome follow up @dlutter ! Thank you!

- the due tight thing seems to require their lines, I have the silver thing from Morebeer so that leaves me limited options
- the tung oil might add a yellow hue, I was looking at satin enamel 12 oz. Protective Enamel Gloss Crystal Clear Spray Paint (homedepot)
- love the idea of copper pipe, it adds insulation and gets colder (high thermal conductivity)
- thinking about complicating myself a bit to add copper coupling inside althou you said there might be no need. ( did you use 2 feet of cooper per tower)
- my tower is a bit longer/wider and might need to push air to the extremities

I am very curious about tightining the fitting together and line them up properly, I read your comment about you felt like needing to use the wrench.
Ps. New Edit
I tried to bend or straighten the barb but I ended up with the barb separating. So I will get few tail pieces that will be straight!
 
Last edited:
Awesome follow up @dlutter ! Thank you!

- the due tight thing seems to require their lines, I have the silver thing from Morebeer so that leaves me limited options
- the tung oil might add a yellow hue, I was looking at satin enamel 12 oz. Protective Enamel Gloss Crystal Clear Spray Paint (homedepot)
- love the idea of copper pipe, it adds insulation and gets colder (high thermal conductivity)
- thinking about complicating myself a bit to add copper coupling inside althou you said there might be no need. ( did you use 2 feet of cooper per tower)
- my tower is a bit longer/wider and might need to push air to the extremities

I am very curious about tightining the fitting together and line them up properly, I read your comment about you felt like needing to use the wrench.
Ps. New Edit
I tried to bend or straighten the barb but I ended up with the barb separating. So I will get few tail pieces that will be straight!

Like you, I thought first about trying to put copper couplers inside the top of the "T" and ultimately found they would be very cumbersome to put in there and to put together. Good luck if you try it and post some pics if you are successful!

As far as my hand tightening vs pipe wrench, I just felt the hand tightened connections could be loosened too easily and would result in crooked towers.
 
going to try. Got 3 Ts and 2 copper elbows.

My real concern is about how to line up. I might put some glue on threads... I have this clear, thicker super glue if that fails me I need to use the wrench but I sense is going to be a nightmare to line up 4 shanks!
 
I managed to get the copper pipe and fittings in. It was work to get 4 lines in a the 1 inch and have a air line (planning to push cold air)
BTW had to cut/file the Tees to get them to fit, the harder part with them wasnt the fit but fishing the lines !

I got another set of shanks for brewhardware. I like them, a bit longer then the intertap once. I can still fit the intertap faucets on and the springs although I might have to cut the springs shorter.


Question - did you secure the line with o-ring clamps ? The tail thing seems to be pretty tight but... (the question is for those that didn't use duo tight)
 

Attachments

  • IMG_20200604_175845218.jpg
    IMG_20200604_175845218.jpg
    1.1 MB · Views: 39
  • IMG_20200610_142100784.jpg
    IMG_20200610_142100784.jpg
    729.2 KB · Views: 39
Last edited:
Back
Top