My Ugly Junk- Corona Mill Station...

Homebrew Talk - Beer, Wine, Mead, & Cider Brewing Discussion Forum

Help Support Homebrew Talk - Beer, Wine, Mead, & Cider Brewing Discussion Forum:

This site may earn a commission from merchant affiliate links, including eBay, Amazon, and others.
secinarot,

Just guessing again here, but I am inclined to think that the ball bearing in your front bracket is binding and is not all the way inserted into the front bracket. I would try and press the bearing fully into the bracket by tapping lightly w/ a punch and hammer, or just by simply tightening the two outer bolts to force the bearing home. I'm guessing that during manufacturing and assembly of your mill, the bearing was not full placed in the front bracket of the mill.

Give it a little wack and reporrt back.

I checked the ball bearing and it's in there tight. I even removed the bearing to see if would fit flush and it didn't. I've tried everything I can think of and there is no way that bracket is going to fit flush - the arms are just too short. I really think I have mismatched parts. I can't imagine that the place that makes these has too much quality control. They probably just threw a bunch of parts together as long as they kind of fit. Not worth me sending it back so I'll just tinker with it and I'm sure I can get it to work fine with some spacers.
 
Bummer man...i would get on discount tommy and tell him you want a replacement. His ad clearly states "satisfaction" and "gaurantee". Tell him you want another shipped out, and he can pay the return freight, or you can keep the parts that don't fit together right.

Don't live w/ it...these cheap mills don't need any additional challenge.
 
I emailed Discount Tommy and sent them a picture of the grinder showing the gap in the bracket. This is their response: "Looking at your pictures it looks like all of our other grinders. I do no see a problem with the grinder. "

So, buyer beware if you plan to buy one of these from Discount Tommy. Seeing that I got it for $24 shipped, I'm just going to add a couple of spacers and live with it. I think at that price it's still a good deal. However if you have to pay more to get this model that doesn't fit together right, I would look elsewhere.
 
Well.....maybe not quite, but here it is anyway.... I am taking it as an article of faith that all these attachements will post. Anyway, take a look at that crush! Ugly it may be, but crush it does.

Corona1.jpg


Corona3.jpg


Corona4.jpg


Corona5.jpg


Corona7.jpg
 
I just bought a corona mill and have never crushed my own grains before. Looking at your last picture showing the crush, it looks like I want to see the empty husks somewhat in tact and then the insides of the grains sort of chopped up. Is that true?
 
Well.....maybe not quite, but here it is anyway.... I am taking it as an article of faith that all these attachements will post. Anyway, take a look at that crush! Ugly it may be, but crush it does.

I gotta say, these Internal bucket designs like you have are the way to go, especially since space is an issue for me. Looks like I'm going to have to re-design mine like that....that way I can store it away really easily.

So how do you mount the wood shelf to the buckt? How far down do you have it?
 
.... I want to see the empty husks somewhat in tact and then the insides of the grains sort of chopped up. ..

Pretty much what you want, all grains fractured w/ the interior portion available to the mash. NO WHOLE GRAINS!
here is a good link regarding evaluating the crush....https://www.homebrewtalk.com/wiki/index.php/Evaluating_the_Crush

IMO you could tighten up your crush a bit Rico.

Revvy, details for the internal bucket mount are in my sig, or here if you want to use the corona hopper.

https://www.homebrewtalk.com/f51/my-ugly-junk-corona-mill-station-90849/index3.html#post981526

Another plus for this system, is that you can crush your grain in advance of the brew session, and just snap a lid on the mill / bucket till you are ready to brew.
 
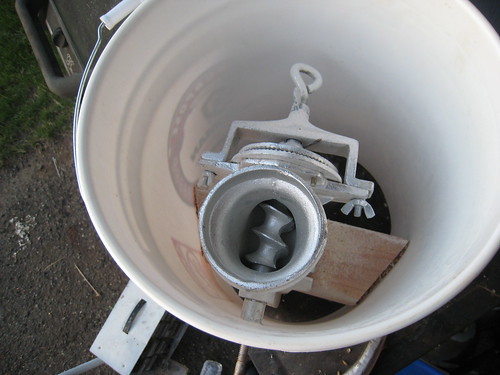
Revvy: From reading other posts about "mill-in-a-bucket" systems, I decided on a big chunk of wood, a two-by of some kind, would be best. So I just hacked out a semicircular piece of 2x6, and notched the center of the curved side so that the back of the mill would clear the bucket wall. This means you can't use the manual handle in the bucket.....but that wasn't part of the plan anyhow.

The wood had to be trimmed up a bit, because I'm lousy at carpentry, and the only way I could think of to get a good template was to use a pencil and draw around the bucket rim. I tried to make the piece of wood smaller (because the bucket tapers), and it came out pretty crude....but not more so than the Corona / Victoria mill itself. I used six #10 x 1" screws and washers to attach it to the bucket wall, and that worked fine. I'm assuming that the 5 gal. Pratt & Lambert paint bucket I used is "standard," and placed the screws 8.5" down from the rim of the bucket, which makes the top of the 2x6 piece of wood 7.75" down from the rim.

The biggest problem with the original plan is that the bucket with the drill in it tends to get stuck in a bucket that you put it in. There are several obvious ways around this, but I haven't decided on any one yet, so I just milled my first batch (EdWort's Pale Ale) into a corrugated box with a trash bag for a liner.

A nice thing about this install (although I NEVER thought it would be possible, just looking at it) is that the mill can be assembled / disassembled without taking it out of the bucket.

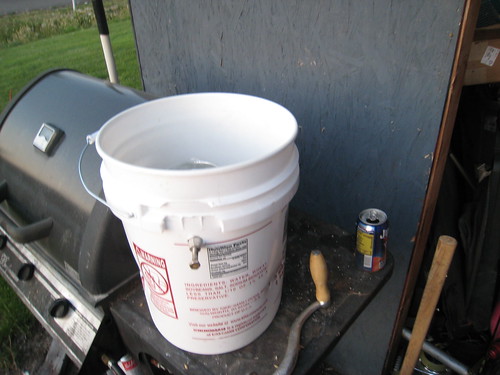
I used a 2" and a 4" hole saw that I had laying around to make the two 2" holes, one for the drive opening in back, and the other for a drain hole in the bottom. The drain hole might not be needed for a standard 9-11 pound grain bill, but for bigger ones, it would mean draining the grist into another container or having to stop and dump the grist one or more times. I used the 4" saw to make the larger opening in the lid, and then enlarged the opening sufficiently with a utility knife.

Bottom line is that the mount is very solid. I bought a 2.5" bolt to replace the manual crank. This is a metric bolt, .125 thread pitch, I think, but the best procedure is probably to take the thumbscrew that holds the crank in to the hardware store and match the size and thread pitch.

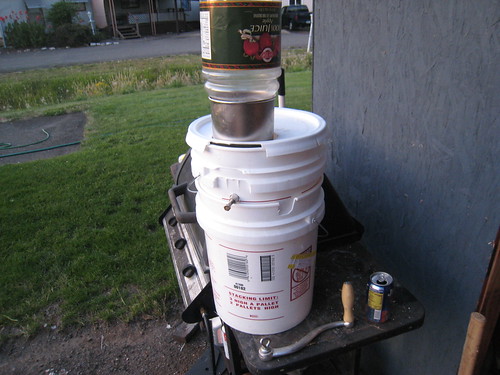
My drive system is just put together out of stuff I have around. I use an extended 13mm socket over the bolt, to a 3/8" drive adapter that chucks into the antique Craftsman 1/2" drill you saw in the pix.

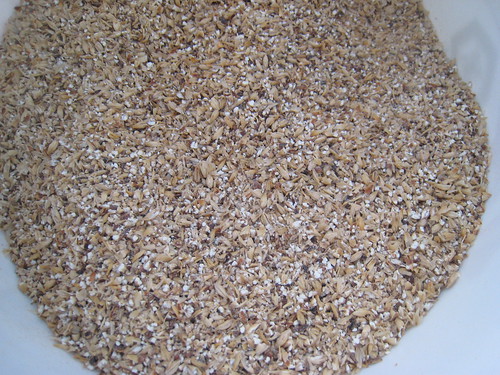
I'm happy with the mill setup. My wort came out 13.8 Brix, which is higher than either of my two previous AG batches, both of which were done with pre-crushed grain. As you can see from the photo, the crushed grain looks as good as anything I've seen in anyone else's pix. A little flour in the bottom of the box, but very little. Wort comes out of the MLT like a firehose.
 
Thanks, wilserbrewer, I think you may be right about the crush.

Not really my advice, I read it here on the board...."crush till you are scared", they say. I crush a good bit finer than your pic w/ good results. These cheap mills deliver big time...talk about "return on investment"!!!
 
I just bought a corona mill and have never crushed my own grains before. Looking at your last picture showing the crush, it looks like I want to see the empty husks somewhat in tact and then the insides of the grains sort of chopped up. Is that true?

It would be very difficult to assess the crush from that picture. It would be better if the grist were spread out no more than one husk deep to better show the starch and flour particle distribution. A dark surface works well for this as it provides more contrast. A pile of grist right out of the mill can also be deceptive as the husks and flour particles will tend to segregate as the pile builds below the mill and the husks tend to migrate to the top. A good crush IMO has all husks smashed, lots of pinhead size starch particles and about 10% fine flour. Whole kernels should be hard to find. Husks should be smashed but mostly intact or halved, not shredded. I used to abide the "crush till it scares you" dogma, but no more. I don't take it quite that far. I gave up a few efficiency points in exchange for a more free flowing mash. I regained the lost points by extending the mash time a little. Yes, go ahead and crush till you're scared. Next time go a little finer on the crush. Soon you will have one of the infamous stuck mashes that everyone has so much fun with. You are not a true home brewer until you have solidly stuck at least three mashes and one of them must be for at least a 10 gallon batch.
 
I just got my mill and am making a trip to the hardware store this weekend for some washers, a 8/32 x 1.5" bolt, a bolt to drive the crank mechanism, and then scrounge up a water cooler bottle for a hopper.

Thanks everyone for the great examples and Macguyverism at its best.
 
Well.....maybe not quite, but here it is anyway.... I am taking it as an article of faith that all these attachements will post. Anyway, take a look at that crush! Ugly it may be, but crush it does.

I'm quoting my own post as a followup to placing my "ugly junk" into operation. Today was the second batch I've crushed with my Victoria / Corona setup, and I found out that low conversion on first batch was all about the crush. The call on this goes to "wilserbrewer" when he stated I should tighten up on my crush. I cranked it down about half a turn, and then gave it a little tweak further, under the rubric of "crush till you're scared, then give it a bit more."
The results were great, hit the OG (a big Rye IPA) right on the money. The "ugly junk in a bucket" made short work of 15 pounds of grain, and the setup keeps everything inside where it belongs. I can unhesitatingly endorse this method of crushing.
 
Hey Rico...good for you and your success! Way to take control and not fear ripping it up a bit,sometimes I think some are afraid to crush enough to give a decent yeild.
 
And I forgot to add....there was NO visible difference in lautering. I'm using Bargain Fittings large diameter braid manifold, about 8-9 inches long, and it lauters like a storm drain, only a few quarts of vorlauf required.
 
You don't want to go quite that far. Have a look at this page on the wiki and you'll see what a good crush should look like (including a corona example, which for disclosure, is mine ;)).

Wow, that picture of the uneven crush is exactly what the crush from my LHBS looks like. I noticed in my last mini mash in which I mashed around 7lbs. that there was a good number of whole, untouched grains left. No wonder I am gettin only 60-63% in my mashes. Just got a brand new corona for free. Plan to spen some time this weekend messing with it. Thanks for all the great help!
 
I too am getting on board with the ugly junk grain mill; ordered mine Thursday and it is on its way. Next is trying to find a 6 gallon bucket and getting things going!!
 
.....there was a good number of whole, untouched grains left. No wonder I am gettin only 60-63% in my mashes.

Yes, whole untouched grain is the key sign of undercrushing...should this happen, stop...and run it through again.

ps. I realize this was a LHBS crush, but I just had to put it out there.

Go Dutch...while a 6 gallon bucket will give a bit more room, any 5 gallon bucket will do fine, look in the right places and you will be tripping over empty spackle buckets.

{Gets a bit :off:}

The plastic "homer buckets" are available all over the place, and in a variety of sizes. For something like the corona mill setup, anything will do. I use a 5 gal. Pratt & Lambert paint bucket. A few weeks ago, I scored a couple of 3.5 gallon buckets & lids from the local IGA supermarket's bakery. I was pleased to find this size, as it will come in handy for several uses. They had icing & filling for doughnuts in them, and thus may be easily cleaned.
For fermenters, I naturally suggest buckets that have had food packed in them originally (NOT dill pickles, apparently!!!), but for other purposes, a myriad products come packed in these things. A janitorial service is another good place for buckets for non-fermenting use. Waxes, strippers, etc. come in these buckets.
The best source of buckets for fermenters I've found is U.S. Plastics. They have a 7 gallon bucket that has a bit taller profile than the standard-issue "Ale Pail," and so it gives significantly more headspace when fermenting (these are of course #2 HDPE, FDA approved yadda-yadda). I got three plus lids for $32 delivered, way cheaper than an "Ale Pail." all you have to do is bore a hole in the lid with a 1/2" wood bit & install the rubber grommet, available from any homebrew supply (got mine from Midwest). The lids on these buckets are also superior to the "Ale Pail." They have a neoprene O-ring in the lid to seal to the bucket, and it is the real deal. I now have a lot more depth in my pipeline since I have way more primaries.

For storing grains, my son provides me with cat litter buckets. They hold 28# of cat litter, and will hold a 14-15# grain bill in a plastic trash bag placed in the bucket. I use the bag, even though the buckets are #2 and I have washed them thoroughly. They've got a good metal handle and are very handy.
 
My turn...

I recently bought one of the carona knockoffs from discount tommy. It's a poorly fit piece of junk, but I made it work. My 4 requirements for the design were dust free milling, ability to mill powered by hand or by drill, station built primarily with parts on hand, and a storage footprint of two nested 5 gallon buckets. At some point I'll work on plate alignment (it's BAD).

3759481334_232333d1fa.jpg


Holds about 5 lbs of grain. I get bored holding the drill anyways...

3758678725_9dff7dd447.jpg


3758678661_b5b63bd1e2.jpg


3758678705_d166e30feb.jpg

Bottom of inner bucket was cut off.
 
Got my mill this week and have it built out; ugly as sin as the buckets are Homer buckets (the gf works there and gets them real cheap). Going to pick up some grain this weekend as so to give it a try and get the crush dialed in.
 
Wow. Awesome thread! I think that wilserbrewer should get a certificate or something for his variation.

Anyways, has anyone tried the Grizzly version? Available from Amazon for $22.95 + 7.70.
 
Wow. Awesome thread! I think that wilserbrewer should get a certificate or something for his variation.

Anyways, has anyone tried the Grizzly version? Available from Amazon for $22.95 + 7.70.

Yup there's a few grizzly's in use...they all are pretty much the same, and they all work fine with some tweaking.
 
As near as I can tell, the Grizzly is the same as the Victoria is the same as the Corona. They all look the same (the Grizzly just has a short hopper), and they all have the tell-tale number "500" stamped on the side. I don't know how well they do producing corn meal for tortillas (I suspect their intended use.....wouldn't really want to try and produce fine bread flour with the thing), but I suspect it works really well, or they wouldn't be produced & sold South of the border. Those people are too poor to buy stuff that doesn't work.
I DO know they work really well for crushing malt for brewing....and the variety of builds, tweaks, and tips in this thread can get anyone up and making great grist for homebrew.
 
If you did want to produce flour you would probably want to install one of the conversion kits to make it a stone mill, like this one

Fascinating- if I bought the version with the modified auger (which sounds like the best bet) the conversion parts would only cost 3X the cost of the original mill....
 
Fascinating- if I bought the version with the modified auger (which sounds like the best bet) the conversion parts would only cost 3X the cost of the original mill....

Which would still be cheaper than a good hand cranked flour mill like the "Nugget" mill at that same site.
 
Thanks Revvy for starting thread. It sure went a different direction, but sure was what I was looking for.

Wilserbrewer great idea, as Maxwell Smart would say..."The Old Grinder In The Bucket Idea." That was my template, I was ready!

Wilserbrewer what can I say? I read a few pages on and you did the upgrade to 2.0 and got the best setup! I threw out the template, you had done a far better job than I could have figured out, thanks for sharing. I will be building an exact copy of yours (with your permission of course). ;)

All the info. on tweaking from everyone is sure gonna be appreciated.

Congrats to Laughing Gnome Invisible for the prize of "Ugliest", and I'll add "Most Dangerous" setup.

I have had issues with PayPal, I couldn't believe that I still had the ability to use PayPal after I reemed a few people over there, I did not want to use PayPal, and asked months ago could I just send a check to be a member of this website.

I have not been a member until today, I use this site often (few posts) but half way through this thread, I had to cough up some dues, Worst of all I had to use PayPal (only acceptable payment). Money well spent. I sure want this site to stay up!:rockin:
 
Go Revvy!

I cannot find a Corona, or the like for under 44 bucks! I can get it going,with info from this thread, but now I am thinking, a little more sturdy, and less headache out of the box for the same money.
 
Go Revvy!

I cannot find a Corona, or the like for under 44 bucks! I can get it going,with info from this thread, but now I am thinking, a little more study, and less headache out of the box for the same money.

eBay My World - discounttommy is who many of us have purchased from. His prices are a rollercoaster - watch for a week or two and he'll have em at $15ish plus $8 shipping. Search for "corn" from the listing of his items - looks like they're currently about $31 shipped.
 
Just put my first home ground batch into the fermenter last night.


Looks like 75% efficiency, which is 5-8% higher than I was getting from BMW's crush. It was ground pretty fine. I think I'm still doing something slightly off on the Mash/Lauter side. I'm using a 5g cooler, which means I'm mashing a little thick, so that might be the whole problem.
 
I cannot find a Corona, or the like for under 44 bucks!

It appears discounttommy has changed his sales approach, Seems like he is listing a bunvch of mills w/ a starting bid of $0.05, maybe some deals to be had??

Search ebay under "NEW Premium Cast Iron Corn Grinder Wheat Grain Nut Mill" for tommy's listings.

Good luck bidding, I would not spend any "real big" money for one of these mills, but they work great if you can buy one right.
 
Got one @ Grizzly! 30 bucks after shipping and handling...I'm on my way.:ban:

Added 8-12-9

Grinder will be here tomorrow
Got the 5 gallon bucket to mount grinder, a 6 gallon bucket to catch the grit (gives me about 18 inches of space total). Need to find a plastic 5 gal. water bottle though.

Question: How do you guys determine the percentages you guys are talking about?

The percentage of flour to grit and all I get, but everyone it talking 60-63% or 70-75%. Sorry for nubeing on you good folks, but hey....Need input!

added 8-14-9

Got it all together, JBed it up and tightened it up to set. It is not completely flush, but maybe I have to watch it while it has grain going through it. I believe it is as good as this perticular crusher will do. Looking at it closely, I see that it has low grade processed parts. The impeller/grinder is not machined so that it can ever be perfect. But hey I am just crushing grain, should save me lots of money and help me to make quality AG. :tank:
 
I nominate this thread to be put in the DIY Project Locator thread or as a sticky in the All-Grain forum! :rockin:

I'm loving this, if my bank card will ever come in from our new acct. I'll be ordering one up & creating my own fugly design! Though I'm actually thinking of building a plywood/particle board box to mount mine in. I'm now a full fledged minister in the United Methodist denomination and we get moved around as the church sees fit! So I want something more stable, transportable, less flimsy. Hmmm do I go the duck-tape & milk jug route or spend hours building a pretty box... Great hobby aint it!!!

One thing I don't understand is how in the world you adapt the drill handle to use with a drill. Someone please explain it to this dim-wit!

Schlante,
Phillip
 

Latest posts

Back
Top