My new BCS-460 HERMS system

Homebrew Talk - Beer, Wine, Mead, & Cider Brewing Discussion Forum

Help Support Homebrew Talk - Beer, Wine, Mead, & Cider Brewing Discussion Forum:

This site may earn a commission from merchant affiliate links, including eBay, Amazon, and others.

flugelizor

Well-Known Member
Joined
Jul 9, 2011
Messages
174
Reaction score
36
Location
Wellsville
I haven't seen many build threads for BCS-460, so I hope my thread will help others.

I moved to a new house and there is a nice little cove in the basement.
I decided to set up an electric HERMS.
I settled on BCS-460. For repeatability, and partially because I am a computer programmer, and computer nerd.

For the first post I will start at the beginning. Here is a picture of the future site of my brewery
before-62655.jpg

There was water damage, and water would run over the wall during a hard rain.
I chipped off all the stucco that I could, and applied a portland cement based wall patch.
patch-62666.jpg
 
I chose a 15G Blichmann boilermaker for the mash tun. I really like the false bottom. But I don't need all the extra features on the other pots, so I bought an 80Qt Concord for the boil pot, and a 60qt Concord for the HLT/HERMS pot. I got the Concords from Amazon, and I am pleased with the quality.

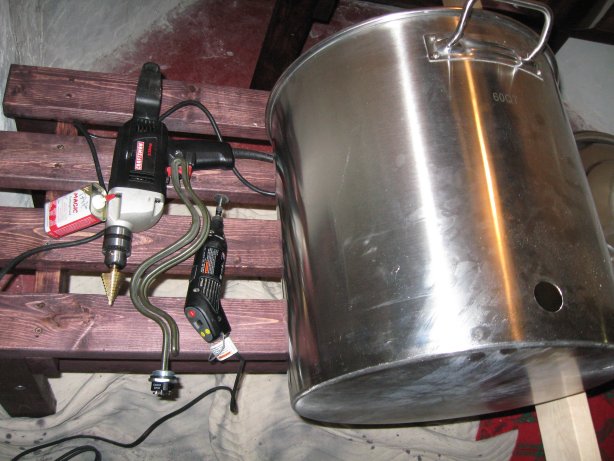
I had to drill many holes in the pots.
I have a friend who is an engineer and machinist.
He didn't volunteer to help, but he said stainless steel work hardens very easily, so be careful to always be cutting. If your tool is not cutting into the material you are making it harder and harder to break in.

So I came up with a method that worked great for me.
I used this method for all 1/2" fittings, as well as the element holes.

Tools: Dremel with a cut off wheel and a titanium drum bit.
A Powerful hand drill
Neiko Titanium Step Drill Bit - 1/4" to 1-3/8" in 1/8" Increments, 10 Steps
Metal cutting oil. - My friend recommended "tap magic"

1. Cut an "X" in the center of where you want the hole with the dremel cut off wheel. This will make it easier to catch a bead with the bit.
2. Just be brave and just lay into the hole with the hand drill / step bit. put your weight into it and twist when it bogs down.
3. when the rough size is close, put the drill inside the pot to even out the burr. Then deburr the hole with the Dremel with the titanium drum bit.
elementholes-62657.jpg
 
I really like the posts I saw here for switchcraft connections, so I used those for my element connections.

I drilled a hole in an aluminum single gang box and mounted four stainless screws at the corners. Then I silver soldered the screw heads to the pot.
Ground is attached to any one of the screws
elementbox-62659.jpg

elementbox3-62661.jpg

elementbox2-62660.jpg

elementbox4-62662.jpg

elementbox5-62663.jpg

elementcord-62664.jpg
 
The panel is 12" x 12" from ebay.
It is kind of crowded inside.
I would recommend smaller contactors to fit in this box.

I put the heat sinks on the side so air would rise as it flows over the fins.
controller-62658.jpg


The "Arm" switches close the contactors for each element.
The "Next" button is used to tell the BCS to advance to the next step without having to go to the computer. For instance Dough in complete - hit next to start mash temp#1.
 
My first batch went VERY well.
I made 10 gallons of IPA with Chico yeast and dry hopped with Citra hops.
My wife says it's the best I have made.
(I have been brewing for about 25 years so that's saying something)
The only thing missing is exhaust.
I would like to start small and put a fan in the window to start. I will only add a hood if I have to.
 
Very nice! Got any pictures I side your panel? I am getting set to finish my 462 eherms bud with 30 gal stout kettles. I pretty much just need to wire it up.

I was afraid someone would ask that...
This design took a lot of wire, and it is a bit messy.
I don't have an exact wiring diagram. It was based on a couple of PJs diagrams with some of my own ideas thrown in.
jacks-62675.jpg

wiring1-62676.jpg

wiring2-62677.jpg
 

Latest posts

Back
Top