These post, replies, variations etc. have all been really very inspiring....just read the whole thing.....the one comment I find interesting is that no one has posted any plans that give you access from the side if you have your beers stacked to the ceiling and you want one of those you made 6 months ago on the bottom...well at my age I don't want to have to unstack all those creates to get a couple beers from the bottom crates....any ideas on how to use them on their sides so the beer doesn't fall out or even use them for wine storage also as I also have that problem....as you get to bout 70 u look at things a bit different.....thanks for all the great ideas and variations....any comments appreciated
You are using an out of date browser. It may not display this or other websites correctly.
You should upgrade or use an alternative browser.
You should upgrade or use an alternative browser.
How To Make A Beer Crate For 12oz Beer Bottles
- Thread starter UncleDavid
- Start date

Help Support Homebrew Talk - Beer, Wine, Mead, & Cider Brewing Discussion Forum:
This site may earn a commission from merchant affiliate
links, including eBay, Amazon, and others.
Maybe put one side with hinges and some type of latch to keep it closed?lcat45 said:These post, replies, variations etc. have all been really very inspiring....just read the whole thing.....the one comment I find interesting is that no one has posted any plans that give you access from the side if you have your beers stacked to the ceiling and you want one of those you made 6 months ago on the bottom...well at my age I don't want to have to unstack all those creates to get a couple beers from the bottom crates....any ideas on how to use them on their sides so the beer doesn't fall out or even use them for wine storage also as I also have that problem....as you get to bout 70 u look at things a bit different.....thanks for all the great ideas and variations....any comments appreciated
Don't know how much structural integrity may be compromised though.
Goldenboy
Well-Known Member
Not really a wood worker, but can someone please explain the modification to make these stack easier? Looking forward to having some storage consistency with bottles, plus they look awesome!
Thanks!
Thanks!
ianw58
Well-Known Member
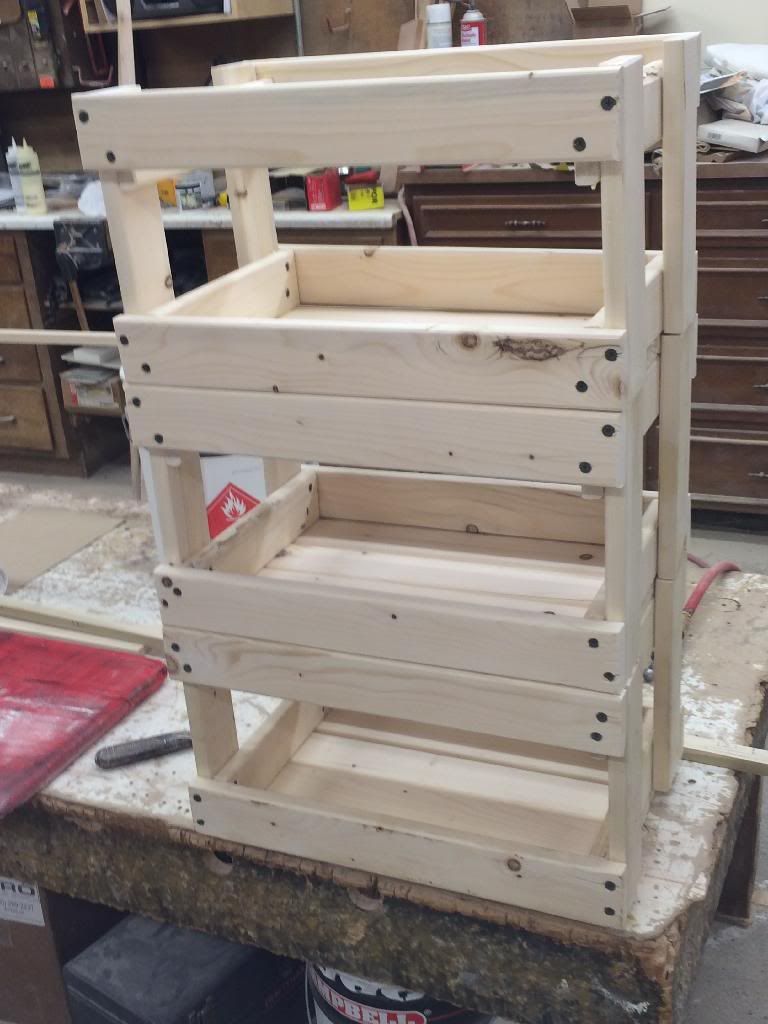
The two vertical pieces at each end are offset downward by 1/2" to 3/4". Thus creates four "feet", which sit in the spaces of the crate below. These "feet" act as grips or cleats stabilizing the stack of crates.


Thanks for the reply moscoeb....was thinking about just tilting the crate 90 degrees and being able to just place bottles in on their side but have them tilted up a bit so they wouldn't fall out .....somehow reworking the crate so that they would be stackable on their side....doesn't seem like it would be that difficult but as I said, not a wood working person
Travestian
Well-Known Member
I think the only problem you'd have is bottle sliding out on you. You could fix that with either the hardboard separators others have built and/or tilting the racks back a slight bit with a shim of some kind. The crates would still sit on top of each other if they were stacked but would be slightly offset of course.
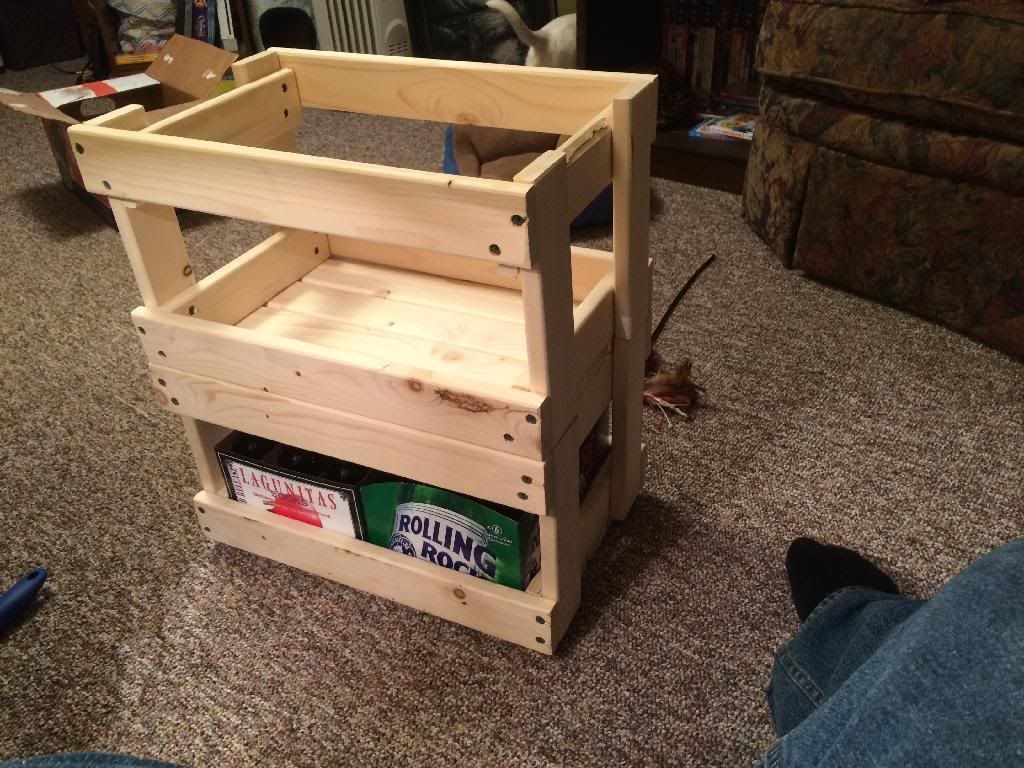
Here is my attempt. Not totally perfect or pretty but then again, neither am I. :fro:
My miter saw jig that I crafted moved a bit on the second crate so things aren't quite the same from one to the other. This beats boxes that are falling apart.
I cannot print to legal sized paper for the insert template but I'm going to craft some inserts and see what happens.
I do not have a name for my beers yet. I don't have a brewery but I don't really have a name I use on bottles either but I would love to mark them somehow. I may just do the chalkboard paint since I have a quart and only used it on a 20" x 6" space once.
Appreciate the plans for sure. They were obviously clear.

revco
Well-Known Member
The two vertical pieces at each end are offset downward by 1/2" to 3/4". Thus creates four "feet", which sit in the spaces of the crate below. These "feet" act as grips or cleats stabilizing the stack of crates.
Another method, which I use, is to drop the top and bottom long side rails. I measure out a furring strip's thickness to drop the top long board and overhang the bottom long board by a furring strip's thickness. (Everything else is built according to the original plan.) This gives you a nice long rail of support and I think looks a little nicer when stacked. Using a board's width is easiest because you usually have scrap or pieces to work with when you're assembling them. The most important thing is that all your crates are consistently designed, measured and cut in the same way, although the original crate design does allow for a fair bit of "close enough" measurement. I would also add that using a stop block to get consistent, repeated cuts makes a considerable difference in the stack's overall integrity.
The difference between the two methods is where the loads are primarily held. Technically, the above quoted method is probably more structurally sound (in many cases) since you're not relying on any particular type of joinery (nails, screws) to hold the weight. But, I personally think the lowered rail system makes for a much more secure and visually appealing stack overall . I feel to use the lowered rail method, it's best to secure the side rails with 6-7 nails each since the side rails will be more likely to be load bearing, thus creating a need for it to be fairly secured.
Here's this stacking method in action (as well as my newer bomber cases and chalkboard paint mod):
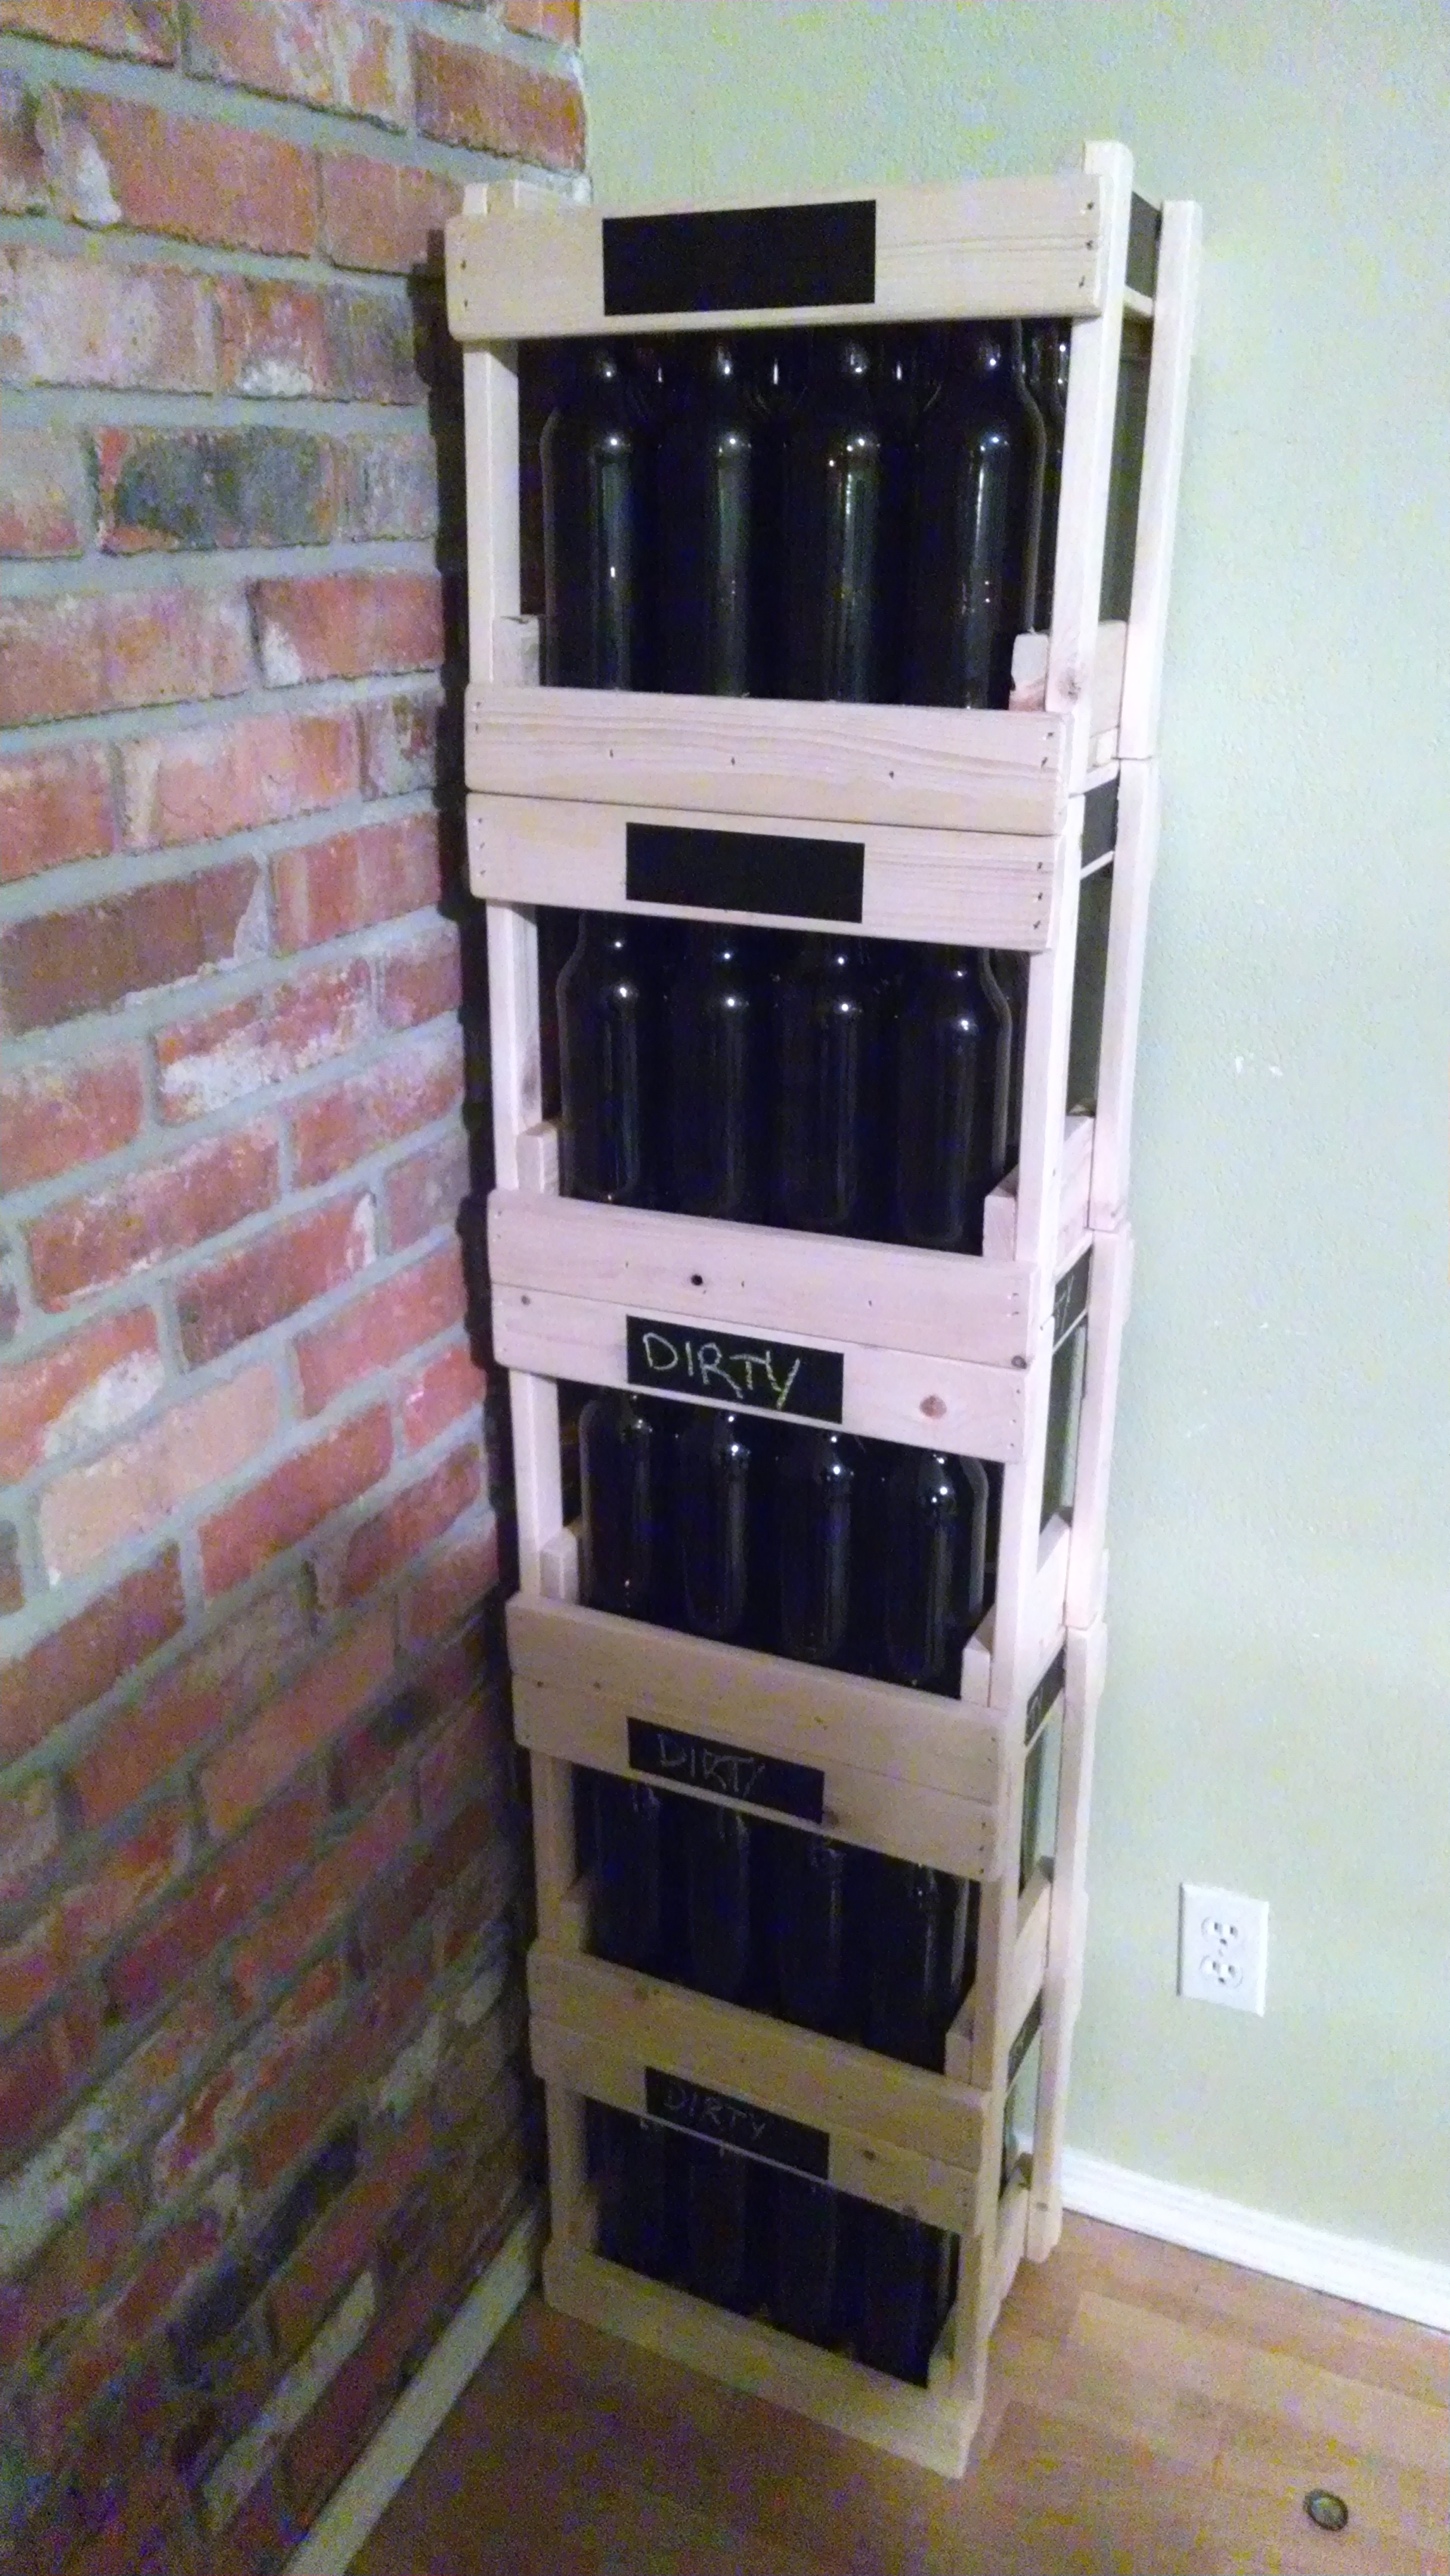

Maybe this has already been mentioned as a stacking method, but just adding a small block on the sides locks them in on each direction and can be added "after the fact" if you have some you didn't modify while building. 


revco
Well-Known Member
These post, replies, variations etc. have all been really very inspiring....just read the whole thing.....the one comment I find interesting is that no one has posted any plans that give you access from the side if you have your beers stacked to the ceiling and you want one of those you made 6 months ago on the bottom...well at my age I don't want to have to unstack all those creates to get a couple beers from the bottom crates....any ideas on how to use them on their sides so the beer doesn't fall out or even use them for wine storage also as I also have that problem....as you get to bout 70 u look at things a bit different.....thanks for all the great ideas and variations....any comments appreciated
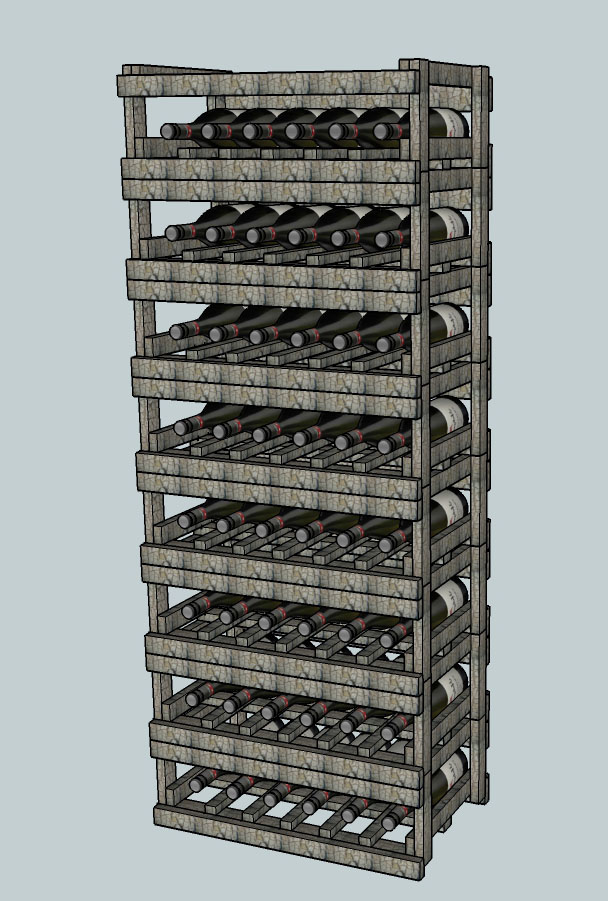
Funny. I actually worked up a design a couple weekends ago using this concept for wine bottles. The design allows horizontal storage of six 750ml bottles per crate and could be modified to fit bombers quite easily. The side (front) opening was kept large enough to be able to insert or remove bottles while stacked without having to move any of the crates.
It would be considerably more time and material intensive to do these for 12oz bottles, but I imagine it could be done if you really wanted to.
I haven't yet built one, so I can't say it works 100% yet...but I did go over it fairly carefully in the Sketchup model. If you're interested, I can post final measurements once I've built and verified the prototype. I'm half tempted to put the stacks on casters and a base frame, just to make them easier to manipulate.
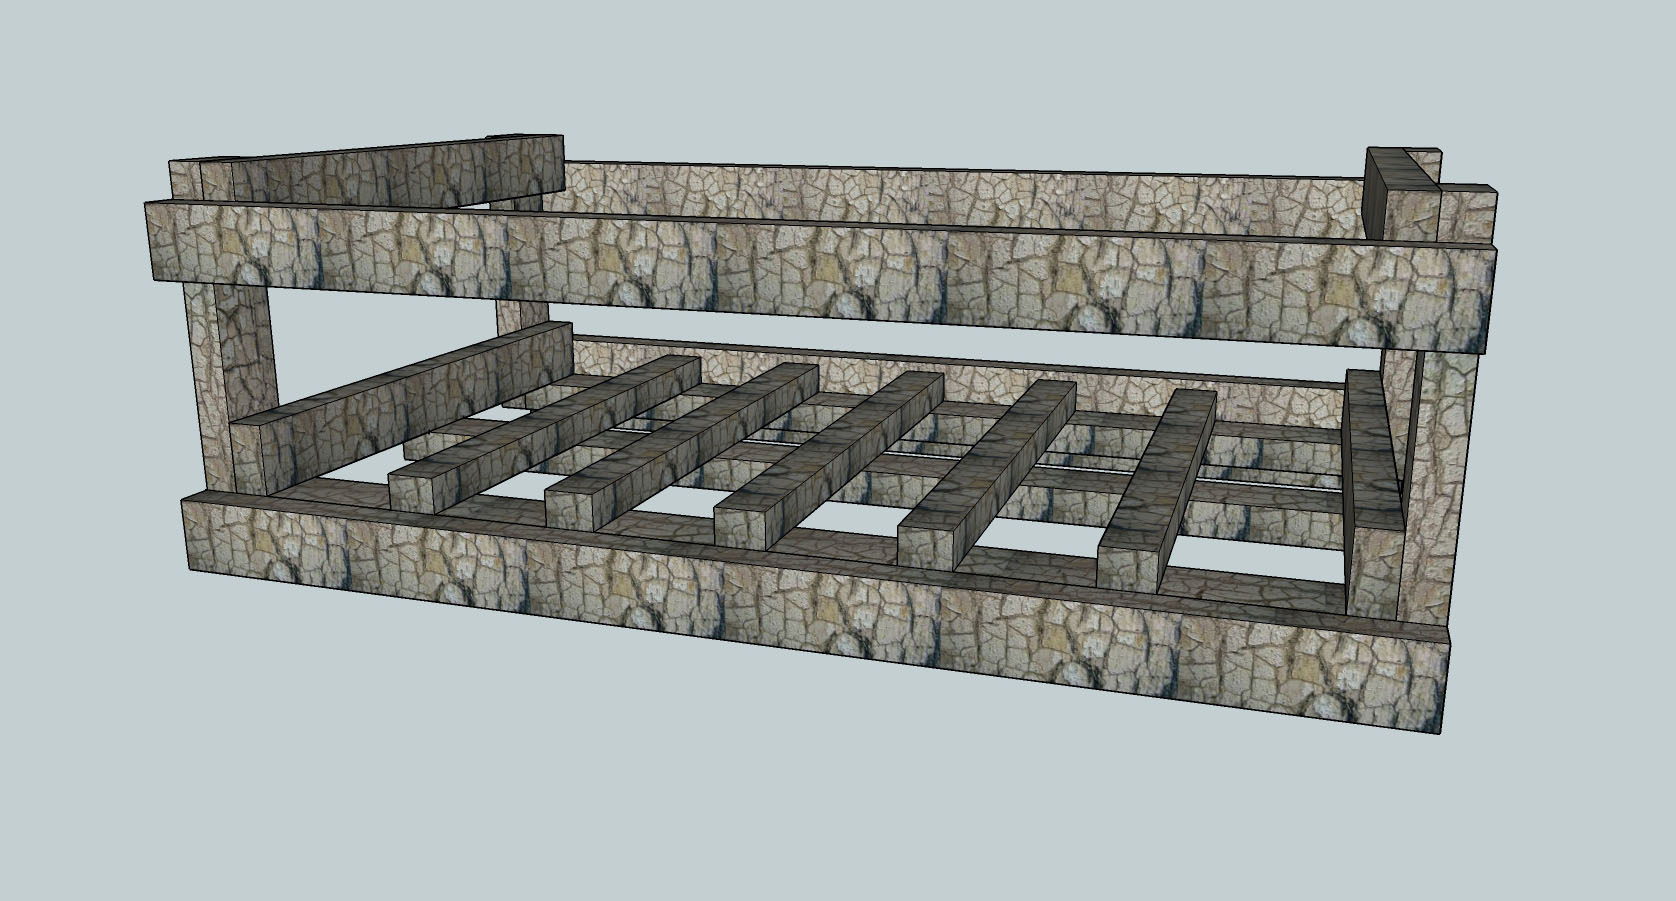
How about a stackable crate system in which you can insert the bottle upside down into some holes, so that they are stored in a better position to keep dust and stuff out of them? It may be as easy as a crisscross pattern of slats. Then when the bottles are full, you turn them right-side-up and they rest with their bottom on the crisscross. The crates would have to be tall enough to clear the tops of the bottles when they are resting upright, and the holes would have to sit high enough off the bottom so that the tops of the bottles didn't protrude out the bottom.
I'm at work and can't really fire up Solidworks to build a model right now.
I'm at work and can't really fire up Solidworks to build a model right now.
As promised, I worked the measurements about half a page back into plans.
Code:Lumber for Beer Crates (24x 12oz) Lumber for Beer Crates (12x 22oz) ================================= ================================= Interior: 15-1/2" W x 10-1/2" D x 9-1/4" H Interior: 11-3/4" W x 8-3/4" D x 11-1/2" H Five 1x2 @ 17" (bottom slats) Five 1x2 @ 13-1/4" (bottom slats) Four 1x2 @ 10" (vertical ends) Four 1x2 @ 12-1/4" (vertical ends) Four 1x3 @ 10-1/2" (short sides) Four 1x3 @ 8-3/4" (short sides) Four 1x3 @ 18-1/2" (long sides) Four 1x3 @ 14-3/4" (long sides) Lumber for Beer Crates (12x WM Pint) Lumber for Beer Crates (12x WM Quart) ==================================== ===================================== Interior: 14-1/8" W x 10-5/8" D x 5" H Interior: 15" W x 11-1/8" D x 6-3/4" H Five 1x2 @ 15-5/8" (bottom slats) Five 1x2 @ 16-1/2" (bottom slats) Four 1x2 @ 5-3/4" (vertical ends) Four 1x2 @ 7-1/2" (vertical ends) Four 1x3 @ 10-5/8" (short sides) Four 1x3 @ 11-1/8" (short sides) Four 1x3 @ 17-1/8" (long sides) Four 1x3 @ 18" (long sides) Lumber for Beer Crates (6x .5-Gal) Lumber for Beer Crates (12x 1L Teddy's) ================================== ======================================= Interior: 13-5/8" W x 9-1/8" D x 9-1/2" H Interior: 13-7/8" W x 10-3/8" D x 10-1/2" H Five 1x2 @ 15-1/8" (bottom slats) Five 1x2 @ 15-3/8" (bottom slats) Four 1x2 @ 10-1/4" (vertical ends) Four 1x2 @ 11-1/4" (vertical ends) Four 1x3 @ 9-1/8" (short sides) Four 1x3 @ 10-3/8" (short sides) Four 1x3 @ 16-5/8" (long sides) Four 1x3 @ 16-7/8" (long sides)
Will be building one of each today to test for fit before I start cranking them out tomorrow.
Also, built a few White Labs vial / 2L soda preform / baby soda bottle / test tube (many different names, I know) rack. Once I upgrade to the dedicated chest freezer for the brewery, at least one of these will be used for the yeast bank. I may make modifications.
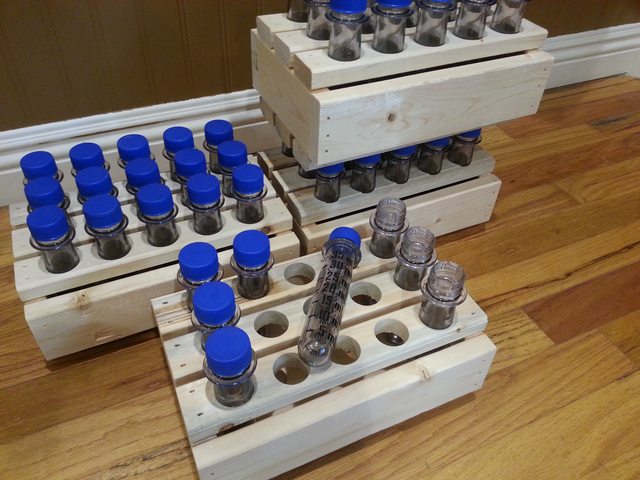
Pardon my ignorance. What is a WM Pint, WM Quart and 1L Teddy? I want to make some of these boxes for 12 oz bottles and I liter growlers.
EineProsit
Well-Known Member
Just what I've been looking for.
Hey Revco.....thanks for the mockup as that is way closer as to what I had in mind and much more accessible.....the only difference in my minds eye view was I was thinking of the size of the milk crates you see everywhere which would hold about a dozen or less bottles and be build on the bottles being on a slight angle with the top tilted up a bit so they wouldn't slide out.... I have access to champagne bottles which come in a carton of 12 with the dimensions being as such....11 1/2 width, 15 1/4 on the length and 13 on the depth of the box....that way I could just place the whole case in the wooden frame and use the dividers already in the box and not have to build those....only haven't spent any time on figuring out how to get the box to lay in the crate with a slight tilt up to help keep the bottles in place...thanks a bunch for the idea... may build one and try it just to see how it works
Revco, did you ever get those wine crates built? Any updates there? I find myself in need of storing 40 bottles all of a suddenly, and think that's a grand way to do it.
Thanks!
Thanks!
I made one slight modification that allows you to cut the # of pieces of lumber (assuming 8') from 4 pieces (2 of each) to 3 pieces by replacing the 5 17" slats made with the 1x2 with 4 17" pieces made with the 1x3.
This will actually let you make 2 full crates with 5 total piece since the 1x2 strip can be used across 2 differen crates by only using it for the vertical pieces.
Summary of the breakdown for one crate:
1x3: 18.5 | 18.5 | 18.5 | 18.5 | 10.5 | 10.5
1x3: 10.5 | 10.5 | 17 | 17 | 17 | 17
1x2: 10 | 10 | 10 | 10
Thanks for sharing this idea, and thanks to the original fence picket too! Awesome being able to make 2 crates for less than $5 (I didn't do the dividers).
I made 7 crates a year ago using this mod and love them. See pics on posts #169 and #170. Use a good wood glue with your screws and nails and they're pretty tough. Time to make a few more. Thanks again for the original and the mod!
revco
Well-Known Member
Revco, did you ever get those wine crates built? Any updates there? I find myself in need of storing 40 bottles all of a suddenly, and think that's a grand way to do it.
Thanks!
I haven't yet, had a few other projects to get wrapped up and this one has been put on the back burner. I'm going to have to get something done soon though as I have a number of wine bottle cases now and no proper place to put them!
I don't want to let you down, though. Here's the Sketchup file with the actual dimensions, should be pretty close. It looked good to me when I designed it, just haven't done the mock up to be 100% sure yet.
All the pieces were designing using the common furring strip dimensions, except for the wine bottle separators at the bottom of the case. I found these needed to be ripped down to size slightly (1" from memory?) in order to accommodate the bottles without too much or too little space between the bottles. This was my biggest concern in the design from what I recall...I played with several sizes in the mockup and it had to be fairly close to a specific size to get the right fit.
If you do build it, let me know and I'm curious if you had to modify the dimensions. If not, I'll post here once I can get back out to the shop with the finals.
sparkshooter
Well-Known Member
I'm a little bit wood-working challenged. I cut all the wood tonight (with a freaking jigsaw, since i didn't have a better way to cut the wood), and started glueing/nailing. After making the end pieces, I started trying to nail on the bottom pieces.All the banging was putting a lot of stress on the nails holding the first pieces together. I stopped.
What am I doing wrong? Should I let the glue on the first pieces dry first before nailing the bottom pieces into place?
What am I doing wrong? Should I let the glue on the first pieces dry first before nailing the bottom pieces into place?
jimmarshall
Well-Known Member
Here's my take, I used all 1x3 strips because that is what I could get at my local lumberyard. Bundle of 8 got me 3 crates for 12.64 in materials. I adjusted the design a little to make the boxes interlock when stacked.


Thoughts?
I still plan to antique and add a logo to these


Thoughts?
I still plan to antique and add a logo to these
sparkshooter
Well-Known Member
Those look great! I also love the stealth cat in the background, haha.
Since you seem to have been very successful, I have a woodworking question - why does my wood keep splitting when I use screws? I predrill pilot holes and stay away from the edge but the wood is splitting a TON. I got so frutrated that I tore apart my first box before the glue could dry.
And of course, when I tried to use nails, the wood was just ever-so-slightly warped and nails weren't holding everything flat.
Photopilot
Well-Known Member
Those look great! I also love the stealth cat in the background, haha.
Since you seem to have been very successful, I have a woodworking question - why does my wood keep splitting when I use screws? I predrill pilot holes and stay away from the edge but the wood is splitting a TON. I got so frutrated that I tore apart my first box before the glue could dry.
And of course, when I tried to use nails, the wood was just ever-so-slightly warped and nails weren't holding everything flat.
If you look on the previous post you can see the screws close to the edge have split some as well. It not a big deal if there is some splitting you are just trying to pull the wood together long enough for the glue to do it's thing.
You could try a larger drill bit and sinking the screw a little less. Also there are special bits that leave a tapered hole and countersunk area for the screw head. It does not guarantee no splitting in soft woods like that being used but it helps.
http://www.amazon.com/b?node=552396
jimmarshall
Well-Known Member
I got mine to quit splitting by drilling larger holes and then countersinking the holes as well. If you do not have a countersink drill bit, you can accomplish the same thing by using a drill bit the same size or slightly larger than the diameter of the head on your screws and running the drill in reverse. Like it was said though if the board splits a little bit it's not a huge deal structurally. More disappointing aesthetically than anything. And thanks for the compliment on the cat. I had had the beer out of the box for like 3 seconds before she jumped in it.
Sent from my iPhone using Home Brew
Sent from my iPhone using Home Brew
Photopilot
Well-Known Member
Against someones advice on here. I used a pallet for my wood. I am not sure what kind of chemicals I may be ingesting from it but since i use a pallet to grow some greens in why not and I have two sitting around. Even though the wood I found to make more crates is significantly more than the rest of you are paying, dismantling the pallet was not worth any money savings, but I would do it again anyways.
I bought a 4 pack of the stainless carboys for $18/ea on groupon. They are awesome. Now that I know I would pay the $45 retail for one if I needed more. I have been carrying them one or two at a time to go sailing or take to a friends house. Now I can carry all four at once.
I plan on sanding it up and maybe darkening it, with the vinegar bath and possibly A rope handle. Nest step is a 3x5 case for Bombers.
Photopilot
Well-Known Member
Here/albums/rr190/basserjim/2y]
Thoughts?
I still plan to antique and add a logo to these
Those look pretty slick. I'd like to see a shot from the side and or the bottom of you crate to see how they stack and mesh together. I may have to "borrow" your design.
Photopilot
Well-Known Member
Double post
Those look great! I also love the stealth cat in the background, haha.
Since you seem to have been very successful, I have a woodworking question - why does my wood keep splitting when I use screws? I predrill pilot holes and stay away from the edge but the wood is splitting a TON. I got so frutrated that I tore apart my first box before the glue could dry.
And of course, when I tried to use nails, the wood was just ever-so-slightly warped and nails weren't holding everything flat.
The wood splits because you are probably using a flathead screw, which has a taper to the head. Some wood splits very easily and I think the only way to get around it is to not use that style of screw and use a screw with a non-tapered head and screw just snug. You'll have to counter-bore the screw locations to get the head to not stick out.
The other option is to not screw so close to the edge of the board, but that's not really feasible for this project.
Drill slightly bigger holes, and countersink, and don't overtighten, and glue everything. I'm no woodworker, and this worked for me, and my year-old boxes are still going strong.
PackerfaninSanDiego
Member
pallet wood is awesome wood, to a point. I have made cabinetry from pallets and also beer crates. I used the half inch wood slats for my crates, those that use 3/4" wood are wasting their money. But then again I use my crates for storing the empty bottles. I have seen many crates that are screwed together with the black drywall screws and say, "really?" All my crates are put together with 1/4" crown staples, (and no glue)it really adds to the "crate" look.Against someones advice on here. I used a pallet for my wood. I am not sure what kind of chemicals I may be ingesting from it but since i use a pallet to grow some greens in why not and I have two sitting around. Even though the wood I found to make more crates is significantly more than the rest of you are paying, dismantling the pallet was not worth any money savings, but I would do it again anyways.
I bought a 4 pack of the stainless carboys for $18/ea on groupon. They are awesome. Now that I know I would pay the $45 retail for one if I needed more. I have been carrying them one or two at a time to go sailing or take to a friends house. Now I can carry all four at once.
I plan on sanding it up and maybe darkening it, with the vinegar bath and possibly A rope handle. Nest step is a 3x5 case for Bombers.
jimmarshall
Well-Known Member
Those look pretty slick. I'd like to see a shot from the side and or the bottom of you crate to see how they stack and mesh together. I may have to "borrow" your design.
Here you go.


I just essentially turned the end pieces 180 degrees before assembling. If you look closely in the picture, I had to do a little bit of trimming with a table saw to get the boxes to fit together.
Sent from my iPhone using Home Brew
Photopilot
Well-Known Member
Thanks Jim,
Exactly as I thought. Already cut pieces for 5, put together two but did not install the bottoms yet. I need to either rip some wood to fit or find some different width boards for the bottom.
Sent from my Nexus 7 using Home Brew mobile app
Exactly as I thought. Already cut pieces for 5, put together two but did not install the bottoms yet. I need to either rip some wood to fit or find some different width boards for the bottom.
Sent from my Nexus 7 using Home Brew mobile app
Photopilot
Well-Known Member
pallet wood is awesome wood, to a point. I have made cabinetry from pallets and also beer crates. I used the half inch wood slats for my crates, those that use 3/4" wood are wasting their money. But then again I use my crates for storing the empty bottles. I have seen many crates that are screwed together with the black drywall screws and say, "really?" All my crates are put together with 1/4" crown staples, (and no glue)it really adds to the "crate" look.
That only works of you have a compressor and stapler. I have not priced out a compressor recently but my initial investment in glue and screws was $11.
Was your pallet stapled initially? Mine had countersunk twisted nails. It probably takes almost two hours to free the boards from one crate.
Sent from my Nexus 7 using Home Brew mobile app
jimmarshall
Well-Known Member
Thanks Jim,
Exactly as I thought. Already cut pieces for 5, put together two but did not install the bottoms yet. I need to either rip some wood to fit or find some different width boards for the bottom.
Sent from my Nexus 7 using Home Brew mobile app
No problem. What kind of wood are you using?
Sent from my iPhone using Home Brew
Photopilot
Well-Known Member
No problem. What kind of wood are you using?
This kind. I have 2 1/2" furing strips and 1x4s to make this. The 1x4s run almost $4 a board. I am going to stop by Lowes today to see if i can do better.

jimmarshall
Well-Known Member
On the furring strips is 2.5 the actual measurement? Sold as 3 inch?
Sent from my iPhone using Home Brew
Sent from my iPhone using Home Brew
jimmarshall
Well-Known Member
On the furring strips is 2.5 the actual measurement? Sold as 3 inch?
Sent from my iPhone using Home Brew
Sent from my iPhone using Home Brew
Photopilot
Well-Known Member
On the furring strips is 2.5 the actual measurement? Sold as 3 inch?
Sent from my iPhone using Home Brew
Yes they are and since my bottom opening is 9" wide I could use 3 strips across the bottom with a 3/4 " gap. Just not sure I like the way that looks, but it would probably work.
Similar threads
- Replies
- 0
- Views
- 12K
