Fermentation Enclosure for heating and cooling?

Homebrew Talk - Beer, Wine, Mead, & Cider Brewing Discussion Forum

Help Support Homebrew Talk - Beer, Wine, Mead, & Cider Brewing Discussion Forum:

This site may earn a commission from merchant affiliate links, including eBay, Amazon, and others.

JeffWScott

Active Member
Joined
Jun 2, 2015
Messages
29
Reaction score
2
I was fermenting in my temperature controlled basement. But now my mother-in-law is moving in and I've had to move my brewery out to the garage (It's cool, it's more manly out there :rockin:). I live in Canada so the winters get really cold and the summers get fairly hot and humid. I need a fermentation enclosure that can both warm and cool the air so it will be constent all year round. I'm okay with DYI projects, but on this one, I'm at a huge loss. I don't even know where to start.

I have a mini-fridge, which I think I can re-purpose for the cooling portion (I also have a decent sized chest freezer). I have seen people use light bulbs to warm the chamber; but I use glass carboys so I don't see that working.

Even if I figure out how to cool and warm the chamber I'm not sure how I make the fridge cool the chamber when it needs to and the (insert warming apparatus) warm the chamber.

Can someone please help? :mug: If I need to be a paid member I will do that... I just need to come up with something within the next few months.
 
Subscribed to see the answer. I have an old full size fridge for my project.

One thing: I see no reason why a light bulb would work any differently with a glass carboy than with any other fermentation device.

Basically, it seems that you need either a two stage temperature controller, (i.e., one that turns on the heat when it gets cold and turns on the warm when it gets too cold outside), or else you need to reset your controller when the weather turns. Someone else will need to explain the choices and, more important, just how to set it all up.

Thanks for your response!

I suppose I'm ignorant on how temperature controllers work.
I see someone posed a link to this one: http://www.ebay.com/itm/17112085963...&_trksid=p3984.m1439.l2649&afsrc=1&rmvSB=true

But I only see a temperature probe, how does it tell my fridge, freezer or whatever to turn on?

Also, I'm under the impression that you need to ferment in a dark place. This is the only reason I'm saying that I wouldn't be able to use light-bulb based heating for my glass carboys.
 
There are a lot of ways to approach it but if you don't have the time or inclination for DIY, you can get a two-stage controller like a Fermostat (which is what I have) and you can use a heating pad on the carboy (I use two but I have a 31 gallon fermenter) if you don't like using a lightbulb.
 
I use light bulb, but you have to put it in a paint can. That keeps the light from skunking beer and turns the can into a heat source. I have holes drilled in top to let just a tiny bit of light out, that way I can check that it is working when needed.
 
There are a lot of ways to approach it but if you don't have the time or inclination for DIY, you can get a two-stage controller like a Fermostat (which is what I have) and you can use a heating pad on the carboy (I use two but I have a 31 gallon fermenter) if you don't like using a lightbulb.

Is this not the same thing as the Fermostat?

http://www.amazon.com/gp/product/B008KVCPH2/?tag=skimlinks_replacement-20

Do I wire the plug from my freezer/fridge to the unit? They don't ever show the back of the unit so I can't see what's involved.
 
Last edited by a moderator:
I use light bulb, but you have to put it in a paint can. That keeps the light from skunking beer and turns the can into a heat source. I have holes drilled in top to let just a tiny bit of light out, that way I can check that it is working when needed.

What type of bulb do you use?
 
STC 1000 is a great dual controller, will decide if it needs heat or cold. Think I picked up mine on eBay for less than 20 bucks, shipping included. You could easily repurpose your mini fridge and build a nice 4' x 4' ferment chamber for under a 100 bucks.
 
STC 1000 is a great dual controller, will decide if it needs heat or cold. Think I picked up mine on eBay for less than 20 bucks, shipping included. You could easily repurpose your mini fridge and build a nice 4' x 4' ferment chamber for under a 100 bucks.

Thanks this gives me a clearer picture.

So do I cut the 120v plug from the fridge/freezer and directly wire it to the Controller? Is that how that works?

I'm thinking of using the freezer because I won't have to build an insulated box to extend the fridge. I just need to add some heating into the freezer and run the wires to the controller. (sound right)?
 
There are a million fermentation chamber threads in here in the DIY section, go check them out.

Chest freezer and a heat source (Ferm wrap, reptile infrared heat lamp, light in a paint can, etc) wired with an STC-1000.

I have a large chest freezer and a light in a can. Heater cost a total of maybe 10-15 bucks, works fine. The STC-1000 is around $20 on Amazon, but it does measure in Celsius (easily dealt with with a conversion sheet taped next to it). It is a dual stage, meaning heating and cooling. You have to wire it (mildly confusing, there are a million diy articles on how to do it) for a heating and cooling plug, power in, and then the included temp probe. The temp probe gets taped to your carboy with insulated tape, in a bucket of water in the freezer, or in a thermowell in the beer). Program the controller for your set point temp, allowed variance from set point and compressor delay time (easily done) and you're all set. Very easy and effective chamber, that, if big enough, can also be a conditioning chamber.
 
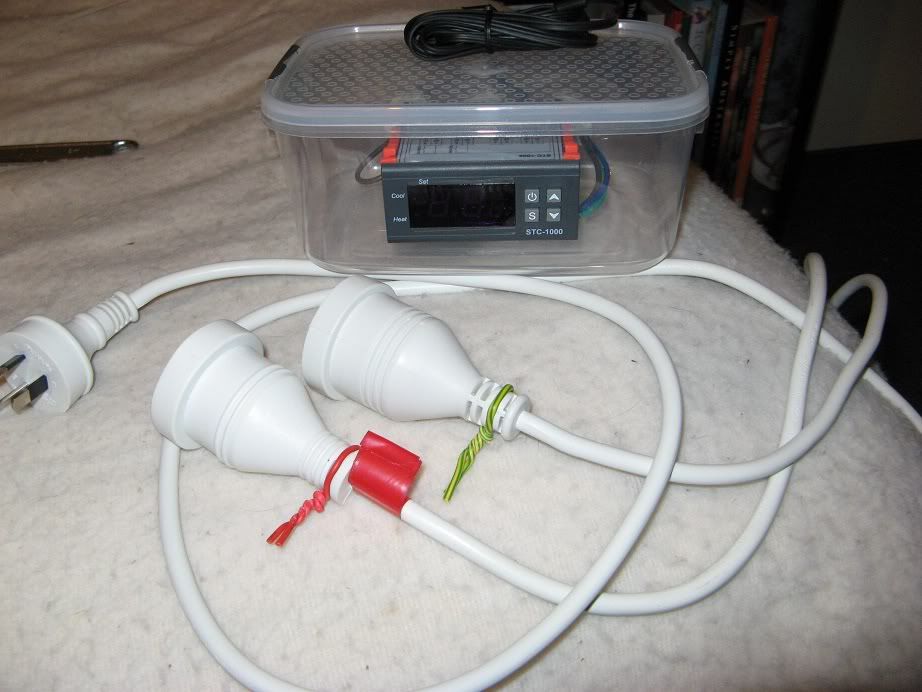
You can cut the wire to your fridge, but I would highly recommend against it. I just bought a cheap short extension cord, an extra female end and made the 3 leads needed. (Power in, cooling, heating). All you are doing is setting up a temperature controlled switch really. You put power into it and then plug your heat and cooling sources in, depending on the need dictated by the probe and your settings, it will direct power to the heating plug or cooling plug.

Here's a pic off google:

stc1000_8.jpg
 
Thank you to everyone! I have all the information I need to do the build now.

To repay you for your time I will document the install and post it after I am done. This will hopefully help someone else later on.

My beer thanks you!
- Jeff
 
There are a million fermentation chamber threads in here in the DIY section, go check them out.

Chest freezer and a heat source (Ferm wrap, reptile infrared heat lamp, light in a paint can, etc) wired with an STC-1000.

I have a large chest freezer and a light in a can. Heater cost a total of maybe 10-15 bucks, works fine. The STC-1000 is around $20 on Amazon, but it does measure in Celsius (easily dealt with with a conversion sheet taped next to it). It is a dual stage, meaning heating and cooling. You have to wire it (mildly confusing, there are a million diy articles on how to do it) for a heating and cooling plug, power in, and then the included temp probe. The temp probe gets taped to your carboy with insulated tape, in a bucket of water in the freezer, or in a thermowell in the beer). Program the controller for your set point temp, allowed variance from set point and compressor delay time (easily done) and you're all set. Very easy and effective chamber, that, if big enough, can also be a conditioning chamber.

Exactly - you nailed it

You need to figure out which method is best for you though. Every one of us is different.

If were you I would get a cheap chest freezer or side x side on Craigs list or wait for a summer sale and pay for a new one ($150+)(home depot, lowes, sears, etc...) and wait for the perfect unit and grab it. Make sure you pay money for it on Craigs - don't take just a free fridge (most of the times it won't work). There are lots of side x sides out there from a remodel or move now - just look.

I started with a fridge we kept when we moved in (free-ish) - I have put in two different stc1000s. One into the freezer side (which moves the main part of the whole - cold wise) Fan control for the other stc and then into a heater pad around the main keg. This way I get two zones - one for serving and one for storage etc... Right now the freezer is set at 1.5*C for serving (2-8g & 2-5g) and the fridge is at ~6*C. (yes I put a fan in)

I got frustrated with this experience of not getting a consistent cold level in the fridge for real lagering and quickly found a chest freezer for under $50 - built a collar for it and now I run a stc1000+ with it so I can take temps in F.

Here are a few of the links you might want to look for:
https://www.homebrewtalk.com/showthread.php?t=527594
https://www.homebrewtalk.com/showthread.php?t=272478

This one I followed for my side x side:
https://www.homebrewtalk.com/showthread.php?t=289241

Hope this helps you! :mug:
 
What type of bulb do you use?

I have a smaller fermentation space, probably size of a smaller floor freezer, I use a 40w refigerator bulb for durability. First bulb lasted about year and about 10-12 brews including through winter in a 50F garage. That can keep my "heated" chamber at temps and heat the "cool" chamber to within about 5 degrees with my pc fan recirculating set up.
 
This thread was very helpful when building my chamber https://www.homebrewtalk.com/showthread.php?t=256068

I had mixed feelings about that thread. While I liked his effort and DIY spirit, that is far too much space to expect that small mini fridge setup to keep cool for long. Those things aren't made for longevity to begin with, and then when you more than quadruple the amount of space they need to cool, you're asking for trouble from the compressor... Getting a chest freezer is a much better idea for longevity. I feel the same about people who put so much concentrated effort and one-off fabrication into a craigslist chest freezer that could crap out at any time.
 
I had mixed feelings about that thread. While I liked his effort and DIY spirit, that is far too much space to expect that small mini fridge setup to keep cool for long. Those things aren't made for longevity to begin with, and then when you more than quadruple the amount of space they need to cool, you're asking for trouble from the compressor... Getting a chest freezer is a much better idea for longevity. I feel the same about people who put so much concentrated effort and one-off fabrication into a craigslist chest freezer that could crap out at any time.

Great point, I did take that into consideration when building a chamber but I hoped that with good insulation and air circulation it would at least last a few years. When it was all said and done with beer fermenting the compressor doesn't kick on very often and when it does it doesn't seem to run very long. I would never try to cold crash or lager in it. Chest freezers are best for that but for ales it's working great so far.
 
I'm lazy and opted out of building the STC 1000. I spent the extra money on a plug and play unit already setup for this.

http://www.morebeer.com/products/ranco-digital-twostage-temperature-controller-wired.html

I have this wired into a carboy thermowell. Ceramic heater for the heating cycle rather than light bulb.

Similar to you, I live in a colder environment, so wasn't too worried about cooling a big space to ale temps with a mini fridge.

My chamber:

https://www.homebrewtalk.com/showthread.php?t=525166
 
Very true, for holding somewhere around 50-70 it would be better, I just preferred searching craigslist until I came upon my big $75 chest freezer.
 
After some thought I hit a design snag.

i will need to run the wire into the freezer to power the heating lamp. What is the best way to seal that hole up after I fish the wire in? Spray foam?
 
After some thought I hit a design snag.

i will need to run the wire into the freezer to power the heating lamp. What is the best way to seal that hole up after I fish the wire in? Spray foam?

Pretty sure most people just lay it across and it seals well enough to be ok, I did. Maybe even get a flat extension cord to minimize the gap. DO NOT drill through the side, the refrigerant runs through the entire thing I believe. Inside is the cooling coil, outside face has the condenser, getting rid of the heat.
 
I know this is an old thread but just wondering how it turned out.
I have some experience with thermoelectric cooling (TEC) modules and peltier modules (links below)
I believe that if you pair a TEC/peltier module with its fans under the base of the enclosure you are making, and pair it with a temperature controller like the ones available on amazon you might have a nice little thing there. It would avoid the light issue, but there would be fan and noise.

The issue with this is that these cooler modules is that they are like chips that expel heat from one side and cold from the other simultaneously, so you need to exhaust one side out at all times. Also, this means you would need to flip it around in summer/winter months and for the months in between, it might be a challenge. Take this into account in your designs and ensure there is ample room between the module and the mead jar so no direct heat to the bottom.
Keep in mind that in summers, the temperature controller should trigger only when it gets too hot, thus activating the cooler and in winters, when you flip the cooler around, change the controller to activate only when the temperature drops too much to activate the heating.

If you set it to activate for a temperature 'range' the issue will be that, IF it gets too cold during summer on an oddly cool day (when you have the modules flipped to its cooling side) the temperature controller will activate and it will cool it even further and continue to do so. So be sure to program the controller for not a range but instead a temperature trigger. and ensure you find one capable of doing this.

Thermo electric modules :
https://www.amazon.ca/s?k=peltier&crid=2563IM1UYG9HF&sprefix=peltier,aps,145&ref=nb_sb_noss_1Temperature controller: https://www.amazon.ca/sk=temperature+controller&crid=1KB2DKVKPNY7U&sprefix=temperature+controlle,aps,141&ref=nb_sb_noss_2

P.S. A small module should easily be able to heat/cool an enclosure for 1 or maybe even 2 One Gallon carboys, but please do your research on the module capacity and size you may need for your purposes and the amperage/voltage needs for the same as well as the controller.

I have never built something like this myself but I plan to one day :D

Update: I realized that some of the temperature controllers, come with two outlets/ triggers, so you may in fact be able to set a temperature range have have two peltier/TEC modules - one with the heating side facing into the enclosure and the other with the cooling side facing into the enclosure. and this should help you maintain that range while only the respective outlet gets activated when needed.
Be sure to exhaust the other sides of the modules into a well ventilated room so that the expelled air doesnt drasitically impact ambient temps. that is all :D Hope this helps someone
 
Last edited:
Back
Top