
Project Description:
Adding glycol cooling system to exterior of an existing stainless fermentor and detachable from cooling unit. Kept cooling coils outside of fermentor for ease of maintenance/cleaning. Setup is easily capable of -20F below ambient, can probably do another -20 if needed. Overall very easy to do, a level 2+ project on the HBT DIY Project Locator.
Background:
My DIY conical has been working great for the last few years but during heat waves i have to cover it in ice and/or spray it down every few hours and even then the temperature approaches 80F. The conical is quite large and being short on space i couldn't get a large fridge to put it in, even if I did get a large fridge past the SWIMBO moving 10-15gal wort from the brew space to the ferment space would be very difficult.
https://www.homebrewtalk.com/f51/40-diy-conical-keg-no-welding-262336/
Parts needed:
Copper Coil (25ft)
Thermal Silicone/Adhesive (SS-35 direct from siliconesolutions.com, one 10oz tube)
Silicone caulking (two 10oz tube)
Tubing (polypropylene)
Stainless Flux (Lenox High Activity Stainless Steel Flux)
Solder (Harris Stay-brite #8)
pond pump (Eco 396)
fridge/freezer
glycol (Splash RV -50F)
Closed cell insulation (sleeping pads via ebay)
Various barb fittings and clamps
liquid vessel to fit in fridge/freezer
pipe insulation, 6ft length
STC-1000
siphon pump (optional, to prime the system)
Cole-parmer auto-sealing disconnects (optional, but clean, leak free way to separate fermentor from fridge)
Tools needed:
Soldering Gun
Drill
pliers, screwdrivers, etc
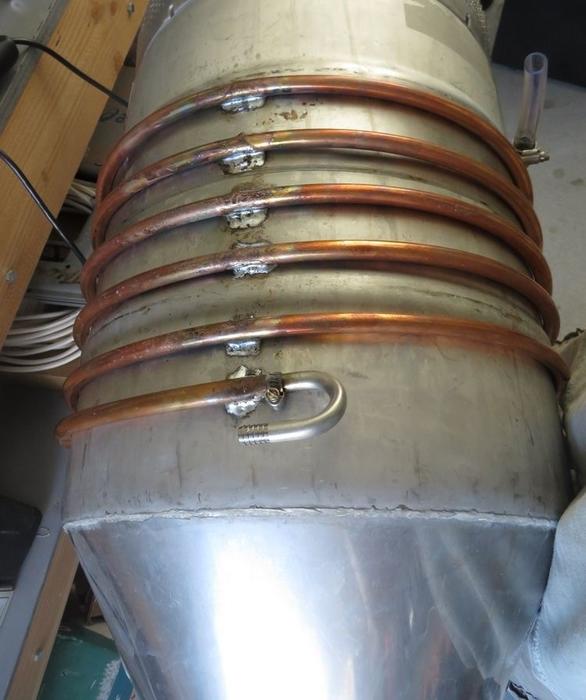
Step 1
Coil copper around fermentor and solder once each loop for strength. I pre-wet (pre-solder) the stainless and copper before soldering them together which made it a lot easier to join. Because copper is so thermally conductive it just sucks the heat out of the soldering gun and makes for some ugly joins. I hit the solder with a propane torch and the solder flowed nicely into the joint, for this project it's not necessary but it made things better looking (and stronger). I also added a barbed U-bend so the glycol input and output would be in the same direction.
To solder stainless you *need* stainless flux. There are some posts on HBT on how to do it, but if you dab some flux the solder sticks like a champ. I used lenox flux (rated up to 850F) with a soldering gun but if you want to use a torch then you'll need a brazing flux such as Harris Stay-Silv.
Step 2
Even though i pulled the copper coil tight around the fermentor the actual contact surface between the two was limited (even without the occasional gap) so heat transfer would be incredibly inefficient. I filled in the gap on both sides of the coil with thermal silicone adhesive (Silicone Solutions SS-35) to overcome the lack of contact. I didn't concentrate on a smooth bead as the entire unit will soon be covered with insulation. Any play that was in the copper is now gone and the coil is firmly attached to the fermentor.
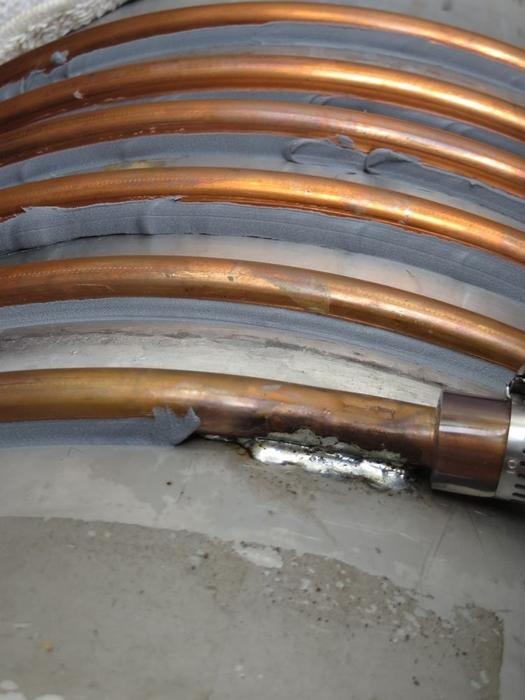
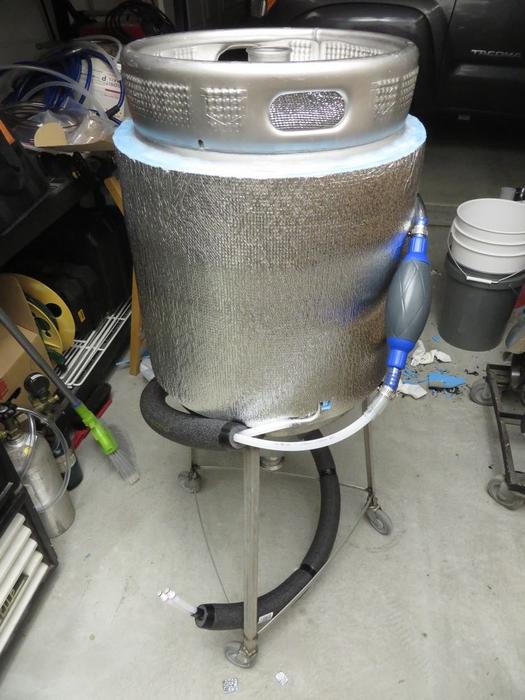
Step 3
I bough 4 rolls of closed-cell backpacking sleeping pads, $7/ea off ebay w/ free shipping. They were 1/4" thick, 2ft wide, 6ft long. I cut small strips to fill in the spacing between coils and glued them in place with silicone caulking. An hour of cutting and gluing the gaps were done and i wrapped the entire fementor with another two layers of padding. This gave the fermentor 1" of insulation with 1/2" on the coils. I also fit the top and the bottom conical with insulation. I then sealed all the exposed edges of insulation with more caulking with a nice thick and angled lay on top to control runoff/spillage, this will prevent water/wort from seeping in between layers and turning into a nasty moldy mess. I then feed 2 lines of polypropylene tubing thru pipe insulation and attached it to the fermentor with the cole-parmer disconnects on the opposite end. I aligned the tubing inside the insulation with each other as well as the curvature of the fermentor- so when no in use the tubing wraps easily around it.
With 25ft of coil and another 15ft of tubing in the system there would be a fair amount of resistance and vertical height that the pump would need to work against, so i added a siphon to prime the system.
The finished picture of the fermentor:
Step 4 - freezer
The boring part of the project was to flesh out the freezer. I drilled 2 holes in the internal hump for the coolant lines and 1 for the pump electrical. Nothing fancy here, i took a 2.5 gal water jug from the grocery store and put the tubing, pump, and glycol in there. In my kegerator project i used an aluminum container but it pitted heavily within a month so i switched to polypro. Also for this build I originally started with a 90gph pump but it barely had the horsepower to keep flowing so i upgraded to a Eco 396 (396gph, $23 amazon) which is doing the trick nicely. This should allow me to eliminate the siphon now (which is leaking due to the cold coolant).
Step 5 - electrics
My initial plan was to use an old homedepot thermostat to trigger a relay to trigger the freezer/pump but for just a few bucks more i could get an STC-1000 and simplify the wiring as well as have a nice bright display. In my case i have the freezer plugged into the wall and only the pump into the relay. This way when the STC-1000 triggers coolant flow the freezer can supply 10F glycol instead of waiting to cool down. 3-4 years ago when i made the fermentor i added a thermowell, i finally get to use it! It's just a simple tube fit into a tri-clamp cap and cost me $4 to make. Just drill two 1/2" holes in the cap, one tube goes up for blow-off, one goes into the wort for temp monitoring (be sure to seal the bottom end). $120 retail : )
How it's working
Great! My fermenting station is outside in a shed so it can get very warm during the day, this setup is keeping my wort spot on at 69F all day (IIPA bubbling away as i write this).
Things i like
Gotchas
Upcoming changes
p.s. keg is from a defunct brewery.


Adding glycol cooling system to exterior of an existing stainless fermentor and detachable from cooling unit. Kept cooling coils outside of fermentor for ease of maintenance/cleaning. Setup is easily capable of -20F below ambient, can probably do another -20 if needed. Overall very easy to do, a level 2+ project on the HBT DIY Project Locator.
Background:
My DIY conical has been working great for the last few years but during heat waves i have to cover it in ice and/or spray it down every few hours and even then the temperature approaches 80F. The conical is quite large and being short on space i couldn't get a large fridge to put it in, even if I did get a large fridge past the SWIMBO moving 10-15gal wort from the brew space to the ferment space would be very difficult.
https://www.homebrewtalk.com/f51/40-diy-conical-keg-no-welding-262336/
Parts needed:
Copper Coil (25ft)
Thermal Silicone/Adhesive (SS-35 direct from siliconesolutions.com, one 10oz tube)
Silicone caulking (two 10oz tube)
Tubing (polypropylene)
Stainless Flux (Lenox High Activity Stainless Steel Flux)
Solder (Harris Stay-brite #8)
pond pump (Eco 396)
fridge/freezer
glycol (Splash RV -50F)
Closed cell insulation (sleeping pads via ebay)
Various barb fittings and clamps
liquid vessel to fit in fridge/freezer
pipe insulation, 6ft length
STC-1000
siphon pump (optional, to prime the system)
Cole-parmer auto-sealing disconnects (optional, but clean, leak free way to separate fermentor from fridge)
Tools needed:
Soldering Gun
Drill
pliers, screwdrivers, etc
Step 1
Coil copper around fermentor and solder once each loop for strength. I pre-wet (pre-solder) the stainless and copper before soldering them together which made it a lot easier to join. Because copper is so thermally conductive it just sucks the heat out of the soldering gun and makes for some ugly joins. I hit the solder with a propane torch and the solder flowed nicely into the joint, for this project it's not necessary but it made things better looking (and stronger). I also added a barbed U-bend so the glycol input and output would be in the same direction.
To solder stainless you *need* stainless flux. There are some posts on HBT on how to do it, but if you dab some flux the solder sticks like a champ. I used lenox flux (rated up to 850F) with a soldering gun but if you want to use a torch then you'll need a brazing flux such as Harris Stay-Silv.
Step 2
Even though i pulled the copper coil tight around the fermentor the actual contact surface between the two was limited (even without the occasional gap) so heat transfer would be incredibly inefficient. I filled in the gap on both sides of the coil with thermal silicone adhesive (Silicone Solutions SS-35) to overcome the lack of contact. I didn't concentrate on a smooth bead as the entire unit will soon be covered with insulation. Any play that was in the copper is now gone and the coil is firmly attached to the fermentor.
Step 3
I bough 4 rolls of closed-cell backpacking sleeping pads, $7/ea off ebay w/ free shipping. They were 1/4" thick, 2ft wide, 6ft long. I cut small strips to fill in the spacing between coils and glued them in place with silicone caulking. An hour of cutting and gluing the gaps were done and i wrapped the entire fementor with another two layers of padding. This gave the fermentor 1" of insulation with 1/2" on the coils. I also fit the top and the bottom conical with insulation. I then sealed all the exposed edges of insulation with more caulking with a nice thick and angled lay on top to control runoff/spillage, this will prevent water/wort from seeping in between layers and turning into a nasty moldy mess. I then feed 2 lines of polypropylene tubing thru pipe insulation and attached it to the fermentor with the cole-parmer disconnects on the opposite end. I aligned the tubing inside the insulation with each other as well as the curvature of the fermentor- so when no in use the tubing wraps easily around it.
With 25ft of coil and another 15ft of tubing in the system there would be a fair amount of resistance and vertical height that the pump would need to work against, so i added a siphon to prime the system.
The finished picture of the fermentor:
Step 4 - freezer
The boring part of the project was to flesh out the freezer. I drilled 2 holes in the internal hump for the coolant lines and 1 for the pump electrical. Nothing fancy here, i took a 2.5 gal water jug from the grocery store and put the tubing, pump, and glycol in there. In my kegerator project i used an aluminum container but it pitted heavily within a month so i switched to polypro. Also for this build I originally started with a 90gph pump but it barely had the horsepower to keep flowing so i upgraded to a Eco 396 (396gph, $23 amazon) which is doing the trick nicely. This should allow me to eliminate the siphon now (which is leaking due to the cold coolant).
Step 5 - electrics
My initial plan was to use an old homedepot thermostat to trigger a relay to trigger the freezer/pump but for just a few bucks more i could get an STC-1000 and simplify the wiring as well as have a nice bright display. In my case i have the freezer plugged into the wall and only the pump into the relay. This way when the STC-1000 triggers coolant flow the freezer can supply 10F glycol instead of waiting to cool down. 3-4 years ago when i made the fermentor i added a thermowell, i finally get to use it! It's just a simple tube fit into a tri-clamp cap and cost me $4 to make. Just drill two 1/2" holes in the cap, one tube goes up for blow-off, one goes into the wort for temp monitoring (be sure to seal the bottom end). $120 retail : )
How it's working
Great! My fermenting station is outside in a shed so it can get very warm during the day, this setup is keeping my wort spot on at 69F all day (IIPA bubbling away as i write this).
Things i like
- the cole-parmer disconnects. The ability to separate the fermentor from the freezer making things easy for a single person to move around.
- I was pleasantly surprised by the quality of the sleeping pads. Shipped directly from China and they were as advertised. I'd never replace my thermarest or z-pad in the backcountry but it's a good source for cheap foam.
Gotchas
- -50F glycol can form fairly significant ice crystals/slush at 10F. If i had to do this over again i'd use a fridge instead.
- As usual i finish a lot of beer projects before a big scheduled brew day with the buddies. Finishing up a bit past midnight i didn't have time to test the system before going live. STC programming was a bit panicky as was a leak but we got things sorted out quickly.
Upcoming changes
- Remove siphon. The very cold glycol is making the internal diaphragm stiff and it barely works. With the upgraded pump it's no longer needed.
- Replace vinyl tubing. Most of the tubing is polypropylene but i have a few segments of PVC/vinyl which stiffens up when cold.
p.s. keg is from a defunct brewery.

