
I know these threads are a dime a dozen, but I can't believe I ever went groveling to my LHBS asking if I can pretty please mill my own base grain if I promise to buy something from them. Last time, dude followed me to the parking lot, talking "Did you forget to pay for all that grain in the bucket?"
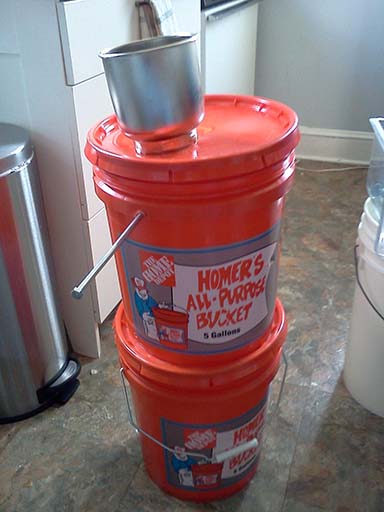
Find below an ugly m'f'ing bucket rig that took all of 90 minutes to assemble, and cost $34 front to back. In addition to showing off my silly hackjob, I also wanted to share some close-ups of the grind for anyone so worried about mangled hulls that they're terrified to try this sort of approach.
For the record, I'd love a barley crusher, but I don't think it's reasonable to spend that kind of scratch on just one small part of my hobby--a hobby that is, at least in some part, about spending less to drink good beer. There are lots of reasons to go all-grain, but price is definitely up there for some of us. If you love your pricy rig, please do keep loving it. (But not like that. Equipment can't consent.)
Ingredients:
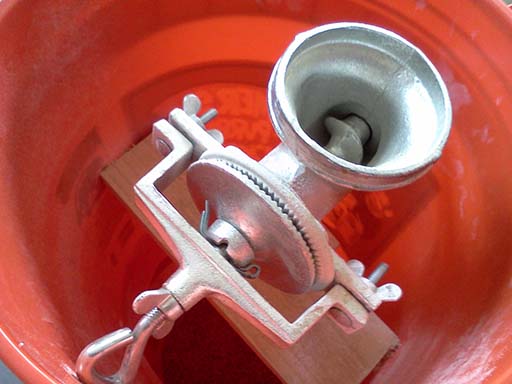
Now, I linked the grinder that I bought, and it's fine--it saved me a whopping $4 off the next cheapest brand, which was probably the same POS grinder sold by a different Chinese importer. I had to bend the base of the hopper back a little to make it fit on the grinder intake. It's a poorly cast, zinc-slathered piece of junk, but it grinds just fine.
You'll want your mill adjusted to the tightest reasonable grind (the hulls survive just fine), and you'll want to turn your drill down around the lowest setting to start. This is not like a grain roller in terms of volume, if you run it at full speed (especially with no grains in it), your neighbors will have the SWAT team at your door. The empty space in the grinding chamber turns it into a real resonator, but you probably aren't going to use it every day. Put it on carpet if you're in an apartment, stuff it with throwaway blankets maybe.
This grinds a pound in about 10-15 seconds to single-mill. I could probably adjust the grinder a little tighter, but given the depth of the mill grooves I think it's just going to be eating metal at some point. I think a single grind is comparable to my LHBS's barley crusher, but I don't stress about regrinding because I'm BIABbing this stuff. The grains aren't flattened but I think the idea of a roller actually rolling grains flat is fantasy stuff, the reason people use rollers is to preserve the hull for traditional lautering, and this does that.
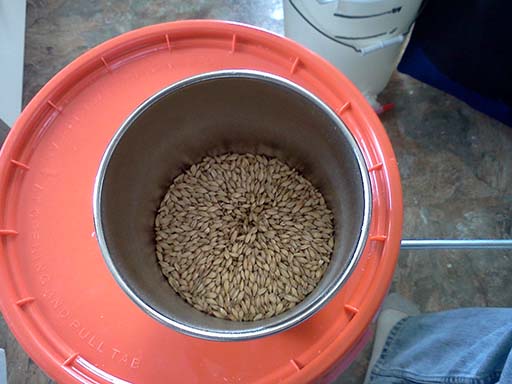
The stock hoppers with these things, you'll notice, is small--about 1lb. I have seen lots of rigs that modify the hopper, and I'm pretty sure you can work that out for yourself (I curled up a flexible cutting board and turned it into a smokestack today, it probably held 4-5lbs).
Here are some hi-res (low-quality but hi-res) phone shots of the grain, for the perverts.
First grind:
http://i.imgur.com/XzwcYdG.jpg
http://i.imgur.com/TYBqNi2.jpg
Second grind:
http://i.imgur.com/vayduRI.jpg
http://i.imgur.com/OzqdBbg.jpg
Some adjustment tips, btw:
* If you tighten the wingnuts on the sides of the mill as far as they will go and then untighten maybe a half turn, you will be content with a single crush if you BIAB (if that's a good reference point).
* You will have to re-tighten slightly every 5-10lbs.
* If you run it this tight, give your drill a break. I recently set mine on fire, but I did 15lbs straight and I think it was too tight near the end. So that makes this a ~$60 project, I guess--but only if you're as dumb as me.
Update: The drill survived both smoking and me spritzing water inside to stop the smoking. Oh, to be as durable as a $20 drill.
Find below an ugly m'f'ing bucket rig that took all of 90 minutes to assemble, and cost $34 front to back. In addition to showing off my silly hackjob, I also wanted to share some close-ups of the grind for anyone so worried about mangled hulls that they're terrified to try this sort of approach.
For the record, I'd love a barley crusher, but I don't think it's reasonable to spend that kind of scratch on just one small part of my hobby--a hobby that is, at least in some part, about spending less to drink good beer. There are lots of reasons to go all-grain, but price is definitely up there for some of us. If you love your pricy rig, please do keep loving it. (But not like that. Equipment can't consent.)
Ingredients:
- "Premium Cast Iron Corn Grinder": $26.95 shipped with Amazon Prime (not "premium" in any sense of the word)
- Homer buckets and lids (2 each): About $6 (you will only be modifying the lids and one bucket. Food grade is about double at Lowes, but I had these around and this is for short-term dry contact so I'm satisfied.)
- Longest 5/16" hex bolt you can find: Max $2 (do this after you get the grinder so you can be sure that's the size you need to replace the handle)
- Some screws and a 2x4 scrap or whatever wood is lying around.
- A drill. You have a drill, right? I like my old school plug-in because it was $20 new and never runs out of batteries, but do what suits you.
Now, I linked the grinder that I bought, and it's fine--it saved me a whopping $4 off the next cheapest brand, which was probably the same POS grinder sold by a different Chinese importer. I had to bend the base of the hopper back a little to make it fit on the grinder intake. It's a poorly cast, zinc-slathered piece of junk, but it grinds just fine.
- Assemble the grinder. This will be the most complicated thing you do, because the instructions are basically nonsense.
- Cut your 2x4 to the diameter of your bucket, give or take. Screw it in to the sides of the bucket, using the grinder as a guide for placement.
- Remove the handle of the grinder and throw it in the trash. Secure the grinder to the board. Drill a hole so you can insert your 5/16" bolt into the hole the handle was removed from.
- Cut the bottom off the bucket your grinder is in, and cut a hole in the lid of the bucket below it that will allow grain to pass from the grinding chamber while letting the top bucket rest on the rim. (The base of your grinder bucket is much smaller than the lid so this is easier and more intuitive than it sounds.)

- Cut a hole in the top lid to accommodate the hopper, or whatever hopper you intend to use (I believe I saw a tek where someone used another 5gal with a sliced up bottom as the hopper, but I think I look like enough of a maniac stacking two buckets together and am happy to refill my hopper for now).
- Insert bolt. Drill away.
You'll want your mill adjusted to the tightest reasonable grind (the hulls survive just fine), and you'll want to turn your drill down around the lowest setting to start. This is not like a grain roller in terms of volume, if you run it at full speed (especially with no grains in it), your neighbors will have the SWAT team at your door. The empty space in the grinding chamber turns it into a real resonator, but you probably aren't going to use it every day. Put it on carpet if you're in an apartment, stuff it with throwaway blankets maybe.
This grinds a pound in about 10-15 seconds to single-mill. I could probably adjust the grinder a little tighter, but given the depth of the mill grooves I think it's just going to be eating metal at some point. I think a single grind is comparable to my LHBS's barley crusher, but I don't stress about regrinding because I'm BIABbing this stuff. The grains aren't flattened but I think the idea of a roller actually rolling grains flat is fantasy stuff, the reason people use rollers is to preserve the hull for traditional lautering, and this does that.
The stock hoppers with these things, you'll notice, is small--about 1lb. I have seen lots of rigs that modify the hopper, and I'm pretty sure you can work that out for yourself (I curled up a flexible cutting board and turned it into a smokestack today, it probably held 4-5lbs).
Here are some hi-res (low-quality but hi-res) phone shots of the grain, for the perverts.
First grind:
http://i.imgur.com/XzwcYdG.jpg
http://i.imgur.com/TYBqNi2.jpg
Second grind:
http://i.imgur.com/vayduRI.jpg
http://i.imgur.com/OzqdBbg.jpg
Some adjustment tips, btw:
* If you tighten the wingnuts on the sides of the mill as far as they will go and then untighten maybe a half turn, you will be content with a single crush if you BIAB (if that's a good reference point).
* You will have to re-tighten slightly every 5-10lbs.
* If you run it this tight, give your drill a break. I recently set mine on fire, but I did 15lbs straight and I think it was too tight near the end. So that makes this a ~$60 project, I guess--but only if you're as dumb as me.
Update: The drill survived both smoking and me spritzing water inside to stop the smoking. Oh, to be as durable as a $20 drill.
Last edited by a moderator: