Designing the best mash tun

Homebrew Talk - Beer, Wine, Mead, & Cider Brewing Discussion Forum

Help Support Homebrew Talk - Beer, Wine, Mead, & Cider Brewing Discussion Forum:

This site may earn a commission from merchant affiliate links, including eBay, Amazon, and others.

ryanj

Supporting Member
HBT Supporter
Joined
Nov 19, 2017
Messages
250
Reaction score
93
I have a custom built E-HERMs system with two half barrel keggles (HLT and BK), but I'm still mashing in my 10 gallon Igloo cooler with a dome'd false bottom.

The cooler is a little over 3 years old and with 20-30 batches on it, it's starting to show some age. A bunch of scratches on the cooler wall, some discoloring, and the bulkhead has begun to sag because it's a little too heavy for the plastic cooler walls. I can only run my circulating pump at 20-30%, but the plus side is that I'm getting 82-85% mash efficiency (according to the Brewfather).

So on one hand, I have a very high performing vessel. On the other hand, the vessel is starting to show some age and eventually I'd like to move to a larger, stainless steel vessel.

So, if I design and build a new mash tun, here's what I'm thinking...

First, I exclusively brew 5 gallon batches. I'll probably never do a 10 gallon batch.

My HLT and BK are both half barrel Sanke kegs. I picked them up for $25-40 each on CL. I figured if I design a new MT, I'll probably start with another Sanke keg (price, volume, and material is hard to argue with).

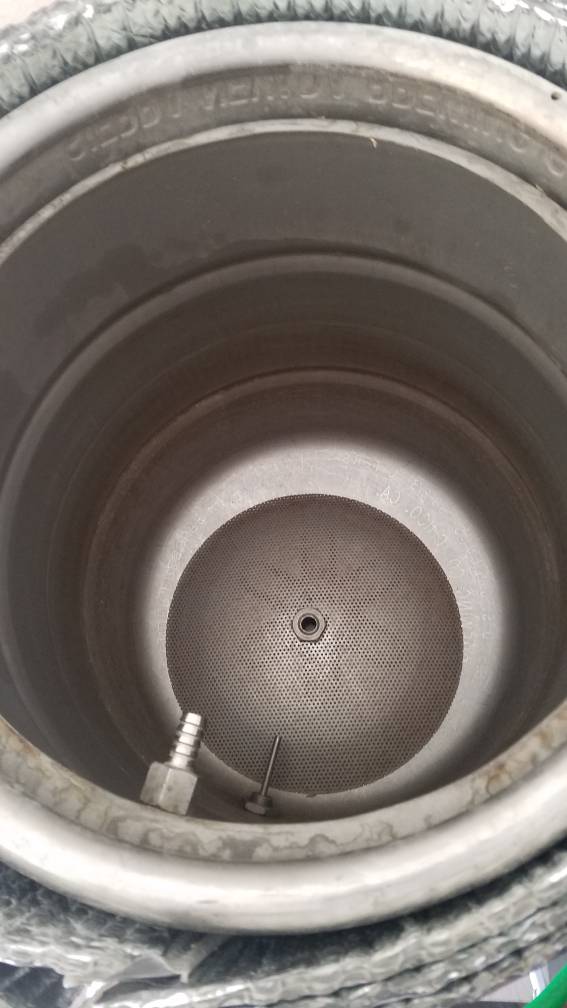
I hear the Pico false bottom (https://www.homebrewing.org/PICO-KegKeggle-False-Bottom-Assembly_p_1010.html) is one of the highest flowing false bottoms you can buy. I really like the design of it, but it sounds like it creates ~3 gallons of volume under the false bottom. I mash in at 1.75qt/lb because I like a thin mash. Most batches are about 5-6 gallons of mash water, so at least half of the water would be under the false bottom. I feel like this could be a bad thing...

If I do go with a Pico FB, I'd probably solder a 1.5" TC ferrule on the bottom to minimize the need for a pickup tube and kill any possible dead space. I'll build detachable elbow with a ball valve to control the flow leaving the MT.

Currently, I have my MT temp probe on the recirculation input bulkhead. It sounds like probe placement is clearly preferential and if you ask 3 brewers, they'll probably give you 3 different answers. If I'm designing a new MT, I think I might add a bulkhead a few inches above the false bottom, so I can add an RTD probe to measure MT temps within the vessel.

As for the recirculation input port, I'm currently using a locline arm (https://www.amazon.com/gp/product/B006R9OFGS/ref=ppx_yo_dt_b_search_asin_title?ie=UTF8&psc=1) with my cooler mash tun. It works well, so I'll probably continue to use that. I am tempted to consider a Blichmann AutoSparge because then I'd really be "hands off".

Any thoughts? Especially on the false bottom and AutoSparge? These are probably the most important decisions I need to make.

Or, should I keep rocking the cooler as long as I can because ultimately it's performing like a champ?
 
So you have no plans to make larger batches and your current system works fine? The only real problems you describe are the esthetics. Plastic coolers are going to show some wear and tear; discoloration and scratches are normal. If the look truly bothers you then go all stainless.
 
Have you considered a bottom drain by using the sanke top as the bottom? There are 2 inch triclamp set ups for this. This will leave zero dead space.
I have, but then there's the challenge of cutting a perfect circle hole without anything to mount the cutting jig too.
 
I have, but then there's the challenge of cutting a perfect circle hole without anything to mount the cutting jig too.

Dimple with an automatic center punch (one of my favorite tools), then bimetal hole saw with pilot drill. No problem.

But really, if you're going to stick with 5g batches, a round (Gott) cooler is pretty sweet.
 
Dimple with an automatic center punch (one of my favorite tools), then bimetal hole saw with pilot drill. No problem.

But really, if you're going to stick with 5g batches, a round (Gott) cooler is pretty sweet.
I think we're talking about two different things. I built a jig that mounts in the sanke hole that allows me to cut a perfect circle for the opening. If I use that end for the bottom, then cutting a nice hole for the opening on the other end would be way harder.

I may just stick with the cooler (at least for now). It's hard to argue with the efficiency I've been getting.

Woops, I see. You need to cut the 10" - 12" opening, but on the bottom of the keg.

Many people have just handheld an angle grinder around the rim of the keg and gotten a fairly symmetric hole. You could also drill a hole in the middle, use a bolt and string to that hole and tie the other end of the string to an angle grinder. I don't see that working too great, but it might.

I started a thread a zillion years ago related to this topic. Maybe you can find something useful there.

Simplest (?) Keggle Cutting Jig
Well look at that... I built that exact jig from the thread you linked. :) I've cut two perfect holes off of Sanke kegs with that jig.

I've used enough angle grinders to know that without a solid jig...I'm going to get a horrible hole that I'm not going to be happy with. I'd rather settle for a perfect hole on top, and then solder a TC ferrule at the bottom.

Haha! I cut my first keggle handholding an angle grinder. About 1/360th the way around the circle, the cutting disk dug in and shattered, whizzing by my head. I knew there had to be a better way. I opened up my plumbing (PVC) bin and, in about 15 minutes, fashioned the jig that is in the first post of that thread. Glad it worked for you.
 
I have, but then there's the challenge of cutting a perfect circle hole without anything to mount the cutting jig too.

If the hole you are cutting is the big one in the top, use the rim of keg to guide right angle grinder with cutoff wheel.

Link is a HLT I made similar to MT, but w MT cut the hole bigger by cutting close to rim. Get new cut off wheel, and not the thinnest type, they will shatter, and work it around slow and steady.

https://www.homebrewtalk.com/forum/threads/just-made-keg-based-hlt-with-electric-option.652823/
 
If it ain't broke...
I have a ten gallon Gatorade cooler that has seen over 100 all grain batches. It looks a bit scruffy and will need a new braid after 6-7 years but that is small potatoes! I must concur with RPh_Guy...

Technically mine IS broke and will need fixing.
 
My mash tun is a Rubbermaid 10 gallon round drink cooler. 7 1/2 years old. 100 batches. Orange so you can guess where it came from. It is scratched, it is stained. I used a 3/4" water heater supply line. It is about 12 inches long with the ends cut off. I closed one end with nylon nut and bolt. The other end is hose clamped on the outside of the part that holds the valve in place. It is the original and works great. (batch sparging)
 
I have a bottom drain Keggle MLT with the pico FB and an autosparge.

I drilled a small hole in the center of the bottom. I then rigged up a jig that had a nail inserted in the hole to cut out the top (bottom). This is very similar to the many jigs that used a hole saw or similar inserted in the sanke tap but I replace the hole saw with a nail.

For the FB I was also concerned with the amount of dead space. I ended up cutting the supports and contouring them to better fit the interior of the keg. I have .75 to .8 gal of dead space now.

I think the autosparge is worth it. With it you only have to worry about setting the flow on one ball valve and the flowrates don't have to match. It allows almost hands off sparging. This has been one of my better upgrades.
 
I have, but then there's the challenge of cutting a perfect circle hole without anything to mount the cutting jig too.

Easy, drill a hole in the center of the bottom. From there the choice is yours, you could make a jig to work with the center hole, or make a ring line using a string pen and drill bit. I ended up using a sharpy and a string to mark the line I needed to cut and free hand cut the hole with an angle grinder, and cleaned the edges up with a flapper sanding disc. I have a 3v EHERMS and all three are bottom drain.

I use a brewcraft or similar domed fb, and this allows me to really dial in my water volume figures to let every last drop make it to the bk.
 
Technically there is ZERO deadspace in a bottom draining mash tun. I dont think there is a long standing term for space under a false bottom that is not dead space so ive been calling it slack space. In a recirc system, it is still actively part of the mash but it will create a seemingly thicker mash on top.
 
Bobby you are correct. My issue with it is just what you stated along with limiting the amount of sparge water with a fly sparge.
 
I have used the same 10 gallon cooler for 10 years, and I love it. I think they work great, and you should try some pbw on the discoloration if it bothers you. +1 for only fixing it if it makes you happy. Sounds like what you have is very functional.

20190709_085939.jpeg
20190709_090031.jpeg
 
When migrating your recipes from the cooler to the new mash tun you will want to initially add the volume of the liquid under your false bottom to your strike water volume and subtract that amount from your sparge water volume. This might lead to a small loss of efficiency but I expect other features of the new mash tun will make up some of that loss - those mainly being better recirculation rates with less channeling.

With experience you will probably find you can mash somewhat thicker and return some of that liquor to the sparge, regaining the original sparge efficiency while retaining the improvements from the false bottom.

I'm not sure you need that Pico FB. Seems the primary benefit it to get your false bottom pretty far away from your keggle bottom so you can do direct fire mash heating. But you have a HERMS so I guess you don't plan on putting flame on your mash tun. I'd get a FB from @Jaybird at Norcal, probably with the level 1 stand. I think that give you plenty of flow and probably reduce the amount of mash liquor under your false bottom.
 
Bottom drain through the bung (keg is flipped upside down), then you can get the FB down as low as you can.
 
Well look at that... I built that exact jig from the thread you linked. :) I've cut two perfect holes off of Sanke kegs with that jig.

I've used enough angle grinders to know that without a solid jig...I'm going to get a horrible hole that I'm not going to be happy with. I'd rather settle for a perfect hole on top, and then solder a TC ferrule at the bottom.

There a million of ways to cut a nice circle in a keg. You could build a jig that travels along the bottom "rim" of the keg. If you have doubts about your ability, no matter what method you chose, make the hole small and finish it off to a perfect circle by grinding to a line scribed onto the keg.

You can also buy this and then find someone with a plasma cutter or buy a cheap one for yourself.

https://www.eastwood.com/eastwood-p...sMkTN_eaFnaAM2lLhQcwCtEOgqnI68wwaAryWEALw_wcB
 
If you have an angle grinder, get a sanding flapper disc. Free hand the cut and clean it up with the flapper.

Here is my bottom drain 3 v 3 tier eherms.
20190717_110649.jpeg
20190717_110640.jpeg
20190717_110633.jpeg
 
Nice job on the keg!, but man I wouldn't trust those shelves with a full keggle of boiling liquid - the "locking mechanism" just doesn't seem suitable. I guess it works for you, so maybe I'm being too nervous.

Found this on Amazon:
  • One single shelf holds up to 350 pounds and the whole shelving holds up to 1400 pounds max (evenly distributed)
It seems he is safe. But I have not seen how those "locking mechanisms" work.
 
Found this on Amazon:
  • One single shelf holds up to 350 pounds and the whole shelving holds up to 1400 pounds max (evenly distributed)
It seems he is safe. But I have not seen how those "locking mechanisms" work.

I have a couple of these in my garage. There is a plastic sleeve that gets compressed and holds onto little grooves in the vertical metal post. The plastic sleeve has its own matching ridge inside it. You can see the bottom of the plastic sleeve and one of the many grooves in pic below.

I do keep some fairly heavy stuff on them - they have never failed. I'd be careful with 15 gallons of boiling liquid. Mine are pitted with rust out there. It's florida, so that's expected. In a basement they'd last forever I'd think.

upload_2019-7-22_12-22-36.png
 
True about rust in Florida. I have the plastic coated wire shelving. I see rust staining the plastic. It also seems the heat turns the plastic coating back into oil. They are sticky to the touch.

I too would be concerned about ~ 150 lbs of boiling liquid.....
 
True about rust in Florida. I have the plastic coated wire shelving. I see rust staining the plastic. It also seems the heat turns the plastic coating back into oil. They are sticky to the touch.

I too would be concerned about ~ 150 lbs of boiling liquid.....

When (if) I build a stand, I'll do it with unistrut. It's available in SS and powdercoated, but I'll probably just go with cheap steel and spray with rustoleum.
 
I have been using this shelving for almost 2 years now. Right now each keg sits on it's own shelf.

The hlt was the scariest one to test out, as it is full to the top and has the most steel parts inside. She sits up top, which is actually about eye level to me. Full the hlt weighs and estimated 200 lbs at most.

The heat doesn't transfer from the kegs to the rack at all in any of the brews i have done on it, even when boiling.
 
Be prepared that if you switch, you may not get what you expect the 1st or 2nd time out. It will be a slight learning curve.

This is what I did when I felt like I was in the spot you're in now:
https://www.homebrewtalk.com/forum/threads/low-profile-bottom-drain-mash-tun.622069/

This way I didn't have to cut a hole in my table top. Took me a while to dial it as good/better than my cooler but I eventually got there.
The beer doesn't taste any better than before. Just a different way to get there........
043-68021.jpg
 
Back
Top