D0ug
Well-Known Member
I don't know if anyone has posted a variant of this idea here yet, so apologies for repeating something if I have. I'm assuming (I know, I know..) that most bottling bucket spigots are set up like mine.
So, if you have an air bubble trapped between your dip tube and spigot one thing you can try is purging that air.
After you fill your bottling bucket with beer, but while the bottling cane still has sanitizer in it (it will work with beer too, but who wants to waste that?),
rotate the spigot 180* so the whole assembly is pointing up.
Making sure the spigot is fully open depress the button valve on the bottom (now temporarily the top) of the bottling cane.
The sanitizer now flows up through the cane and draws the air bubble out from behind the spigot and allows it to flow out the end of the cane. By the time the beer gets into the cane the bubble should be gone.
Once the air is purged, I release the valve, close the spigot, and rotate the assembly back into position. A couple of shots of Starsan on the end of the bottling cane and your good to go, no air and beer ready to hit the bottles.
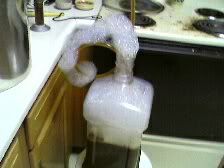
You can wait for the air to rise on its own and spill less fluid, but I work in my basement with a concrete floor and a floor drain, so I don't worry about spills to much.")
The key is to rotate the spigot so it points up, leaving the outlet from the spigot higher than the air pocket and giving it some place to go, then opening the spigot up to let it escape, then closing everything up once it is primed so air can't get back in.
Try it, change it, laugh at it, but it's working for me.
So, if you have an air bubble trapped between your dip tube and spigot one thing you can try is purging that air.
After you fill your bottling bucket with beer, but while the bottling cane still has sanitizer in it (it will work with beer too, but who wants to waste that?),
rotate the spigot 180* so the whole assembly is pointing up.
Making sure the spigot is fully open depress the button valve on the bottom (now temporarily the top) of the bottling cane.
The sanitizer now flows up through the cane and draws the air bubble out from behind the spigot and allows it to flow out the end of the cane. By the time the beer gets into the cane the bubble should be gone.
Once the air is purged, I release the valve, close the spigot, and rotate the assembly back into position. A couple of shots of Starsan on the end of the bottling cane and your good to go, no air and beer ready to hit the bottles.
You can wait for the air to rise on its own and spill less fluid, but I work in my basement with a concrete floor and a floor drain, so I don't worry about spills to much.
The key is to rotate the spigot so it points up, leaving the outlet from the spigot higher than the air pocket and giving it some place to go, then opening the spigot up to let it escape, then closing everything up once it is primed so air can't get back in.
Try it, change it, laugh at it, but it's working for me.