Blichmann BrewEasy

Homebrew Talk - Beer, Wine, Mead, & Cider Brewing Discussion Forum

Help Support Homebrew Talk - Beer, Wine, Mead, & Cider Brewing Discussion Forum:

This site may earn a commission from merchant affiliate links, including eBay, Amazon, and others.
I'm also considering having one of the batches be a 5 gallon batch to see how that goes on the 10 gallon system. If not, I'll certainly be doing a 5 gallon batch soon so I'll keep you posted.
This is where I am very curious. I do 5 and sometimes 10 gallon batches so I'd opt for the 10 gallon system IF it would work well for my more common 5 gallon batch size
 
Worst case scenario, just use the mash tun like a normal 5 gallon batch without the recirculation, or recirculate from/to the mash tun until mash out time.
 
Where is everybody putting the temp probe for the tower of power in this setup? In mash tun or in the path of the recirculation?
 
Thanks for all the info everyone!

Seriously considering pulling the trigger on one of these... Right now I am torn between getting the gas or electric (240) version in the 20 gallon size...

I'm going to be converting my downstairs basement kitchen to a dedicated brewery and this looks like the perfect setup!

One main question I have is for those using the 240v electric - how long does it take to get the wort to a boil and is it a strong, rumbling boil? Or just a simmer?

I have the blichmann burner and I am considering buying everything else to piece this beauty together but going in-doors for good makes me nervous about the open flame...

If anyone has any stats for boil time using natural gas vs the 240 boil coil please post!
 
240v version definitely produces a vigorous boil easily. I haven't timed anything, but coming from the Blichmann burner I have been pleased. If others don't have stats for you, I can plan on timing things during my next brew.
 
240v version definitely produces a vigorous boil easily. I haven't timed anything, but coming from the Blichmann burner I have been pleased. If others don't have stats for you, I can plan on timing things during my next brew.

Wow excellent, glad to hear that... yes, if you don't mind would love to hear some stats... any issues cleaning the coil itself?

I really do not want to retire my blichmann gas burner... I LOVE that thing but at the same time... My kitchen will require ZERO construction if I move to electric... already have the 240 installed too!


If you clean up right after the boil, they're pretty easy to clean. That's the trick with any brewery cleaning. Don't wait.
 
Had my first brew day on my new 10 Gallon electric! So much info to share but I'm drunk and tired! :D More info and detail to come tomorrow...
 
Had my first brew day on my new 10 Gallon electric! So much info to share but I'm drunk and tired! :D More info and detail to come tomorrow...

Haha looking forward to it! Love hearing everyone's feedback this is getting me so excited for the purchase!!
 
Had my first brew day on my new 10 Gallon electric! So much info to share but I'm drunk and tired! :D More info and detail to come tomorrow...

Haha looking forward to it! Love hearing everyone's feedback this is getting me so excited for the purchase!!
 
BAH! Blichmann shipped me a G2 kit instead of a G1, with a G1 mash tun on the same order. Sent an email to AIH to hopefully get it resolved soon.
Dammit, apparently Blichmann doesn't know what's in their kits. They shipped me the "difference" including only two 1/2' MPT-MPT connectors and the proper drain tube. I'm not sure how they missed the 90 degree elbow that's required. Guess I'm not trying it out this weekend like I planned. I can just buy the damn thing but when you spend $1300 to for a premium setup (I already had the boil kettle) you expect all the correct parts.
 
I'm about one click away from ordering the electric 5 gal turn key.
I see by reading the posts here that the weak link is getting the mash temp correct when using the tower of power.
I might be way off here but I see that the temp probe is mounted down by the pump after the boil kettle. The wort is then pumped back up to the turn losing degrees by the time the heated water is recirculated back to the middle of the mash.
I think if the temp probe were placed into the middle of the mash a more accurate measurement would be achieved. The pid would just continue to heat as needed until your exact mash temp is achieved.
I'm going to test this theory no mater what but I need some advice.
First I like an idea on how to mount the temp probe into the mash turn in such a way to quickly remove it when the turn is lifted off before the boil.
Can additional probes be purchased? I want to continue using the original probe and connect them to the pid using a selector switch.
How does the probe connect to the controller anyway?
I know the current location of the temp probe is pretty close to the mash but being a aircraft electronic guru the exact placement of any kind of probe can make a huge difference in data.
For example. The oil temp probe on the aircraft engine can have a different reading of as much as 45 deg when placed in the oil pan as opposed to up top by the cam shaft. It is still a closed system and the oil flows around a lot quicker than in the easy brew but it still has a large variable in temps. We need accurate readings to make sure that the oil temps at some point in the system achieves at least 175 deg to flash off any condensation.
Same logic should apply here.
I think with a little fine tuning this two pot system could be great.
Discussions?
 
Jeff, the issue with putting the control probe in the mash is thermal mass by the time the bulk of the grain bed is up to temperature the wort in the kettle could be close to the boil!

IMHO the control probe should be in the kettle, all the tubing and the mash tun insulated. On my recirculating biab I can get the temperature difference between the wort return to <1°C it may be less but I'm limited in my measurements by my thermometers.

In addition if the pump fails and the probe is in the kettle your protected against boiling.

Aamcle
 
The first thing you can do is download the instructions, they will give you info on what the connectors look like.

I had the same question about temperature. I may add a hole in the low/middle part of the mash tun to add the probe. I think what some people are doing is adding 3-4 degrees to offset the temp losses in the tubing. I'm sure it works, but I'm sure you have to compensate for ambient air temps too.
 
Jeff, the issue with putting the control probe in the mash is thermal mass by the time the bulk of the grain bed is up to temperature the wort in the kettle could be close to the boil!

IMHO the control probe should be in the kettle, all the tubing and the mash tun insulated. On my recirculating biab I can get the temperature difference between the wort return to <1°C it may be less but I'm limited in my measurements by my thermometers.

In addition if the pump fails and the probe is in the kettle your protected against boiling.

Aamcle

Those are both good point. I can't calculate the thermal mass scenario you suggested as our grain bill could be different with each brew. I would assume one would try to achieve the highest recirculating rate without sticking the mash.
Can't the power to the coils be adjusted? I thought I read that the control on top of the controller does this.

Runaway heating... Did not think about that. But as the system is stock, if the pump fails the probe does not see the temp in the cook tank anyway and the heat will continue.
 
I contacted Blichmann and asked but I can't find their reply, flow rate is another issue I agree the faster the better.

There is a scenario that could go very badly, a stuck mash the float valve would close as the level in the MT rose. When the flow stops the stock temperature probe will cool and there's your heater run away.

I'm considering building something like BE, I had a Brutus20 and liked it, but after some thought I'm inclined to a Grainfather constant head arrangement.

Atb. Aamcle
 
I looked at the online Manuel for the controller. Not much info for the supplied temp sensor. I can't tell if it is a threaded probe or if it has an attached cable that just plugs in. Can someone enlighten me?
 
I looked at the online Manuel for the controller. Not much info for the supplied temp sensor. I can't tell if it is a threaded probe or if it has an attached cable that just plugs in. Can someone enlighten me?


It's a threaded probe and a 4 pin cable that disconnects on both sides for the temp probe. Then there's a single wire for the igniter for the gas setup.
 
Some are saying just bump the temp up to compensate for traveled loss and some are leaning towards probe relocation... Does anyone out there have any real data yet? Modifying a brand new "turnkey" system rubs me the wrong way yet I completely agree that a temp reading after the mash out valve seems much more accurate than after the kettle/pump... I feel we are very close to finding a solid setup. Keep um coming!! :rockin:
 
Maybe the temperature probe should be located at the connection for the autosparge? This way the temperature of the wort entering the mash tun is monitored and kept in range?
 
Some are saying just bump the temp up to compensate for traveled loss and some are leaning towards probe relocation... Does anyone out there have any real data yet? Modifying a brand new "turnkey" system rubs me the wrong way yet I completely agree that a temp reading after the mash out valve seems much more accurate than after the kettle/pump... I feel we are very close to finding a solid setup. Keep um coming!! :rockin:
From the manual:
Important!
Do not install the sensor directly into a mash tun!
The grain greatly impedes the convection and transfer of heat.
It is VITAL to the performance of the product that the sensor be
installed so that it is measuring the temperature of the wort
returning to the top of the mash bed. Installing the sensor
directly into the mash tun will cause severe overshooting,
oscillation, scorched wort, and possibly equipment damage!

 
Nooo if the flow rate falls because the float valve closes the probe would cool and the wort in the kettle be heated.
Because the flow through that line can change and even stop its not a good place for the temperature probe.


Aamcle
 
Nooo if the flow rate falls because the float valve closes the probe would cool and the wort in the kettle be heated.
Because the flow through that line can change and even stop its not a good place for the temperature probe.


Aamcle

So if not at the tun outlet and not at the autosparge, then at the exit of the kettle?
 
I'm still putting together my notes and details from two brews (yesterday and the day before 12/31 and 1/1) but in the meantime, here are some pictures. I'm super bummed I didn't take more action shots of the two brew days. I guess I was a bit pre-occupied with the new equipment. :eek:

IMG_4455.JPG


IMG_4470.JPG


IMG_4460.JPG


IMG_4461.JPG


IMG_4462.JPG


IMG_4465.JPG


IMG_4468.JPG


IMG_4463.JPG


More coming soon!
 
Ahh I am also super bummed about the lack of pictures lol but that looks fantastic! I can't wait to have mine set up... ugh Damn you bank account you need to grow faster at a much quicker pace!
 
WARNING: Mega-post ahead!

Alrighty... I did two batches this week. I have a bunch of details about my brew days but I'm still consolidating and trying to figure out my notes. In the meantime, I figured I'd start with a full review of all my new equipment, which is what's below in this post. Later this weekend I'll walk you through the brew days and provided some notes and stats on the BrewEasy. Here we go! :rockin:


I always find it helpful to know a bit about who’s posting a review when I read one, so I figured I’d do that for all of you:
• I’m 34 and started brewing in 2010.
• Started with 3 extract batches in bottles and moved to all grain and kegs after that.
• Used a rectangular cooler that I retrofitted for my mash tun, an 8 gallon boil kettle with thermometer and drain spout/valve, turkey fryer burner, plate chiller, PET carboys, small chest freezer with temp controller for fermentation and also for serving from kegs in-between batches.
• Probably did about 8 batches on the aforementioned equipment.
• Up until this week, I had only brewed 5 gallon batches.
• 3 years ago we sold our condo and moved in with the in-laws to save to buy a bigger place. All my equipment went into storage at that time. Only pulled it all out of storage to brew twice during that time and my last batch was a year ago! So I’m RUSTY!
• After being in the new house for 6 months, most of the major projects on the house are done, so now it’s back to brewing!

--- Vendor ---
• 9/10
• Everything was purchased from Great Fermentations.
• I went with GF because of all the great things I read about them, and I’m very glad I did! They are super responsive and helpful.
• There was a timing issue with some of the other items I ordered at the same time as my BrewEasy. They reached out to me to see what I preferred, which I really appreciated, instead of them just guessing or doing what worked out better for them.


--- Equipment Purchased ---
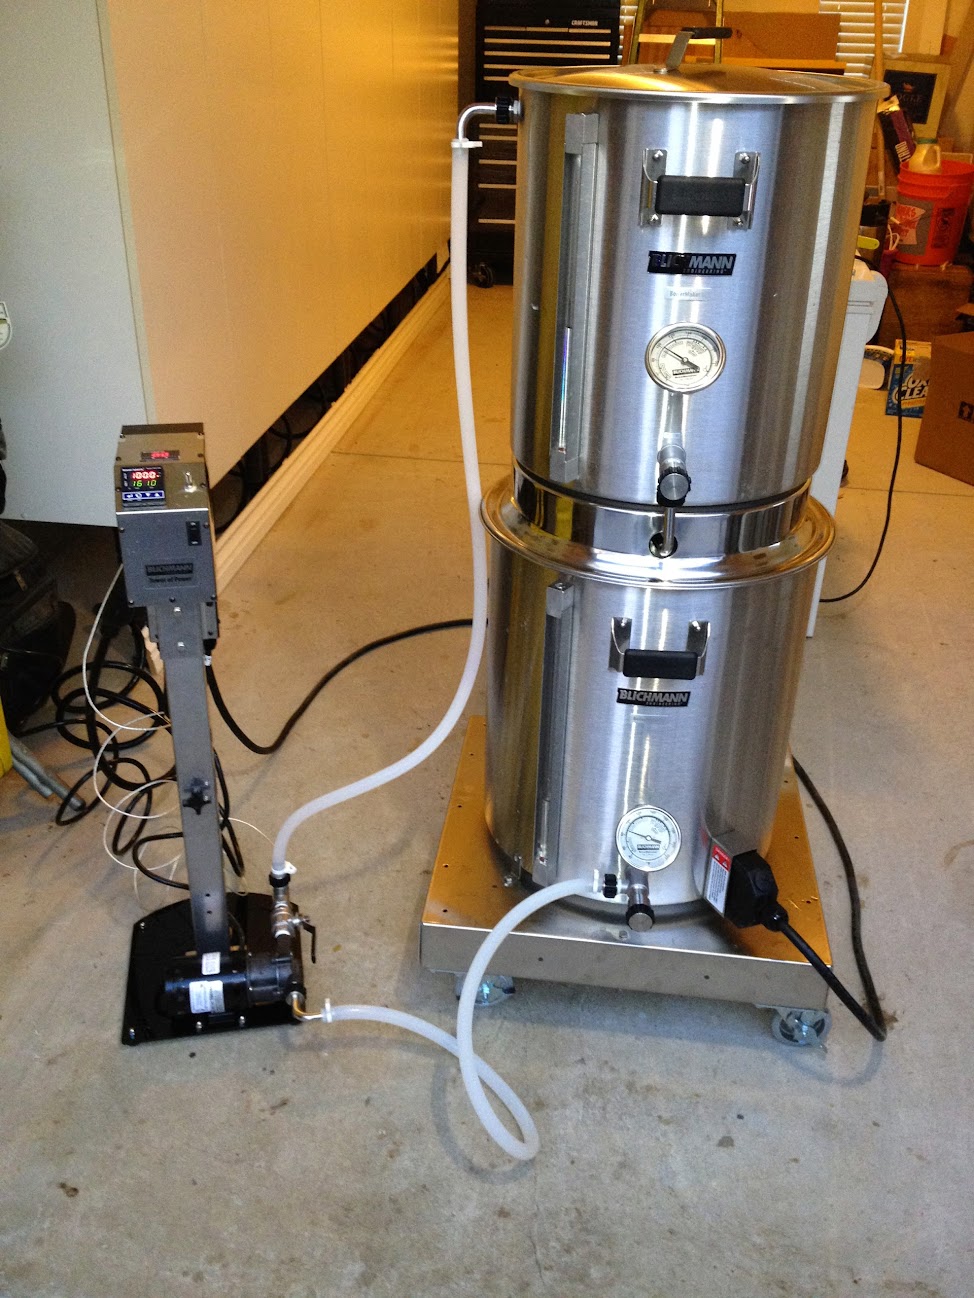
The turnkey system truly is turnkey. No other equipment is needed to start brewing after unboxing and assembling. I was skeptical of this but it’s true! :mug:

• BrewEasy 10 Gallon 240v Electric system (turnkey system)
• 20 gal BoilerMaker G2, pre-drilled for BrewEasy/BoilCoil (part of turnkey system)
• 15 gal BoilerMaker G2, pre-drilled for BrewEasy (part of turnkey system)
• False bottom for 20 gal BoilerMaker (part of turnkey system)
• Blichmann AutoSparge (part of turnkey system)
• Tower of Power LTE (part of turnkey system)
• March 815 pump (part of turnkey system)
• 240v BoilCoil and required cables(part of turnkey system)
• Fittings (all 1/2" Blichmann Quick Connect): 2 90° elbows, 2 straight (part of turnkey system)
• Inline temp sensor and threaded fittings (part of turnkey system)
• Ball valve (part of turnkey system)
• ½ silicon tubing and hose clamps (4) (part of turnkey system)
• SS drain tube with quick connect fitting (part of turnkey system)
• Kettle Kart (NOT part of turnkey system)

--- Instructions and Setup---
• 7/10
• Overall I thought the instructions and documentation were pretty good. I’ve read a lot of negative comments online about Blichmann’s instructions so I probably went into thinking they’d be terrible.
• Just like they say at the top of each instruction set, you really should read ALL of the instructions carefully before starting anything. I missed two things in my eagerness to get going that I thought were missing from the instructions, but found them after going back and reading them more closely. One of them was in bold… :drunk:
• Take a look at the tools lists on the instructions and make sure you have it all before starting. I had to run to Home Depot halfway through installing the BoilCoil to pick up a deep socket. That was annoying but my own fault. I had all other necessary tools. With the turnkey systems, it’s pretty much just monkey and/or socket wrenches that you’re using.
• Again, I recommend reading all of the instructions for each individual part before starting anything, but read the BrewEasy instructions first and things will make more sense.
• I was surprised that I had to wire the pump into the Tower of Power controller. I guess it makes sense why they have to ship them separately and have the consumer put it together. However, it was easy to do and things were labeled well. Tip: Make sure you remember to feed the wires through that damn tightening nut on the outside of the controller so you don’t have to wire it twice! ;)
• The BrewMometers were easy to install. Just make sure you adjust the metal bracket/sleeve that determines which way the dial will bend BEFORE you install it into the kettle. Also, it does take a decent amount of force to turn that damn sleeve. I don’t know why they ship with the dial bending down. Seems like most people would want them to bend up, right? Especially on this system.
• The intake tube and inline valve come pre-installed on the kettles, which is nice. However, if you go with the KettleKart on an electric system, you’ll need to loosen the valve/spigot to turn it to the left at a 45 degree angle, since there’s no room to fit the quick connect and tubing. And make sure you turn it to the LEFT so it’s pointing away from where you’ll be plugging in the BoilCoil chord.
• Installing the LTE stand, controller, pump, ball valve, and temp sensor, and auto sparge, were all pretty straightforward. Just read carefully and look at the pictures for reference and you’ll be fine.
• The BoilCoil was easy to install too, but I did have to run to Home Depot to buy a 7/8” deep well socket and 1/2" ratchet to be able to reach the bolts to tighten inside the plug guard.
• Overall the setup wasn’t too bad, but it definitely took me much longer than I thought it would to put together. Maybe 5 hours from unboxing to finally running test water through it? I was moving pretty slow though and I’m known for not exactly being quick with this kind of stuff.

--- 240v BoilCoil ---
• 9.5/10 (I freakin’ love this thing!)
• No problems at all bringing water or wort up to temp. With the 240v, getting a vigorous boil going is no problem. For both my batches I was running at about 78% power, give or take 5 percentage points depending on what was going on and the volume.
• At one point my mash (second batch) was at 148 (29.5 lbs grain) and it only took 16 minutes to get it up to 154 by setting the controller to 160 (probably could have set the controller higher to heat the mash even faster). On the first batch, I went from ~160 in the boil kettle up to boiling in 20 minutes!
• It makes absolutely no sound. It’s kind of eerie, but was really nice to be able to talk at a normal volume during the boil. My old turkey fryer was like a jet engine.
• I can sometimes have kids and dogs around when I brew, so the lack of an open flame is reassuring. Although one kid got pretty close pretty quick during the boil to look inside. I think a flame and the heat it gives off might be a more effective deterrent.
• I was worried about scorching or burning if anything landed on or got stuck to the coil, but after two batches that did not seem to be an issue at all. This was including whole hop flowers in one of the boils. Didn’t see or smell any signs of burning. Tasting the wort from the gravity readings showed no signs of this either.
• No more having to worry about wind! It was fairly windy for my first batch and it was great not having to try to wrap my burner stand with foil!
• My only gripe is the 240 version has a stupid little metal piece that you put on the backend of the coil to help keep the coils separated (couldn’t find a picture online). Good intentions but horrible execution. It fits on the outside of the coils and can easily get bumped off. As soon as I saw it I thought, “Well… I’m sure I’ll lose that soon”. Sure enough, it’s already MIA. I’m pretty sure I tossed it in the trash with all my post-boil trub, which I’ll be digging through tomorrow morning. Fun. This is the only thing that prevented me from giving it 10/10. Here’s a picture:

http://i.imgur.com/Mgg1zdS.png


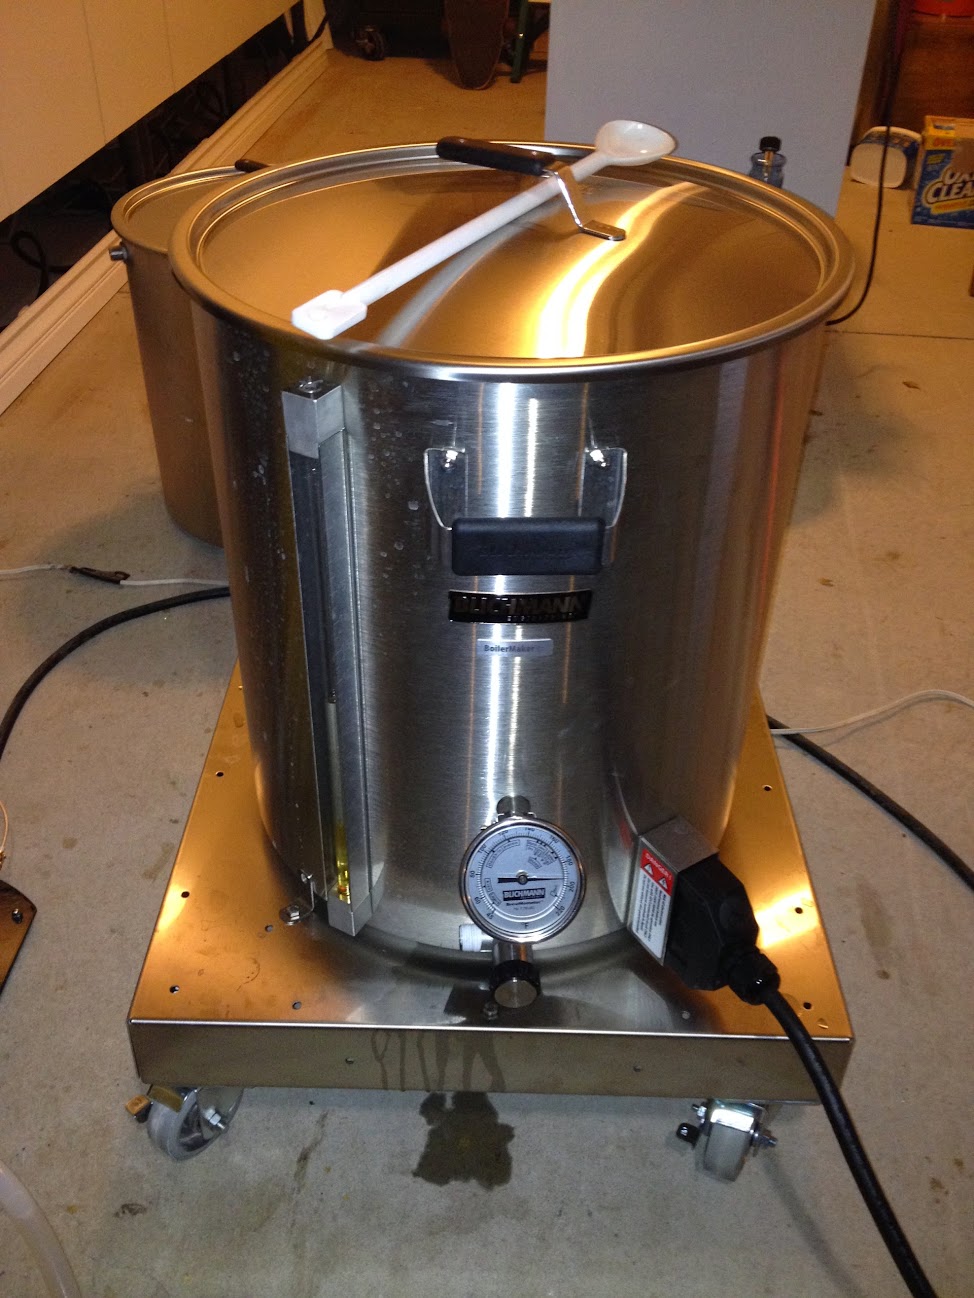
--- G2 BoilerMaker Kettles ---
• 9/10
• Overall the quality seems great. The stainless walls seem well crafted and quite sturdy. No doubt they’ll last a lifetime.
• The lids are nice. They fit really well and are nice and snug. I’ve had lids that can be easily bumped ajar or completely off. These are the opposite of that. I wasn’t sure about the fact that only one side of the handle is attached, but after two brew days I really like the design. Made it easy to grab and move around.
• The glass volume sights are SO helpful. No more guessing or having to do something crazy to figure out your volumes. The metal casings around them seem like they’ll really help to keep the glass safe. The numbers are hard to see since they’re only etched into the metal. I’ll probably try taking a Sharpie to them or something.
• The side handles are my biggest gripe. The underlying stainless seems fantastic, but then they covered them with two-piece hard plastic that looks glued together. I guess time will tell, but they look like they could crack within the first year. I could be wrong though. We’ll see.
• I love the linear flow valves. They’re awesome. So easy to control and I don’t miss that annoying handle sticking out at all.
• The intake tube inside the kettle does a great job picking up the wort, and I like how you can rotate it up or down, if needed.
• The BrewMometers seem great so far. Easy to see, especially with being able to tilt them. I still need to test them against other thermometers though (shame on me). Probably should have done that before two batches.
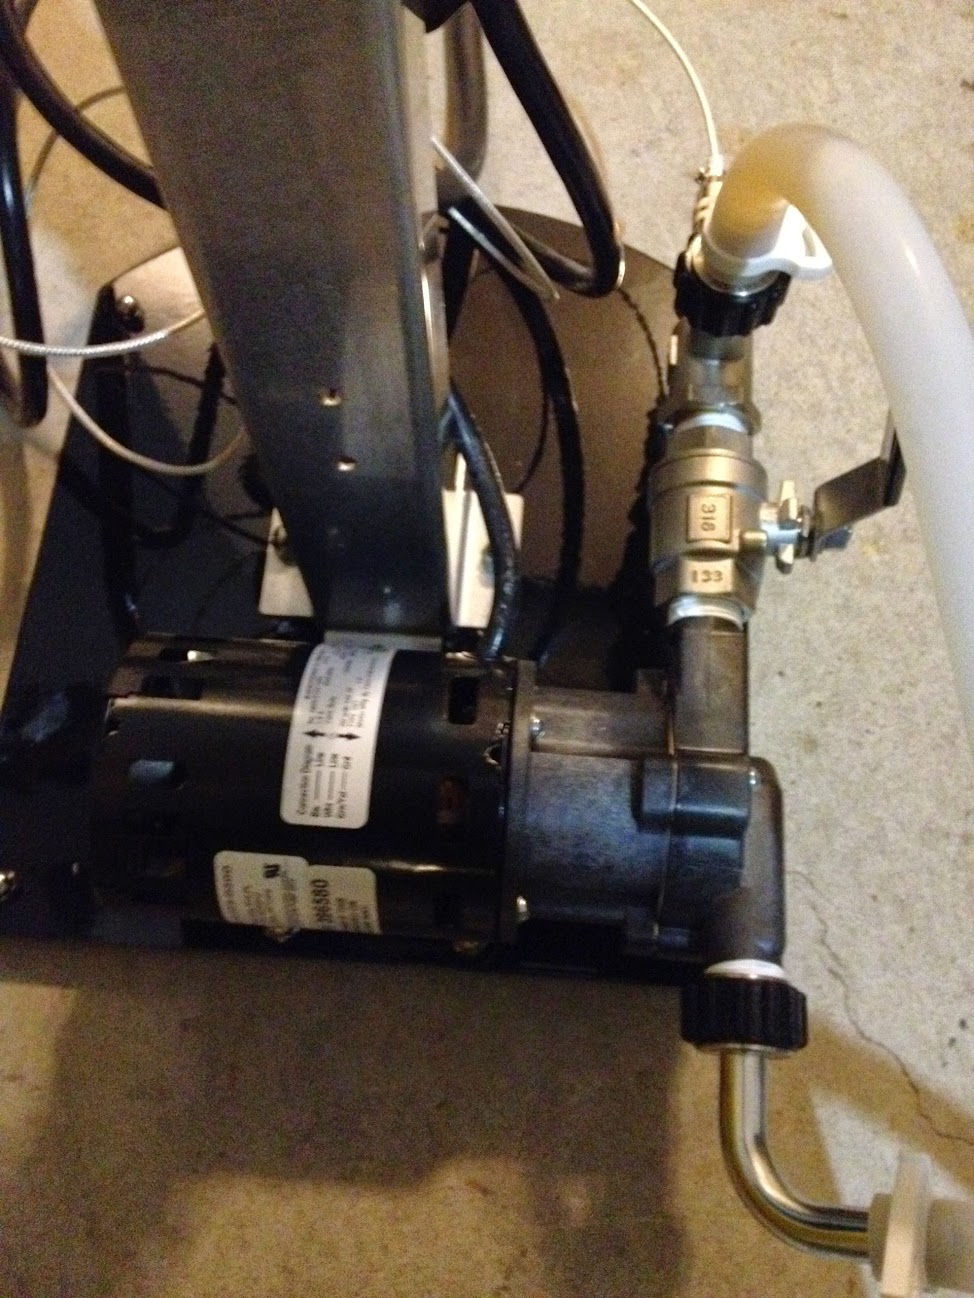
 :drunk:

--- March 815 Pump ---
• 7.5/10
• Seems to work well so far. I do wish it came with a steel head instead of plastic though. It was kind of tough to get the quick connect on the intake side. I was afraid I was going to cross-thread because of how much pressure it took to get it on all the way.
• It has a bit of volume to it but not bad. I don’t have much experience with pumps though but so I’m not sure how it compares.
• It moves liquid quite quickly once it gets going but getting it started can take a while sometimes.
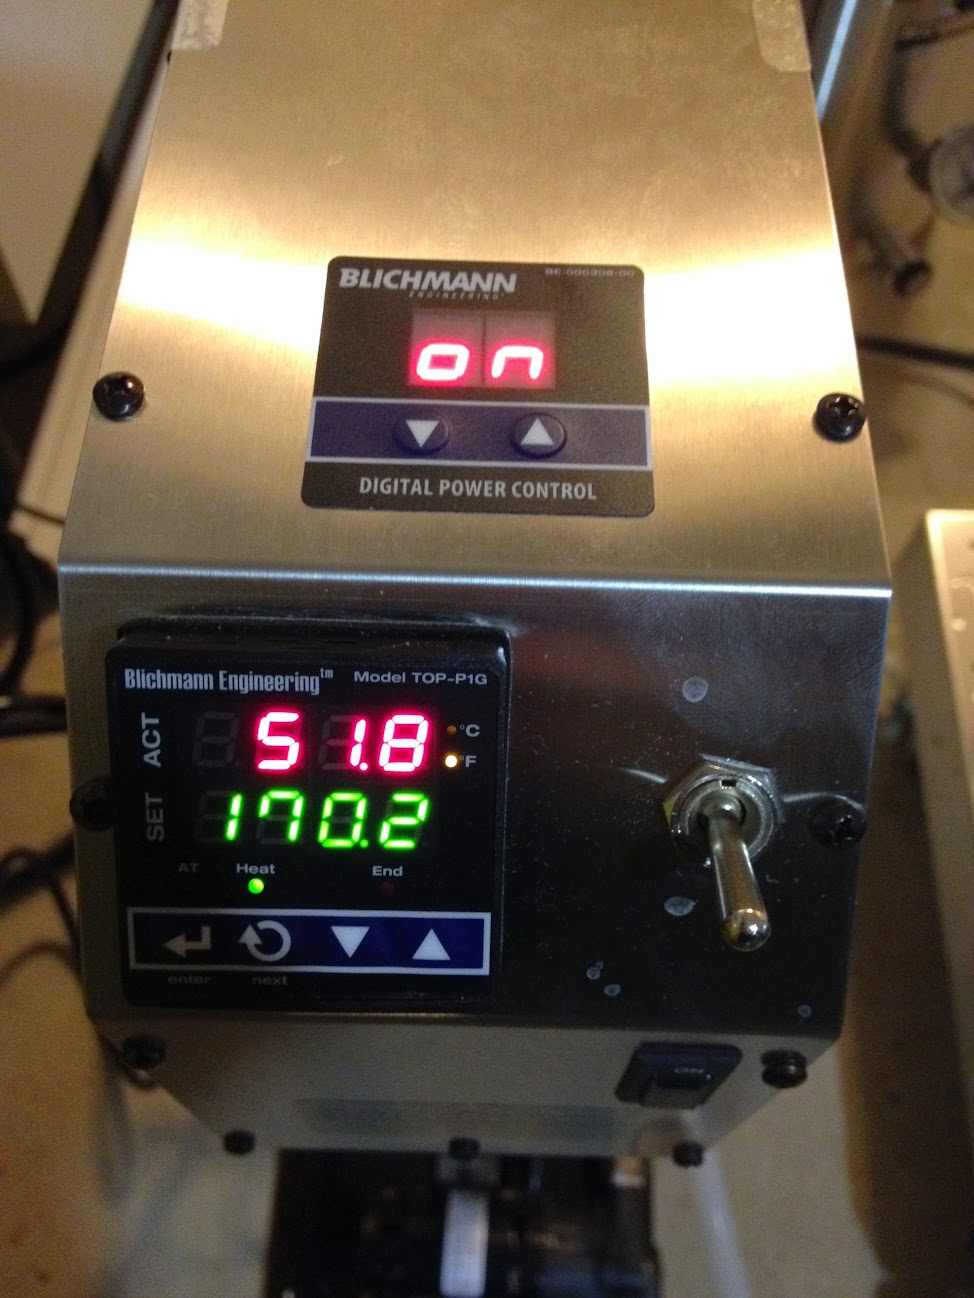
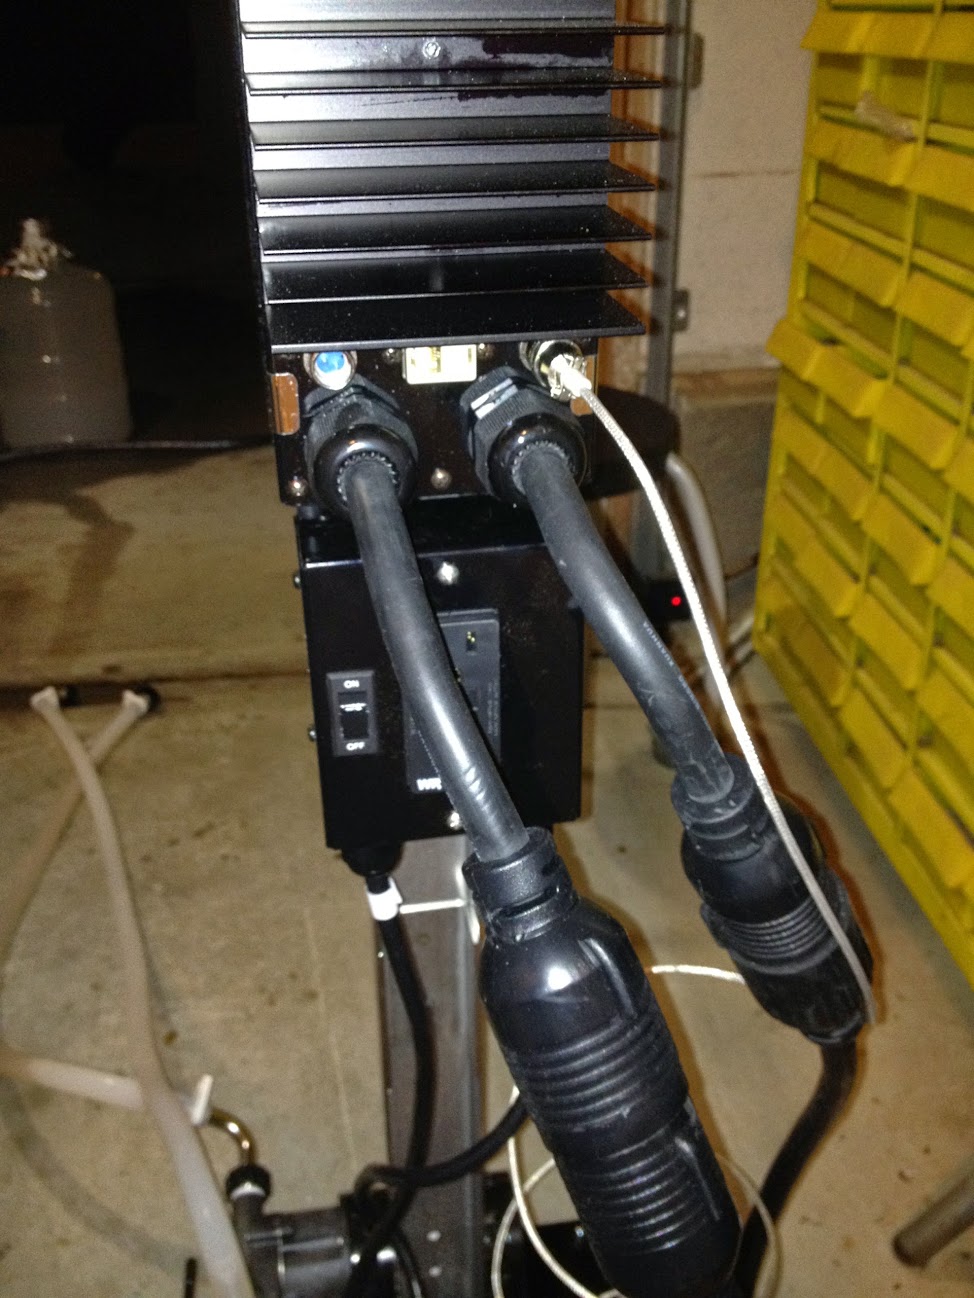
--- Tower of Power ---
• 9/10
• Pretty slick. I haven’t owned a piece of equipment like it before, so maybe I’m easily impressed, but it’s pretty cool.
• Easy to use design. I like the On/Off/Auto settings (continuous heat/no heat/automated heat regulation base on the set temp).
• I was VERY impressed with how well it works in conjunction with the BoilCoil. It does an incredible job in terms of retaining the temperature you set. It’s a great combination (Tower of Power and BoilCoil). It seemed to keep the inline temp sensor very consistently within .2 degrees of the set temperature. I don’t know that I ever saw it go beyond .2 from the set temp (maybe .3 when I wasn’t looking?).
• The power percentage on the top (percentage of power going into the BoilCoil, 0 being off and 100 being full power) was so easy to work with to control the boil.
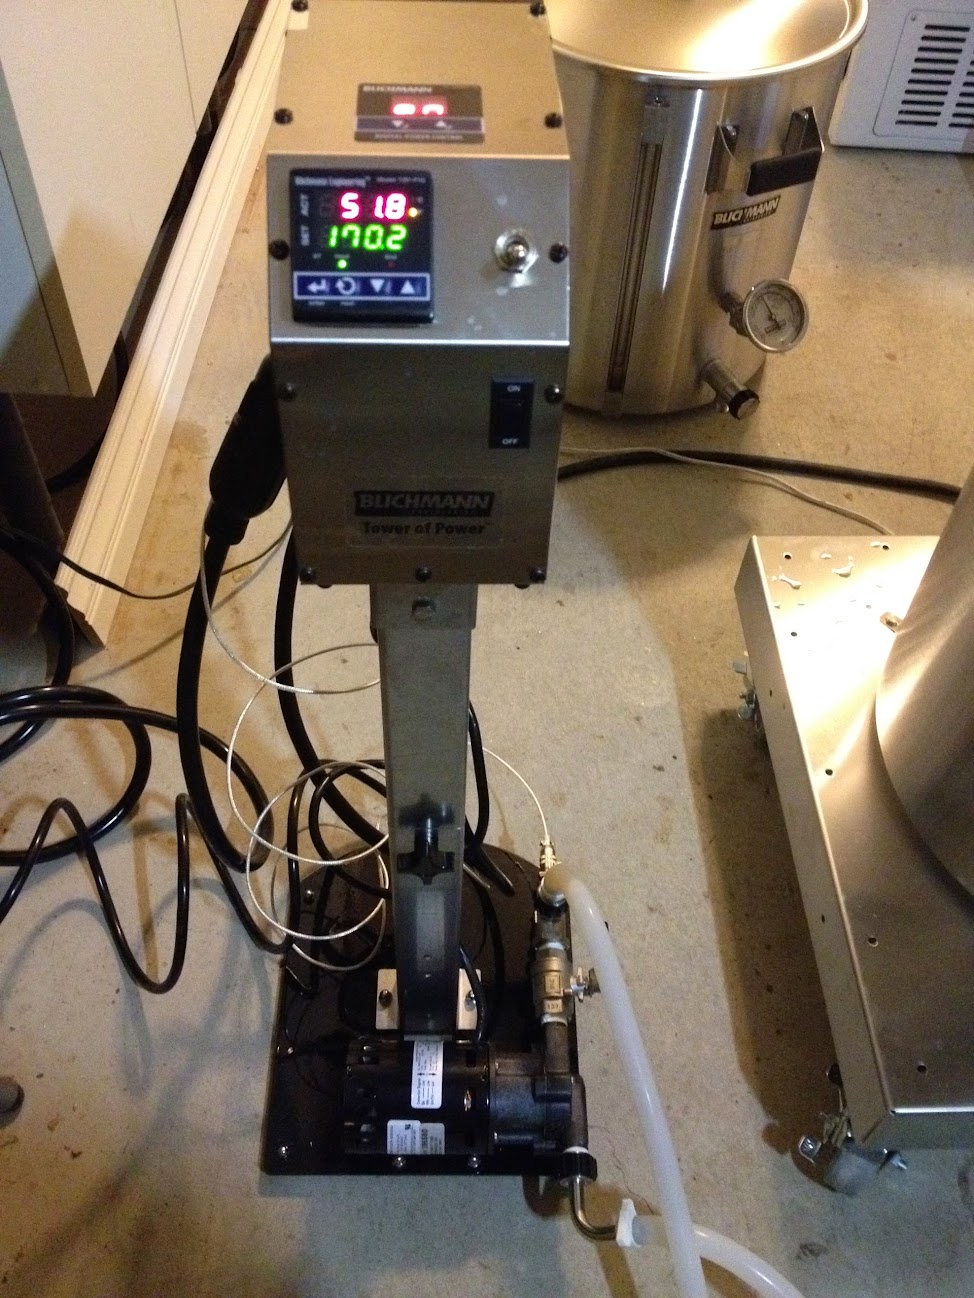
--- LTE Stand ---
• 9/10
• I actually wish I would have gotten the full stand (oversight during ordering) but now that it’s up and I’m using it, I’m quite happy.
• I have it configured for full-height and the height works well for me. No need to stoop down. I can’t comment on the compact configuration though. I’m sure I’ll just keep it full-height since storage isn’t an issue for me.
• It’s pretty sturdy but still easy to move around.
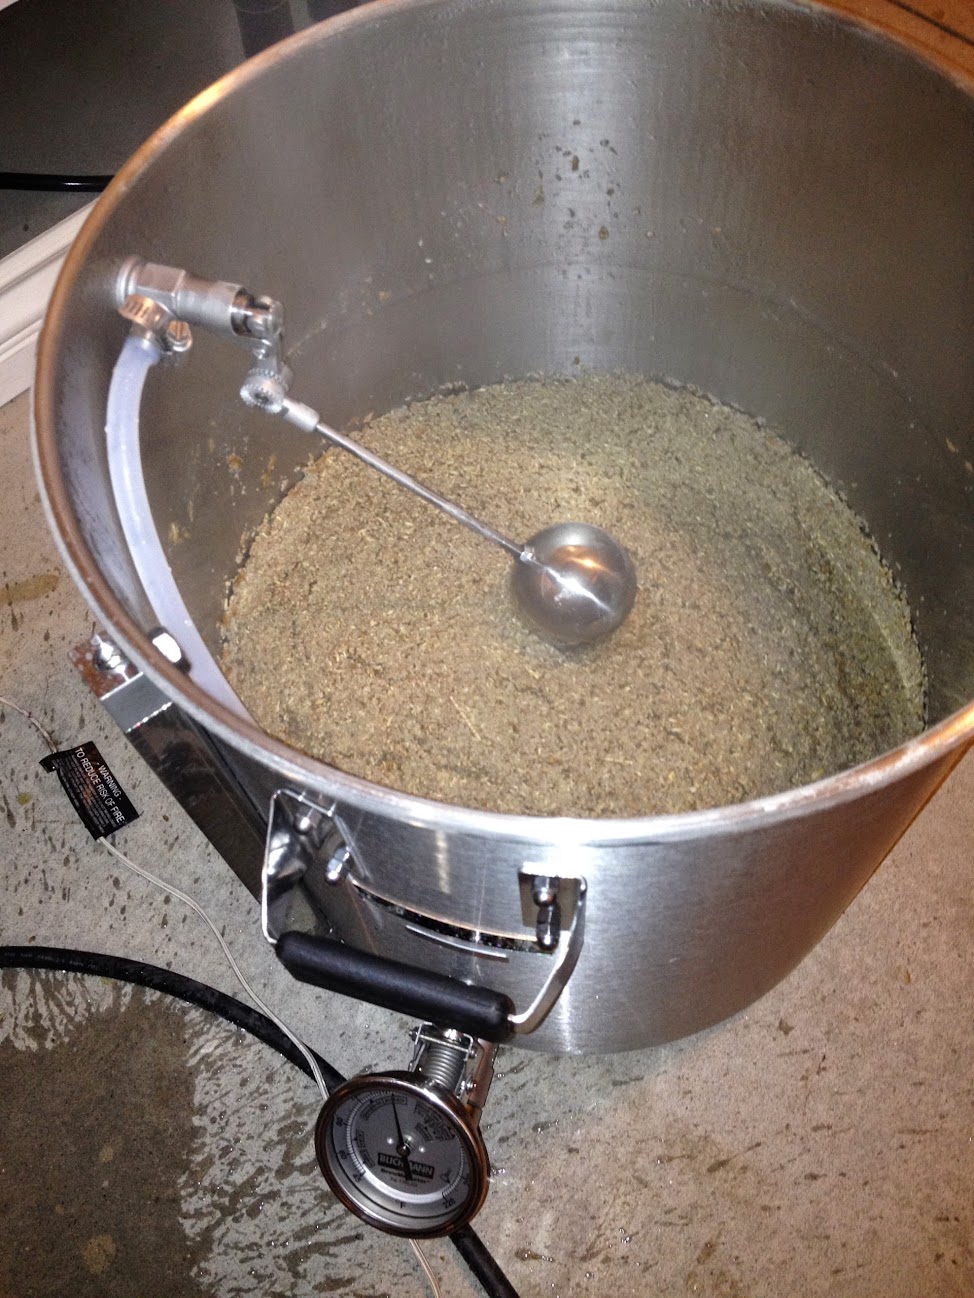
--- AutoSparge ---
• 7/10
• Not super impressed with this piece but it works.
• It definitely works but it still feels a bit clunky and rudimentary, especially for a Blichmann product.
• I think it’s actually by design but a decent amount of water flows out the back of the valve. Not a problem exactly but just kind of weird.
• I was disappointed to see that the small float on the tubing (not the large float attached to the valve) was made of somewhat thin plastic. I’m fairly certainly I’ll crack that thing by accident at some point.
• Seems like too much guesswork to try to get the float at the right level. And then if you get it wrong, you have to contend with 145+ degree water trickling onto your hands as you try to adjust it.
• All said and done, it gets the job done and except for the little plastic float, I’ll probably never have to replace it.

--- KettleCart ---
• 9/10
• Super helpful! Very glad I bought it.
• Easy enough to put together, except I with they’d mark the holes for the brackets that hold the kettle. Would be nice to know which holes to use for a given boilermaker size. Would have saved me some time.
• Was able to easily wheel it around with 18.5 gallons between the two kettles and 30 pounds of grain in the mash tun. The ability to lock the wheels was helpful when moving it to my driveway, which has a slight gradient. Was easy to clean after a boil over.

--- QuickConnectors ---
• 10/10
• No cons whatsoever so far! Super easy to use and very effective.
• Putting them on and taking them off is a breeze. Not having to deal with a wrench is fantastic.
• I also like that I can’t over tighten them on accident, but that they still stay nice an snug.
• The silicon grips are easy to use and stay cool.
• I really like how they fit the O ring inside so it doesn’t slip out. Nice to not have to worry about keeping track of another small part.
• It was easy to fit on the silicon tubing and the clamps they provided work well to keep the hose on.

--- Misc. ---
There’s been concern over switching out the orifices in the drain tube. It’s really easy. Not something to be concerned with, IMHO. You just close the valve, unscrew the quick connector (very easy) pop out the orifice and push in the new one, screw it back on, and open the valve. Takes a minute or less? I’m more concerned about losing them! ;)


--- BrewEasy ---
?/10

I don’t want to rate the overall system yet. While there wasn’t quite enough magic to give it a fantastic rating right out of the gate, I see the potential on the horizon and I feel it could be great once I get the hang of it.

As you can see from above, the individual components are fantastic. High quality. High performing. High potential. But for two batches I was not able to achieve what I was hoping for. However, I think like all new equipment, it takes learning and getting used to.

I think after another 3-6 batches I’ll have the hang of it and will be able to accurately rate the system. My plan is to decide on a fairly simple recipe to brew multiple times in a row (suggestions welcome!), and to take ridiculous notes and stats for each batch. I’m hoping that I’ll then be able to feel confident that I can control the system and hit my numbers as expected.

As I mentioned, I'll be providing notes, stats, and etc. later this weekend (including efficiency notes on how my first batch was 64% but my second batch was 82%!).

:mug:
 
BREWEASY TEMPERATURE ISSUES - owners comments please.

Its really bugging me, I itch but can't scratch!! please help...

Due to to its length the top end of the wort return hose must be cooler than the wort in the kettle.
So if I want the mash in the mash tun to be at a target temperature of a constant 150°F (for example) I might need to control the kettle at 154°F to allow for the cooling of the wort as it flows up the tube to the top of the mash tun.

Its just an example but 4°F temperature drop from one end of the return tube seems sorta reasonable.

So in the practical experience of real owners and users does having the kettle a few degrees over the target mash temperature make any noticeable difference to the beer produced?


Many Thanks. Aamcle
 
So if not at the tun outlet and not at the autosparge, then at the exit of the kettle?


Does it really matter? Get used to your system and adjust mash temps up or down bars on the results. At least then all brew easy systems will give the same results (and it course, all systems are different from each other - we only think we are doing the same as our friend on a different system).
 
BREWEASY TEMPERATURE ISSUES - owners comments please.

Its really bugging me, I itch but can't scratch!! please help...

Due to to its length the top end of the wort return hose must be cooler than the wort in the kettle.
So if I want the mash in the mash tun to be at a target temperature of a constant 150°F (for example) I might need to control the kettle at 154°F to allow for the cooling of the wort as it flows up the tube to the top of the mash tun.

Its just an example but 4°F temperature drop from one end of the return tube seems sorta reasonable.

So in the practical experience of real owners and users does having the kettle a few degrees over the target mash temperature make any noticeable difference to the beer produced?


Many Thanks. Aamcle

After drinking the beer this weekend that I achieved 80% efficiency with this method, I can say that it certainly does.
 
So no strange flavour profiles, odd mouth feels or other nastiness?

Aamcle
 
In regard to this statement: "Due to to its length the top end of the wort return hose must be cooler than the wort in the kettle."

I really don't think this is a big issue. The wort leaves the pump and hits the temp sensor and at that poit it's still at your set temp (150 in your example). It's only traveling like 4' up the tube and it's moving fairly quickly. I really don't think you'd even lose a degree by the time it reaches the mash. However, I haven't tested this and I'm bummed I didn't measure it during brewing.

I've got a bunch of PBW solution sitting In the kettles right now. This weekend (maybe tonight/tomorrow) I'll turn on the heat and and test the difference coming out of the auto sparge.
 
That would be great, it would settle my mind I really look forward to seeing the result.

Thanks. Aamcle
 
So the way this system works if we were going to do a single step.mash there is no problem.
But if I wanted to do a temp profile there would be a big lag in the middle of the mash?
I just have not read any reports of the accuracy of temp control or ramp rates. How long does it take to ramp up and stabilize at a new temp?
Do we have to adjust the pid for a slightly higher temp to get the mash at our ideal level?
This system has a big loop and losses of degs and lag are bound to happen.
I have some ideas on how to control over shooting temps when the temp probe is inserted into the mash turn but im getting discouraged for the lack of reviews specifically related to actual brew days.
Where are the promised reviews?
 
I was planning to insulate heavily, I have a recirculating biab rig and with propper insulation the temperature drop between the pump and the top of the return hose is 1°C or less.

Aamcle
 
For those that have brewed with this system, after you have recirced and drained the MLT to the kettle, how have you cleaned the pump and recirc lines? Also how have you sanitized them in preparation for transfer to your fermentation vessel.
I have a top tier system that is all gravity fed except for when I transfer to my fermentation vessel (which gravity feeds my pump and pumps through my chiller to my carboy). I do all of my sanitization as I am waiting on the mash to complete. This is a very important step for me, just not exactly sure how you would do it with this system.
 
Back
Top