Jari Kenter
New Member
- Joined
- Jan 10, 2022
- Messages
- 2
- Reaction score
- 0
During my internship I received the assignment to design a complete beer brewing setup.
The base of the assignment was to make a movable 75L beer brewing setup.
This had to work as automatically as possible by combining the BIAB and RIMS brewing methods.
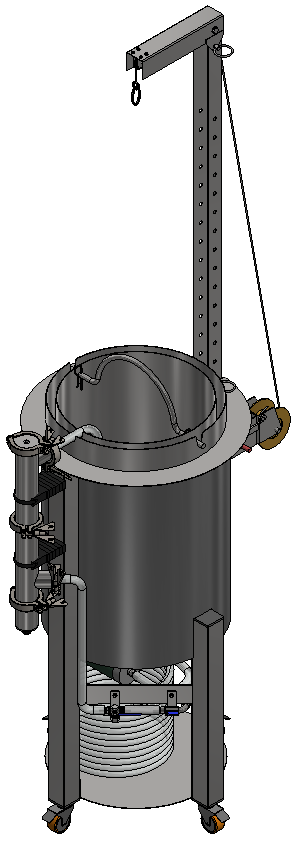
During the design process we have made steps upon the setup, which eventually led to the following concept.
The base of the product lies with a 50L barrel. This barrel will be supported by four legs and a plate extension to reach 75L.
The wheels on the bottom of the legs make sure that the setup is movable, where brakes are necessary to secure the product.
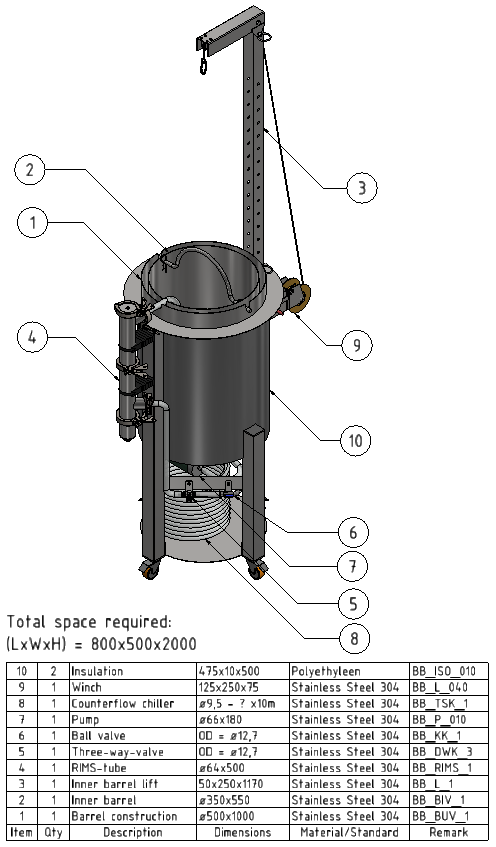
On the next picture you can see the concept assembly again. In this case a table is added which provides information about the parts.
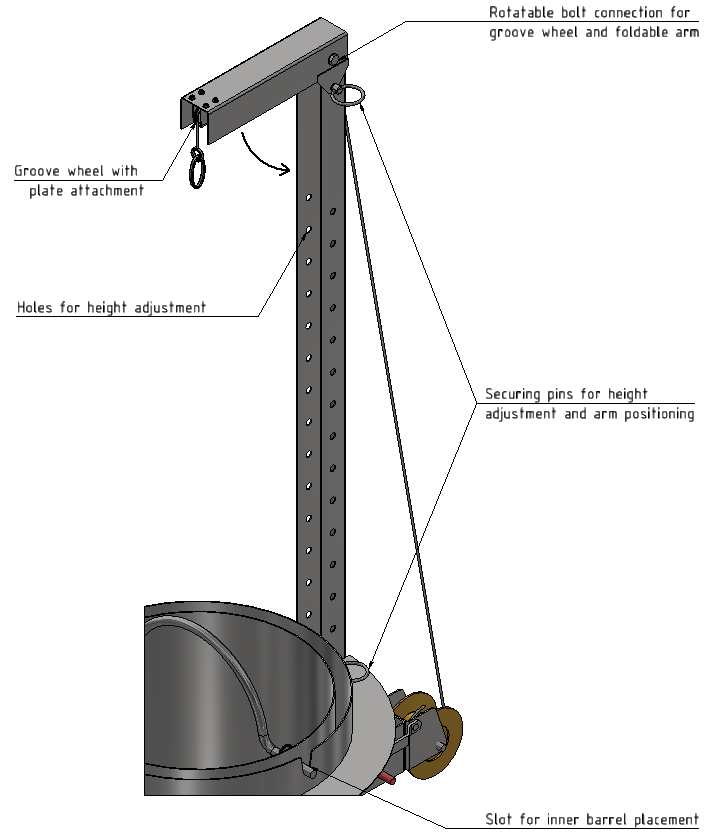
The setup is provided with an inner basket. This basket has holes for the wort to flow out of the grain.
This inner basket hangs in a slot in the outer basket. Due to the possible heavy weight of the inner basket with malt,
a lift has been added to the product. This will give the user the comfort of lifting the inner basket out of the construction.
The size of the lift can be minimized by folding the arm and lowering the post into the leg it is placed in.
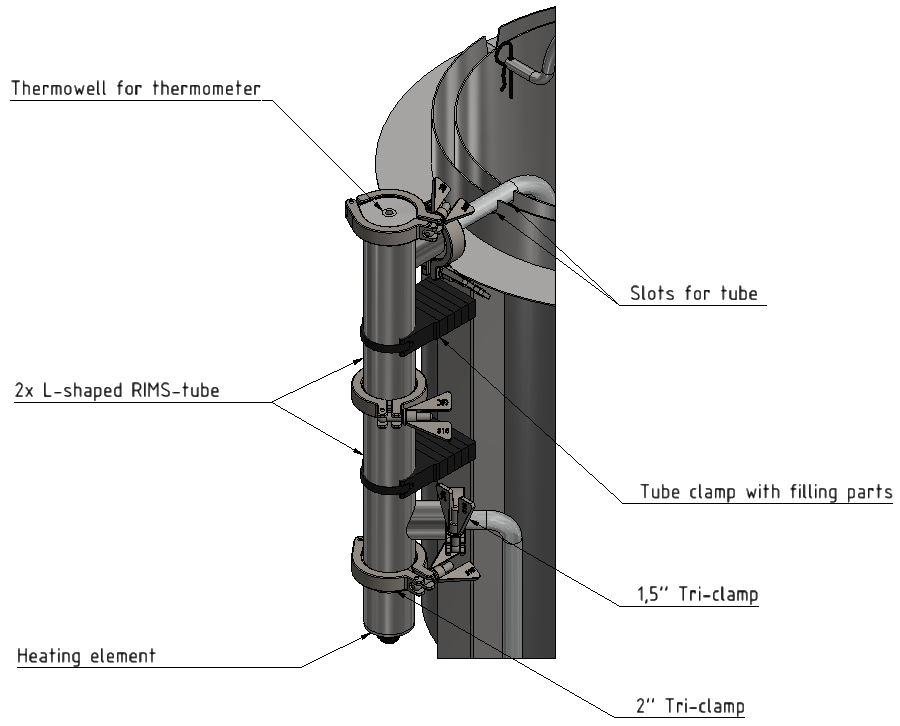
The product is provided with a RIMS-tube on the other side of the barrel. This part is accountable for the heating of the wort.
Before the wort enters the RIMS-tube, it is being moved through a pump, ball valve and a three way valve.
With the ball valve and three way valve, the flowing speed and direction can be regulated manually.
The flow direction decides whether the wort is being cooled or heated.


In addition to the cooling, a counterflow chiller is being used. This part rests on the bottom of the setup on a supported plate.
At last, the setup is provided with an insulation layer. This can simply be placed against the outer basket structure.
The two lower legs make sure that the insulation layer can be placed around 180° degrees of the basket. Therefore, 2 insulation mats will be needed.
All metal parts of the concept are made of stainless steel. The connections are made of silicone tubes, provided with the corresponding couplers.
In this way, the complete setup is food grade, which is essential for beer brewing.
For questions or feedback, feel free to leave a comment.
Therefore, I can already express my appreciation for reading this forum and even more for elaborating on the concept.
The base of the assignment was to make a movable 75L beer brewing setup.
This had to work as automatically as possible by combining the BIAB and RIMS brewing methods.
During the design process we have made steps upon the setup, which eventually led to the following concept.
The base of the product lies with a 50L barrel. This barrel will be supported by four legs and a plate extension to reach 75L.
The wheels on the bottom of the legs make sure that the setup is movable, where brakes are necessary to secure the product.

On the next picture you can see the concept assembly again. In this case a table is added which provides information about the parts.

The setup is provided with an inner basket. This basket has holes for the wort to flow out of the grain.
This inner basket hangs in a slot in the outer basket. Due to the possible heavy weight of the inner basket with malt,
a lift has been added to the product. This will give the user the comfort of lifting the inner basket out of the construction.
The size of the lift can be minimized by folding the arm and lowering the post into the leg it is placed in.

The product is provided with a RIMS-tube on the other side of the barrel. This part is accountable for the heating of the wort.
Before the wort enters the RIMS-tube, it is being moved through a pump, ball valve and a three way valve.
With the ball valve and three way valve, the flowing speed and direction can be regulated manually.
The flow direction decides whether the wort is being cooled or heated.


In addition to the cooling, a counterflow chiller is being used. This part rests on the bottom of the setup on a supported plate.
At last, the setup is provided with an insulation layer. This can simply be placed against the outer basket structure.
The two lower legs make sure that the insulation layer can be placed around 180° degrees of the basket. Therefore, 2 insulation mats will be needed.
All metal parts of the concept are made of stainless steel. The connections are made of silicone tubes, provided with the corresponding couplers.
In this way, the complete setup is food grade, which is essential for beer brewing.
For questions or feedback, feel free to leave a comment.
Therefore, I can already express my appreciation for reading this forum and even more for elaborating on the concept.
Last edited:


