80/20 Brew Stand

Homebrew Talk - Beer, Wine, Mead, & Cider Brewing Discussion Forum

Help Support Homebrew Talk - Beer, Wine, Mead, & Cider Brewing Discussion Forum:

This site may earn a commission from merchant affiliate links, including eBay, Amazon, and others.
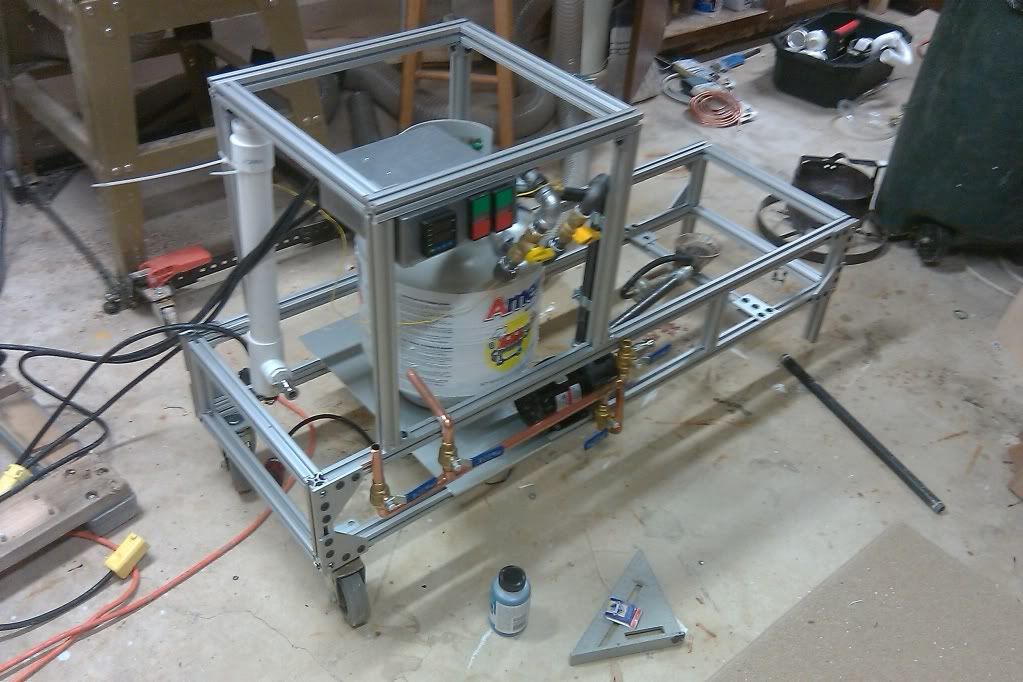
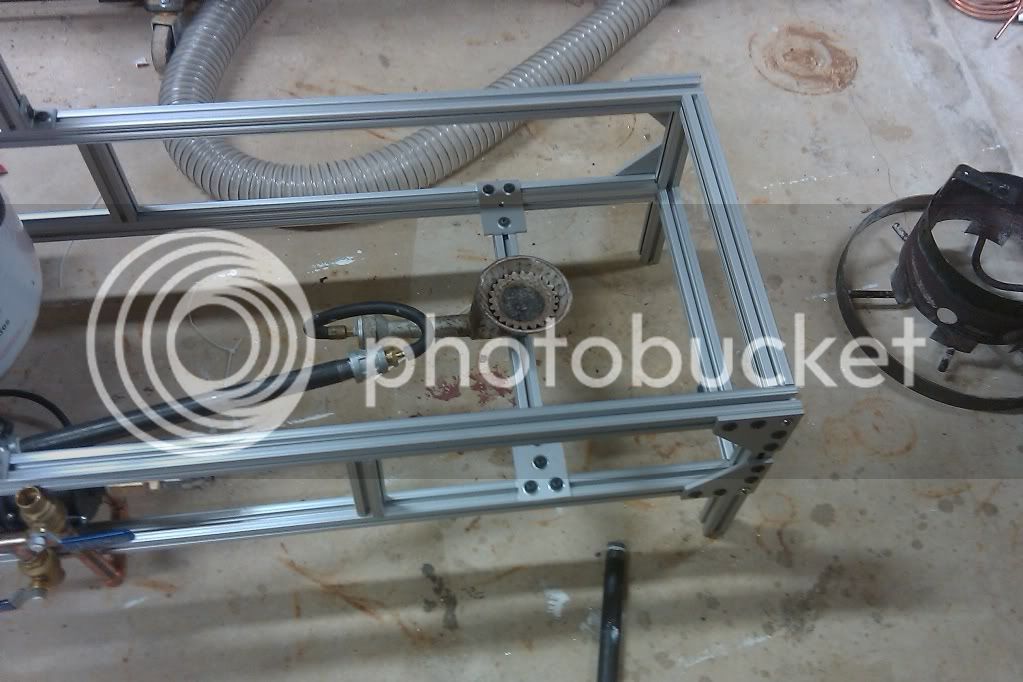
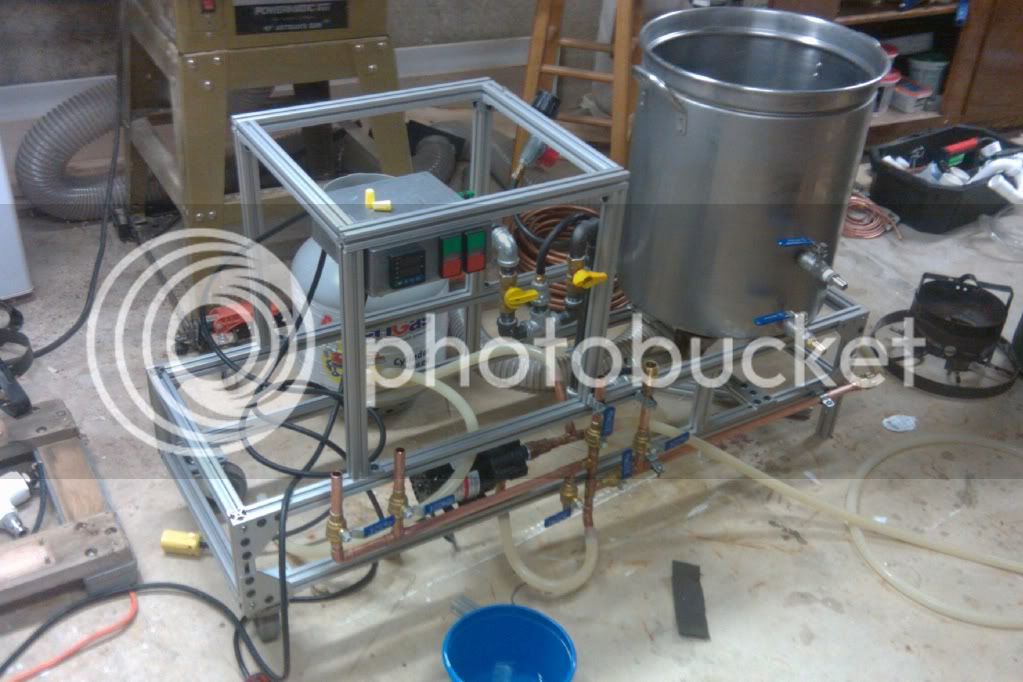
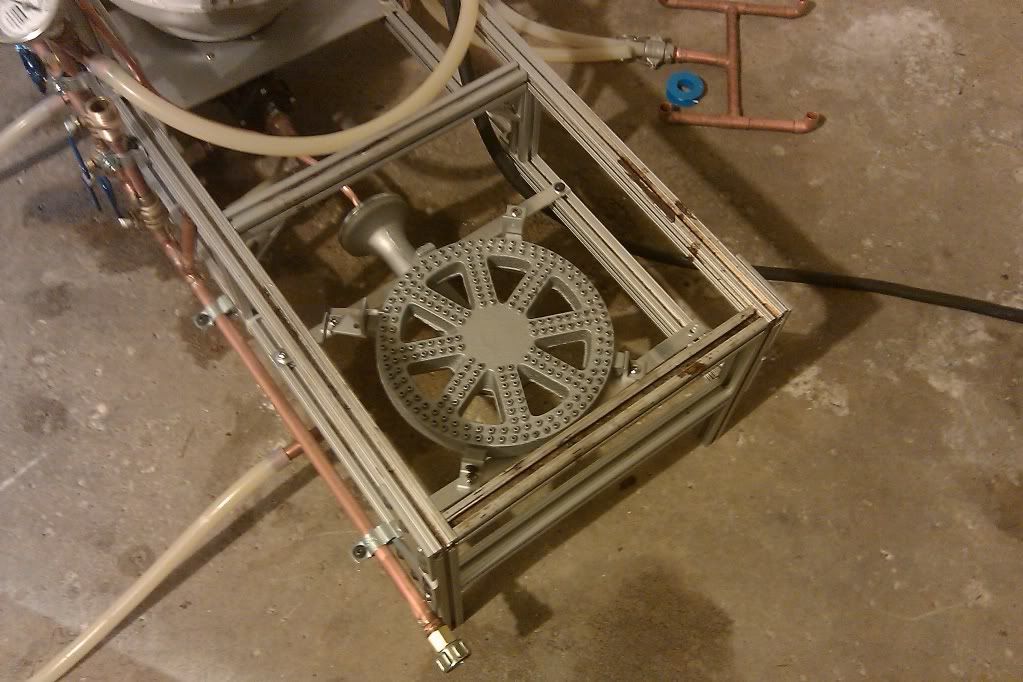
Well, thats exactly how my kettle would be sitting, except that I would be using one of the cheap 'jet' burners. What is the purpose of the steel sections inside of the aluminum frame though? They dont seem to support the kettle at all in that video. My main concern is the flames bending around the kettle and getting the aluminum too hot.

Ok, it looks like I will probably be fine without anything.
 
Roughed-in some of the plumbing and finished the burner mount:

imag0084.jpg


imag0085.jpg


Obviously the black nipple in the burner mount picture needs to be much shorter.

Test fired it and it works well, but the gas control using valves is not nearly as precise as using a regulator.
 
... What is the purpose of the steel sections inside of the aluminum frame though? They dont seem to support the kettle at all in that video. My main concern is the flames bending around the kettle and getting the aluminum too hot. ...
I thought that, too. They aren't necessary, IMO. The frame should support the kettle. He also had the burner mounted to low. What is that, a 10" clearance? He's going to waste a lot or propane keeping that full open. And brewing outside on a windy day, the flame will blow out often. I think mounting it ~3"-5" from the bottom of the kettle would work better. I wind screen around the burner would be good, too.
 
Yes, a small wind screen (10 x 8 ducting reducer) will work wonders....you only need about 4 inches of clearance as well. Those burners are great...very little of the burner is in contact with the stand, so less heat will be transferred. If you can keep the flames/heat from washing over the stand, you should be GTG.

A needle valve is what you want for fine control....ball valves are worthless.

Also, you could probably shave about 6-8" off the length of the stand (maybe 12?).....and still not send too much heat near the tank....if it's a concern, you could insert an aluminum plate into the 80/20 to cover it. This will allow you to significantly reduce your footprint and better drain the MLT into the BK....
 
Out of curiosity, how does your tankless heater handle the exhaust? If it goes to a vent, why not go with an electric BK and lose the burner? You could REALLY slim down the build that way, and because the water heater is doing most of the heavy lifting, you could get away with a weaker element in the BK because you'd just need to maintain a boil.
 
yeah, there are a lot of options with this system... Too many to think about.

I will look into needle valves, do hardware stores carry them with 1/2" NPT?

The tankless has a 6" stub of a vent, you can see 1/2" of it protruding on the top. I am probably going to just ad a 90° turn to keep it away from the cooler.

I am interested in going electric, but my garage is opposite of my electrical panel, and I have no 240Vac over there. In addition, the service panel is in the basement, the garage is on a slab obviously, and routing the electrical service there would require me to cut out the back of a closet and the basement ceiling... not fun.

I kept the build that long since I might shift the cooler stand over a bit to give more room for the tankless heater. As it is now, the tankless heater will overhang by about 2 inches. Additionally, I wanted room for a 100qt kettle in case I ever needed it, and they are roughly 20-21" in diameter.

Thanks for the thoughts and feedback, keep them coming.
 
I finished the pump supply and return manifolds this weekend. LOTS of soldering.

I am going to try to get it done and do an inaugural run on Sunday. Just have to finish the electrical, put in the needle valves for the gas, and attach a few more pieces of aluminum and I'll be ready for a test-drive.

Oh, and I tested the whirlpool abilities this weekend, having only about 2ft of copper pipe and 2 feet of Silicone tube makes for a VERY fast whirlpool, also much nicer with the integrated return spigot.

imag0091.jpg
 
Most recent update:

imag0093.jpg


- Added the thermometer on the kettle return so that I can monitor the chilling process.

- Plumbing Supply manifold is nearly complete, just need to run down and under the flash boiler to supply it.

- New gas manifold needle valves dont have enough flow to be practical, so I am going to go with a ball valve for the flash boiler and one of the Bayou Classic valves for the burner.

- I tried to mount a grill igniter near the burner, but it doesn't seem to ignite the propane, maybe when I can get more propane out of the burner it will ignite.

- Electrical still needs to be completed, but that really take more than 10 minutes of work.
 
Thanks, another couple of days, and I think I will be done, I have to be... in order to brew a Wit this weekend!

I have a feeling I wont have the control valve for the burner, but thats OK, I can deal with that.

Oh, and I got to mount the RIMS tube, but it will sit right behind the Flash Boiler.
 
What a unique build! I love seeing new ideas being fabricated. You're moving right along without hitting any snags, as well... Good job!

There have been plenty of little snags, nothing big though. The gas control issue is going to be the biggest snag, I will have purchased 5 valves by the time this thing is done, and used only 2 of them.

The next big snags will be when I fire it up, maybe I will melt the aluminum, or my Mash Tun. I am going to need an infared camera to watch how hot the frame gets!

The big part that is making it so easy is that it was all a 'benchtop' system for about 6 brews, so I have the hang of how everythign works, the control box was complete already, RIMS tube, Flash Boiler etc. I am simply making them all work together in a very concise way.
 
So what kind of flow rates/temps are you looking at with the Tankless?
 
can I see a photo if the inside of your kettle I'd like to see how you have your whirlpool setup.

-=Jason=-
 
So what kind of flow rates/temps are you looking at with the Tankless?

Roughly 1/2 Gal per Minute at a 110 degree rise (last time I actually measured was in in the summer with ~64° ground water temp. I have to slow things down a bit now that our ground water temp is about 45°.
 
can I see a photo if the inside of your kettle I'd like to see how you have your whirlpool setup.

-=Jason=-

imag0090.jpg


Not whirpooling when it was taken, but you get the idea. Needs to be cleaned too.

I didnt use the coupler on the return, and it worked well, but I had to bend the SS washer a bit to acomodate the flare fitting. Once the flare fitting was not butted right up to the washer, and the washer could seat on the lip of the inside of the MPT side, it was fine.
 
Finished it up last night.

Here is the overview with all of the hoses attached as they would be in a normal brew session:

imag0100.jpg


Here you can see the supply manifolds and valves:

imag0102.jpg


Here is the control panel, from left to right, RIMS PID, Pump Switch, Heater, Flash Boiler output temp, and BK burner igniter. The 3 valves below are from L to R, Flash Boiler Needle Valve, Main shut-off, BK Burner Valve (will be replaced by somthing with higher flow). The Flash Boiler power switch and igniter are on the left side.

imag0103.jpg


Testing last night went well, I want to re-verify the max output from the Flash Boiler tonight, but everything worked well, I went to-from each vessel, and through each heat exchanger. The pump primes pretty well with the dump valve, and the flow rates are really fast.
 
Finished it up last night.

Testing last night went well,

Congratulation, looking great.
A lot more brewing projects you can build with 8020, like grain mill, etc.

If you wash down the frame as I do the non stainless screws and bolts on your system will rust in no time.


Cheers,
ClaudiusB
 
Yeah, the goal will be to not get it too dirty, and eventually replace with all stainless if I can.

My grain mill is a barley crusher mounted on particle board, but it does have a 6A electrical motor driving it with nice forward and reverse switches, not as pretty as my brew rig, but certainly works great.
 
Really nice....I like those needle valves! You could easily increase the size of your vessels if you want to go bigger...room to grow!
 
Except for some reason, they cant supply enough to the burner. I have one of the Bayou Classic valves on the way, but for tonight's brew session, I am going to stick with just the ball valve and cross my fingers. I think I would need a larger orifice if I am going to stick with the needle valve, with that much upstream restriction, the flow through the needle valve is too low. The needle valve works great for the flash boiler though, as I can finally dial the gas down enough to get a no-soot flame. Since it is a leaner burn the performance doesnt take a hit either, but I dont get to show off with the 4' flame shooting out though!
 
So I took it for a test-drive this weekend. Other than some odd propane regulator issues, which wont prevent me from brewing, but are a bit annoying, things went well.

I can fill and heat my strike water in about 10 minutes, and I can generate sparge water at just under a gallon a minute at 175°F, so that went great, but I didn't get to actually brew anything. I will do a 10 gal batch on Wednesday, an all centennial IPA, those are always tasty!
 
This seems to be my only remaining issue:

https://www.homebrewtalk.com/f11/odd-regulator-behavior-218601/

But I found a regulator with a green ACME coupler in my basement, maybe that one will have enough flow to support the tankless heater without the surge protect valve operating.

Sounds like the black ones are only to about 75K btu, the green should get me roughly double that.

Any of you guys know anything about those things?
 
First batch done. Definitely need to work out the LP issues, starting the tankless heater was not as easy as it should be. The whirlpool chilling worked amazing. About 15 minutes to get 10 Gal down to 62 degrees.

Lastly though, 17 degrees is way too cold to brew in!
 
Ahhh, finally solved the biggest problem from the first brew-day:

IMAG0108.jpg


The tankless heater was originally designed for natural gas, so the solenoids fail safe and dont open at high pressures from my 0-10psi regulator. Additionally the regulator tended to detect a fault when supplying propane to the tankless heater as it is probably between 100-200 kBTU, maybe more. This meant that every time I wanted to light the tankless heater, I had to scale the regulator way back, and slowly increase it until it lit, but if I went too far, it would go out due to the excess-flow device.

I took the existing 0-10PSI regulator and drilled out the safety device in the tank coupler.

Next I re-did my LP manifold with a 11" WC regulator that I had laying around. This supplies the tankless heater at the correct pressure. I also switched out to the NV180P valve from Bayou Classic, This works perfectly and gives a lot of control over the burner, at least a full revolution from barely on-to full blast.

Now I just want to sand the whole thing down, tape off the brass parts and give it a good coat of rustoleum so that it doesn't rust.
 
I was going to brew "whiteout wit" tonight, but I was exhausted from 3.5 hrs of snow blowing and shoveling today, so i did some simple upgrades to my brew system.

Now that I got my LP system fixed, I also did a quick test on the tankless heater. I was able to bring 5 gal up 23 degrees in 1 minute. That comes to roughly 58kbtu applied to the circulating water. So that means that 5 gal of strike water can be prepared from 60 to 160 in 4.5 to 5 minutes.

The other way of looking at it, I can do 1 gal/minute at a rise from 60 to 170 for my batch sparge additions.

I cant wait for the weather to get better and for the kids to sleep so I can brew some more. We finally got our 2.5 year old going to bed in less than 1hr of parental-involvement-time last week, so I see some 8:00-11:00 brewing in my future.
 
Nothing at all. It works perfectly, easily and quickly. I have added 2 more PIDs, just for display, one has a thermowell in the Mash Tun, the other one has a thermowell in the BK.

I fixed the problems with the gas distribution....

I am going to have a custom CNC panel for the PIDs and controls....

Thats about it. I love using it.
 
Alright, it has been a while since I updated this thread.

I have done several updates to the system in the last few months.

1. BG-14 burner. I havent done anything but fire it up, sure is a lot quieter, and seems hotter!
2. Re-configured my propane supply manifold, all flexible 3/8" copper tubing with flare connectors now, much nicer looking and much neater, and it gets the control knob for the burner much higher up on the system.
3. Re-configured water/wort supply manifold. Previous configuration shared some areas so I had to stop recirculating to generate sparge water, and there was always the risk of over-pressure blowing a silicone line off. Now they are separate and it is hard-piped right to the tankless heater. I loose the ability to recirculate the mash through the tankless heater, but I never used that feature since I built the rig.
4. I added 2 PIDs as cheap and easy Pt100 readers, one displays the MT temp as a sanity check against the RIMS, the other displays the BK temp.


Here are some pictures:
IMAG0202.jpg

IMAG0203.jpg

IMAG0204.jpg


Enjoy
 
Ha, I used the BG-14 burner on a 5 gal batch on Monday. When I was at 164, I timed it for 1 minute. I was able to get to 173 in one minute! 9 degrees per minute, that's crazy!

I also ordered the SS RIMS tube from Derrin. I will be installing it in a week or so. I will post some pictures once it is installed.
 
Finally an update!

I am adding a true control enclosure, and automating the hot water heater to give me PID-controlled hot water on demand.

IMG_20110914_164601.jpg


I'll neaten-up the wiring as soon as I confirm that everything works:

IMG_20110914_164534.jpg
 
I'm mulling over my options for a stand so I'm subscribing to this. Everything looks very clean. What website did you go to for your materials?
 
Back
Top