
So, you've decided to move to all grain and are trying to figure out what equipment you need. This article will focus on converting a round 10G cooler into a Mash Tun (MT) for your brewery. This project is an easy one that can be completed in a few minutes and with little effort.
There are pros and cons to every setup. Coolers are not excluded from that statement.
The pros: Round coolers are quick and cheap to convert to MLT's. I have a straight braid in mine to filter the grains, but one can use a manifold or a circular patterned braid to achieve a better yield. As far as manifolds/braids- there are threads on HBT which detail construction of those items. I have been using a stainless braid for the last 2 years and have been quite happy with it's performance. The cooler does a good job maintaining mash temps for 60-90 minutes. One will typically only see a 1-2 degree drop over that time.
The Cons: The cooler may warp with time (mine hasn't yet and it's been 2 years of steady use), but at about $50 per unit, it's not too bad to rebuild every year or two. That also fulfills the need to tinker and build new and improved items in your brewery, an affliction most home brewers seem to have. Step mashes are challenging (not impossible) as direct heat can't be applied to a cooler. A RIMS or HERMS setup would handle that issue, but it does complicate the simplicity of the cooler.
Step 1:
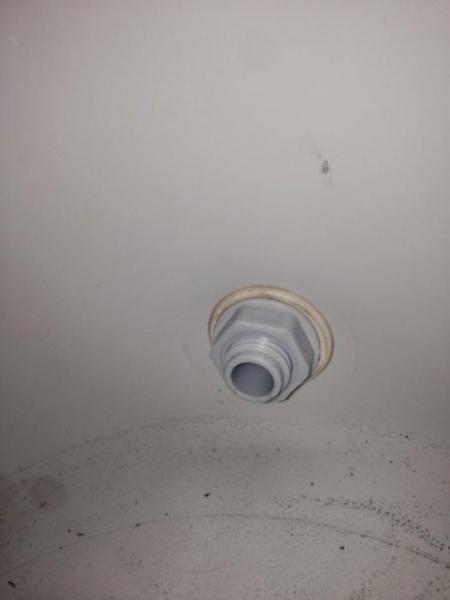
Disassemble the valve on the cooler. Inside the cooler, there is a nut that will need to be loosened. Hold the spigot on the outside and turn the nut with a wrench/pair of pliers. Once that nut is off, the spigot should be able to be removed from the cooler with no issue. This is what it looks like on the inside.
If you are converting to " fittings, remove the rubber washer that is seated in the hole. If you are converting to 3/8", leave that washer in the cooler. You will need it. Here is a thread detailing a 3/8" cooler conversion:
https://www.homebrewtalk.com/f51/cheap-easy-10-gallon-rubbermaid-mlt-conversion-23008/
Step 2:
Insert the new ball valve/bulkhead. I used a stainless " bulkhead and valve kit from Brewhardware.com. Other vendors on HBT have similar offerings, or you can cobble one together at your local hardware store if you are open to using brass fittings. The only trick would be finding a food safe gasket for the bulkhead. Many of the parts drawers have rubber/poly washers that may work for your application. Parts needed would be a ball valve, a " pipe nipple approximately 3" long, 1/2" nut and stainless washers, and some gasket material.
Step 3:
Now that you have your bulkhead and valve installed, you need to consider how you will get the wort to your kettle while leaving your spent grains in the MT. There are a couple of options to choose from. You can build a manifold from copper or pvc (a search on the forums of Homebrewtalk.com will yield many threads that detail the steps, or a quick read in the "Brewware" by Lutzen and Stevens or Palmers "How to Brew" will show you several designs as well.
Option 2 is utilizing a stainless steel braid. In some circles, it is called a Bazooka screen. There are designs that can be searched for on homebrewtalk.com. I chose to use a water heater supply line. I bought a 10" length. Step one to modifying the braid for your MT is to remove the plastic tubing inside the braid. To accomplish that, you can simply cut the ends off the hose with a hacksaw and then push the tube out of the braid. Fold over and crimp one end of the tube in a vice, or with pliers. The other end can be slipped over the " nipple and held in place with a stainless hose clamp as shown below.

Once done, your new mashtun is ready to go! Good luck and happy brewing.


There are pros and cons to every setup. Coolers are not excluded from that statement.
The pros: Round coolers are quick and cheap to convert to MLT's. I have a straight braid in mine to filter the grains, but one can use a manifold or a circular patterned braid to achieve a better yield. As far as manifolds/braids- there are threads on HBT which detail construction of those items. I have been using a stainless braid for the last 2 years and have been quite happy with it's performance. The cooler does a good job maintaining mash temps for 60-90 minutes. One will typically only see a 1-2 degree drop over that time.
The Cons: The cooler may warp with time (mine hasn't yet and it's been 2 years of steady use), but at about $50 per unit, it's not too bad to rebuild every year or two. That also fulfills the need to tinker and build new and improved items in your brewery, an affliction most home brewers seem to have. Step mashes are challenging (not impossible) as direct heat can't be applied to a cooler. A RIMS or HERMS setup would handle that issue, but it does complicate the simplicity of the cooler.
Step 1:
Disassemble the valve on the cooler. Inside the cooler, there is a nut that will need to be loosened. Hold the spigot on the outside and turn the nut with a wrench/pair of pliers. Once that nut is off, the spigot should be able to be removed from the cooler with no issue. This is what it looks like on the inside.
If you are converting to " fittings, remove the rubber washer that is seated in the hole. If you are converting to 3/8", leave that washer in the cooler. You will need it. Here is a thread detailing a 3/8" cooler conversion:
https://www.homebrewtalk.com/f51/cheap-easy-10-gallon-rubbermaid-mlt-conversion-23008/
Step 2:
Insert the new ball valve/bulkhead. I used a stainless " bulkhead and valve kit from Brewhardware.com. Other vendors on HBT have similar offerings, or you can cobble one together at your local hardware store if you are open to using brass fittings. The only trick would be finding a food safe gasket for the bulkhead. Many of the parts drawers have rubber/poly washers that may work for your application. Parts needed would be a ball valve, a " pipe nipple approximately 3" long, 1/2" nut and stainless washers, and some gasket material.
Step 3:
Now that you have your bulkhead and valve installed, you need to consider how you will get the wort to your kettle while leaving your spent grains in the MT. There are a couple of options to choose from. You can build a manifold from copper or pvc (a search on the forums of Homebrewtalk.com will yield many threads that detail the steps, or a quick read in the "Brewware" by Lutzen and Stevens or Palmers "How to Brew" will show you several designs as well.
Option 2 is utilizing a stainless steel braid. In some circles, it is called a Bazooka screen. There are designs that can be searched for on homebrewtalk.com. I chose to use a water heater supply line. I bought a 10" length. Step one to modifying the braid for your MT is to remove the plastic tubing inside the braid. To accomplish that, you can simply cut the ends off the hose with a hacksaw and then push the tube out of the braid. Fold over and crimp one end of the tube in a vice, or with pliers. The other end can be slipped over the " nipple and held in place with a stainless hose clamp as shown below.
Once done, your new mashtun is ready to go! Good luck and happy brewing.
