
DocBrown
Well-Known Member
I'm in the process of putting together a kegorator. I don't have room in the garage for a chest freezer, so I decided to expand a mini-fridge to accommodate as many kegs as possible. I found a Sanyo mini-fridge on Craig's List for $50. I think it's the 3.6 cu. ft. version, which actually turns out to be slightly too small to fit even a single keg without modifications (I think if you pull out the shelving from the door it will fit so long as your careful where you put the shank for the tap). My goal was three kegs.
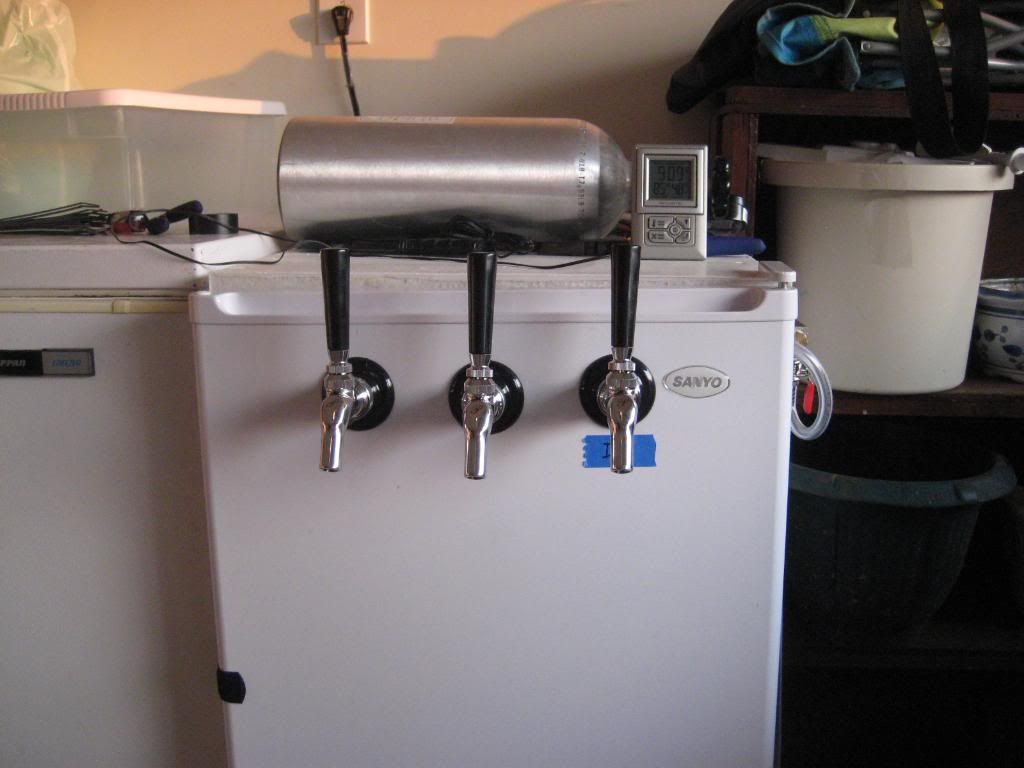
First, the finished product, then the description:

I let the refrigerator warm up for a couple days before bending the freezer coils down to sit against the back of the fridge rather than on the top. I also moved the thermostat to the front of the coils. All the shelving (including the shelves attached to the door) were pulled out. Now to the difficult part.
Extending the Refrigerator
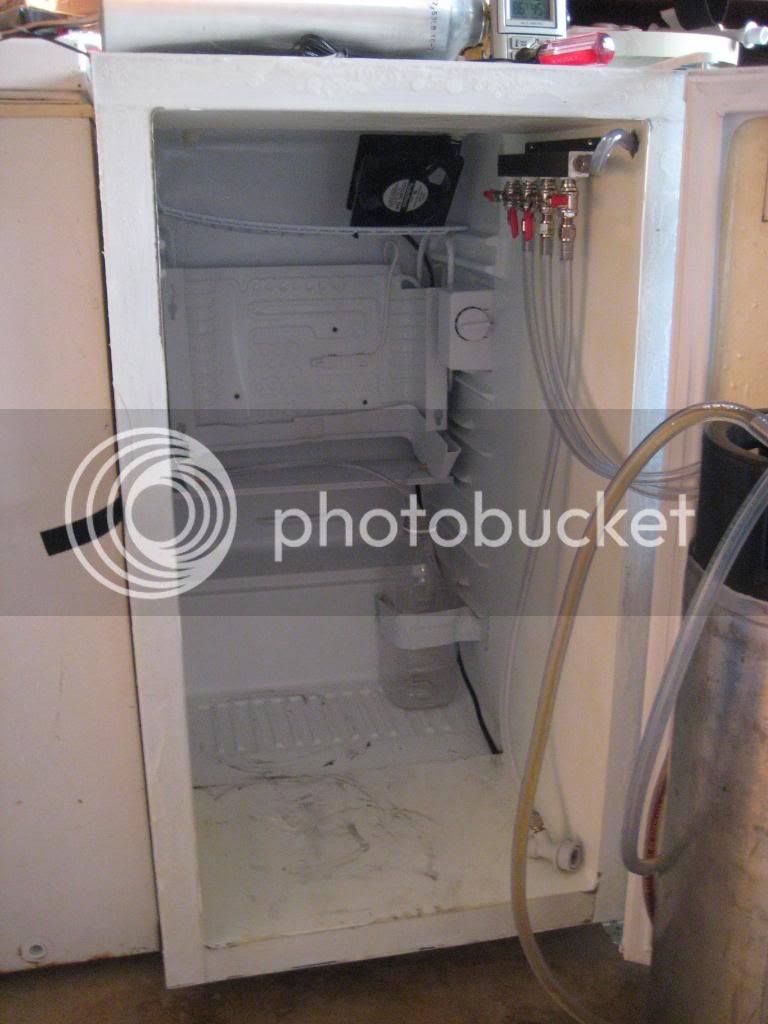
I measured out the width of the fridge carefully and built a model with my kegs included. From that I determined that extending the refrigerator by approximately 12 inches would be sufficient to handle 3 corny kegs. I went with a 2x12 to form a horizontal collar for the fridge. Based on measurements of the width and height of the refrigerator, an 8 foot board was the perfect length (I ended up with about 1-2" of scrap). I cut it into four sections and screwed them together to form the collar. I painted it white to match the refrigerator and also glued a piece of acrylic to the front of the wood to give the door a better surface to seal against (I used a router to trim the acrylic to match the size of wood since it's a single monolithic piece).
I used 4 small strips of metal duct strap to attach the collar to the refrigerator. Since the refrigerator had mounting holes for the door on both sides, no new holes were required. The straps were also painted white to lend in. I put caster wheels on the bottom, with two mounted to the metal refrigerator frame at the back that holds the compressor, and two towards the middle of the 2x12 to reduce torque on the straps. The gap between refrigerator and collar was caulked from both sides, and the outside was also painted white. The door was mounted to the wood collar. Since I'm not giving the door a metal frame to seal against, I attached a velcro strap to the side of the refrigerator to keep the door closed.
The result is a nice deep refrigerator:
CO2 distribution
I purchased a 4-way gas distributor early in the project, though it turns out I only need three of the ports. This mounted nicely to the inside of the wood collar.
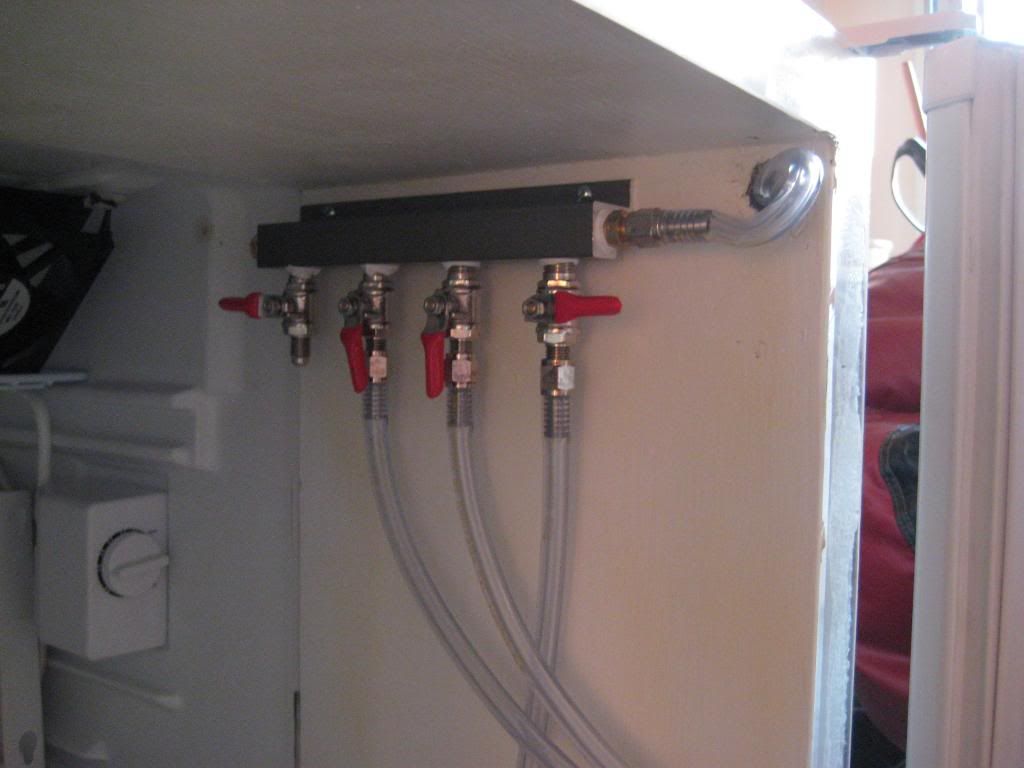
I drilled a hole through the collar for a CO2 inlet. On the outside, I have a 2-way gas splitter I'd purchased quite a while back (used it with picnic taps and two kegs) mounted to the outside of the collar. One of the ports passes through the collar, the other has a ball-lock gas quick disconnect so I can easily prime kegs and two liter bottles outside the refrigerator.
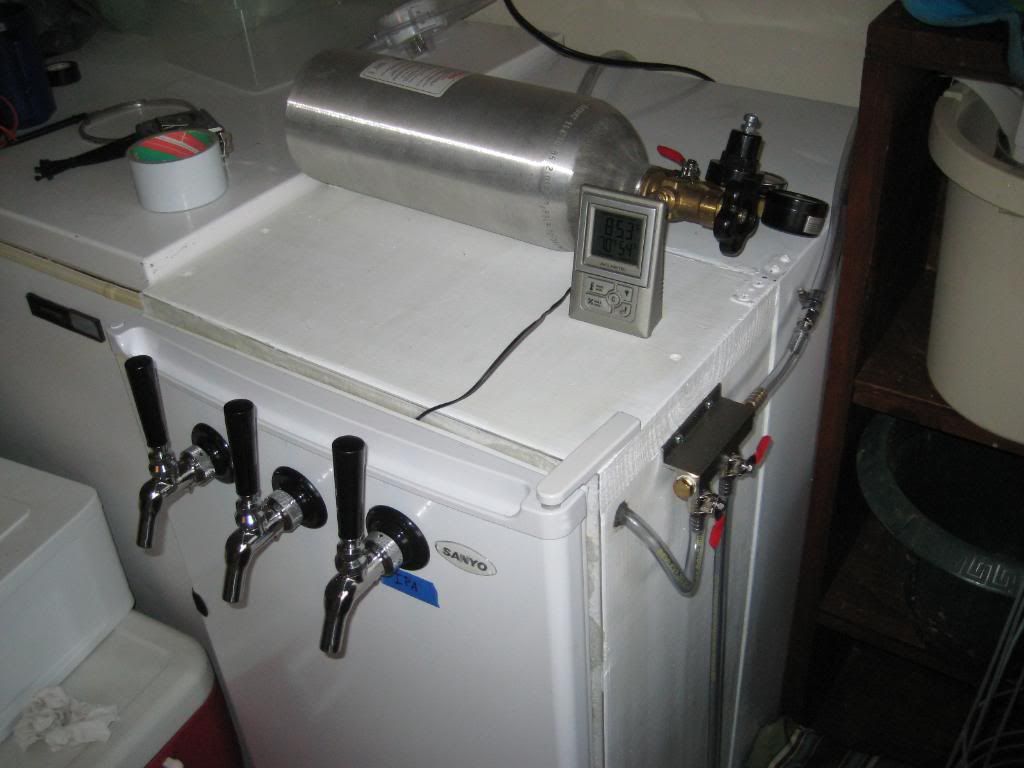
Beer Serving
I drilled three 1" holes through the door and mounted the shanks in place. I cut out a scrap piece of acrylic to fit over the back of the holes so that the mounting hardware would have a better surface than foam insulation material to fasten down to. It's not perfect, and the taps will rotate if you try, but it works.
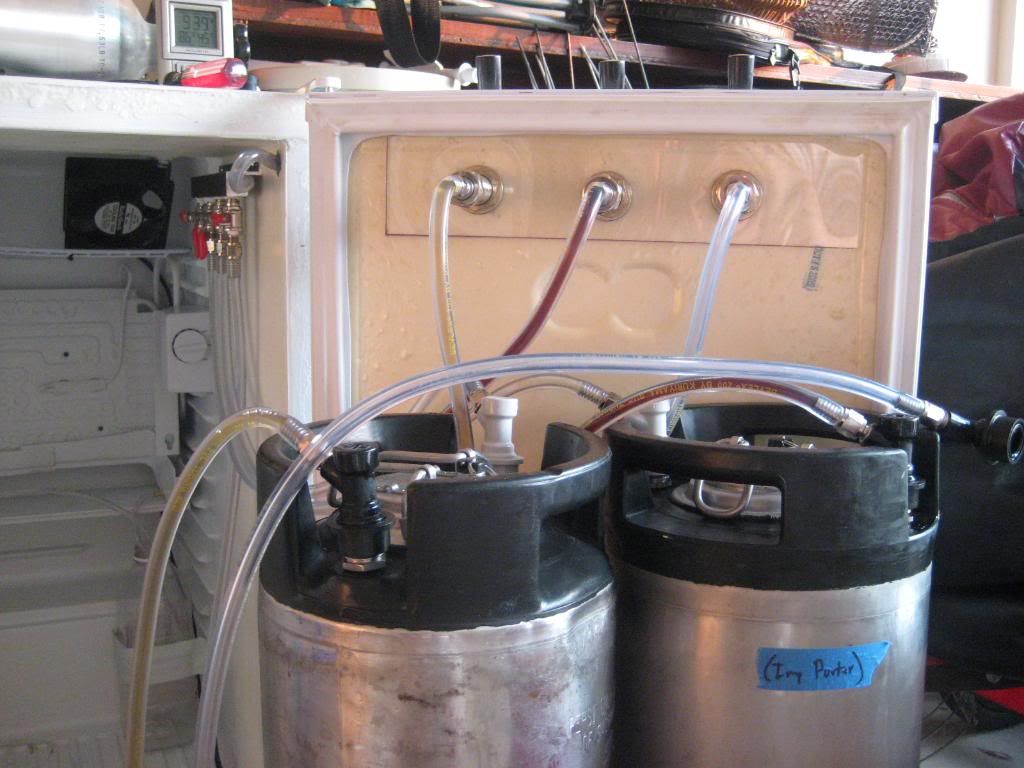
Coil Condensation
It turns out that the coils are quite prone to freezing over, and thawing them results in quite a bit of water in the bottom of the refrigerator. The U-shape of the coils made a drip tray a bit of a challenge, especially since a tray large enough to fit under the entirety of the coils would push the kegs forward too much to allow the intended 3 kegs to fit. However, the door shelving has roughly the correct shape and size to form a nice U-shaped drip pan. I had to trim and re-glue it a bit to fit, but it works nicely now. I used a section of the shelves that already had holes drilled on either side with rubber grommets meant to hold a metal rack to keep shelf items in place. I had some extra copper pipe fittings laying around that fit perfectly in the rubber grommets with 3/16" ID tube fitting snugly over the other end.
I considered drilling a hole through the collar for the tube, but once the refrigerator gets cold enough, the humidity stays pretty low and it doesn't pick up much more condensation so long as it isn't opened for too long. So I just have the drip tray draining into a plastic jug that fits out of the way in a back corner of the refrigerator.

Cooling Capabilities
The refrigerator takes some time to get everything down to serving temperatures. However, the kegs take up the vast majority of the available volume, so when they're mostly full, I've got a pretty large thermal mass in there. To help things chill faster, especially with a new room temperature keg, I've taken to freezing a couple 2-liter bottles of water and putting them inside. Once things are chilled, it seems to be holding in the mid 40s F without too much trouble, even in my 100+ deg. F garage. It does seem to take a couple days to completely chill a keg though, but that's not too much of a problem.
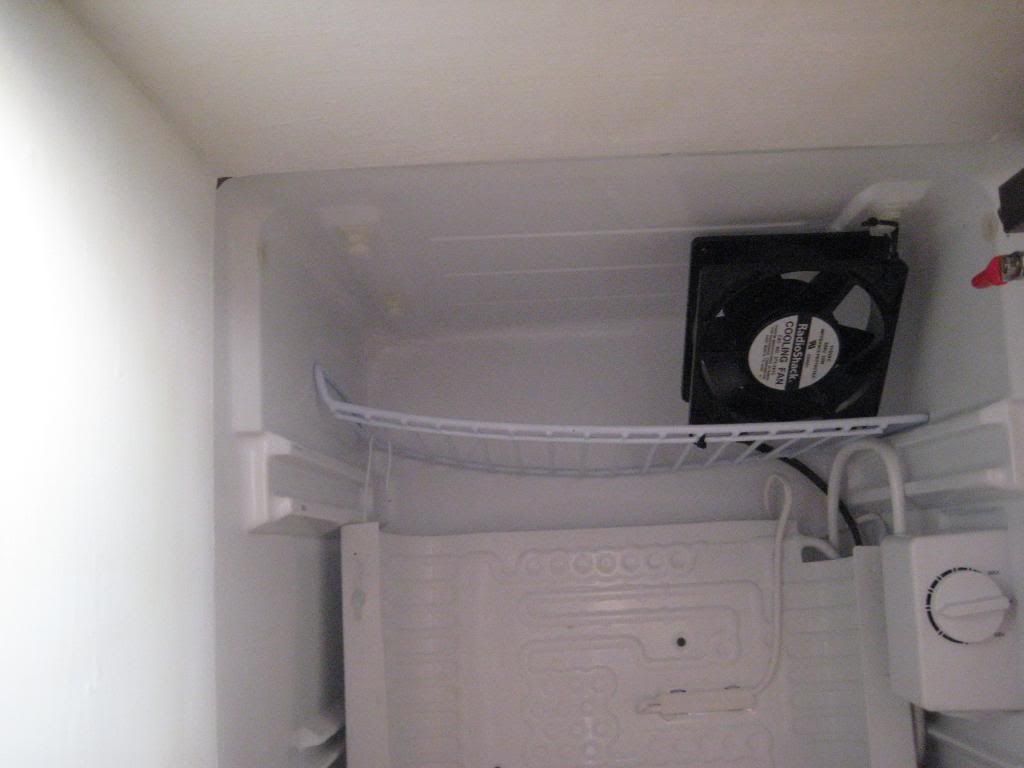
To improve the cooling capabilities and to ensure the third keg will be adequately chilled, I decided to install a 120V cooling fan. I bent the smallest of the metal shelves and managed to fit it where the freezer section used to be. I used wire-ties to hold the fan in place on top of the shelf. Unfortunately, only one of the two wires came to the inside of the refrigerator, so I had to run a wire all the way to the outside back edge of the refrigerator to access power. The easiest way to do that was to make a small hole between the refrigerator and collar, and route the wire through there and underneath the bottom of the original refrigerator to the back side. I wired the fan in so that it turns on whenever the compressor does. It certainly isn't perfect, and I suspect the air circulation is mediocre at best, but it should help some.
Still to Come
I have young kids in the house, and the last thing I want to happen is for a curious two-year-old to wonder past the kegorator and pull a tap handle. Not only will it empty a 5-gallon keg of beer on my garage, it will also drain the contents of my CO2 bottle. I doubt my kids would end up drinking much of it, though that's also a potential concern, but the waste of good beer and the nightmare clean-up makes me want to minimize the chances of this scenario fairly soon.
I've come up with a good plan: I'll drill holes in a wooden board so it fits over my tap handles and extends mostly over the wooden refrigerator collar. I'll mount hinges on the collar and attach this board so it can rotate easily on and off of the tap handles. I'll also cut a slot in the board and mount an eye-bolt into the collar so that it fits through the slot. That way I can put a lock through the eye bolt such that the tap handles cannot be moved. I don't expect to actually need a padlock - a dowel rod through the eye bolt should be sufficient to keep the board in place enough to prevent accidents from a curious toddler - but it might be a nice bonus if I decide to upgrade to a chest freezer in the future and want to sell this to someone with roommates!
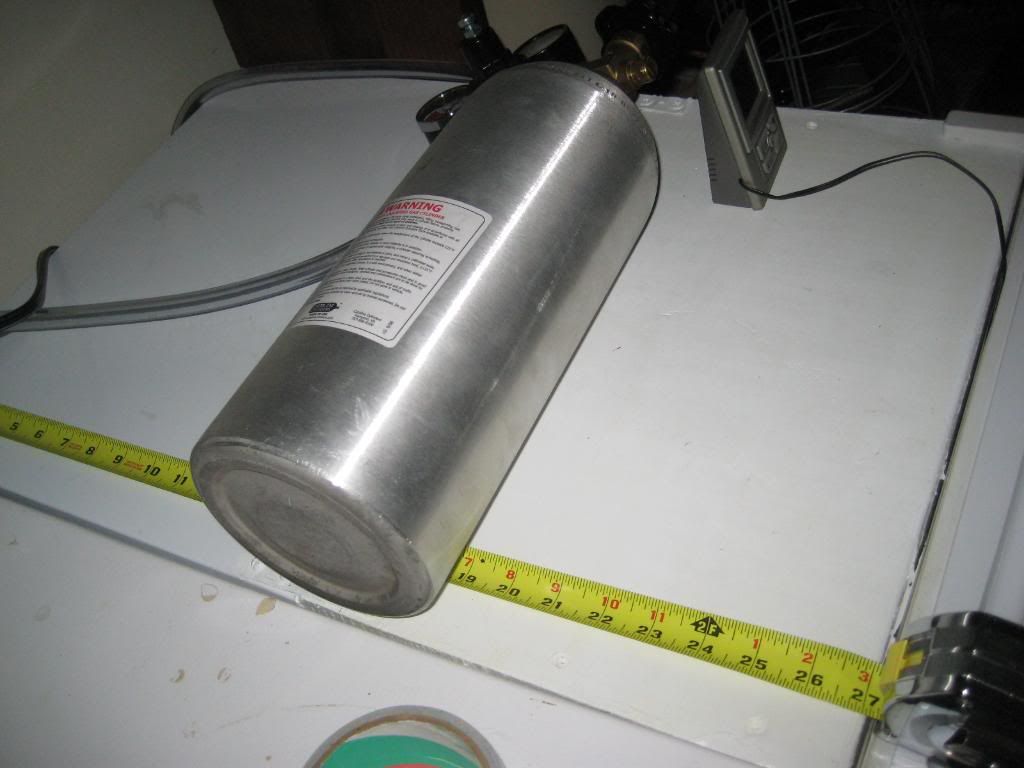
More Pictures

First, the finished product, then the description:
I let the refrigerator warm up for a couple days before bending the freezer coils down to sit against the back of the fridge rather than on the top. I also moved the thermostat to the front of the coils. All the shelving (including the shelves attached to the door) were pulled out. Now to the difficult part.
Extending the Refrigerator
I measured out the width of the fridge carefully and built a model with my kegs included. From that I determined that extending the refrigerator by approximately 12 inches would be sufficient to handle 3 corny kegs. I went with a 2x12 to form a horizontal collar for the fridge. Based on measurements of the width and height of the refrigerator, an 8 foot board was the perfect length (I ended up with about 1-2" of scrap). I cut it into four sections and screwed them together to form the collar. I painted it white to match the refrigerator and also glued a piece of acrylic to the front of the wood to give the door a better surface to seal against (I used a router to trim the acrylic to match the size of wood since it's a single monolithic piece).
I used 4 small strips of metal duct strap to attach the collar to the refrigerator. Since the refrigerator had mounting holes for the door on both sides, no new holes were required. The straps were also painted white to lend in. I put caster wheels on the bottom, with two mounted to the metal refrigerator frame at the back that holds the compressor, and two towards the middle of the 2x12 to reduce torque on the straps. The gap between refrigerator and collar was caulked from both sides, and the outside was also painted white. The door was mounted to the wood collar. Since I'm not giving the door a metal frame to seal against, I attached a velcro strap to the side of the refrigerator to keep the door closed.
The result is a nice deep refrigerator:
CO2 distribution
I purchased a 4-way gas distributor early in the project, though it turns out I only need three of the ports. This mounted nicely to the inside of the wood collar.
I drilled a hole through the collar for a CO2 inlet. On the outside, I have a 2-way gas splitter I'd purchased quite a while back (used it with picnic taps and two kegs) mounted to the outside of the collar. One of the ports passes through the collar, the other has a ball-lock gas quick disconnect so I can easily prime kegs and two liter bottles outside the refrigerator.
Beer Serving
I drilled three 1" holes through the door and mounted the shanks in place. I cut out a scrap piece of acrylic to fit over the back of the holes so that the mounting hardware would have a better surface than foam insulation material to fasten down to. It's not perfect, and the taps will rotate if you try, but it works.
Coil Condensation
It turns out that the coils are quite prone to freezing over, and thawing them results in quite a bit of water in the bottom of the refrigerator. The U-shape of the coils made a drip tray a bit of a challenge, especially since a tray large enough to fit under the entirety of the coils would push the kegs forward too much to allow the intended 3 kegs to fit. However, the door shelving has roughly the correct shape and size to form a nice U-shaped drip pan. I had to trim and re-glue it a bit to fit, but it works nicely now. I used a section of the shelves that already had holes drilled on either side with rubber grommets meant to hold a metal rack to keep shelf items in place. I had some extra copper pipe fittings laying around that fit perfectly in the rubber grommets with 3/16" ID tube fitting snugly over the other end.
I considered drilling a hole through the collar for the tube, but once the refrigerator gets cold enough, the humidity stays pretty low and it doesn't pick up much more condensation so long as it isn't opened for too long. So I just have the drip tray draining into a plastic jug that fits out of the way in a back corner of the refrigerator.
Cooling Capabilities
The refrigerator takes some time to get everything down to serving temperatures. However, the kegs take up the vast majority of the available volume, so when they're mostly full, I've got a pretty large thermal mass in there. To help things chill faster, especially with a new room temperature keg, I've taken to freezing a couple 2-liter bottles of water and putting them inside. Once things are chilled, it seems to be holding in the mid 40s F without too much trouble, even in my 100+ deg. F garage. It does seem to take a couple days to completely chill a keg though, but that's not too much of a problem.
To improve the cooling capabilities and to ensure the third keg will be adequately chilled, I decided to install a 120V cooling fan. I bent the smallest of the metal shelves and managed to fit it where the freezer section used to be. I used wire-ties to hold the fan in place on top of the shelf. Unfortunately, only one of the two wires came to the inside of the refrigerator, so I had to run a wire all the way to the outside back edge of the refrigerator to access power. The easiest way to do that was to make a small hole between the refrigerator and collar, and route the wire through there and underneath the bottom of the original refrigerator to the back side. I wired the fan in so that it turns on whenever the compressor does. It certainly isn't perfect, and I suspect the air circulation is mediocre at best, but it should help some.
Still to Come
I have young kids in the house, and the last thing I want to happen is for a curious two-year-old to wonder past the kegorator and pull a tap handle. Not only will it empty a 5-gallon keg of beer on my garage, it will also drain the contents of my CO2 bottle. I doubt my kids would end up drinking much of it, though that's also a potential concern, but the waste of good beer and the nightmare clean-up makes me want to minimize the chances of this scenario fairly soon.
I've come up with a good plan: I'll drill holes in a wooden board so it fits over my tap handles and extends mostly over the wooden refrigerator collar. I'll mount hinges on the collar and attach this board so it can rotate easily on and off of the tap handles. I'll also cut a slot in the board and mount an eye-bolt into the collar so that it fits through the slot. That way I can put a lock through the eye bolt such that the tap handles cannot be moved. I don't expect to actually need a padlock - a dowel rod through the eye bolt should be sufficient to keep the board in place enough to prevent accidents from a curious toddler - but it might be a nice bonus if I decide to upgrade to a chest freezer in the future and want to sell this to someone with roommates!
More Pictures

