Another option is to vorlauf after mashing in to clarify the wort before turning the pump on. I usually drain a gallon or two from the bottom valve and dump it on top of the grain. Once the wort is running clear, I hook up the pump and turn it on.
You are using an out of date browser. It may not display this or other websites correctly.
You should upgrade or use an alternative browser.
You should upgrade or use an alternative browser.
3-in-1 "Boil Kettle, Jacketed Chiller, Conical Fermenter" by Brewha
- Thread starter MeetsCriteria
- Start date

Help Support Homebrew Talk - Beer, Wine, Mead, & Cider Brewing Discussion Forum:
This site may earn a commission from merchant affiliate
links, including eBay, Amazon, and others.
Hgearle,Another option is to vorlauf after mashing in to clarify the wort before turning the pump on. I usually drain a gallon or two from the bottom valve and dump it on top of the grain. Once the wort is running clear, I hook up the pump and turn it on.
I never thought of doing that. Great advice. Should also help remove some of the fines with the malt.
Do you ever remove any solids from the bottom after mashing, before boiling?
Thanks...Ron8
Hi Ron8 et al.,Hgearle,
I never thought of doing that. Great advice. Should also help remove some of the fines with the malt.
Do you ever remove any solids from the bottom after mashing, before boiling?
Thanks...Ron8
At the end of the mash, I raise the temperature to 172+ and mash out for 10 minutes. Then, I raise the colander until it is above the wort and dripping into the kettle and continue to run the pump so I sparge the grains. I will let the wort flow until I get a few inches above the grain bed. There is still a lot of sugars to be gotten from the grain and this helps with efficiency. This can be done for 10 to 30 minutes until you feel you have gotten the most out of the grain. I then set the temp controller to 195F so as the wort is heating up as I remove the pump from the bottom and top of the BIAC. As the grain bed continues to drain, which can take 20+ minuets, the wort is heating up. At the end when I am tired of waiting for the the grain bed to drain, I place a large garbage bag over the mash tun so I can move the kettle outside my door to boil. This gives me the opportunity to start the boil as the last 2 quarts of wort are draining into the bag. I will then re-hoist the mash tun with the top and bottom handles connected to the hoist, raise it and then dump the grains into a large garbage barrel. If I think I need to, I will bring the half gallon of wort that was drained into the garbage bag over to the kettle and slit the bag with scissors to add the wort to the kettle.
The setup of the recirculating pump is only set aside, because I am going to hook it back up again once the boil is finished to whirlpool the hops and help with circulation during cooling. Heating the wort to boiling only take minutes now.
I recirculate from the bottom valve for the mash, BUT I recirculate from the wort transfer port for whirlpooling. With b1v1r 's great post (post 652) to build a whirlpool device, you can get a raging whirlpool not only to whirlpool hops for amazing juicyness, but to aid in cooling as you recirculate cold water through the jacket to cool the wort. Also, there is no reason to recirculate from the bottom valve where all the sediment is if you can do is at a higher altitude. I also have the SP400RA (1240) Racking Arm for Fermenters from Stout Tanks and Kettle($39.99) which I feel is a necessity for the BIAC. It gives you complete control over the depth or wort being transferred to your kegs. With the Racking arm facing right, and the raging whirlpool going right, you can dump on 8 ounces of juicy whirlpool hops and not worry about clogging your pump. But when you are transferring wort to your kegs, you are taking beer from about 2 inches above the level of the racking port outlet which is critical in getting clear wort into the keg. I almost always brew high gravity IPA's so the racking port hole is always covered in sludge. With the SP400 above, the wort is clear because the inlet valve is above the wort and I rotate the racking arm down as the beer transfers until I feel I an getting....not clear wort, then stop.
After my boil is finished, I hook up the pump again to the racking port (previously, the bottom port), and to the top to the whirlpool racking arm port connected to the kettle top. (I do purge the racking port before connecting).
Once the whirlpool is done, I hook up city water to cool to fermentation temp (I am lucky to have cool city water), then hook up to the chiller to hold whatever temp I desire.
I will finish with this ....the water your brew with is critical to what you are brewing. You cannot brew a Guinness Stout with German pilsner water and you cannot brew a German pilsner beer with water from Ireland. Maybe start with RO/distilled water and add salts (gypsum and calcium chloride) to get to you to where you need to be (https://www.homebrewtalk.com/showthread.php?t=198460).
I realize that there are many ways to brew with this amazing BIAC. If you see that I can improve on the way I am doing things....please don't be shy in telling me the way you do it. Thanks.
Cheers
PS. I still cannot figure out how to get this site to NOT turn my pictures sideways. If you can tell me how to display my pics the way they show on my computer, it would be appreciated.


Hi again Solstice,Here are a few pics:
First, the fermentation chamber (BIAC inside). The AC unit is hot-wired so that the fan and AC come on high when power is applied. This was a cheap workaround to make the system work like a cool-bot - but <$300. Also note that the cool side of the temp controller has cheap light timer that only allows the AC unit to come on for 2 out of every 3 hours to avoid icing up. Again, a cool-bot will do this as well, but costs a bit more.
This is the inside of the ferm chamber - Fermentation is about done, just doing a diacetyl rest on the RIS. The vacuum relief valve is on the other port behind the blow-off pot.
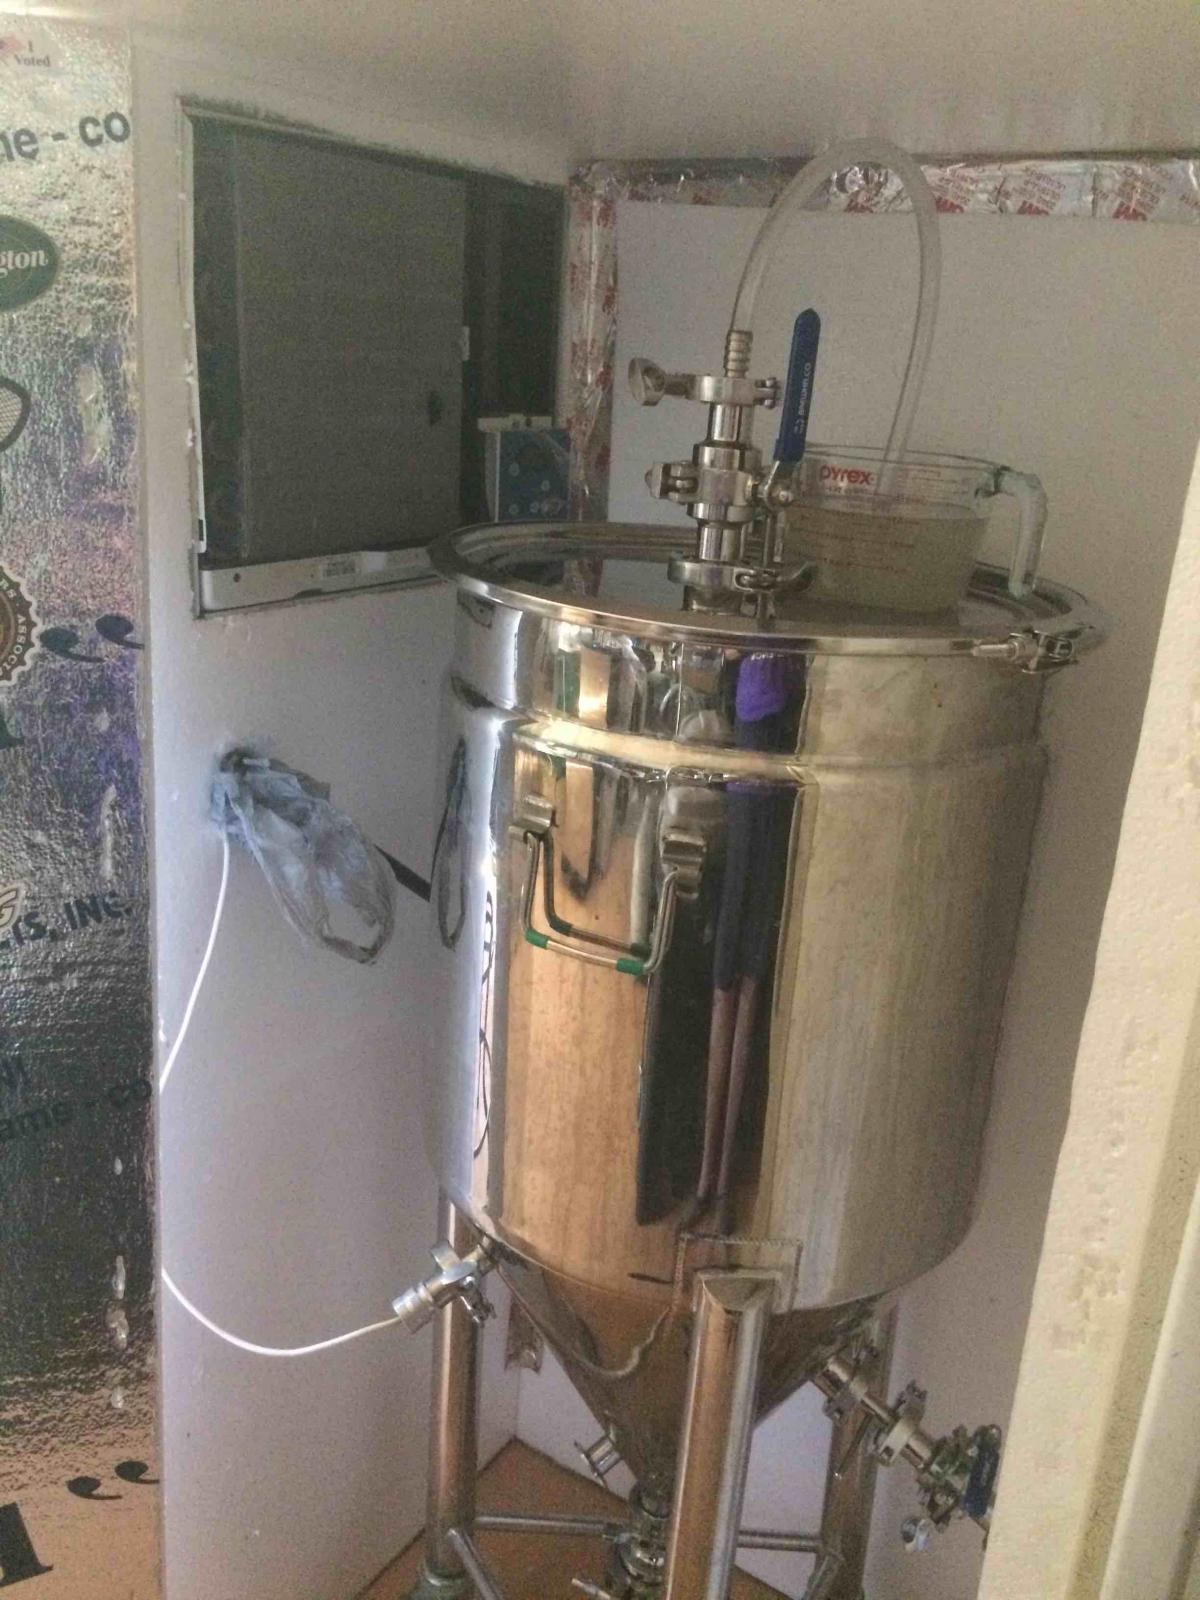
Here's the plumbing system for the whirlpool/chilling cycle.
https://www.homebrewtalk.com/attachment.php?attachmentid=399591&stc=1&d=1494201512
And last - my water collector. I catch the the water from the jacket and the plate chiller to use for clean up and watering the plants.
https://www.homebrewtalk.com/attachment.php?attachmentid=399592&stc=1&d=1494201512
cheers
I am copying your AC unit idea. Just wondering what your thought process was for deciding to sit the AC unit near the top of the chamber? instead of near the bottom. I understand heat rises. But I have been tossing around in my head what would be the best arrangement for getting the air to flow all over the outside of the vessel to hopefully achieve uniform cooling on all surfaces of the vessel.
I have just purchased the dual ETC from BREWHA. And will use the AC for cooling, while continuing my water circulation through the jacket when heating is required, using 90 F water in an insulated box, circulating with the pump.
I noted you used 2" insulating board. Any tips on how you cut the board? My neighbor handy man didn't think it wise to use a power saw. Too much bits of material flying around.
Thanks for your help,
Ron8
Solstice-Brewing
Member
- Joined
- Mar 12, 2015
- Messages
- 14
- Reaction score
- 11
Hey Ron8,
I figured putting the cold air in at the top would allow the colder, denser air to drop and mix it up a bit - allowing a more uniform temperature in the box. No calculations done - just seemed to make sense.
As for cutting the foam board, I just used my table saw. Yes, it made a bit of a mess, but not as bad as I thought it would. Certainly, the cleaner cuts were work a little sweep up afterwards.
Good luck with the new chamber!
SB
Thanks Solstice. I thought more about your set up and, likewise, I concluded at the top is best. The cold air will not impinge directly on the cylinder, avoiding local over-cooling.
I found the idea of using a sharpened putty knife and straight edge, 2 by 4, for cutting the insulation. Thanks for letting me know. It certainly would be faster with a power saw.
- Ron8
I found the idea of using a sharpened putty knife and straight edge, 2 by 4, for cutting the insulation. Thanks for letting me know. It certainly would be faster with a power saw.
- Ron8

Red Clay
Well-Known Member
I like the whirlpool you got from Norcal, Limulus.
Would you share the info you gave them to get the right dimensions? I'd like to make sure I don't get the 'length' and 'width' dimensions on their site mixed up and end up with one that won't fit my medium BIAC. Thanks!
Would you share the info you gave them to get the right dimensions? I'd like to make sure I don't get the 'length' and 'width' dimensions on their site mixed up and end up with one that won't fit my medium BIAC. Thanks!
I like the whirlpool you got from Norcal, Limulus.
Would you share the info you gave them to get the right dimensions? I'd like to make sure I don't get the 'length' and 'width' dimensions on their site mixed up and end up with one that won't fit my medium BIAC. Thanks!
1. Total length of the tube is 21.25in. from tip to tip.
2. From the TC flange that attaches to the kettle lid to the end of the tube is approx 19.25".
3. The section of tubing between the TC flanges is 1.5in.
4. The length from the bottom TC flange (the one that attaches to the kettle lid) to the middle of the 90-degree bend is 17in.
The bend on mine is 1-2 in above the seam where the cone joins the rest of the fermenter. I have not tried it yet, but plan to this next week. I also bought a racking arm from Glacier tanks.
I think that whirlpooling while cooling will greatly decrease the time needed to reach pitching temperatures.
I thought my explanation in my order was pretty accurate, but they called me anyway to confirm what I wanted. Of course keeping the top end of the tube straight was the most important part. The one on the Norcal site has a 90-degree bend. He made it the next day and shipped it. I was impressed that I had it w/in a week.
Red Clay
Well-Known Member
Thanks. Let me know how it works. If it needs a modification, I can get one to test it out.
xico
Well-Known Member
- Joined
- Jan 22, 2015
- Messages
- 328
- Reaction score
- 61
Interested in that setup as well, any pics?
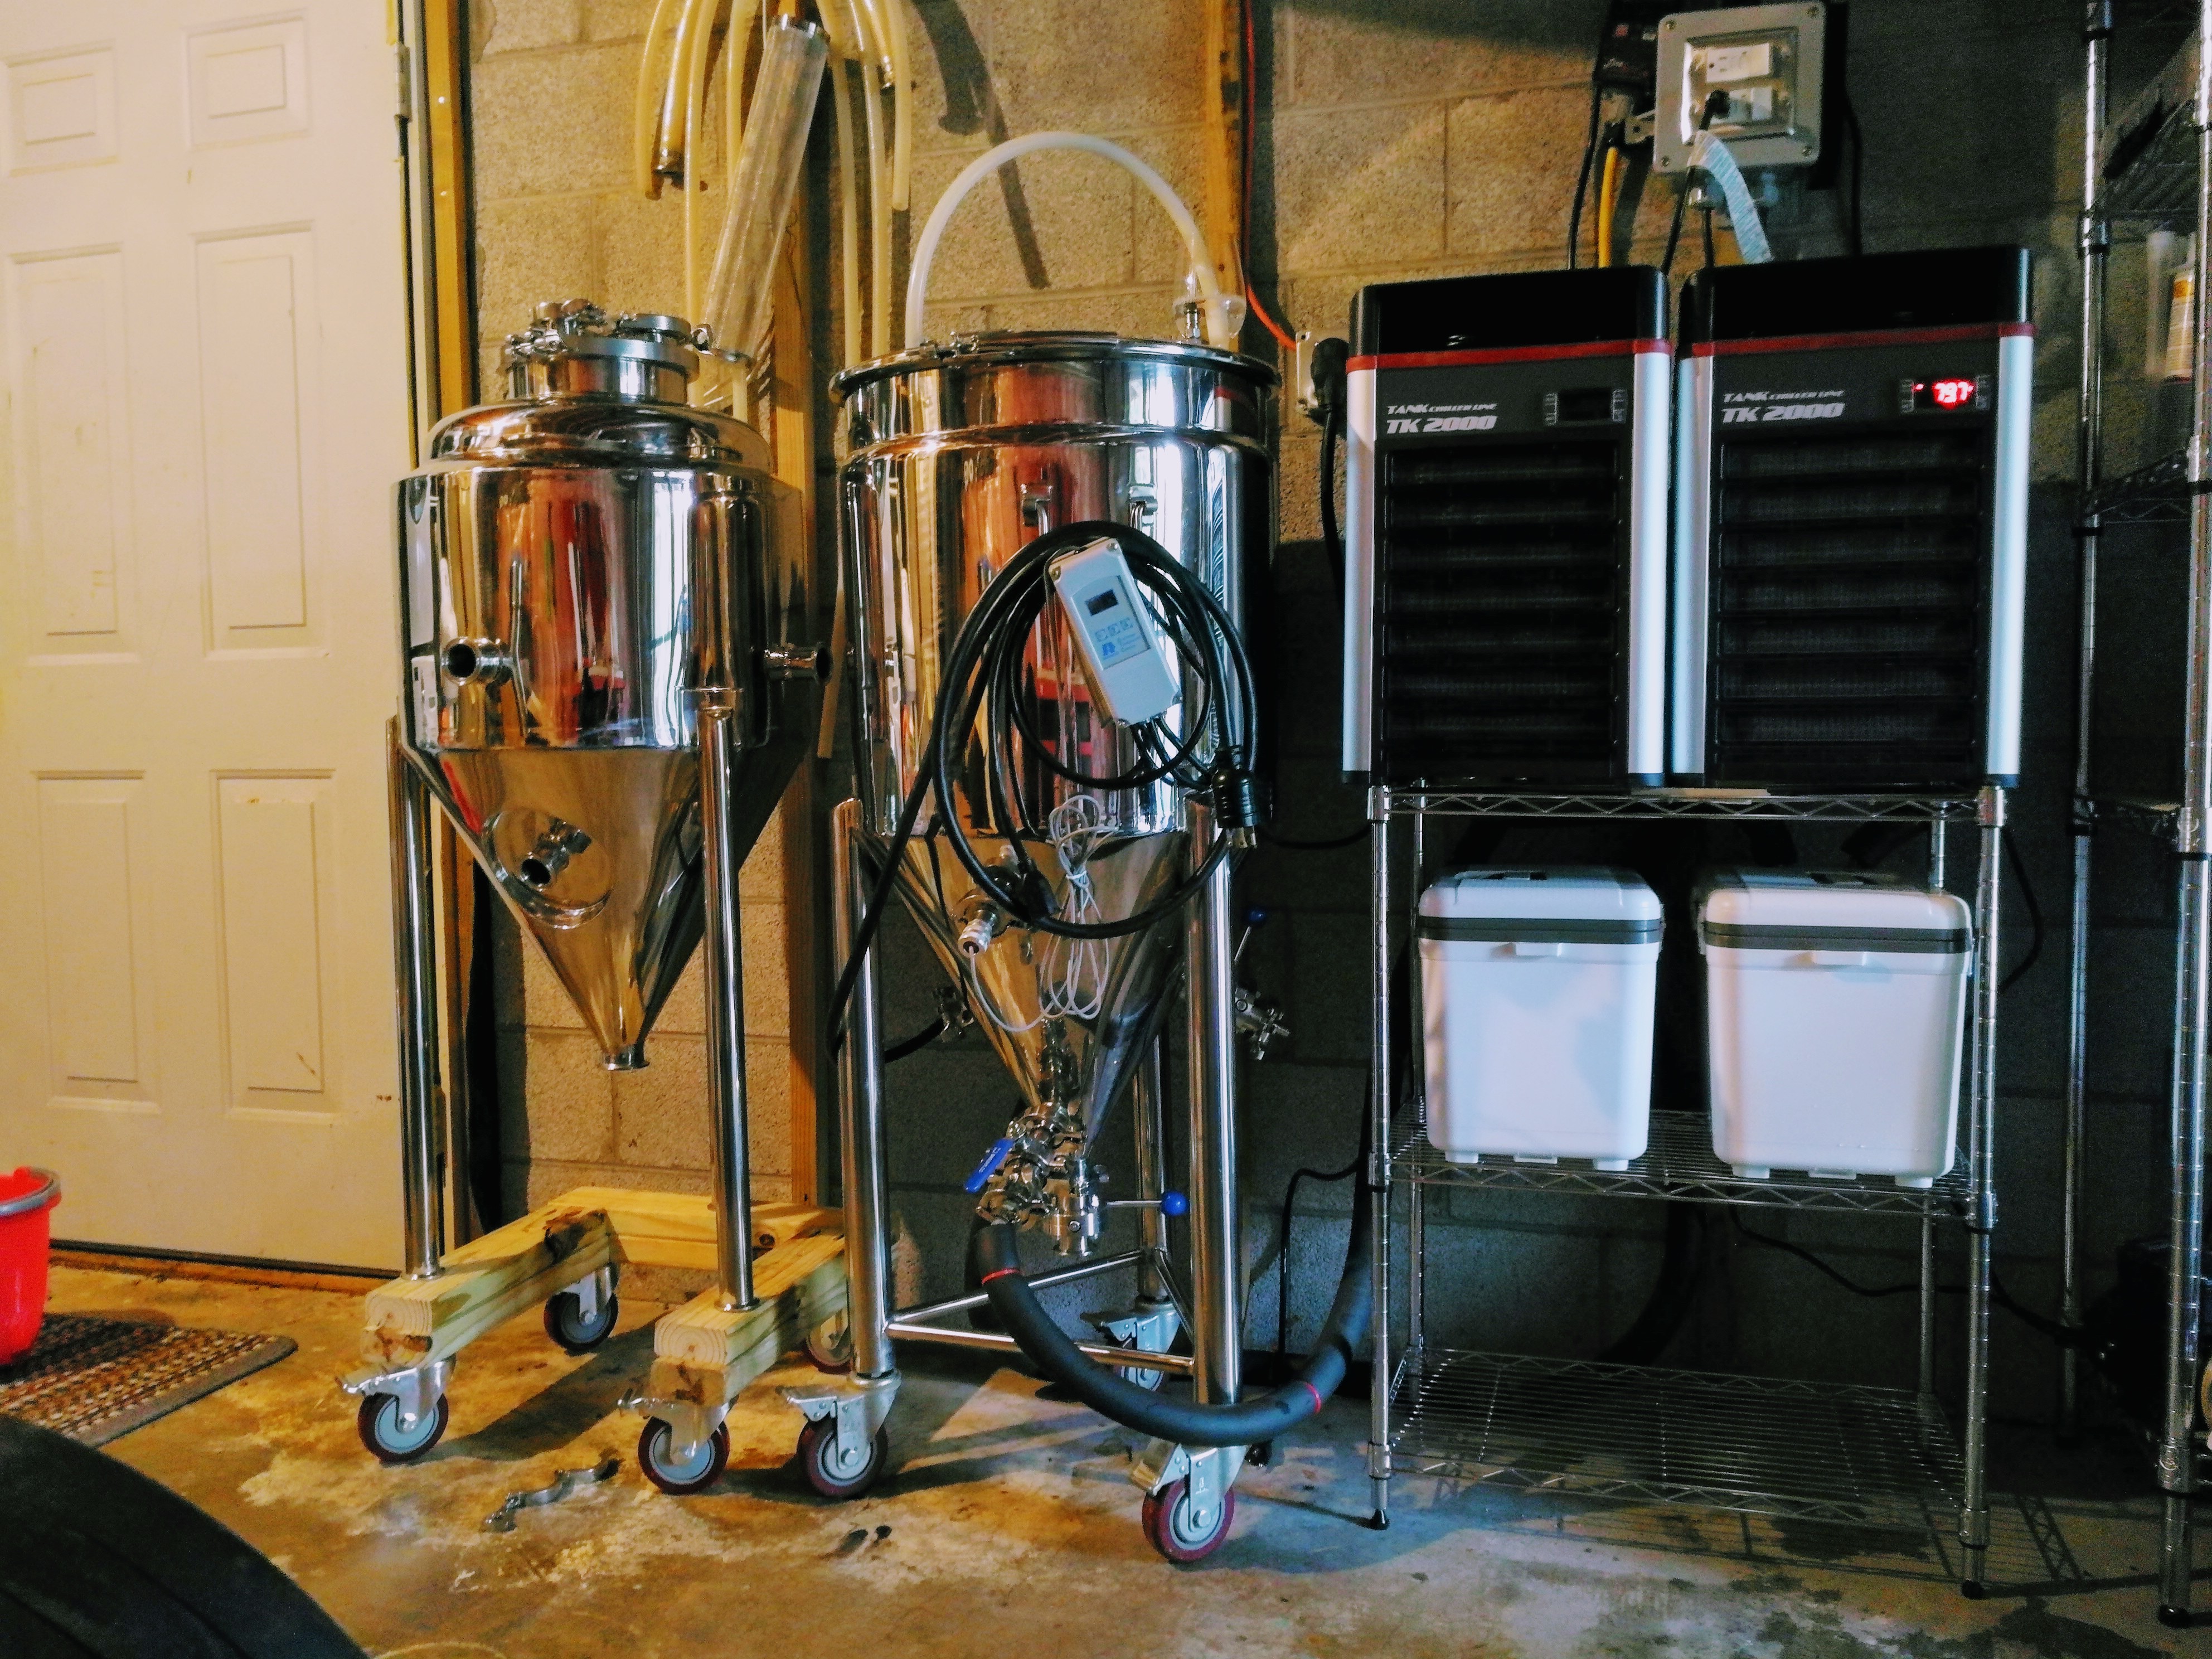
Well, I'm months behind in getting back with pictures of the setup but here it is! I finally have a phone with a camera again.
Image 1 shows our setup on a typical brew. We now mash with the colander raised to the second handles and use the auto-sparge to keep the grain bed submerged. We can brew bigger batches, bumped efficiency to 82-84% (up from 72-74%), and fly sparging allows us to only lift the colander when it is completely drained (better on the back) without disturbing the grain bed.
After adding our salts and acid we pump our sparge into the jacket, overflow is stored in a ported steel vessel (on right on the table). As we sparge the flow runs back into the jacket and then onto the grain bed.
Image 2 is the whirlpool arm we had fabricated by Brew Hardware, it attaches to the kettle lid with 2 90 degree elbows so the hosing won't kink. Recirc is between the racking port (with a butterfly valve, not ball valve) and the whirlpool port and is vigorous and fast. Don't mind the prosciutto meat mummy next to it, I couldn't be bothered to move it in a rush.
Image 3 is the chilling system. After we hit 95F/35C we move the conical to this freezer with a 14 gallon vessel of water held at 1.0C. Flow is controlled by a ball valve so as not to overshoot the temp.


Hi again Solstice, Got a question about your window AC modification. Did you have to deal with 20 gauge fan speed control wires? Did your AC have a low voltage control board?Hey Ron8,
I figured putting the cold air in at the top would allow the colder, denser air to drop and mix it up a bit - allowing a more uniform temperature in the box. No calculations done - just seemed to make sense.
As for cutting the foam board, I just used my table saw. Yes, it made a bit of a mess, but not as bad as I thought it would. Certainly, the cleaner cuts were work a little sweep up afterwards.
Good luck with the new chamber!
SB
My 12K BTU window AC has me stymied. I hot wired the compressor and fan power and common wires fine. The compressor powers up. But the fan does not. I have three 20 gauge fan speed control wires that only get power when the control board is energized. The fan speed wires are all hot wires, low, medium and high. Apparently at least one of the three fan speed control wires needs power.
I was wondering if you encountered this, and if so, what did you do with the fan speed control wires?
Thanks, Ron8
xico, when you mash with the colander raised to the second handles are you using the heating element? I assume you must be brewing much larger than 5gal batches using this method. I already ran one element dry and killed it when I got to ambitious with a recirculation, so this really caught my attention. The method is very interesting for sure. The bumped up efficiency is interesting. I just can't get rid of 10gal batches quick enough. I think I need to start hosting more poker nights and football games so I can brew larger batches of beer.
Thanks. Let me know how it works. If it needs a modification, I can get one to test it out.
I just ran a 5gal batch with this. Now that I'm post boil and in the whirlpool stage, it is not long enough for a 5gal batch in the medium BIAC. I now know I need to order a longer one. For 10gal batches, it is fine.
For those of you who have the Ranco controllers, have you changed to something else? I'm looking for something that may be a little easier to work with. For some reason, I just fumble around with this thing trying to get it to do what I want. I really dislike the LCD display. It is so hard to see at night w/o a flashlight shining directly on it.
xico
Well-Known Member
- Joined
- Jan 22, 2015
- Messages
- 328
- Reaction score
- 61
limulus, i am generally aiming for 55 to 75L (14.5 - 20 gal) depending on the batch. with the auto-sparge and manifold i can keep the mash filled 3 inches above the grain bed and there is plenty of wort in the conical. with this method i have a main fermentation in the vessel and i always transfer off for experimentation. most of the time i transfer off the conical in-line to converted sanke or corny fermenters to test yeast and bacteria varieties, hop usage, and conditioning practices.
my wife/brewmate and i don't drink most of the beer we make. when events are available we provide kegs and unload what we have but if there aren't options to pour i'm sad to say some amazing batches of beer get bottled to single case and dumped to make room for the next project. we've found expanding our cold-side efforts has meant we could brew fewer batches and still yield a spread of varied brews.
re: Ranco, I used them in the brewery i worked at and couldn't stand them myself. they are solid devices and in my experience dependable but not user-friendly. the auber controller that comes with the new brewhas are a step up from the model i got with my unit. but both have lit led screens so there's no fumbling for light to see the temp in a dark space. i have no complaints about the performance but the design of the gen 1 had the probe port pointing up so you have to awkwardly tilt it so as not to damage the cable. the manufacturer sell both models. i use inkbirds for my chest freezers but i don't think i would be comfortable using it with the brewha setup.
if you can wait, i spoke with the auber people about adding a data logging software to their etcs. they already wrote software for the their cheese/cured meat controllers and they will begin making a new model early spring that will record temps for brewers. i love looking at brew, fermentation, and conditioning via temp graph and i'm really excited about the prospect. not knocking brewpi, i tried it but i'm just not tech-savvy enough to utilize it without causing great frustration.
if i can get your input good people, i am looking for a way to improve my sparge system. right now i detach my pump input hose (breaking between two closed valves) and quickly move to the bottom jacket port before the wort above the grain bed drains off the top. i am considering a plumbing solution whereby i T-off the pump input with a three-way valve to seamlessly start the process. another thought is to have a tri-clover T with valves on either end. any challenges i'm not foreseeing or better solutions still lost on me? if you do it at all, how do you sparge?
Hello All,
I've been shocked twice when I touch my fermenter. I keep a small catch bucket below the lower port. All the condensation runs down the fermenter and into that bucket. The first time, we had been gone over the weekend and that bucket had overflowed. I assumed that was the cause of the mild shock. I immediately turned off all power and then emptied the bucket. Today, it happened again and the bucket is not full. Has anyone else experienced this? FYI, I do run a glycol chiller and I have the fermenter wrapped with reflectix. Today, it was the reflectix that shocked me. The first time, it was the leg of the fermenter as I was reaching for the water bucket.
Follow-up:
I just turned off the Ranco controller and touched the fermenter w/o getting shocked. The compressor on the glycol chiller was running. So, I wonder if the shock is from the Ranco? I put a meter on the fermenter and did not see any charge but the battery may be dead in the meter. Since I'm no expert in electricity, I wonder if I should run a ground from the tank to the garage door track which is a foot away? Or, will that make it worse?
To make matters worse, my inner liner is sucked in just a little and I use the vacuum release from Brewha. I also don't seal the lid until the wort has cooled to pitching temps. It is not so bad that my mash tun does not fit, but it is sucked in just a little. Damn annoying.
- Joined
- Feb 17, 2016
- Messages
- 7
- Reaction score
- 1
Hello All,
I've been shocked twice when I touch my fermenter. I keep a small catch bucket below the lower port. All the condensation runs down the fermenter and into that bucket. The first time, we had been gone over the weekend and that bucket had overflowed. I assumed that was the cause of the mild shock. I immediately turned off all power and then emptied the bucket. Today, it happened again and the bucket is not full. Has anyone else experienced this? FYI, I do run a glycol chiller and I have the fermenter wrapped with reflectix. Today, it was the reflectix that shocked me. The first time, it was the leg of the fermenter as I was reaching for the water bucket.
Follow-up:
I just turned off the Ranco controller and touched the fermenter w/o getting shocked. The compressor on the glycol chiller was running. So, I wonder if the shock is from the Ranco? I put a meter on the fermenter and did not see any charge but the battery may be dead in the meter. Since I'm no expert in electricity, I wonder if I should run a ground from the tank to the garage door track which is a foot away? Or, will that make it worse?
Experienced this during my last brew and the shock varied from barely noticeable to ouch that was a shock. After the batch finished fermenting a tore down the whole system and found the element in the housing had a loose ground wire, and after fixing it I have not seen the issue return. I am also running the system on Glycol with a Glacier Vacuum/PRV valve to be safe no issue so far but it is my biggest fear when I chill down to 35.
CamCan, thanks for the info. My element was not plugged in, so my situation is coming from something else.
On another note, I was so focused on the shock that I forgot to remove my blowoff hose while racking to my keg. Guess what happened...??? Yep, about a gallon of water and StarSan was sucked into the fermenter. I did not even know it until the hose started sucking air. The whole time I was racking, I thought something was off because I had more than 5-gal of "beer".
On another note, I was so focused on the shock that I forgot to remove my blowoff hose while racking to my keg. Guess what happened...??? Yep, about a gallon of water and StarSan was sucked into the fermenter. I did not even know it until the hose started sucking air. The whole time I was racking, I thought something was off because I had more than 5-gal of "beer".
xico
Well-Known Member
- Joined
- Jan 22, 2015
- Messages
- 328
- Reaction score
- 61
Oh boy, I've done that once myself and was pretty disappointed. Sorry to hear it!
Is your other electrical on GFCI breakers? That shouldn't happen if it is and that would cause more alarm for me. I transfer now attaching a triclover to flare threading and hook up my CO2 tank on 2ish PSI. This prevents any possibility of repeating the mistake.
Is your other electrical on GFCI breakers? That shouldn't happen if it is and that would cause more alarm for me. I transfer now attaching a triclover to flare threading and hook up my CO2 tank on 2ish PSI. This prevents any possibility of repeating the mistake.
- Joined
- Feb 17, 2016
- Messages
- 7
- Reaction score
- 1
I hate that. Inevitably I always forget something on brew day or when dumping trub/racking beer. I have caught myself with the hose half full before closing the valve, which is why I run it to the ground to give me a small chance of remembering before going too far
On a postive note I brewed this weekend and for once hit my target on OG and volume now that I figured out the stick that came with the system is 5l off what is actually in the tank. couldn't figure out what I was doing wrong, my efficiency was close to 60 and it made no difference what I did to correct it. It occurred to me last week I should measure exactly how much water I am adding, and check the stick to see if it is accurate (a small difference wouldn't hurt but 5 liters? ) so efficiency looks way better when you have the right amount of water and I also started double milling the grain.
Something is touching your BIAC with a current so trace it back as a small current will not trip that GFCI (it did not trip mine either) I would guess your ground is not correct and its transferring to the vessel and giving you a shock? Are you touching something else when you touch the vessel? IE if you were touching the chiller if not grounded correctly and the vessel at the same time would ground you and provide the shock if I recall correctly.
Oh boy, I've done that once myself and was pretty disappointed. Sorry to hear it!
Is your other electrical on GFCI breakers? That shouldn't happen if it is and that would cause more alarm for me. I transfer now attaching a triclover to flare threading and hook up my CO2 tank on 2ish PSI. This prevents any possibility of repeating the mistake.
My BIAC is one that uses the power box with two outlets. I run a GFCI plug from the main power box to the element. There are two outlets on the power box for regular current. I plug the Ranco controller into one of those outlets. The other outlet is used when I want full power to the element. If I want to use the Ranco to control the element, I plug the cord from the power box into the Ranco. The newer BIACs are different. I would hate to get zapped with 240v. When I'm not using the element, I plug a power strip with 8 outlets into one of the outlets on the main power box. Each of those has it's own switch. I think I may need a GFCI somewhere else in this chain. Maybe I'll get one of these:
https://www.amazon.com/dp/B000WJ7R4G/?tag=skimlinks_replacement-20
Last edited by a moderator:
Those that transfer from the BIAC to another conical - what is your process?
For the last 2 brews I have used the standard SS chugger pump and hoses that I use to recirculate the mash. Right when I flame (electric?) out, I have the pump hooked up to the bottom of the BIAC and to the inlet of the BH conical, open both valves and turn the pump on. Both times I have had a few hangups with the pump getting stuck with pellet gunk/trub. Had to pressurize the BIAC to get it moving again, then pump the rest out no problem. I'm not sure if the smaller outlet & line from the pump is causing the hangup or what. I'll then cool in my BH conical same as I would the BIAC.
I wouldn't mind transferring via CO2 with just the bigger hose from the chugger pump setup, but not sure how much CO2 I'll be wasting doing that and how much it will take to overcome transferring that much liquid into the bottom of the second conical. I'm not sure a trub filter like BH sells would help either as it would need to be on the outlet of the pump side where it gets stuck anyways. I may just need a bigger outlet hose from the pump.
JB_Brewing2
Well-Known Member
Those that transfer from the BIAC to another conical - what is your process?
For the last 2 brews I have used the standard SS chugger pump and hoses that I use to recirculate the mash. Right when I flame (electric?) out, I have the pump hooked up to the bottom of the BIAC and to the inlet of the BH conical, open both valves and turn the pump on. Both times I have had a few hangups with the pump getting stuck with pellet gunk/trub. Had to pressurize the BIAC to get it moving again, then pump the rest out no problem. I'm not sure if the smaller outlet & line from the pump is causing the hangup or what. I'll then cool in my BH conical same as I would the BIAC.
I wouldn't mind transferring via CO2 with just the bigger hose from the chugger pump setup, but not sure how much CO2 I'll be wasting doing that and how much it will take to overcome transferring that much liquid into the bottom of the second conical. I'm not sure a trub filter like BH sells would help either as it would need to be on the outlet of the pump side where it gets stuck anyways. I may just need a bigger outlet hose from the pump.
I fill a mason jar at the lowest valve then immediately hook up the larger hose to the lowest valve and start pumping right away. The pump, output hose, and other conical are all set up so there is no time for more sedimentation to occur. First few times I transferred I had the same issue you are experiencing. With the mason jar dump, no problems. Hope this helps.
When I whirlpool or transfer brew, I never use the bottom port due to trub. Instead, I use the racking port with the 90 degree extension that is rotatable. I just whirlpooled 15 ounces of hops for an hour for a 11 gallon batch without a problem (intake from the racking port and input through the lid port with 90 degree tubing). I could have easily transferred wort to a conical from the racking port after whirlpooling if desired.
PS...love all the ways that that the BIAC can be used to make delicious brew.

PS...love all the ways that that the BIAC can be used to make delicious brew.
K
keifu
Guest
I have the Medium size Brewha system w/chiller. After 2-years and 26-10gal batches I can say these are some of the best beers we ever had. My brew day, start to finish is 5 1/2 hours, maybe 6 hours if it's 90 degrees out. The fermentation temp control is spot on and made the biggest difference in the quality of my beers. I hear people say its a bit pricy, but you get what you pay for. Every item is commercial grade top quality. Clean up on brew day consists of wiping out the grain colander, and cleaning the yeast flask, that's about in. In my opinion it's the best 15-gal system out there, the only drawback is it does tie-up your system for 2-weeks a batch but really, how much beer can you drink?
I'll try the dump, then pump method next time to see how it does.
Is anyone doing non-pasteurized mixed culture/LAB ferments in the BIAC? I've just done Brett stuff mostly and a kettle sour. I know lacto is pretty easy to kill and typically, depending on strain, very hop resistant but Pedio is quite a bit more dangerous to have around. I don't think even at boiling temps the outer portion of the butterfly valve gaskets get hot enough to kill LAB bacteria. I think at minimum I'll get an extra set of butterfly valves for the drain and racking port for any co-pitched LAB fermentations. Gaskets I'll either have to keep separate or use the pressure cooker with them afterwards.
Is anyone doing non-pasteurized mixed culture/LAB ferments in the BIAC? I've just done Brett stuff mostly and a kettle sour. I know lacto is pretty easy to kill and typically, depending on strain, very hop resistant but Pedio is quite a bit more dangerous to have around. I don't think even at boiling temps the outer portion of the butterfly valve gaskets get hot enough to kill LAB bacteria. I think at minimum I'll get an extra set of butterfly valves for the drain and racking port for any co-pitched LAB fermentations. Gaskets I'll either have to keep separate or use the pressure cooker with them afterwards.
xico
Well-Known Member
- Joined
- Jan 22, 2015
- Messages
- 328
- Reaction score
- 61
I'll try the dump, then pump method next time to see how it does.
Is anyone doing non-pasteurized mixed culture/LAB ferments in the BIAC? I've just done Brett stuff mostly and a kettle sour. I know lacto is pretty easy to kill and typically, depending on strain, very hop resistant but Pedio is quite a bit more dangerous to have around. I don't think even at boiling temps the outer portion of the butterfly valve gaskets get hot enough to kill LAB bacteria. I think at minimum I'll get an extra set of butterfly valves for the drain and racking port for any co-pitched LAB fermentations. Gaskets I'll either have to keep separate or use the pressure cooker with them afterwards.
I've resisted the urge to throw LAB into my vessel since I stopped killing my souring microbes with pasteurization or a quick boil. Plasmids (bacterial genetic material) can survive brewing conditions and be incorporated into new cells. This is the dangerous aspect of brew equipment contaminants, most of which can't even be cultured to identify. Certain LAB are able to select for each microclimate in your brew system and it doesn't seem reasonable to help them along. I am not comfortable adding genetic code that could be harnessed by unwelcomed critters. Pedio is a very slow grower and possibly not useful unless you are ready to tie up your conical for 6 weeks or likely more.
I haven't tested autoclaving the valves and pump heads (all non-silicone gaskets removed) but I've run the soft hosing through several runs and holds up well. If it works that's about the only way I'll be ready to sour a beer the way I'd prefer in the BIAC. For now I just sour in a SANKE dedicated to LAB.
Did a search on plasmids on MTF wiki and really didn't come up with anything. A lot of breweries share equipment between clean and LAB stuff and even use Brite tanks between the two as mixing tanks or ferment tank - just being careful using anything soft between the two like hoses, gaskets, etc where they have a better chance of surviving. I just use CO2 pressure and a silicon hose to transfer to corny's so not worried about having two pumps. Even if you autoclaved the non-gasketed parts of the pump, the gaskets and soft parts are where the problem lies. Pedio I would probably keep separate but Lacto I don't think should be a big problem, if you have grain anywhere near any of your equipment it's covered in all kinds of strains anyways
xico
Well-Known Member
- Joined
- Jan 22, 2015
- Messages
- 328
- Reaction score
- 61
Did a search on plasmids on MTF wiki and really didn't come up with anything. A lot of breweries share equipment between clean and LAB stuff and even use Brite tanks between the two as mixing tanks or ferment tank - just being careful using anything soft between the two like hoses, gaskets, etc where they have a better chance of surviving....
I should have given some references, apologies:
http://www.worldbrewingcongress.org/congress/Abstracts/Pages/016.aspx
http://www.worldbrewingcongress.org/congress/Abstracts/Pages/018.aspx
By now these are surely put out in journals if you run a search on the authors or title.
Agreed that soft materials are mainly the culprit. silicone plumbing is an easy pressure cook away from sterile though. I will try a ball valve some time soon and see if it can handle the autoclave process. That said though, there is a big difference between knocking back wild bacteria, and culturing 10s of millions per mL in your equipment. Grain microbes are largely pasteurized early in the mash process (even for complicated step mashes) and aren't active and reproducing when introduced.
It might be over-caution but I personally opt for a separate vessel for LAB incubation, regardless of whether some breweries mix or not.
@limulus, I bought mine at a local shop.
Thanks for the links. I'll definitely still keep pedio separate from the BIAC, and stick with lacto only if I do decide to pitch in the BIAC. Post up the results if you actually autoclave the ball valves and what your process is 
NHBrews
Well-Known Member
When I whirlpool or transfer brew, I never use the bottom port due to trub. Instead, I use the racking port with the 90 degree extension that is rotatable. I just whirlpooled 15 ounces of hops for an hour for a 11 gallon batch without a problem (intake from the racking port and input through the lid port with 90 degree tubing). I could have easily transferred wort to a conical from the racking port after whirlpooling if desired.
PS...love all the ways that that the BIAC can be used to make delicious brew.
For your input on the whirlpool does the wort simply splash down from the lid port back into the BIAC?
Does this set up generate enough spinning in the wort to keep the hops in suspension?
I've had lots of issues with clogged pumps when intaking from the port at the bottom when I use more than 8oz of hops in my whirlpool.
kproudfoot
Well-Known Member
- Joined
- Apr 4, 2015
- Messages
- 188
- Reaction score
- 15
Following
xico
Well-Known Member
- Joined
- Jan 22, 2015
- Messages
- 328
- Reaction score
- 61
For your input on the whirlpool does the wort simply splash down from the lid port back into the BIAC?
If it helps for me to chime in here, some of us use rigged systems to recirculate through a steel tube from the racking port into the top. One person here came up with the use of a steel racking arm and a compression fitting fitting to Tri-clover to keep everything sealed.
I opted to have a whirlpool arm fabricated by brewers hardware that I took a photo of some pages back in this thread. It's a tube with a 90 degree elbow at the base and a tri-clover ferrule at the top to seal to the lid.
For hop clogging issues I would recommend using a bag or screen for pellets. There are baskets at local shops that are all stainless and reasonably priced (25ish dollars). Utilization goes down a bit but clogging drops from some percentage to zero and worth a little extra hops in my opinion over a clogged port/hose/pump.
If you want to keep working with what you have for hardware another option is to do all bittering with extract and only add flavor/aroma hops as desired. This is cut down on ounces of dried material that don't need to soak up your hard-earned wort and will be standardized and therefore accurate in IBU targets so long as your volume is on point.
NHBrews
Well-Known Member
If it helps for me to chime in here, some of us use rigged systems to recirculate through a steel tube from the racking port into the top. One person here came up with the use of a steel racking arm and a compression fitting fitting to Tri-clover to keep everything sealed.
I opted to have a whirlpool arm fabricated by brewers hardware that I took a photo of some pages back in this thread. It's a tube with a 90 degree elbow at the base and a tri-clover ferrule at the top to seal to the lid.
For hop clogging issues I would recommend using a bag or screen for pellets. There are baskets at local shops that are all stainless and reasonably priced (25ish dollars). Utilization goes down a bit but clogging drops from some percentage to zero and worth a little extra hops in my opinion over a clogged port/hose/pump.
If you want to keep working with what you have for hardware another option is to do all bittering with extract and only add flavor/aroma hops as desired. This is cut down on ounces of dried material that don't need to soak up your hard-earned wort and will be standardized and therefore accurate in IBU targets so long as your volume is on point.
Thanks, this is helpful. I have been considering the bag route, but always concerned about it hitting the heating element. I'll have to keep an eye out for the baskets, that sounds like a much better option. I've gone up to 1lbs of hops in my bigger NEIPAs (14oz post flameout), will the baskets you speak of handle this amount of hops?
xico
Well-Known Member
- Joined
- Jan 22, 2015
- Messages
- 328
- Reaction score
- 61
The local homebrew shop will likely be able to order them for you as they did for me. I bought three and have used them a bunch. I have mainly been using flower rather than pellet and I generally add about 500g (a bit over a pound) of late and whirlpool additions. I don't see why you couldn't add something comparable with pellets.
The handle prevents total lid seal. I personally don't worry too much about that but if you are concerned another alternative is to add late boil additions in a basket or two and drop whirlpool additions in with nylon bags with unwaxed and unflavored floss or butcher's twine (boiled) tied on the end you can link to the conical handle. Once you are in whirlpool I wouldn't worry about the element burning plastic. I would wait a little after flameout and drop them in.
I second the racking port with an arm on it. You can get every bit of beer from your conical that way and I've added at least a couple liters to my finished batches with it.
Similar threads
- Locked
- Replies
- 15
- Views
- 3K
- Replies
- 17
- Views
- 2K
- Replies
- 7
- Views
- 463
- Replies
- 1
- Views
- 651
