1-Gallon Brewers UNITE!

Homebrew Talk - Beer, Wine, Mead, & Cider Brewing Discussion Forum

Help Support Homebrew Talk - Beer, Wine, Mead, & Cider Brewing Discussion Forum:

This site may earn a commission from merchant affiliate links, including eBay, Amazon, and others.
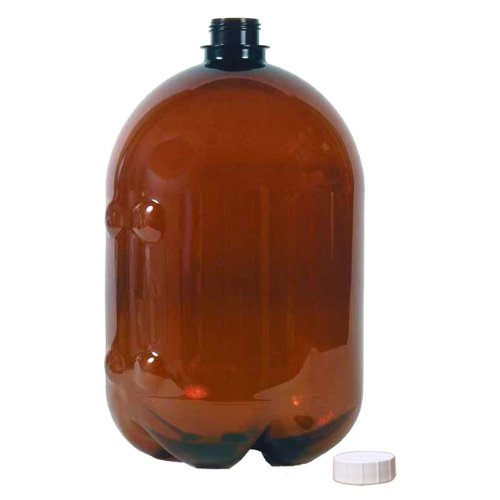
Do you have access to some large PVC? Without knowing the dimension on those bottles (they look like the Party Pig bottles to me, with those little feet and the fact it's supposed to be on it's side - your original pic looks like the ones you'd get from the old Miller/Coors party boxes), you could cut some rings of PVC pipe (like 8" or 6") and rest them upright in the rings.

Otherwise maybe some 2gal buckets cut down?

A 2x12" with some circles cut in it?
 
SBD: Huzzah! Glad to hear that the beer was better/different than the last time that you tasted it. I believe, based on the strong bourbon flavor and the ABV, that bourbon is an ingredient, as well as a fermenting container.

I have a few old Red Line Hot Wheels to sell on Ebay to use as seed money for some of the pricier hobby purchases.. I've had a few of the Camaro Hot Wheels sell for nearly $300 apiece. I just need one or two more like that, and the wifey-unit won't have a complaint about what I do in the mancave.
 
Do you have access to some large PVC? Without knowing the dimension on those bottles (they look like the Party Pig bottles to me, with those little feet and the fact it's supposed to be on it's side - your original pic looks like the ones you'd get from the old Miller/Coors party boxes), you could cut some rings of PVC pipe (like 8" or 6") and rest them upright in the rings.

Otherwise maybe some 2gal buckets cut down?

A 2x12" with some circles cut in it?


They measure roughly 7" in diameter, plus the embossment where the feet are. 8" PVC might work. I have no idea what short lengths of it goes for, but it'd be worth a look. I could also make some wood crates (kinda like using milk crates for 5 gal carboys). I've probably got enough scrap wood on-hand to make that a no-cost equation for me...
 
For those interested by the Tap-A-Draft bottle conversation (for 1.5 gal fermenters), I received my order for (3) of them today.

I'd seen this picture of the bottle on Amazon:
41dD%2BdALZQL.jpg


and this one on Morebeer (which is where I ordered):
8451.jpg


What I received is this:
7821b_1.jpg


Either there are multiple versions of this bottle out there, or there's been a mfg change.

Unfortunately, with the round bottom, I'm going to have to find a creative way to keep these upright to make them useful as fermenters.

I could return them, I suppose, and re-order from the Amazon source, but I'm debating if it's worth it...

I want one with the tap!! Actually I would need to because I have the 2.5 Gallon fermentor. Gonna get a couple batches under my belt before I invest tho

Sent from my ADR6410LVW using Home Brew mobile app
 
Ivan - you'll need to look for a few scraps of 8" PVC , you don't want to pay for a 10' length, trust me. I think the wood frame would be the way to go, if you already have the raw materials available.

Beerlover - Go cornie! More cash up front, but that's the direction I'm heading. That and a beer engine with some polypins for fun.

As long as we're talking about beer storage, I need to get off my rearend and make some slat crates for my bottles. My original cardboard boxes are starting to get ragged, and I'd hate to lose a batch to a box giving out.

Should I make them for 12's, 16's, or 24's? I'll always have a few stragglers, but those get cleaned up pretty quick. :mug:
 
I want one with the tap!! Actually I would need to because I have the 2.5 Gallon fermentor. Gonna get a couple batches under my belt before I invest tho

Sent from my ADR6410LVW using Home Brew mobile app

What I see is a cone bottom fermenter ;-) ........... Turn it upside down, and put a spigot in it.........but I don't know how you would get a spigot attached.......... Kind of like building a ship in a bottle. I see a hole in the bottom (now the top), a spigot on the side, and a valve on the bottom........... Your trub collects in the bottom tapered portion, giving you more recoverable beer if your spigot was located properly.

H.W.
 
I haven't yet brewed a batch as small as one gallon............... I've done 5 gallon batches in the past, 2 gallon ones recently, and now a 2.5 gallon one. 2.5 - 3 gallons is optimal for me due to equipment size.

As the big boys point out, the time involved in brewing small is far more per bottle of beer than brewing 200 gallons. Our arguments in favor of small batch size is space, equipment size, and variety. Also if we screw a batch up, it's only a few bottles..............

But here's the real liability................ I suspect this applies to most of us........ I'm like a kid in the kitchen. I have to taste everything. I taste the wort, hot and cold, I chew on hops, and I can't wait to try the latest batch. Give it a few days in the bottle, and I have to open one and try it........ a few days later, another. When the carbonation level is decent, the incentive to "see how it's doing" becomes greater. Is it improving in the bottle? Yesterday's bottle was an improvement over the one two days ago, I wonder what till taste like today? "Yes! That's a definite improvement! I'll have another one in a couple of days" ............. "I had one only yesterday......I'd better wait..... Oh what the hell, I'll try one today" ............. Oops. That last one was really good, but there's only 2 left!

............ It's bad enough with two gallons, I can't imagine with 1!!

H.W.
 
I haven't yet brewed a batch as small as one gallon............... I've done 5 gallon batches in the past, 2 gallon ones recently, and now a 2.5 gallon one. 2.5 - 3 gallons is optimal for me due to equipment size. H.W.

Oops...........That doesn't sound good ;-(....... by equipment size I mean the size of the pots I have to work with............. ;-)

Thought I ought to clarify that before someone else had fun with it ;-).


H.W.
 
Owly - I hear you on the sample issue. The only thing that gets me by is that with 3 fermenters running constantly, there's always something to sample and check on by the time I get around to cracking a finished beer. It was hard initially, but once the pipeline was up and running I actually find it harder to NOT find a reason to brew than to get the kitchen dirty. I just love brewing - and there's just so much data to play with, it encourages me to continue brewing.

AFA your conical idea, I thought about something similar but what I came to the conclusion was that the angle of the PET bottle at the mouth is not steep enough to effectively collect the yeast/trub to drain. You might get it down there, and it might drain a little, but it's not steep enough to use the weight of the wort to push the yeast/trub out.

I even looked at the smaller 4gal HDPE inductor tanks, and after running the numbers on the slope, it's got the same issue.

Honestly, other than looking really cool, I'm not positive that conical would really benefit small batch brewing. Yeast harvesting is relatively simple, and with the smaller volumes you could easily set up a farm and culture before pitching vs trying to reclaim afterward.

Still scratching my head on the topic, honestly.
 
AFA your conical idea, I thought about something similar but what I came to the conclusion was that the angle of the PET bottle at the mouth is not steep enough to effectively collect the yeast/trub to drain. You might get it down there, and it might drain a little, but it's not steep enough to use the weight of the wort to push the yeast/trub out.


There actually used to be a commercially available product to turn a carboy into a conical this way. It never came into favor for exactly the reasons you mention...
 
Owly - I hear you on the sample issue. The only thing that gets me by is that with 3 fermenters running constantly, there's always something to sample and check on by the time I get around to cracking a finished beer. It was hard initially, but once the pipeline was up and running I actually find it harder to NOT find a reason to brew than to get the kitchen dirty. I just love brewing - and there's just so much data to play with, it encourages me to continue brewing.

AFA your conical idea, I thought about something similar but what I came to the conclusion was that the angle of the PET bottle at the mouth is not steep enough to effectively collect the yeast/trub to drain. You might get it down there, and it might drain a little, but it's not steep enough to use the weight of the wort to push the yeast/trub out.

I even looked at the smaller 4gal HDPE inductor tanks, and after running the numbers on the slope, it's got the same issue.

Honestly, other than looking really cool, I'm not positive that conical would really benefit small batch brewing. Yeast harvesting is relatively simple, and with the smaller volumes you could easily set up a farm and culture before pitching vs trying to reclaim afterward.

Still scratching my head on the topic, honestly.

Actually, I've thought about that a lot.........The trick with the plastic bottle would to flick it with your finger tip whenever you waked by.... This would cause the trub to slip down the slope. I've thought a lot about the carboy conversion (glass)......... I think it is doable,l but it of course would require you to jar it periodically.

H.W.
 
The other day I did a 2.5 gallon batch, and it's bubbling merrily away. It was made from left overs and some melanodin somebody gave me. I still had 2.25 lbs of 2 row, and some crystal 60 I wanted to get rid of. I wanted something really light for a change, so I plugged things in and decided to use the 2.25 lbs of two row, along with some rice that I haven't been using ..... ordinary rice from the kitchen, and just a pinch of CR60. I also have some East Kent Goldings hops and some Northern Brewer.......not much at all of either.

Decided on the spur of the moment as it's too windy to do what I should be doing today....... that I'd brew instead....... Mashing at 155......... I don't want it too light bodied and dry, I'll let the mash temp taper off though. We'll see what I come out with. Didn't even measure the 60.... just reached in and grabbed a couple pinches.

Batch size will be 1.5 gallons, and I'll brew it in one of my 2 gallon glass Ice Tea jugs by Yorkshire. I've used these before. The steel lid doesn't seal, so I wrap them with black electrical tape, and that seals them tight enough that the F lock bubbles....... That pretty much uses up all my grain except for 3/4 pound of crystal 60.

Took very little time........I'll go out to the shop now and come back in an hour and a half or so, and do the boil...........

I'm going to order a few pounds of RedX (Best Malz), and try a nice red ale next moderately hopped.........

H.W.
 
i'm thinking about ordering up some of the RedX also - looks like a fun malt to play with on a couple beers. That and possibly some gluten free grains/enzymes so I can play with that eventually. I doubt it'll take over my regular brewing, I'm not gluten intolerant or know anyone who is, but it'll be fun to play with.

Tried my oak aged oat ale tonight. Ooofda, this one's going to have to sit for a few months. Dang it, oh well, it's only beer! :)
 
I have a couple partial grain brew days under my belt now and am considering getting into some all grain brew in a bag kinda stuff. How steep is the learning curve for that? I did some research and it didn't seem too difficult? Is it just mashing grains for about 60 minutes at about 150 or so, followed by 10-15 minutes at 170, then draining the bag and boiling as usual?
 
I have a couple partial grain brew days under my belt now and am considering getting into some all grain brew in a bag kinda stuff. How steep is the learning curve for that? I did some research and it didn't seem too difficult? Is it just mashing grains for about 60 minutes at about 150 or so, followed by 10-15 minutes at 170, then draining the bag and boiling as usual?

Just as easy as you stated.

1) put enough water in for your total boil amount, plus the water your grain will absorb - OR - short yourself by about a half gallon, then see how much is left after you pull the bag and make up the difference with sparge water.

2) As you're warming up your water, turn your oven on LOW, like the lowest setting you have, and then when you stir the grains in turn the oven OFF. Put the now mashed in grains into the pre-warmed oven and set your timer for 60min. Forget about it, come back in and hour.

3) Raise the temp up to 170, let sit for 10min, then drain the bag (use a collander to hold it over the pot, or a grill grate, or a cookie drying rack, you'll figure it out - no need to hold it physically). Measure your water and make sure you have enough for your boil, if not, pour some 170deg water over the grain bag until you have the correct amount of wort.

4) BOIL!

5) ?????????????

6) Cool/pitch yeast/drink beer and celebrate an all-grain brew day. (PROFIT!!!) :rockin:

Thanks! Is it possible to do it on the stove top? My stove seems to hold temperature pretty well based on the steeping I did in my first two batches.
 
Yep, if you trust it and want to watch it, just hold the mash temps for an hour. I like the oven trick because it's set/forget and lets me get started on the rest of the stuff that brewday has (hop measuring, carboy clean/sanitize, etc).

I don't trust my stove top to keep the temps close, much less want to watch it like a hawk as the coil cycles on/off.
 
View attachment 186046
Just dropping in to post a pic of my setup. I've only done 1 gal brews with it so far, but I think I can get a half batch (2.5-2.75 gal) out of it depending on how much grain it takes.

The nice thing about what I have here is that the hardware on my Walmart pots and mini cooler can be moved to something bigger if I decide I want to! But, for now, everything can fit into a big Rubbermaid tub! I've even offered to lend the system to friends that are thinking about moving into AG brewing.

It's also fun pulling out the digital scale and separating the ingredients into fifths! who new that medicine containers would be good for hops? Good thing I'm a hoarder. (yogurt and coffee containers for grains)

I was considering a wort chiller, but I can drop temps for 1 gal in <10 minutes in the kitchen sink!


Sent from my iPad using Home Brew

Hey Danno, what's the cost/labor for putting that metal spigot into your rubbermaid cooler along with a false bottom? I've been thinking about setting up one of those. Thanks for sharing a photo of your set-up!
 
Having had mixed results with all-grain brewing (due to a combination of what I believe to be slightly high fermentation temps along with under-carbonation of bottles), I have decided to temporarily try my hand at some "easy" brews - i.e., extract kits.

I ordered the 1-gallon Bav Hef kit from NB, and right now the yeast sex is on hyperdrive. I have never seen so much bubbling out of the blowoff tube - I probably pitched closer to 60-65% of the dry yeast packet instead of 50%. Whoops. I'm still at around a 73-75 degree range, so hoping that's not too high. Anyone try the hefeweizen before?
 
Sumbrewindude:

I saw you liked the kolsch you tried. My friend and I are trying to brew some kolsch using this recipe: http://beersmith.com/blog/2008/04/05/brewing-a-kolsch-beer-recipe-beer-styles/.

What recipe are you using? We haven't started yet (he's doing a 10-gallon extract, and I'm doing a 2.5 gallon extract with my old Mr. Beer fermenter).

Anyone else want to share some tried and true kolsch recipes? I'm willing to try all-grain too after giving extract a shot first.
 
Thanks! Is it possible to do it on the stove top? My stove seems to hold temperature pretty well based on the steeping I did in my first two batches.


It is, but as sumbrewindude said, it just takes more attention. And with the smaller volume (I assume you're talking about a one gal batch, based on this thread), it's harder to maintain temps over time (less thermal mass = faster temp swing to equilibrate with ambient temps). It helps to insulate your kettle (blanket, towels, sleeping bag, heavy jacket, etc), but even when I did that I would still have to add some heat from the burner, and then worry about burning the bag (always stir or lift out when adding heat) or overshooting my desired temp (which I invariably did).

Once I started using the warm oven method (my 5 gal or 3 gal kettles both fit in if I remove one of the racks), I haven't lost more than one degree F over the course of a one hour mash... Much easier in my opinion!


Sent from my iPad using Home Brew
 
Hey A_Power!

I read up on Kolsch's from the BYO article (https://byo.com/brown-ale/item/1881-koelsch-style-profile) and developed my recipe off of that, while fitting into the Brewtarget style guidelines. I haven't had a chance to order up the ingredients, but if you'd like the run down I can post it. The key really looks like the ferm temp as well as the yeast. Pretty much everything I've seen said use the Wyeast 2565, so that's what I'm going to do.

Biermuncher's got a Kolsch recipe also with honey malt (Krisp Kolsch), and I've spied a few more. I'm gonna keep it simple for the first go around, let the yeast to do the magic.

AFA the parts list for the cooler, I can check and see if I still have the receipts for my 5gal cooler conversion, it wasn't too expensive at all, using 3/8" hardware and some washers.

Hefe yeast is a monster, almost like hot Notty. Which yeast did you get with your kit? Must have been a dry yeast, I'm wondering if it was Fermentis (WB06) or Danstar?

If you're having issues with ferm temp, get a cheap foam cooler (big enough to fit your carboy) and a couple refreezable icepacks/bag of frozen peas. One bag in with your beer should easily hold it around 65 for the day, then toss in another and freeze the first up again. You only need to worry about it for primary fermentation, then you can let it warm up to room temp (5-6days). Carb issues, well, I'm still working on those. :D
 
I mentioned that I was mashing a 1.5 gal all grain batch yesterday.......... One of the joys of small batch is that you can experiment.......... I used partially cooked rice run through the food processor........ why not? I wasn't eating it. I also put in half a cup of honey to bring the gravity up where I wanted it, and I put some grated fresh ginger in, as I've been wanting to know what ginger would do in beer...............

I didn't start out with a recipe, I just wanted to get rid of what 2 row I had left, and the hops I had left so I could start with a clean slate next go around. I assessed what I had available.... 2 row and some crystal, and not quite enough hops....... but also the rice and some ginger.......... Figured the ginger heat could stand in for some of the hops I didn't have enough of, and the rice and honey allowed me to stretch to 1.5+ gallons which is optimal for my 2 gallon ice tea jug fermenter. OG 1.06

Is this any sane way to brew beer??? but I don't really have anything in it in terms of cost. I'm sure it will be drinkable, and probably will finish out around 5% abv............ It should only yield around 12 bottles....

H.W.
 
Owly, I don't see any issue with it at all. AFAIC, small batch brewing is centered around experimentation; doing things differently, using ingredients differently, allowing creativity and experimentation to take hold of the process and just run like a bull in a china shop.

I know a lot of brewers pride themselves in consistency, and for large volumes of the same product day in and day out, I could see definite merit in that.

For me, I do like consistency in the process, but above all I live for the experiment and what's this going to taste like.

:mug:
 
Hey A_Power!

I read up on Kolsch's from the BYO article (https://byo.com/brown-ale/item/1881-koelsch-style-profile) and developed my recipe off of that, while fitting into the Brewtarget style guidelines. I haven't had a chance to order up the ingredients, but if you'd like the run down I can post it. The key really looks like the ferm temp as well as the yeast. Pretty much everything I've seen said use the Wyeast 2565, so that's what I'm going to do.

Biermuncher's got a Kolsch recipe also with honey malt (Krisp Kolsch), and I've spied a few more. I'm gonna keep it simple for the first go around, let the yeast to do the magic.

AFA the parts list for the cooler, I can check and see if I still have the receipts for my 5gal cooler conversion, it wasn't too expensive at all, using 3/8" hardware and some washers.

Hefe yeast is a monster, almost like hot Notty. Which yeast did you get with your kit? Must have been a dry yeast, I'm wondering if it was Fermentis (WB06) or Danstar?

If you're having issues with ferm temp, get a cheap foam cooler (big enough to fit your carboy) and a couple refreezable icepacks/bag of frozen peas. One bag in with your beer should easily hold it around 65 for the day, then toss in another and freeze the first up again. You only need to worry about it for primary fermentation, then you can let it warm up to room temp (5-6days). Carb issues, well, I'm still working on those. :D

For the hefe, I used Danstar Munich yeast. It was the standard one that came with the NB kit.

That's a great tip on the foam cooler! I think I will need that because my apartment never gets as cold as 65. Will grab one of those before embarking on a kolsch. I got a White Labs (vial) yeast for the kolsch instead of Wyeast, only because my friend had a bad experience with dead smack packs. I think I might try the BYO article's specs for my next Kolsch attempt.
 
It is, but as sumbrewindude said, it just takes more attention. And with the smaller volume (I assume you're talking about a one gal batch, based on this thread), it's harder to maintain temps over time (less thermal mass = faster temp swing to equilibrate with ambient temps). It helps to insulate your kettle (blanket, towels, sleeping bag, heavy jacket, etc), but even when I did that I would still have to add some heat from the burner, and then worry about burning the bag (always stir or lift out when adding heat) or overshooting my desired temp (which I invariably did).

Once I started using the warm oven method (my 5 gal or 3 gal kettles both fit in if I remove one of the racks), I haven't lost more than one degree F over the course of a one hour mash... Much easier in my opinion!


Sent from my iPad using Home Brew

One more question about small batch BIAB:

Is there any need to make adjustments to the water chemically as far as adjusting pH, minerals, etc.?
 
Avocado:

Here's one that is sold as a kit, including all false bottom and plumbing hardware included:

http://www.homebrewing.org/5-Gallon-Converted-Igloo-Cooler-Mash-Tun-with-False-Bottom-_p_1005.html

Since BIAB is a tried and true method of all-grain brewing which many here use, you don't necessarily need the false bottom and some of the hardware. If you wanted to go the cheaper route, here's a nice little write-up of what's needed:

http://www.onemansbeer.com/diy-mash-tun-parts/

Homebrewcraig - this is incredibly helpful stuff! That onemansbeer writeup is one of the first DIY blogs that I've seen on the topic that is actually straightforward. And the weekend is coming up...then again the pre-assembled version is also enticing.

Now my new internal debate is whether I have the cojones for DIY. Thanks again - whatever the result, I will post a pic.
 
Avocado: If you have the cojones to make your own beer, then you have the basis to use those cojones to DIY a little bit :)
 
One more question about small batch BIAB:


Is there any need to make adjustments to the water chemically as far as adjusting pH, minerals, etc.?


Proportionally, water makes up the same amount of the final product as in larger batch brewing, so if you have need to adjust your water to hit proper mash pH or for flavor ions in a 5-gallon batch, you'd need to do the same for 1-gallon batches.
 
Proportionally, water makes up the same amount of the final product as in larger batch brewing, so if you have need to adjust your water to hit proper mash pH or for flavor ions in a 5-gallon batch, you'd need to do the same for 1-gallon batches.


Yep, and too add to that...
You only really need to do adjustments if you're doing all grain (which I assume you are, since asking about BIAB), and either using distilled or RO water, or possibly your tap water if trying to make a really dark or really light beer (depending on the profile of your source water). Otherwise, for an extract beer, or even an all-grain that is medium in color, your tap water should be good enough (a majority of the country, anyway)... Though you will want to treat for chlorine/chloramine first.

And, as mentioned above, mash pH could be an issue, so to brew the best beer you'll want to learn somewhat about water chemistry. The "brew science" (or is it "beer science"?) sub-forum has lots of good info about water - read the primer especially. I'm currently reason the new Water book by Palmer and Kaminski, tons if good info in there, too!


Sent from my iPhone using Home Brew
 
Proportionally, water makes up the same amount of the final product as in larger batch brewing, so if you have need to adjust your water to hit proper mash pH or for flavor ions in a 5-gallon batch, you'd need to do the same for 1-gallon batches.

Agreed.

In my sick little mind, water is the final frontier. Unless you have crazy, crazy bad water, chances are you'll have beer with no chemistry adjustments. IMO, once you have a handle on your own process for making good beer, that's when you can start fooling around with water. If you look at your local profile, or use a source that has an established profile (eg bottled water, not RO), you should be able to brew beers that work best in that chemistry. If you want to play around after that, go ahead.

I can tell you my water favors amber to dark colored beers, and is relatively "soft" so my IPA's seem to be more smooth rather than punch you in the face sharp. Because of this, I picked up some gypsum to play with, in addition to some sour mals to adjust mash pH for lighter beers.


Speaking of picking things up, found out one of the LHBS's is closing. :( They put everything up at 20% with a roll down to 60% and closed by next week. Stopped in and over 3/4's of the store was gone - all the carboys, a few of the books I wanted, hops were picked through, and grains were almost all gone. I did get a few pounds of pale ale malt and mild malt, as well as a pound each of chocolate, exspec, crystal 60, caramunich, and carapils. Not a lot, but enough color and flavor to play with if I can find some 2row/pilsen. Hate to see a small shop close, I got most of my hops from them.

Guess this means I'll need to grab a Corona for some Ugly Junk.
 
Fellas got all my small batch stuff but the kettle got delayed until Monday. I am going to use a 12quart stock pot any extra cleaning steps I should follow to ensure I don't get any leftover potato soup ( what we had for dinner last night) taste in the beer?

I am going to start with NB radical red as my first brew. &#127867;


Sent from my iPhone using Home Brew


1) Clean it well, and boil up a gallon of water for 45min. Once done, measure it - that's how much liquid you're going to lose on your first recipe, so make note of it and use that with the instruction kit from NB so you end up with the right amount of wort!

2) Make sure you warm up your extract syrup in a hotwater bath before adding it, it'll be easier to pour in. When you do add it, take the pot off the hot burner/heat, and stir well - really well - so that you don't get any syrup on the bottom of the pot when you put it back on the heat.

3) You have a funnel to pour the wort into the bottle? Sanitizer? Check it over now, make a dry run!

Don't let the process intimidate you - you're making sugar soup, it's easy.

HAVE FUN!! :rockin:
 
I'm currently reading the new Water book by Palmer and Kaminski, tons if good info in there, too!

In my sick little mind, water is the final frontier. If you look at your local profile, or use a source that has an established profile (eg bottled water, not RO), you should be able to brew beers that work best in that chemistry. If you want to play around after that, go ahead.

Good points here! I am ordering the Palmer Water book. I also got ahold of my latest water report (published annually). Metro Atlanta seems to have great water for Pilsners. I entered my water profile into Bru'n water and it matches Pilsen very closely for several years now.

Low and behold this is one of my favorite styles but fermenting Pilsners and/or Lagers is a patience task. This forces me to chem up just about anything else I brew so hence the water profile to beer style matching I have been doing.

This has seemingly been more important on smaller batches as there is not much room for error. Precise measurements on a gram scale help. Not just for water adjustments but for the recipe as well.

I have a nice collection of most of the brewing salts. Still learning but fun to see the impact that water adjustments has on my brews. It can definitely make a huge difference once you get a handle on pH!
 
Hey Danno, what's the cost/labor for putting that metal spigot into your rubbermaid cooler along with a false bottom? I've been thinking about setting up one of those. Thanks for sharing a photo of your set-up!

Here's a secret that you cannot tell my wife. i bought a ton of crap at Menards, hardware for all those pots and that mash tun, along with home repair stuff, then i threw the receipts into a box of other receipts and i'll never see them again. It's a secret because I intentionally do not keep track of what I spend on my beer hobby!

Now, that cooler is a 2 gallon and doesn't have a false bottom, only a braided hose. literally took me about 5-10 minutes to take off the original spout to put this one in.
 
Oh man Danno...I got busted on my oxygen aeration system I just ordered. The box was sitting on the steps when the CFO/SWMBO got home. She thought it would be fun to open it and see what was inside. Here's how the conversation went when I got home.

SWMBO: Why did you pay $65 for some hose, a tube and that brass thingy? :mad:

Me: It's for my beer. :eek:

SWMBO: Oh...(walks away).

Her silent response says it all. :D
 
Speaking of that O2 kit, that's a neat little setup Sammy. I thought about getting one of those, but so far I've had great luck with the whole "shake it like 1,000 polariods" technique. I'm concerned if I ever try a really big beer (barleywine, etc) I won't have enough O2, though - so eventually I'll pick one up. I'm interested to see how your's behaves - keep in mind you don't need a lot of time with that, maybe 15sec or so. What size stone did you get, 5micron?

Man, the list of wants just keeps growing daily.
 
SBD - That is what I am gearing up for...bigger brews! :drunk:

I was actually confused about the infusion times. The Williams Brewing site says 50 seconds for a 5g batch and the kit instructions say 20 seconds for a 5g batch. I am wondering if the infusion scales proportionally with batch size? 10-25 seconds for a 2.5g batch? 5-12 seconds for a 1g?

I guess I will find out when my airlock goes for a flight on the Maibock I have in the que!

The stone is a 2 micron btw. Next on the list is a starter setup. No stir simple starters might work for smaller batch big beers?
 
Sammy -

When all yeast knowledge fails, refer to Mr. Malty. I believe that a single smackpack should have enough cells for a 2.5gal, but it really depends. If you've brewed a monster beer you'll need all the cells you can get, so a starter or pitching an established cake is always a great idea.

The best use I can think of for a stirplate setup for small batch brewing would be to create a rolling starter bank - eg, you make your starter, decant off half, and store that in the fridge for later, and then pitch the other half. In a few weeks if you want to pitch the same strain, just take out the sample from storage and run it up with DME again to make a large starter, and split it again. That way you're always pitching a fresh culture, and not running out.

I know when I did LIVID, I took a look to see which yeast set had an established culture, and used that to pitch (Notty in this case). Fermentation took of crazy fast, and that was just with shaking for O2!
 

Latest posts

Back
Top