
Did I get your attention with the title? I thought so. So how do I manage to pull off this seemingly incredible feat of keeping my wife happy and brewing beer at the same time? One word; BREAD. My wife doesn't mind if I spend all day brewing beer if she knows there is a loaf of this in her future.
I have been experimenting with making bread out of my spent grain almost from the day I started down the road of all-grain brewing. I have experimented with the recipe many times and have had plenty of failures getting this recipe perfected. In my mind what I'm about to share is THE perfect spent grain bread recipe. However, while this is the recipe I've settled on as being perfect for me, feel free to experiment yourself to get exactly what you want. Shall we get started?
The Ingredients
3 cups All-purpose Flour
1 tsp. Kosher Salt
1 1/2 Tbsp. Sugar
1 packet Active Dry Yeast
1 1/4 cups Beer (or water if you're a sissy) at room temp.
1 1/4 cups Spent Grain (dried)

Steps
I mentioned above that I've had my fair share of failures attempting to make spent grain bread. Most of these failures had to do with having no idea the amount of water that was actually
still in the grains. This caused all sorts of problems from gooey dough, failure to rise and just general rock hard bread. This recipe really came together when I figured out one very important step. DRY YOUR GRAINS FIRST!
The way I do this is to spread about 3 cups of wet grain on a cookie sheet and place it in the oven set as low as your oven will go. My oven goes down to 170. I've found that 3 cups of weight grain is approximately 1 1/4 cups when completely dried out. Leave it in for about 1-2 hours and occasionally spread it around about to make sure it's all dried out.

While the grains are drying you can pull out a bottle of beer to warm up to room temp. I like to use the same style beer as the one brewed with the grains you are using, but any beer (or water) will work.
Once the grains are all dried out the rest of this recipe is fairly simple and like any other bread recipe you've made before. If you have a stand mixer or a bread machine this is a lot easier, but it's also possible without one. I use a stand mixer so these instructions are mostly geared toward that (bread machine would be the same) but I will try to point out how to do things without one where I can.
In your stand mixer with the bread hook attachment (or any bowl) add the warm beer, sugar, yeast and 1/3 of the flour and mix until combined.

Next, add another 1/3 of the flour along with the kosher salt.

Again mix until well combined. Finally, add the last of the flour and your spent grain and mix more. If the dough still feels sticky, add a little more flour until it feels good.

Using a stand mixer, simply let the bread hook knead the dough for you until it is no longer sticking to the sides of the bowl (about 2-3 minutes).

If doing this by hand, lightly flour a clean surface and knead the dough for about 5 minutes. You know it's ready when you stick your finger in the dough and it bounces back.


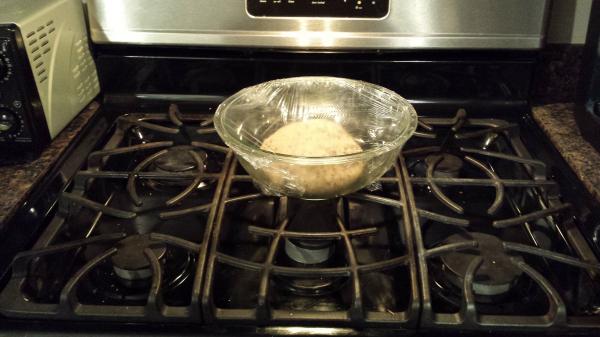
Place the dough in a bowl sprayed with non-stick cooking spray, cover it with saran wrap or a towel and let it sit in a warm spot to rise for about an hour or until the dough has doubled in size.

When the dough has doubled in size divide the dough into two equal pieces and form them into loaves. Place the loaves on a cookie sheet that is lightly dusted with flour and again let them rise for at least 30 minutes but I usually let it go for another hour.

Pre-heat your oven to 450. Before you put the bread in the oven, take a sharp knife and put a few slits in the top of the bread. This helps some of the moisture inside to escape more easily. It also looks cool.

Put the bread in oven and bake for 30-40 minutes. You will know it is done when it is golden brown in color and sounds hollow when you tap on it.

PRO TIP FROM GRANDMA: If you like really crispy crust and chewy insides then place a baking dish full of water on the rack below your bread. My grandma always did this when baking bread and it produces an extremely hearty crust.

When the bread looks done, remove it from the oven and allow it to cool for 5-10 minutes before cutting it. I like this bread best toasted or paired with a delicious home brew.


I hope this recipe brings you (and SWMBO) as much joy as it has me. Enjoy!

I have been experimenting with making bread out of my spent grain almost from the day I started down the road of all-grain brewing. I have experimented with the recipe many times and have had plenty of failures getting this recipe perfected. In my mind what I'm about to share is THE perfect spent grain bread recipe. However, while this is the recipe I've settled on as being perfect for me, feel free to experiment yourself to get exactly what you want. Shall we get started?
The Ingredients
3 cups All-purpose Flour
1 tsp. Kosher Salt
1 1/2 Tbsp. Sugar
1 packet Active Dry Yeast
1 1/4 cups Beer (or water if you're a sissy) at room temp.
1 1/4 cups Spent Grain (dried)
Steps
I mentioned above that I've had my fair share of failures attempting to make spent grain bread. Most of these failures had to do with having no idea the amount of water that was actually
still in the grains. This caused all sorts of problems from gooey dough, failure to rise and just general rock hard bread. This recipe really came together when I figured out one very important step. DRY YOUR GRAINS FIRST!
The way I do this is to spread about 3 cups of wet grain on a cookie sheet and place it in the oven set as low as your oven will go. My oven goes down to 170. I've found that 3 cups of weight grain is approximately 1 1/4 cups when completely dried out. Leave it in for about 1-2 hours and occasionally spread it around about to make sure it's all dried out.
While the grains are drying you can pull out a bottle of beer to warm up to room temp. I like to use the same style beer as the one brewed with the grains you are using, but any beer (or water) will work.
Once the grains are all dried out the rest of this recipe is fairly simple and like any other bread recipe you've made before. If you have a stand mixer or a bread machine this is a lot easier, but it's also possible without one. I use a stand mixer so these instructions are mostly geared toward that (bread machine would be the same) but I will try to point out how to do things without one where I can.
In your stand mixer with the bread hook attachment (or any bowl) add the warm beer, sugar, yeast and 1/3 of the flour and mix until combined.
Next, add another 1/3 of the flour along with the kosher salt.
Again mix until well combined. Finally, add the last of the flour and your spent grain and mix more. If the dough still feels sticky, add a little more flour until it feels good.
Using a stand mixer, simply let the bread hook knead the dough for you until it is no longer sticking to the sides of the bowl (about 2-3 minutes).
If doing this by hand, lightly flour a clean surface and knead the dough for about 5 minutes. You know it's ready when you stick your finger in the dough and it bounces back.
Place the dough in a bowl sprayed with non-stick cooking spray, cover it with saran wrap or a towel and let it sit in a warm spot to rise for about an hour or until the dough has doubled in size.
When the dough has doubled in size divide the dough into two equal pieces and form them into loaves. Place the loaves on a cookie sheet that is lightly dusted with flour and again let them rise for at least 30 minutes but I usually let it go for another hour.
Pre-heat your oven to 450. Before you put the bread in the oven, take a sharp knife and put a few slits in the top of the bread. This helps some of the moisture inside to escape more easily. It also looks cool.
Put the bread in oven and bake for 30-40 minutes. You will know it is done when it is golden brown in color and sounds hollow when you tap on it.
PRO TIP FROM GRANDMA: If you like really crispy crust and chewy insides then place a baking dish full of water on the rack below your bread. My grandma always did this when baking bread and it produces an extremely hearty crust.
When the bread looks done, remove it from the oven and allow it to cool for 5-10 minutes before cutting it. I like this bread best toasted or paired with a delicious home brew.
I hope this recipe brings you (and SWMBO) as much joy as it has me. Enjoy!
 Now I get to upset her by making beer she can't drink AND bread she can't eat, but man this looks good!