My growth.. extract to E-biab

Homebrew Talk - Beer, Wine, Mead, & Cider Brewing Discussion Forum

Help Support Homebrew Talk - Beer, Wine, Mead, & Cider Brewing Discussion Forum:

This site may earn a commission from merchant affiliate links, including eBay, Amazon, and others.

watermelon83

Well-Known Member
Joined
Sep 22, 2014
Messages
743
Reaction score
197
Ok, I haven't seen many of these so I'm going to document my journey.

Originally, I planned on going biab in my exsisting but unused keggle. Now that I have the cash to spend, and given the hundreds of places to spend it, I decided to go single vessel e-biab in a 80qt SS steamer pot.

I bought my control panel stuff from Auber and Home Depot. Very typical stuff, PID, Temp. sensor w/ xlr's, SSR, and heatsink from Auber. The box, outlets, and gfci came from Home Depot.

I have a keggle bag from this fine retailer and sponsor (I will soon be ordering one to fit the new pot) so my first batch will be with a tool smaller then the job requires, story of my life.

So far I have assembled most of the control panel stuff and added a 50A breaker to one of my service panels. For the moment my lil'ebrewery will have to be in the garage. The wife is fine with me moving it into the basement but I am torn atm between ebiab and eherms. Mainly becuase I can't convince myself that there is any reason to go full tilt boogie on a three vessel until I taste something from my ebiab. My gut says that ebiab will fit my needs just fine, but the geek in me longs to put together one of the fancy 3 pid, timer, alarm bling boxes. The thought of connecting and disconnecting twenty hoses, while timing my mash and heating water for various things gives me soft chub at least. Pics of my panel to follow.
 
Last edited by a moderator:
View attachment ImageUploadedByHome Brew1416632820.307098.jpgView attachment ImageUploadedByHome Brew1416632890.869150.jpgView attachment ImageUploadedByHome Brew1416632924.069497.jpg

Yes the last photo is of my currently turned off 50a 240v breaker. It is connected to 8-4 wire going to my garage. Originally planned for a dryer or welder, it will make beer instead. I asked and it's fine with that, seemed rather happy actually.

The real reason I posted that picture is two fold. First, kill the main!! Everything I touched last night was dead, except when the wire I was holding grazed the lead coming out of my basement bathroom breaker and gave me a warm fuzzy reminder of the power of electrons. Secondly, as I do not wish to get a REALLY strong reminder it will stay off until the entire thing is assembled and ready to brew.
 
Good advice on killing the main. I do it anytime i'm working in the panel.
Especially when you're only an enthusiast electrician!
 
Ok, I haven't seen many of these so I'm going to document my journey.

Originally, I planned on going biab in my exsisting but unused keggle. Now that I have the cash to spend, and given the hundreds of places to spend it, I decided to go single vessel e-biab in a 80qt SS steamer pot.

I bought my control panel stuff from Auber and Home Depot. Very typical stuff, PID, Temp. sensor w/ xlr's, SSR, and heatsink from Auber. The box, outlets, and gfci came from Home Depot.

I have a keggle bag from this fine retailer and sponsor (I will soon be ordering one to fit the new pot) so my first batch will be with a tool smaller then the job requires, story of my life.

So far I have assembled most of the control panel stuff and added a 50A breaker to one of my service panels. For the moment my lil'ebrewery will have to be in the garage. The wife is fine with me moving it into the basement but I am torn atm between ebiab and eherms. Mainly becuase I can't convince myself that there is any reason to go full tilt boogie on a three vessel until I taste something from my ebiab. My gut says that ebiab will fit my needs just fine, but the geek in me longs to put together one of the fancy 3 pid, timer, alarm bling boxes. The thought of connecting and disconnecting twenty hoses, while timing my mash and heating water for various things gives me soft chub at least. Pics of my panel to follow.
After a few home brews that longing will go away, at least until you wake up on the floor. :D
 
Last edited by a moderator:
My current plan is to elevate the basket above the element and recirc into the bag for maintaining or step mashing (when I get there). Did you try something like this?

I'm trying to avoid the extra cost and complexity at this point, less learning the system and more learning the process. I am currently leaning towards a HERMS if I upgrade past biab. Why do you prefer a RIMS? I appreciate the input!

You may find that the fine weave of the bag will plug up when recirculating.
 
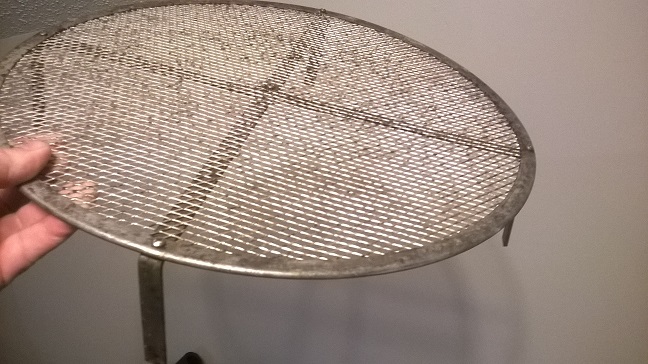
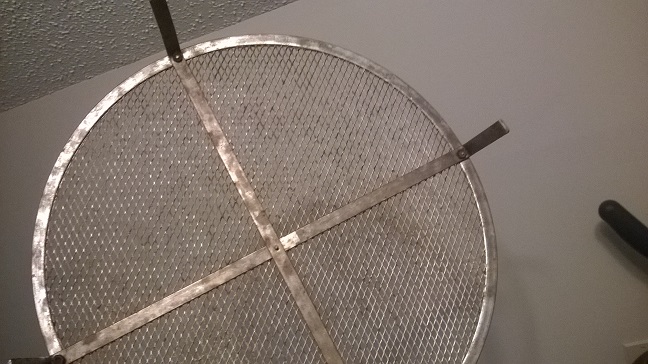
I made an elevated screen out of a pizza screen 1 inch above the element by bending aluminum strips and using as legs, it does work but heats up the mash unevenly and produces mixed results.

even after recirculating the element will turn on high until the temp reaches its set point letting the bottom almost boil for a minute or 2 then the recirculation will even it out but didn't like working that hard regulating the temp by stirring constantly

plus you need more water because of the difference in height, basically 3 inches off the bottom and I do sparge because I have a metal insert not a bag so I batch sparge while its up in the air so I need that extra water


once i added the external rims tube I now have more of an even temperature throughout the mash and don't have to stir as much

getting back to your situation you can do it and for cost I would, but you really need a pump to recirculate or your going to get a weak efficiency

just let the bag sit on this then when done host the bag up to drain and pull this out

WP_20141122_001.jpg


WP_20141122_002.jpg


WP_20140618_001.jpg
 
Threw down some more cash today. Have a full compliment (I think) of fittings coming from bargianfittings, a pump and some misc. stuff coming from Bobby, thermometer from Amazon (not in kettle) and some outlets from electric something or another. It'll be like an early Christmas at my place this week.

I tried to get enough variety in my fitting selection to have parts on hand as the build grows. I ordered an extra 3 piece valve so I could whirlpool the boil kettle. I was on the fence between whirlpooling and a JB false bottom. For $25 I'll try whirlpooling first and change it if it needs upgraded. The other issue is how the false bottom fits into the single vessel scheme of things and the boil element, I don't want to have to mess with the bottom of the kettle full of hot sticky water.
 
Subscribed with great interest. I'm planning to go a similar direction, but there is a lot of talk around about clogged bags and temperature stratification with this type of system. Rims tube may help with stratification issues, as has already been suggested. I am definitely considering this. Do you have any plans to mediate against the clogged bag issue, Watermelon? Eg, are you recirculating through your whirlpool, or into the bag through the lid?

Thanks for being my unwitting guinea pig!
 
Through the lid is the current plan. I'm also considering some sort of auto- stir device, if I can find/ build one for pert near free. I'm not sure how much I can hold back the geek if things go south.

I'm also curious why I can't find where anyone has tried hot air injection, something way short of steam.

I am currently planning on insulating the kettle. So I suppose worst case I'm making good beer at one temperature. 😬
 
Have you seen this video? This guy has a good solution for stratification that I am considering (see from 3:00).


Won't solve the potential issue of the clogged bag, though.
 
Last edited by a moderator:
I'm thinking with the basket the clogged bag issue may go poof. Normally you'd have just the bottom of the bag to drain to the output valve, with the basket you have all the holes on the sides as well.

Stirring would have to be fairly regular or I think you'd end up with a metric crapton of channeling though. Which is what I see wrong with the producers setup, water takes the oath of least resistance. Which in my opinion is probably out of that pipe and straight to the side of the basket, depending on his mash thickness.

I see how stratification is bad, after all the only comparison I can see to a "real" mash is uniform consistent temperature. Other then that it seems like most of the rules change.

I can't wait to play with it.
 
I wonder how much of the bag clogging problem is coming from folks that double tap the grain for efficiency as well.
 
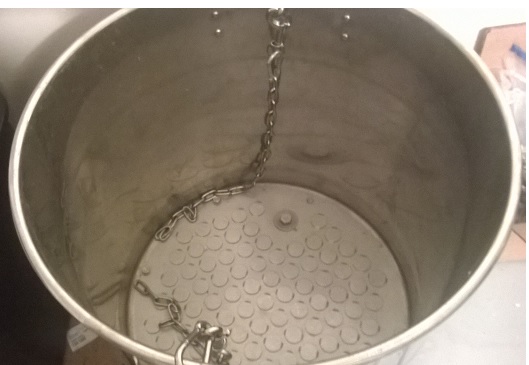
the stuck mash issue only comes into play when you crush wrong or have allot of flaked grain, never stuck mine with a bag but have several times using the bag on top of a false bottom so then I ended up finding another pot that fit inside mine and cut the bottom leaving an 1 1/2 lip then I just bolted my false bottom to it, add chains to hoist up

insert.jpg


WP_20141123_001.jpg
 
Cool. The pot I linked in the top post comes with a steamer basket.

I was thinking last night, since my element will be below the basket it kind of is a RIMS just a chamber rather then a tube.
 
Mmmmmm the more I think and hear, the more a I think a basket sounds like a good approach. I must admit, I can't imagine a channeling problem with this setup because the BIAB mash is so thin (never done trad mash & sparge so perhaps I don't understand the concept properly). But I agree that the basket stands a good chance of maintaining a good circulation and keeping the temp even.

I see what you mean about the RIMS thing. The main reason I was thinking of a RIMS tube was for a second element. One little tiddler in the RIMS tube for temperature correction during the mash, and a big mother in the kettle for strike water and boil. Reduces the change of scorching the mash - a problem mentioned in RIMS vs HERMS posts I have reviewed. I'll probably keep it simple with just a kettle element if your project goes well ;).

Good luck and I look forward to your future posts!
 
The basket has the advantage over a FB having greater surface area to prevent sticking. I would think a stuck mash is almost impossible with a basket, because the upper portion of the basket has no grain to clog the bag...sort of like a default bypass if the grain bed is impermeable.

The discussion above pretty much sums up why I have chosen to not automate, but choose to simply insulate the kettle at a mash temp and live with a 2 or 3 degree drop over the mash rest...it's just too easy :)
Have fun and enjoy!

Wilserbrewer
Http://biabbags.webs.com/
 
only issue I had with mine was using flaked rice and flaked oats once each so rice hulls would be needed if the pump valve is on full otherwise reduce the pump flow and watch it and stir stir stir, otherwise it can overflow the pot so watch it carefully

had a big issue with this false bottom too and stirring the bottom to unclog a stuck mash so to fix it I added a stainless splatter screen on top below the mash, that way if you hit the bottom, you don't force mash through the inserts

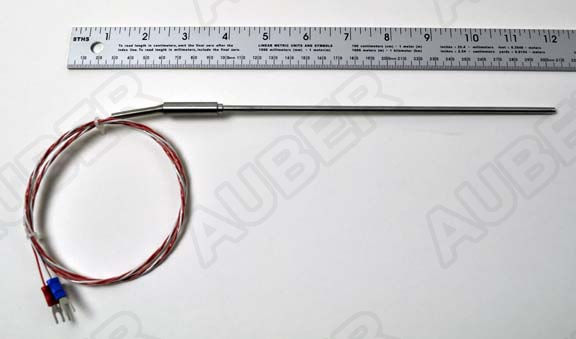
and you can't put your pid temp probe under the mash it will read wrong, you have to have a portable one and stick it in the mash its self to get a true reading

PL3080a.jpg
 
Currently, my plan is to use a weldless fitting, nipple, and T in the lid to provide the recirc water to the top of the mash. The other side of the T will hold my temp probe.

If this fails I'm going to make a temp probe stick out of pipe and use the hole in the lid to hold the stick so the probe is near centered in the mash. The PID is fairly useless at that point, but at least I dont have to keep taking off the lid to check the temp and don't run a risk of tearing the bag on the probe in the kettle.
 
Got my stuff from Bobby this weekend, got my pot today. It's huge!! I ordered SS but I think they sent me one made out of Unobtainium. I have tried three different drill bits and I can actually here the pot laughing as I try to drill it. Off to the hardware as soon as funds become available to buy an ass kicker.

I also bought my spa GFCI yesterday. Started modding it, installed the plug and found out I will have to add wiring in the garage, which sucks. The wiring I put in all those years ago is 8-3 (with a baby ground??) so I will need to lug and tape the three conductors then run some sealtite out to the spa panel I think. I have a plug between my element and panel, and between the panel and the gfci. I really hate the idea of adding another at the wall. Pics of spa gfci to follow.
 
The basket has the advantage over a FB having greater surface area to prevent sticking. I would think a stuck mash is almost impossible with a basket, because the upper portion of the basket has no grain to clog the bag...sort of like a default bypass if the grain bed is impermeable.

The discussion above pretty much sums up why I have chosen to not automate, but choose to simply insulate the kettle at a mash temp and live with a 2 or 3 degree drop over the mash rest...it's just too easy :)
Have fun and enjoy!

Wilserbrewer
Http://biabbags.webs.com/

What do you use to insulate the kettle? I've only wrapped it in towels... which I'm sure isn't the best method...
 
What do you use to insulate the kettle? I've only wrapped it in towels... which I'm sure isn't the best method...

I typically do 8 gallon batches, usually around 16 lb of grain. Just noting that larger batches hold heat better. My brew area is near the downstairs bathroom linen closet, so I just usually grab a large comforter and wrap the kettle. I dont sweat losing 2,3, or even 4 degrees during the mash. I prefer to think of the mash rest as a range of temps, and not specific to the degree. Rather than painstakingly try and maintain 152 degrees, I'll mash in at 153-154 and let it fall to 150-151...not all that critical, just plan ahead and anticipate a wee drop in temp....RDWHWHB
 
Great thread, thanks for documenting your build. I have a very similar setup with a Bayou Classic 10-gallon pot. I have the steamer basket that goes with it, but I've never used it. The only time I've had a problem with circulation is when I was brewing with a massive grain bill. For that brew, I just stirred the mash by hand.
 
Alright, had to wait till I got the appropriate temp probe in. The one I had purchased initially was a weldless type. It was before I decided on recirculating the mash to the lid. Of course, I forgot until the day I wanted to test it that this was the case. Today, the new one came in, thank you Auber for lightning fast shipping and great customer service!

There were two issues upon firing it up, the first was crossing the wires on the PID output to the ssr. Flipped those and it worked great until I lost a wire on my temp sensor cable. The break was at the fitting and needed re-soldered. No biggie. So now.....


View attachment ImageUploadedByHome Brew1419459871.932141.jpgView attachment ImageUploadedByHome Brew1419459894.743746.jpg

I am now recircing and heating the water to 143 to get ready for the auto tune.
 
Auto tune is complete and it took about 1m 10 seconds to get from 153 to 157 with 1-2 degrees overshoot.

In all fairness there isn't more then 4-5 gallons in the pot though.
 
First brew day! I milled my grain twice due to my mill issues. Turned out looking okay, I think. I left my recirc on so the grain had a nice slow fall from strike temp to mash temp. It was a mistake, oh well.

So far things are going fairly smooth. Probably to smooth. Lol. Temps are holding within a degree or two. I've stirred the mash twice so far. I watched the temp when I did and it didn't move. I'm happy for that because I would imagine there would be a drop if I had stratification issues. A couple pics:

View attachment ImageUploadedByHome Brew1419961883.034905.jpgView attachment ImageUploadedByHome Brew1419961902.249695.jpg
 
Nice work! I will admit I'm just a touch jealous of your automation...

Temps are holding within a degree or two. I've stirred the mash twice so far. I watched the temp when I did and it didn't move. I'm happy for that because I would imagine there would be a drop if I had stratification issues.

BUT, I am also a bit lazy...so I guess I will just continue to wrap the mash kettle with grandma's old horse blanket and RDWHAHB....j/k
cheers to your success!
wilser
 
Thanks Mike! None of it would have been possible without handling your bag!!!! I plan on wrapping the kettle eventually, I was watching this one like a nervous mother though. :tank:

Just measured my FG 1.063! only a few points off and 72.69% efficiency! Not bad fer me first time and all.
 
Last edited:
Really informative thread so thanks, Melon. I'm delighted that its worked out well. Proof that ebiab can work with the right planning. I'll take lots away from this for my own upcoming build.
 
Well poop. I had to kettle cool down to 120, now it's in the carboy and ferm fridge until pitching temps. I did not get 5 gallons only 4.5ish making my efficiency more like 62% :( Oh well, my mill sucks, need to get that sorted and somewhere my water calcs went wrong. I know my boil-off was right, must be somewhere else.
 

Latest posts

Back
Top