Guide to Making a Frozen Yeast Bank

Homebrew Talk - Beer, Wine, Mead, & Cider Brewing Discussion Forum

Help Support Homebrew Talk - Beer, Wine, Mead, & Cider Brewing Discussion Forum:

This site may earn a commission from merchant affiliate links, including eBay, Amazon, and others.
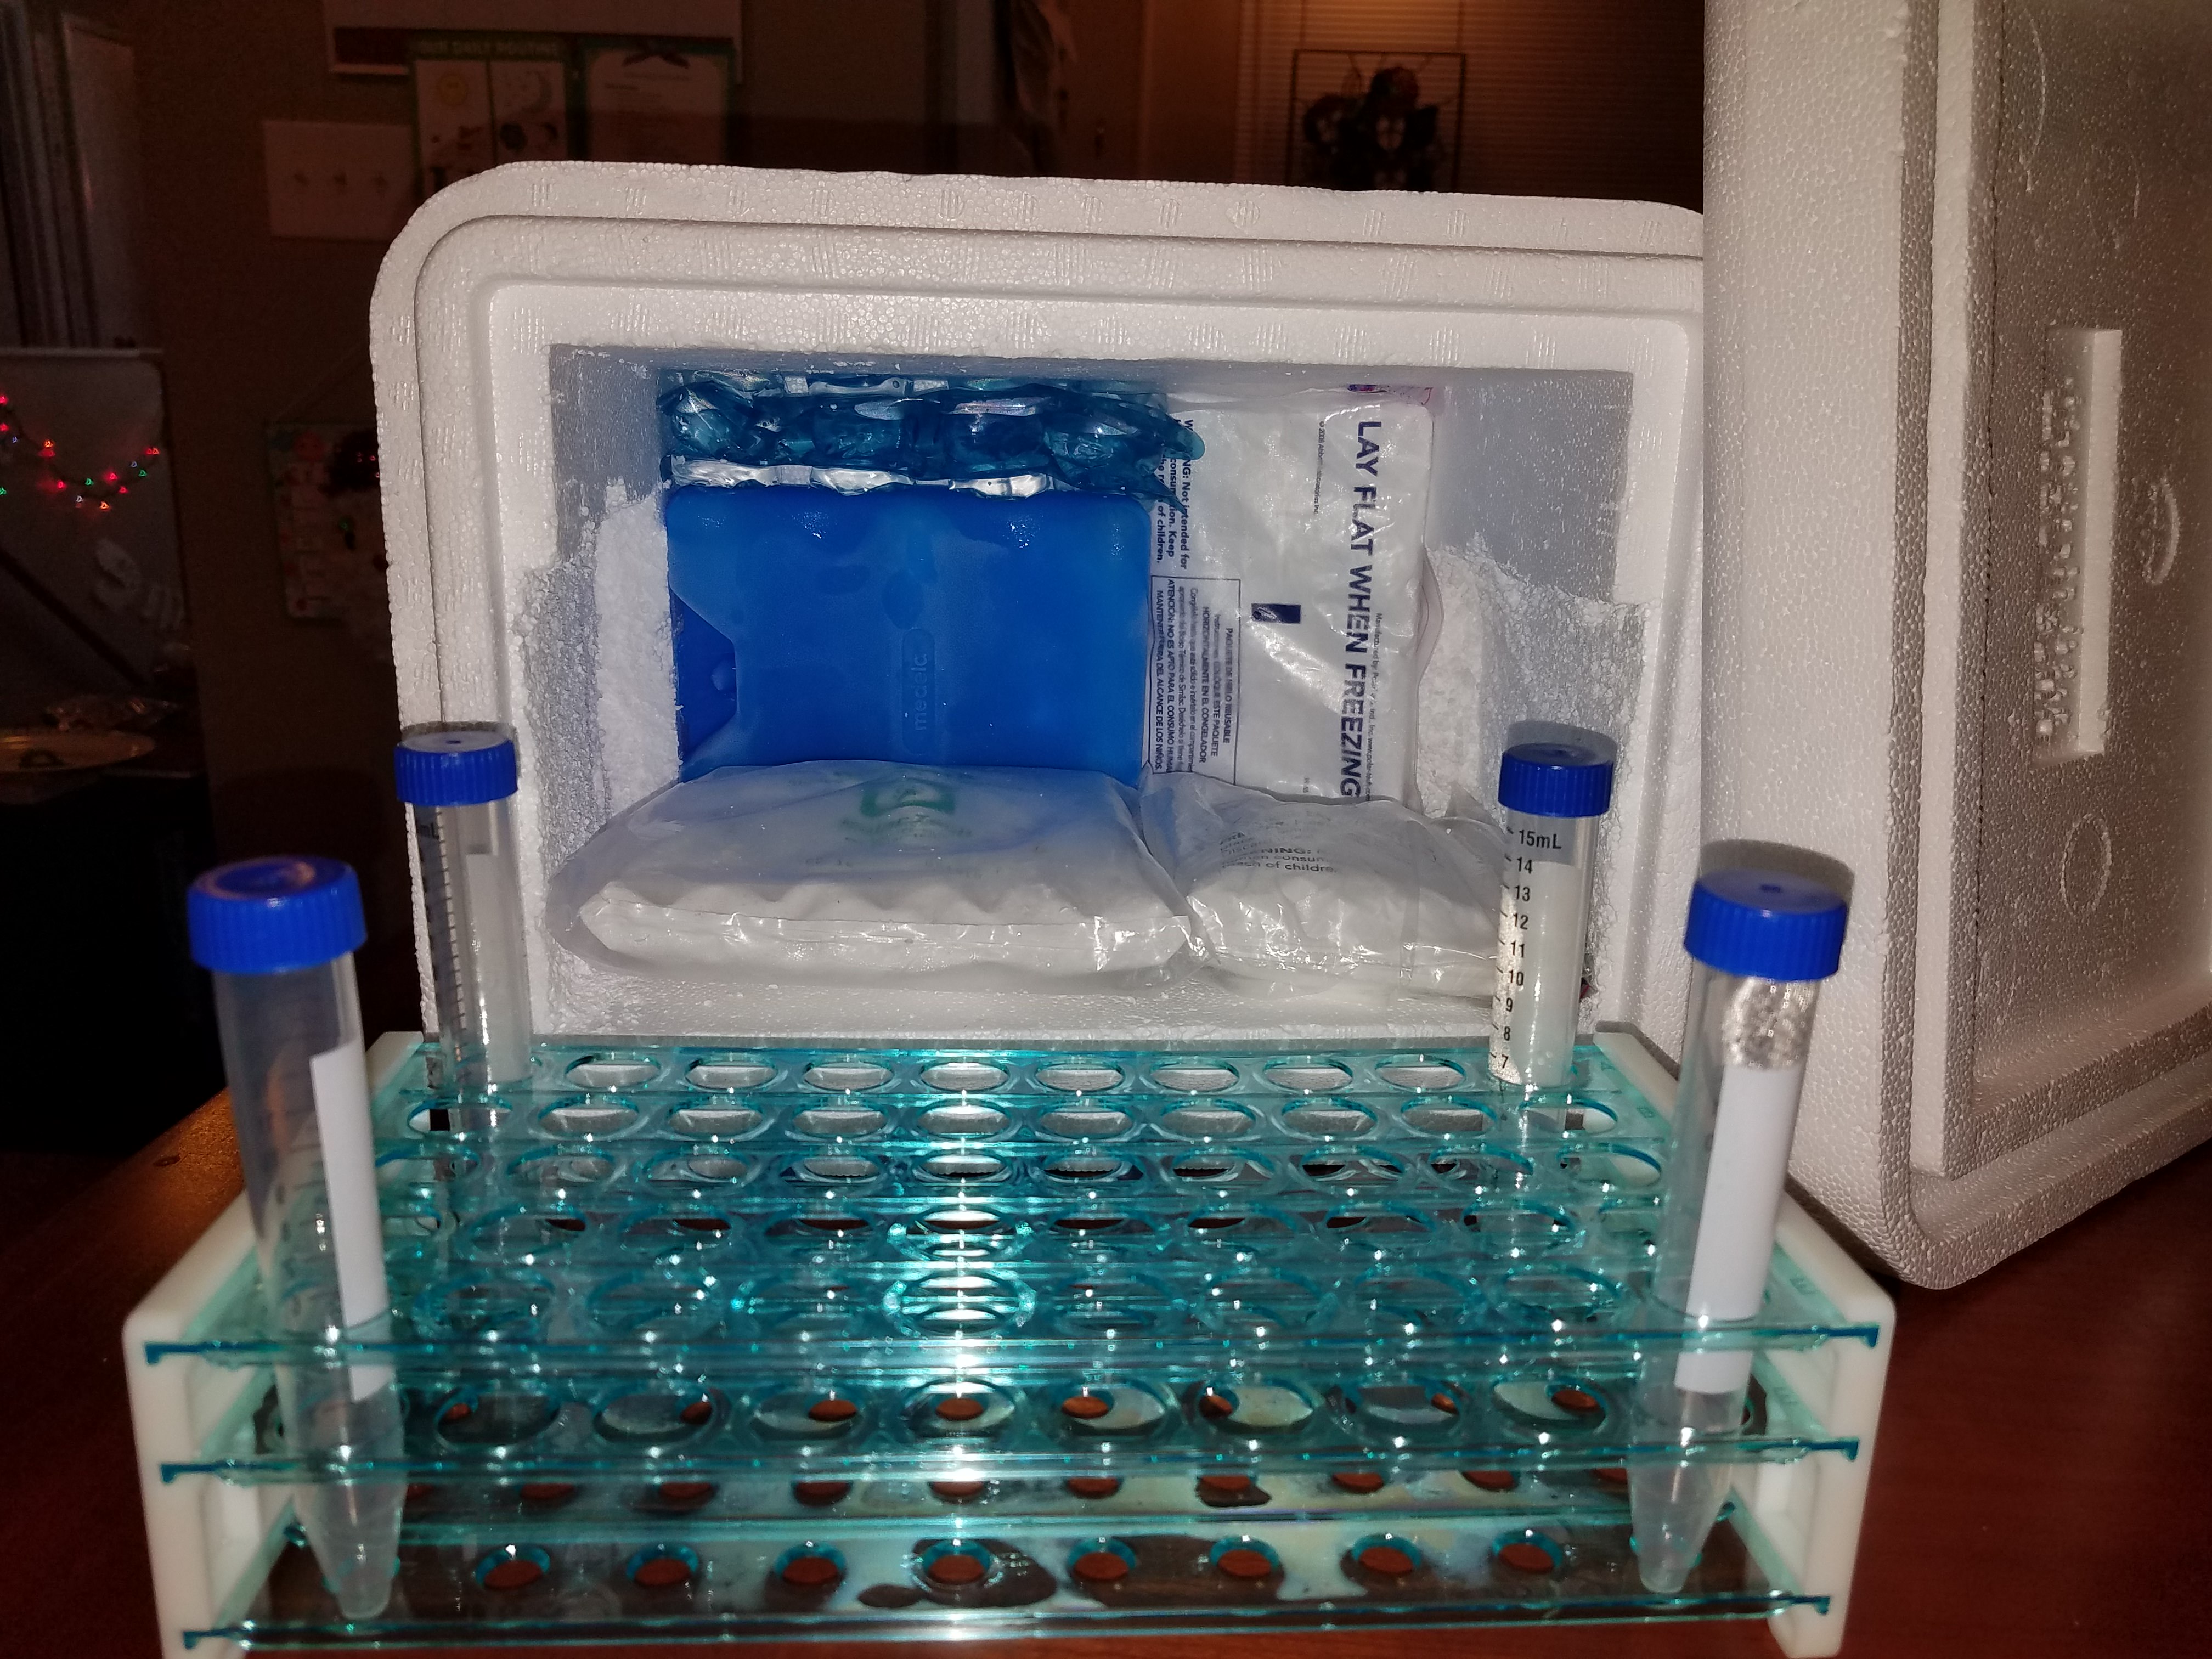
Waiting for the ole HLT to come up to temp, so thought I would update on my yeast ranching experience. I have been freezing yeast since last november with phenomenal results. I have 8 different strains right now in a small dorm-sized freezer that is used just for yeast and hops. The yeast, two samples each, are stored in 45 ml autoclavable vials in a custom closed-cell foam locker I made just to protect my investment.

Here is how I stored the yeast:

- autoclaved several (two dozen or so) vials with 14 ml of glycerin and recommended dosage of vitamin c each and store for easy use later

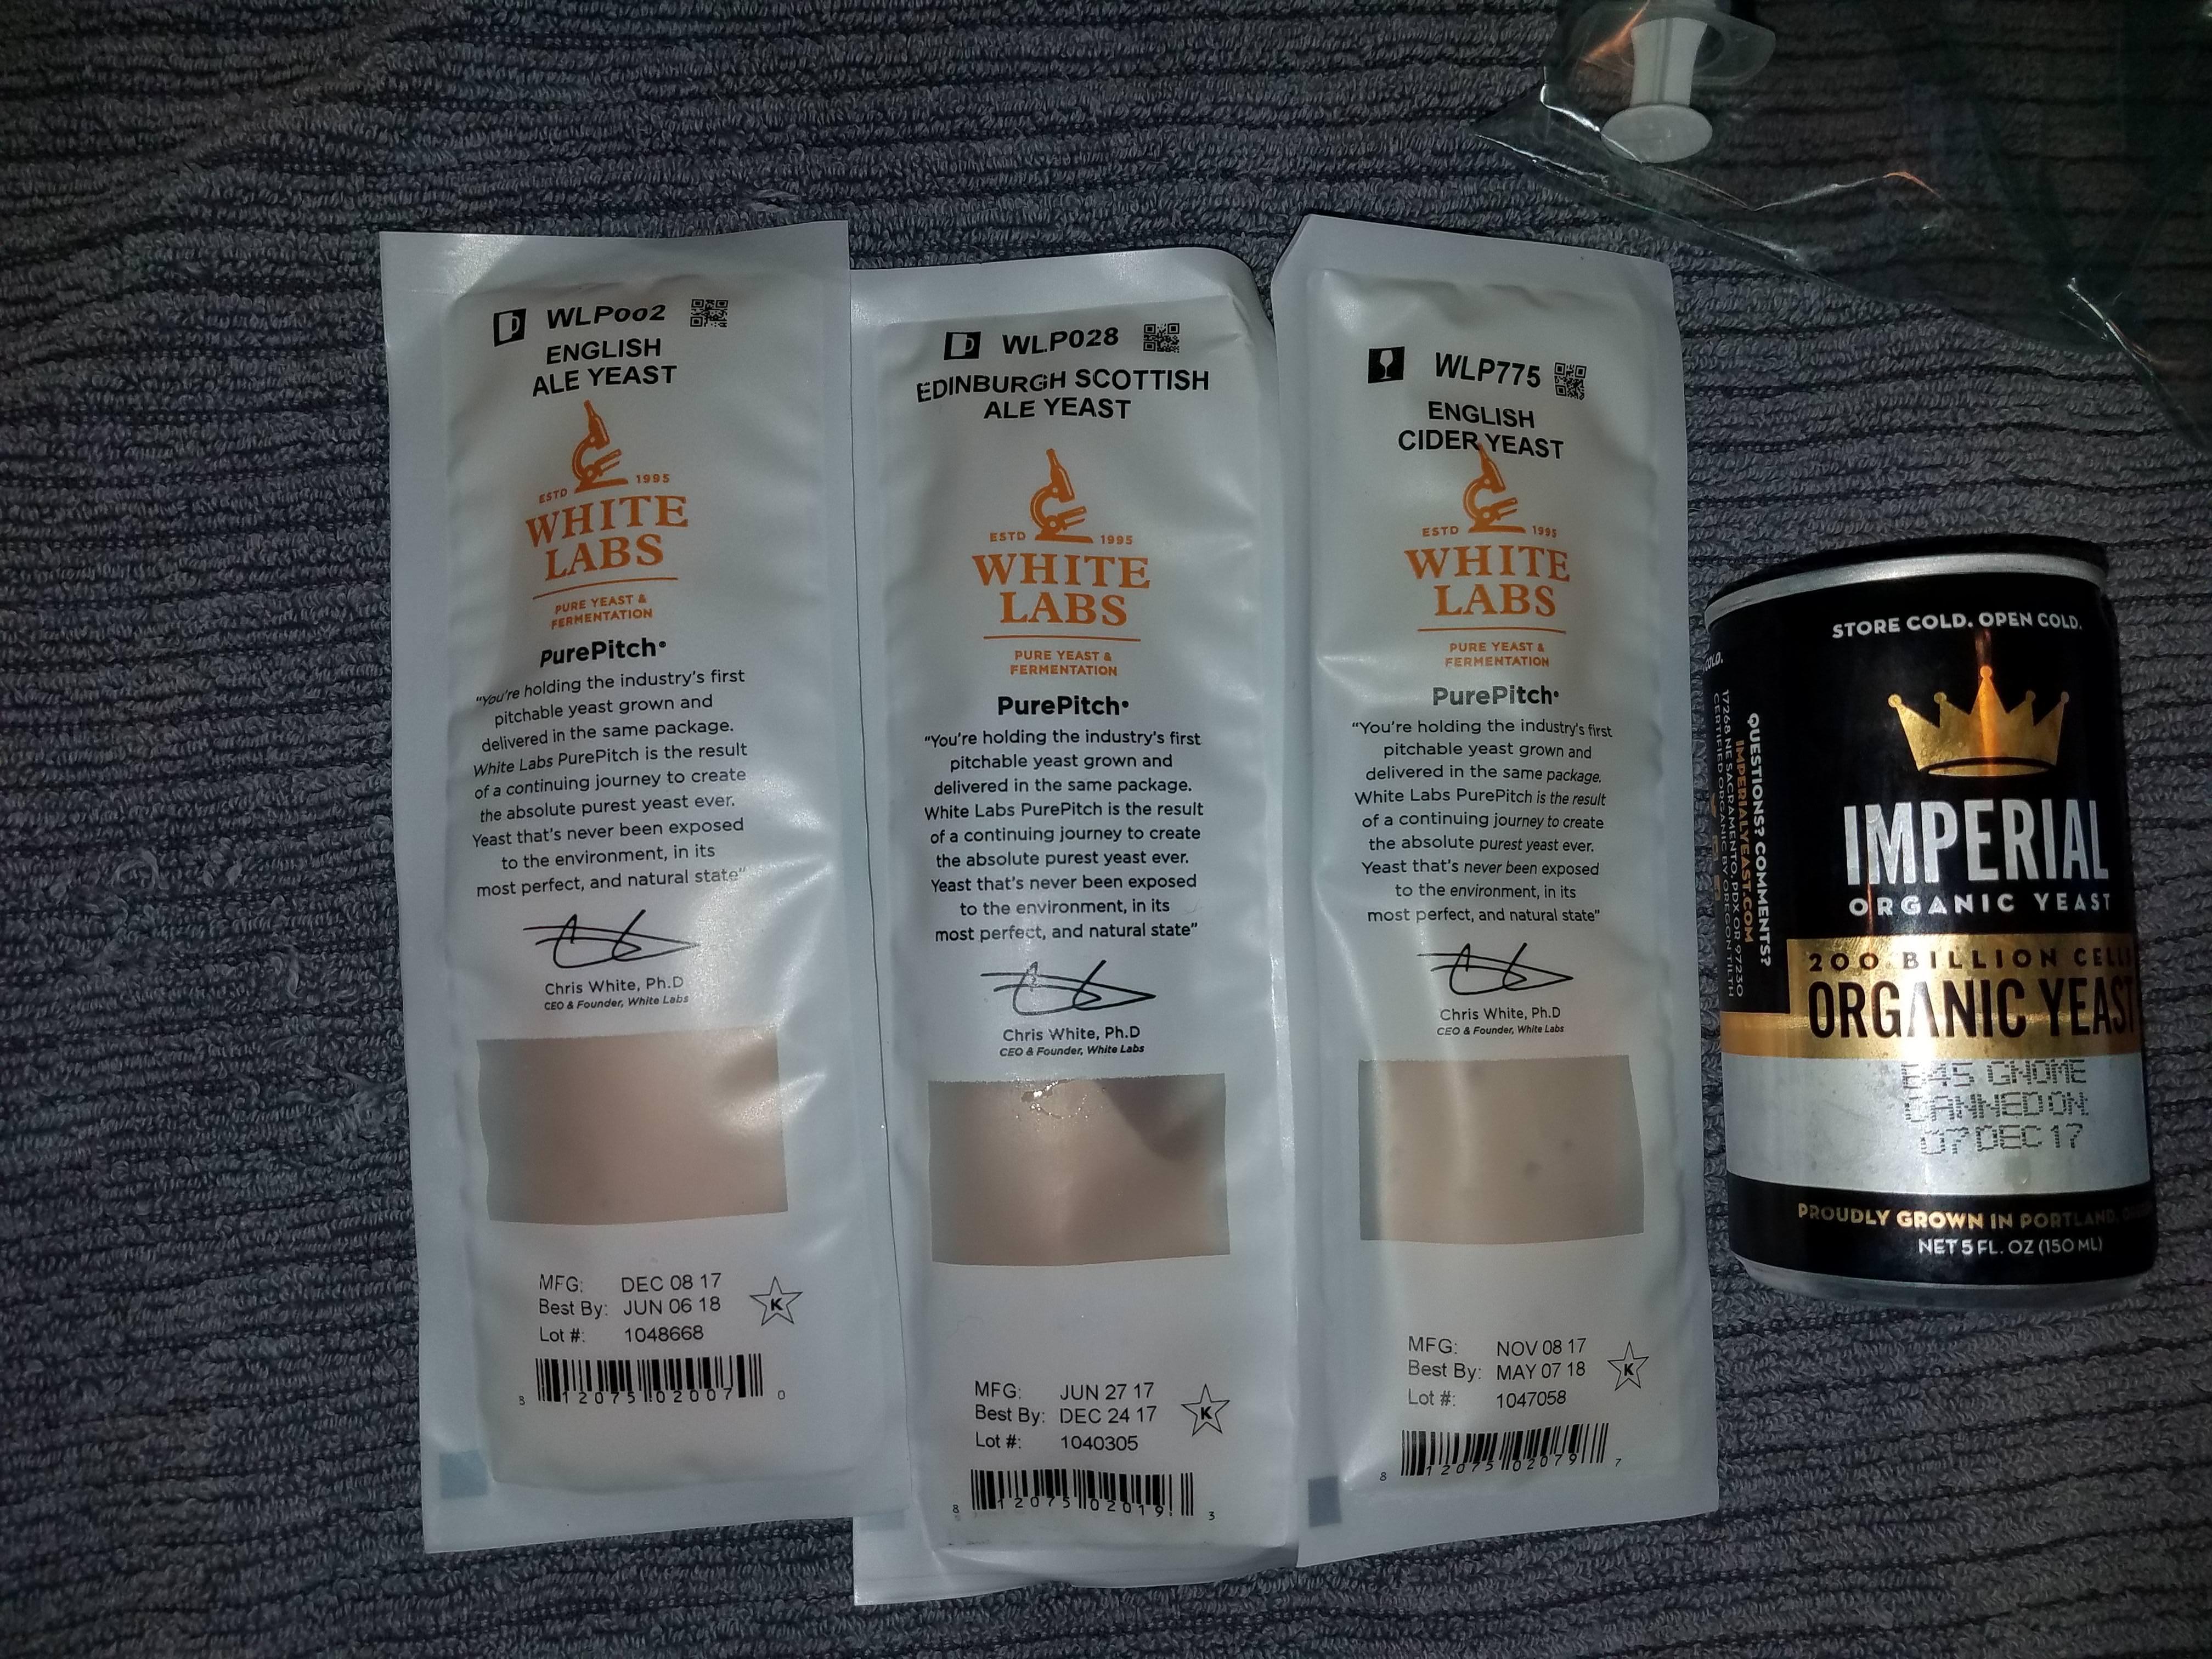
- purchased new and healthy White Labs strain 1 month old or less

- Set up burners, sterilized counter and used disposable sterile pipette to split WL strain into two storage vials (approx 17 -20ml) of yeast slurry each

- Recorded strain and all pertinent info and stored vials in fridge for 48 hours in preparation for freezing

- Placed vials in foam locker and froze for later use

Here is how I re-animate:

- Pull strain from freezer and place in fridge ovenight
- Sanitize 1000ml flask and then put in 175ml of canned sterile 1.040 wort
- Warm yeast with hand, and then place in flask/wort
- Let sit for 1/2 hour and then place on heated stir plate for 24 - 30 hours
On second or third stage, pull one 20 ml yeast slurry sample and place in 45 ml storage vial. Follow freezing procedures above. Pull 3ml sample and follow yeast counting procedure (with microscope).

So far my starters have been incredibly healthy. I know it sounds crazy, but they seem even more lively than before I started freezing yeast. Great/healthy/tasty batches of brew as well. Needless to say, after 8 successful starters, I am now a complete convert to yeast ranching.
 
Nice writeup!

Heated stirplates worry me.... unless you've got a brand new, digitally controlled one. Some of the surplus ones (Corning especially) are known to loose heat control after prolonged usage. What happens is they go on full high. This is really hot and could burn down your house. It's not enough to melt pyrex but it will melt tinfoil. Just google some of the horror stories.

I stopped using a heated stirplate for that reason.... remote as it is. I like my house. Got a SCREAMING deal on ebay for a person who didn't know what they had
... now I use this for small heated n shaken starters off slants and don't heat my larger volume step ups

That is a nice get off of Ebay!

All my fermentation, including starters, takes place in my basement which stays 52 to 57F depending on time of year. A heated stir plate is a must for me. I have a Yeast Forge from Digital Homebrew a could not be more pleased with it. I have a 3400ml starter in a 5000ml flask going as we speak.
 
Question for you experienced people.

When I step up a colony or slant to make tubes to store in the freezer I have been using wort made from DME sterilized in a pressure canner. I get quite a bit of hot break and when I cold crash the yeast, add glycerol mixture etc... i end up with a good bit of hot break in the centrifuge tubes. I know this probably isn't a huge deal but ...

Do any of you just boil your step up media similar to a starter rather than sterilize it? Is this bad practice for yeast banking? I'd definitely get much less hot break material that way.
 
You should boil the wort on the stove first, and separate from the trub, then pressure cook. You can go with only boiling, but you never know what can resist the boil.
 
I autoclave my wort mixture in reagent bottles 50% full then once cool (and needing sterile wort), I manually pipette out what volumes needed....being careful and keeping the stock bottle sterile. I've had a stock bottle of wort for 2 months before. There's a significant amount of break material on the bottom but I just let gravity settle it and don't transfer it.

In a nutshell, I'd try to limit break material in your master culture vials. It looks ****ty and could possibly alter the freezing dynamics? But mostly cuz it looks ****ty.

I also wouldn't trust a normal boil alone for this kind of sterilization work.
 
I haven't read through all the pages yet, but if it hasn't been mentioned yet adding ascorbic acid also helps the yeast membrane stabilize for freezing. I currently have 113 strains banked in my freezer and have kept them that way. I also have a lab freezer on the way for our brewery so I won't have to worry about shelf life soon.
 
I haven't read through all the pages yet, but if it hasn't been mentioned yet adding ascorbic acid also helps the yeast membrane stabilize for freezing. I currently have 113 strains banked in my freezer and have kept them that way. I also have a lab freezer on the way for our brewery so I won't have to worry about shelf life soon.

Oh where did you score the - 70 deep freeze at? Cost? Deets plz
 
I've been freezing yeast for several months now.
For vials I have these: http://www.sks-bottle.com/340c/fin59a.html

I got my Glycerin at Rite-aid. It is the skin treatment kind. But with no additives, I guess it is OK.

The first step I take is to make a starter a little bigger that what I need for brew day. I then make 4 vials for generation 1 to freeze. If I made 4 more each time I could go just 4 generations and make 256 batches from the one original vial/pack of yeast! That is a significant $$ savings!:D

6 varieties now and 21 vials in storage.

I mix 10ml yeast, 10ml glycerin and 20ml water. I have revived 2 so far, 1056 and WLP023 Burton Ale Yeast, with now problems at all.

I do steps of 250 ml decant, 500 ml decant, Then it looks like the same amount as a vial/pack. I then make a starter of the recommended size for the gravity brew planned.

The Burton's is in a Porter and filled my blow off jar after a day!

A few years later and I find that I don't allow enough time for a starter and end up using dry yeast quite often.

But I have used my frozen yeast that has been stored for up to 2 years and it works well.

I now have at least 10 different strains.
 
I've just made a starter with some WLP002 that I froze 10 months ago. This was my first try, and it's been a total success. It got off to a slow start, and I was starting to get worried, but after a day and a half the yeast started to take off. I have a few other frozen strains now too. Thank you everyone for the great information. :)
 
Side note I've found through some of my research and wrangling.... plus backed up by some literature (don't ask me for a citation... I'm not digging one up)....

It seems as if Brett needs to be reslanted significantly sooner than Sacc to keep viability decent at 36F/2C on UBA. Still looking into MRS/LAB slant long term shelf life.
 
If frozen in a home freezer then yes Brett does not survive as long as Sacc. Same applies for slants/sterile wort storage. It has about half the lifetime. For LABs a media with CaCo3 is used to produce more cellular growth and a c02 rich environment. They also have less of a shelflife but it varies strain to stain. In most cases Pedio tends to be a bit stronger on the storage side without a lab freezer. I'm currently doing some experiments for milk the funk on the long-term storage of yeast and bacteria in the fridge using isotonic sodium chloride. We are testing it on 11 brett strains, 3 lacto strains and 2 Pedio strains. We used this method with Sacc before we had a lab freezer and it was extremely successful. once we have a definitive answer I'll post it on hbt.
 
Can one isolate bacteria or brett colonies without lab grade media or ustensils? I reguraly isolate sacc colonies from petri dishes but i have no idea how to do this with a mixed culture.
 
You could streak it out on nurient rich malt agar, Sabouraud, or MYPG media. Then once you have single colony growth just pick that part out. Issue with that is trying to identify what is what without having knowledge on thier morphology, even under a scope Brett can be tricky to identify on looks alone. For the most part Brett is isolated using a media that includes cycloheximide and chloramphenicol
 
WLD agar is super good at this cuz it is selective for non-sacc strains and differential due to pH based color changes.... or as stated above just add cyclohexamide (yeastman sells it) to PDA media.

Then subculture according to colony morphology. Investigate further with microsopy, gram stain, catalase tests and finally a small scale test ferment. It's a long process.... but I've done it on Crooked Stave and Russian River mixed culture beers and now use their isolates at my brewery.... among other things
 
If frozen in a home freezer then yes Brett does not survive as long as Sacc. Same applies for slants/sterile wort storage. It has about half the lifetime. For LABs a media with CaCo3 is used to produce more cellular growth and a c02 rich environment. They also have less of a shelflife but it varies strain to stain. In most cases Pedio tends to be a bit stronger on the storage side without a lab freezer. I'm currently doing some experiments for milk the funk on the long-term storage of yeast and bacteria in the fridge using isotonic sodium chloride. We are testing it on 11 brett strains, 3 lacto strains and 2 Pedio strains. We used this method with Sacc before we had a lab freezer and it was extremely successful. once we have a definitive answer I'll post it on hbt.

I've never seen LAB grow on anything better than MRS, even somewhat fastidious **** like Pedio....I don't even bother with an anaerobic environment it works so well for most of the strains I utilize.
 
I use a recipe from Jeff Mello at bootleg biology. It works just as well as MRS growth. Its on milkthefunk.com/wiki under the lacto page. Works for pedio as well. The LAB's metabolize the Cac03 and create c02.
 
I basically just took what the recipe is on there, then add less CaC03 and then add agar.
 
From the dead.

I tried to setup my first batch tonight, but it turns out the vials I bought can't deal with the heat in the pressure cooker. Can someone link proven vials that the caps will survive pressure cooking?

Thanks.
 
It might take me a while to find a link but basically the kimax resin top vials will handle the heat.
 
Awesome, thank you. Looks like they have varying sizes of the same thing, so I'll pick something close to the vials that failed me.
 
Going to resurrect this thread since it was the inspiration for me to start a yeast bank. Copy and paste from one of the "other" home-brew sites (but I swear I love all my forums equally)

Finally got my yeast bank going!

In each 15ml tube I have approximately 10 ml of slurry and 5 ml of 50/50 water/glycerin, which is about a 15% glycerin concentration. 28 billion cells in each vial on average, assuming 100% viability, which at least for one of them (read more below) is nowhere near accurate viability.
That 028 made me mad.....did not notice it was past its best date until I got home and started packaging the yeast. Almost want to go back for a refund, but....meh....

Also banked some S-04 I had grown up from 2 grams of dry yeast, just for fun. I had WAY more than I needed for 5 vials. Tossed probably 3/4 of my starter after making my vials.

Observations:

002 comes out like toothpaste. No joke. It would not even flow to the bottom of my vials. It clogged the upper half and I had to close, shake, reopen, and finish filling. The floc on 002 is real.

The size of Imperial cans is way bigger than you need if you planned to only bank a couple 15ml vials. I made 8 vials and still had a lot left. Felt bad enough that I grabbed a random gallon of apple juice and put 20ml in it as a completely unplanned cider experiment. Still had more left over after that...should have just dumped it all in the cider. Not sure why I only used 20ml.

The other White Labs yeast packages are supposed to be roughly 35ml, but I seemed to stretch them into 5 vials each, of what I claim was 10ml yeast in each. I am sure that was wishful thinking on my part.

I pulled the quality control reports for all the White Labs batches and they each came in at either 2.82 or 2.83 x 10 to the 9th cells/ml, so that's a plus. Nice and dense yeast and not on the low end of their acceptable density range.

Now I need to see if I can successfully revive any of these in a starter! I will start with the 028 since if Mr. Malty is to be trusted, that was sitting at only 10% viability before I even opened it....then I divided it and froze it. Haha. The deck is stacked against me. But if people can revive from a tiny culture on a tiny refrigerated slant, I can make this work...
EsqCuxR.jpg


qf7od24.jpg
 
The size of Imperial cans is way bigger than you need if you planned to only bank a couple 15ml vials. I made 8 vials and still had a lot left. Felt bad enough that I grabbed a random gallon of apple juice and put 20ml in it as a completely unplanned cider experiment. Still had more left over after that...should have just dumped it all in the cider. Not sure why I only used 20ml.

The other White Labs yeast packages are supposed to be roughly 35ml, but I seemed to stretch them into 5 vials each, of what I claim was 10ml yeast in each. I am sure that was wishful thinking on my part.

I use the original packages that I buy. I make a starter a little bigger than I need for the recipe. I then have yeast that is very fresh. I make 4 vials from the extra yeast and pitch the rest in the current brew. I have used frozen vials that were over 2 years old. I planned (but never have done it) to make a new set of 4 vials from the last of the original 4. Thus never needing to buy that type of yeast again.
 
Hello Everybody. I used to post on Homebrew Digest and rec.crafts.brewing back in the 1990's. It's been a long time, but I'm back and brewing!! I have followed this thread with great interest. I used to make and use agar slants, but I just tried freezing my first batch of yeast, and I would like some feedback on a couple of points. I may be over simplifying things, so I would like to know if I've missed something.

Everybody is talking about harvesting from the primary or from a starter. But that seems to me like it is more difficult, and one generation removed from the original strain. I understand if you are not starting from a smack pack, but if you are, why not extract directly from the smack pack?

Here is the procedure I just used to freeze my first batch of yeast. If I've got something wrong, please comment!

Harvesting Yeast from Smack Pack:

(Follow basic starter, freezing, and agar slant procedures already established in previous articles.)

Prepare 6ea. sterile 15ml vials with 1.5ml glycerin in each.

Prepare 1ea. 500ml starter.

(Optional: Prepare 6 baby food jars with agar/wort media in bottom, sterilize in pressure cooker.)

From a new Smack Pack (smacked and swollen, sterilize outside of pack), extract 6ea. 10ml samples into the 15ml vials with glycerin. This will leave roughly 65ml in smack pack. Pitch this into 500ml or 1000ml starter. Take care not to contaminate smack pack. Now use inoculating loop to gather remaining yeast in bottom of smack pack to inoculate each agar slant (optional, but I wanted a back-up in case I screw up the freeze!!).

Freeze vials (per procedure)

Store agar slants (per procedure)

You now have 6ea. frozen, pitchable vials of Original Generation yeast strain, and 6ea. agar slants. When you get down to your 2nd to last vial, pitch into 200ml or 500ml starter, and begin again, as if it were a new smack pack (create 6 new frozen vials and pitch remainder into 1000ml starter). This should prevent the eventual mutation from constantly harvesting from the primary (so desu ka?, n'est pas?, RIGHT?).


Experiment in Harvesting Yeast and freezing full load from Primary:

Pitching directly into the next batch would be nice, but I'm not ready to brew yet. So... I'm freezing the the whole load. Results will follow in few months when I revive the frozen load.

(Follow basic yeast washing procedures already established in previous articles.)

For 10 gal. batch (2ea. 5 gal. carboys)

On second day of fermentation, right after blow-off had subsided, I transferred to “first secondary”, and threw out all the dredges from primary. Two days later, I transferred again to the real secondary, this time harvesting the yeast (I know... people say harvest from the primary, but this was an afterthought, and I will only be using it to pitch to another batch, not for my yeast bank.). I only put in a small amount of sterile water (~500ml) into each carboy, swirled, and poured into 1-quart, sterile mason jars (one for each carboy.) This was all viable, clean yeast, without the need for multiple washes and getting rid of the top and bottom layers. (Sorry I didn’t take pictures – thought of that afterwards!) The jars settled into 2 distinct layers (not 3 like you usually get with all the trub from the primary) – a yeast cake at the bottom, and the liquid on top. I put in refrigerator over night.

Next day:

I prepared a sterile water and glycerin solution by adding 2 oz (59-60ml). glycerine into 8oz. (~240ml) sterile water. This will render a 25% solution, which I added to the yeast slurry, which is approximately 250 – 300ml. So, depending on the density of your yeast cake, you should wind up between 12.5% to 15% glycerin in the final mix.

Decant liquid from top of yeast in mason jars (I use a sterile turkey baster to remove most of the liquid down to about 1/4” (6mm) of liquid on top of yeast, then pour off remaining liquid until yeast appears in stream. This seems to allow for removal of more liquid before yeast enters the stream.) Now pour half of sterile, 25% glycerin/water solution into each mason jar of yeast. Swirl to loosen yeast cake, and pour both jars into one sterile 1-quart mason jar. Shake vigorously to mix glycerin solution with yeast, and put in refrigerator.

Follow freezing technique to allow 48 hours to cool before final freeze.

I have a VERY old refrigerator that I keep around 50°F (10°C) for my kegs. It is just past the shutoff point of the thermostat – any further and it shuts off completely. So, the freezer never quite freezes – it stays right about 32-33°F (0-1°C). So, it is perfect for stepping down the temperature for a day or two before going into the deep freeze.

Mason jar is about 2/3 full, so plenty of room for expansion during freezing. (Even up to 3/4 full is sufficient - I freeze soup in mason jars like this all the time - so long as you have at least 1" (2.5cm) of headspace, it's fine, just keep the cap loose until it's frozen.)


Other suggestion:

I use a milk frother (Ikea - $3) to aerate my starters. Wipe the stir rod and spring with alcohol and flame to sterilize, then let it rip! Nothing but foam in less than a minute (be sure to use a large container, because volume will more than double in foam.) NOTE: Some of the Ikea frothers are stronger than others. I hot-wired mine to a 5v power adapter (they normally run 3v with 2 AA batteries.) Now it doubles as a weedeater!!


Comments welcome!
 
Last edited:
I use a milk frother (Ikea - $3) to aerate my starters. Wipe the stir rod and spring with alcohol and flame to sterilize, then let it rip! Nothing but foam in less than a minute (be sure to use a large container, because volume will more than double in foam.)
Comments welcome!

The idea of creating massive foam in an oversized vessel and then not worrying about aeration afterwards seems to be one of the "newer" ways of doing it versus a constant stir plate. I can see the appeal and logic. Having the yeast be on the walls of the thousands/millions of bubbles gives them an absolutely massive surface area to work with. Even if the foam slowly dissipates over time.
 
The idea of creating massive foam in an oversized vessel and then not worrying about aeration afterwards seems to be one of the "newer" ways of doing it versus a constant stir plate. I can see the appeal and logic. Having the yeast be on the walls of the thousands/millions of bubbles gives them an absolutely massive surface area to work with. Even if the foam slowly dissipates over time.

I actually still used a stir plate. I have always done the massive aeration (been brewing since 1985), but just recently got a stir plate. I always see action within a couple of hours in my starters and after pitching. But I REALLY noticed an improvement in the starter using a stir plate.

I use a RIMS with a Counter-Flow Heat Exchanger to my sparge/boiling tank to keep temperature where I want it during the mash with no danger of scorching. Then I run cold water through the CFHE to cool, and at the end, I crack open a valve that is "Tee'd" between the tank and the pump inlet with some sterilized cotton as a filter. This sucks air in and not only injects it into the cooled wort as it recirc's, it gets an extra whirl as it goes through the pump. Same effect -- creamy, frothy, aerated wort that takes off within a few hours of pitching the yeast.
 
I actually still used a stir plate. I have always done the massive aeration (been brewing since 1985), but just recently got a stir plate.

Yeah, did not mean to say it was a new thing. Just that I have seen it pop up a lot more often recently as a "better" method than a stir plate, or at the very least on par with stir plate results. Usually when someone says "do I really need a stir plate" and someone else says "let me tell you about our lord and savior shake the hell out of a vessel at least three times the size as your liquid method."
 
Well, I've done both, and I'm now a believer in the stir plate. BUT, I still use my supercharged milk frother!!!
 
Small update from me. I decided to see if I could successfully make a starter from the "expired" 028 Scottish Ale yeast. Just as a proof of concept. Once the yeast had settled and frozen in all my vials, I found that there seemed to be a variation in the amount of compacted cake at the bottom of each. This surprised me since I massaged and shook the original packaging really well and measured out the yeast for each vial. But who knows....for some reason one of my 028 Scottish Ale seemed to have a little more than 5ml of compact yeast versus the 8-10 ml I was seeing in other vials. So I chose that runt of the litter to stack the deck against myself even more. I took the vial out of the freezer and was surprised to find that it "melted" within about 5 minutes. Goes to show that the freezing point of glycerin really is much lower than water. Put it in a 250 ml starter last night and checked on it this morning. Seems to have colored the liquid, which is a good sign. Will check tonight after it has been 24 hours to see if there is any noticeable increase in yeast. Then will step up to something in the 1-2 liter range.
 
Success. I did a 250 mL starter from the vial, and then after about 36 hours dumped all into an 800mL without cold crashing. Let that go for about 24 hours and it was super milky and tasted completely fermented. Ended up with about 60 mL of very dense yeast after cold crashing, netting me 4 really full vials where I used 3 mL of pure glycerin and about 12 mL yeast slurry. I still am keeping my original vials that came straight from the White Labs vial, but might make my future starters from these larger and more fresh vials while keeping the originals as backups.
 
So at the risk of a major thread necro, 4 years, 2 months later I appear to have brought back some Conan I froze in February 2016 using this guide. It survived a divorce and 2 moves. I used 4 soda bottle preform tubes from my “bank” inside a cooler bag with additional ice packs in my various freezers over time. The starter is on a stir plate producing significant CO2 after 3 days. Probably a longer lag time than usual, but if I remember correctly Conan always had a longer lag time.
 
Back
Top