Concial fermenter

Homebrew Talk - Beer, Wine, Mead, & Cider Brewing Discussion Forum

Help Support Homebrew Talk - Beer, Wine, Mead, & Cider Brewing Discussion Forum:

This site may earn a commission from merchant affiliate links, including eBay, Amazon, and others.
Here are a couple more photos of the progress hopefully these ones upload correctly

attachment.php


attachment.php


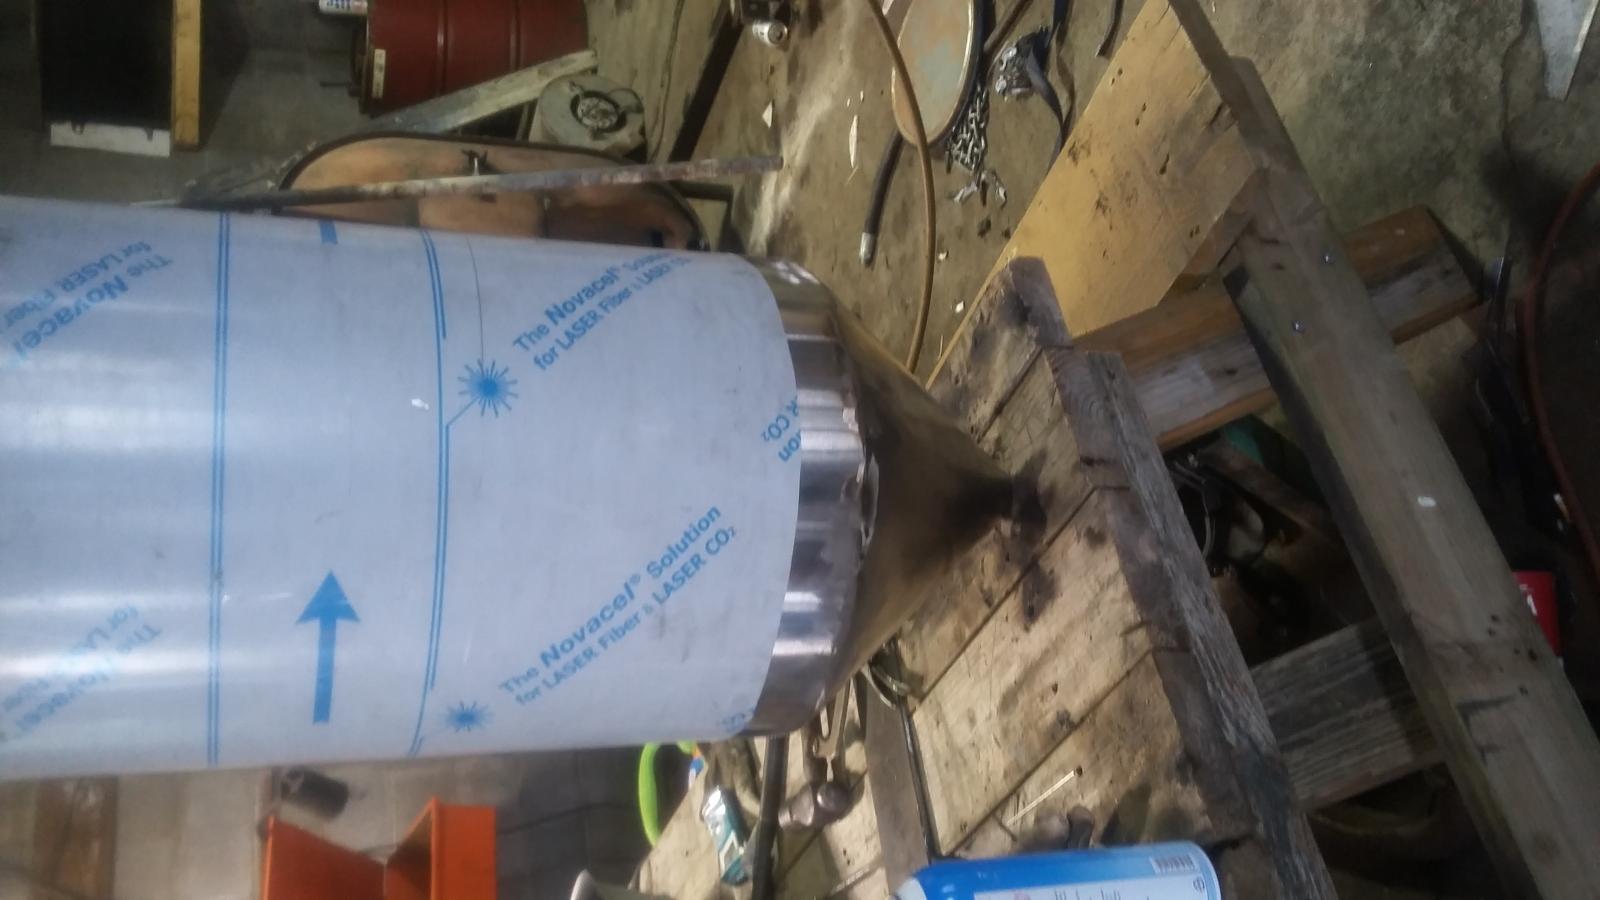
I have sanded down and rounded off the weld on the outside for the seam where the cone meets the cyliner. I am hoping to electropolish the whole thing when done. Which will get rid of the grind marks eliminate the need for passivation and make it really shiney lol :D

20160516_164306.jpg


20160516_164242.jpg
 
You are going to buff out the skin before you call it finished, I hope... How does the interior weld look? As long as it it ground smooth and buffed to a polish, it should be great!
 
The electropolishing will take care of the buffing actually what it will do will take a few thousandths off the surface which will shine it right up and smooth it out. Also the interior welds will also be sanded down and smoothed out too but as of right now they look like this

20160511_130109.jpg
 
What is the angle on your conical portion? It looks kind of shallow, but that might just be the pictures. Shouldn't it be around 60° for being most effective at getting the yeast and trub to slide down to the bottom?
 
What is the angle on your conical portion? It looks kind of shallow, but that might just be the pictures. Shouldn't it be around 60° for being most effective at getting the yeast and trub to slide down to the bottom?

My understanding of conical shapes is that 60 is ideal. However, if it's not going to be 60, then it's better to have a shallower inner wall for the yeast to go down, rather than a steep wall where yeast gets compacted. I might be completely wrong, but that was my thought process.
 
My understanding of conical shapes is that 60 is ideal. However, if it's not going to be 60, then it's better to have a shallower inner wall for the yeast to go down, rather than a steep wall where yeast gets compacted. I might be completely wrong, but that was my thought process.

I agree, but it all depends on what reference you are using to measure your angle. In the picture below, the one on the left is how I think the "industry" measures the angle and is why I asked the question. When I said "shallow," I was referring to the the height of the cone. The one on the right is what I think the OP measured. I could be wrong too. :)

Angle2.png
 
I agree, but it all depends on what reference you are using to measure your angle. In the picture below, the one on the left is how I think the "industry" measures the angle and is why I asked the question. When I said "shallow," I was referring to the the height of the cone. The one on the right is what I think the OP measured. I could be wrong too. :)

Quick calculations from the pictures provided point towards the more shallow cone as being the result, 55 degrees.
 
Quick calculations from the pictures provided point towards the more shallow cone as being the result, 55 degrees.

Here is one at 55°. I guess I should have done that in the first place, but I have 60° stuck in my head. :) Plus, I don't know what diameter the OP is making his conical, so I just guessed at 14 inches. The diameter will effect the cone height.

Angle3.png
 
Yes thats what that shows to the point of the cone its 8" but the cone on mine is cut off to have a 2" opening you add the point it will add height to the cone i would say at least 2 inches. Which would put it at 10" height and thus the angle changes ill put an angle finder on it later and show you its a little over 50°
 
Yes thats what that shows to the point of the cone its 8" but the cone on mine is cut off to have a 2" opening you add the point it will add height to the cone i would say at least 2 inches. Which would put it at 10" height and thus the angle changes ill put an angle finder on it later and show you its a little over 50°

I believe you. :) Now that I have the geometry right it is showing almost 51°

Angle4.png
 
Lol see i wasnt lieing the reason i said 55 is because at first i was going to go with a 10" height from the 2" dia on the bottom to the 15" dia on top but then it would have been under 20 gallon capacity with the cylinder being 22" height so i opted for 8"
 
Brewhemoth Conicals are made with a 45* cone and work excellent for yeast dumping/harvesting. They did a ton of research before making them and from what i remember the 60* was beneficial for dry product flow but there was no conclusive proof that it made a huge difference with yeast/beer. the 60* was just adopted in the beer world because it was easier to source from the plethora of grain conicals.. don't quote me on that though-just what i remember reading somewhere. but I will say I have 2 brewhemoth fermenters and the 45* works excellent. your 50-55 will be just fine.
 
For what it's worth, a 60° (inside the cone) angle is one of the more efficient ways to utilize flat stock to make a cone that fits a cylinder.

If you cut a 30" circle, and then split that in half, each half can be rolled into a cone for a 15" cylinder. The resulting cone is ~13" tall to the point, and has an inside angle of 60°.


Makes sense. Often devices are produced a certain way for efficiency of manufacturing more than efficiency of the actual product use.
 
For what it's worth, a 60° (inside the cone) angle is one of the more efficient ways to utilize flat stock to make a cone that fits a cylinder.

If you cut a 30" circle, and then split that in half, each half can be rolled into a cone for a 15" cylinder. The resulting cone is ~13" tall to the point, and has an inside angle of 60°.

While you may be right about being able to get 2 15" cones with a 60° angle out of one 30" circle i disagree with it being more efficient. The cones i am using can be cut from a piece of material 24" x 16" so to get 2 i would need a piece 24" x 32" and a full sheet comes in at 48" x 96" so i can make a total of 12 cones out of 1 sheet. Where as if i did it the way you are saying id only get 9
 
While you may be right about being able to get 2 15" cones with a 60° angle out of one 30" circle i disagree with it being more efficient. The cones i am using can be cut from a piece of material 24" x 16" so to get 2 i would need a piece 24" x 32" and a full sheet comes in at 48" x 96" so i can make a total of 12 cones out of 1 sheet. Where as if i did it the way you are saying id only get 9

Very good point, I hadn't considered the reduction of width on the flat version by reducing the cone angle. Your design looks like the winner.
 
I know this thread is old now had to put the project off for a while and was procrastinating getting back to it. I have started work on this again for all those who are interested in the progress of it I will be posting pictures of the progress as it is made. I have ordered the fittings and I am getting the materials for the lid cut on the water jet at work should be done very soon. And for anyone who is curious it looks like the total cost of this fermenter is going to be around $300 total for a 20 gallon fermenter not bad if you ask me.
 
Also for all those who are interested the next project is a 20 gallom electric Brew kettle. That one should be realitivly simple compared to this one.
 
Nope sure didn't just didn't have the time to do it and then had a baby so been pretty busy with all that just now getting back to it. And I will say I will not be selling these as it may only cost me $300 to build but including time and the fact that I've gotten deals on materials and getting things cut and formed for next to nothing thru work I'm doubting they would continue to give me those deals if it was to turn a profit. All said and done if I had to pay full price for everything cost would be closer to 600 and at that price you can buy a spin fermenter for not much more.
 
But you know that you can make them, that is the more important thing. As your home brewery grows you know that you can put together one as you need it.
 
IMG_20180410_092802.jpg
received_10216093127909353.jpeg


Here are a couple pictures of the tri clamp fittings I went with a 2 pc NPT ball valve as the tri clamp ball valves are a little on the pricey side. I still have to put the hole in the side for the sample valve ferrule and weld that in and obviously still alot of cleanup and polishing to do as for the lid I have designed a 2 piece lid assembly that I am getting cut at work and should have within the next week or so. The drawings I have attached are what I came up with for the lid consisting of a ring that will get welded to the fermenter with 1/4" bolt holes spaced evenly around the ring and then the lid with the same bolt pattern. 1/4-20 stainless bolts will be welded on to the ring and wing nuts to secure the lid and of course a gasket in between not sure what material to use for the gasket as of right now it's between cork or some sort of rubber. Any suggestions would be appreciated. The lid will have a 3" hole in the center of it for a 3" ferrule and blow off tube. Ignore the second hole I was contemplating putting the thermometer in the top of the lid but have decided against it.

Screenshot_20180410-093742.png

Screenshot_20180410-093748.png
 

Attachments

  • Screenshot_20180410-093748.png
    Screenshot_20180410-093748.png
    71.4 KB · Views: 58
Back
Top