You are using an out of date browser. It may not display this or other websites correctly.
You should upgrade or use an alternative browser.
You should upgrade or use an alternative browser.
My Ugly Junk- Corona Mill Station...
- Thread starter Revvy
- Start date

Help Support Homebrew Talk - Beer, Wine, Mead, & Cider Brewing Discussion Forum:
This site may earn a commission from merchant affiliate
links, including eBay, Amazon, and others.
Discount Tommy, $27 shipped
http://www.discounttommy.com/p-189-...er-for-wheat-grains-or-use-as-a-nut-mill.aspx
http://www.discounttommy.com/p-189-...er-for-wheat-grains-or-use-as-a-nut-mill.aspx
I bought one of these from that same guy on eBay... shipped fast, $22 total cost. I replaced the cotter pin with a small bolt. I still can't seem to get the plates lined up perfectly parallel. If I really tighten the nut onto the bolt (thereby fixing the plate in place firmly, no wiggle at all), the plate ends up crooked and the gap closed and opens as I turn the crank.
However, if I loosely tighten the nut, there is a little play left in the plate (less than with the cotter pin, but still some), and it seems to self align when crushing the grain (i.e. the volume of the grain moving through is enough to keep the plates aligned).
After adjusting the set screw for the gap (and adding a couple washers per this thread) , it does seem like I got about 15% flour, but nearly zero uncrushed grains, and the hulls looked mostly intact.
I crushed 1 lb. of toasted malted barley (for steeping) in my last brew. My OG was higher than expected, and I wonder if it was due to too fine a crush.
I think the setup is ok, but I think everyone here is more experienced than I am, and I'd appreciate any advice or comments.
cyberbackpacker
Well-Known Member
I bought one of these from that same guy on eBay... shipped fast, $22 total cost. I replaced the cotter pin with a small bolt. I still can't seem to get the plates lined up perfectly parallel. If I really tighten the nut onto the bolt (thereby fixing the plate in place firmly, no wiggle at all), the plate ends up crooked and the gap closed and opens as I turn the crank.
However, if I loosely tighten the nut, there is a little play left in the plate (less than with the cotter pin, but still some), and it seems to self align when crushing the grain (i.e. the volume of the grain moving through is enough to keep the plates aligned).
After adjusting the set screw for the gap (and adding a couple washers per this thread) , it does seem like I got about 15% flour, but nearly zero uncrushed grains, and the hulls looked mostly intact.
I crushed 1 lb. of toasted malted barley (for steeping) in my last brew. My OG was higher than expected, and I wonder if it was due to too fine a crush.
I think the setup is ok, but I think everyone here is more experienced than I am, and I'd appreciate any advice or comments.
I think your OG ended up high because, if as stated, you calculated your fermentables based on extract plus steeping grains. However what you actually ended up doing by crushing your toasted barley was a "partial mash" instead of steeping, which yielded more sugars into your wort than a mere steeping would do.
Make sense?
Well, I figured out exactly why my OG was high (probably in addition to the mash from this small amount of grain)... the original recipe called for 9.9lbs. LME.
I ended up using DME, but used 9lbs! I only learned after about the conversion factor of .8*DME = 1*LME... at least it's explained.
Now I have an 8% ABV Maibock on my hands. I sampled when I racked to the secondary today, and it is strong but has a good flavor. I have hope that this will turn out well.
LakeErieBrew
Well-Known Member
I just bought a grinder from Discount Tommy on eBay. I'll post some pics once I get it set up.
BuzzCraft
Well-Known Member
I bought one of these from that same guy on eBay... shipped fast, $22 total cost. I replaced the cotter pin with a small bolt. I still can't seem to get the plates lined up perfectly parallel. If I really tighten the nut onto the bolt (thereby fixing the plate in place firmly, no wiggle at all), the plate ends up crooked and the gap closed and opens as I turn the crank.
However, if I loosely tighten the nut, there is a little play left in the plate (less than with the cotter pin, but still some), and it seems to self align when crushing the grain (i.e. the volume of the grain moving through is enough to keep the plates aligned).
After adjusting the set screw for the gap (and adding a couple washers per this thread) , it does seem like I got about 15% flour, but nearly zero uncrushed grains, and the hulls looked mostly intact.
I crushed 1 lb. of toasted malted barley (for steeping) in my last brew. My OG was higher than expected, and I wonder if it was due to too fine a crush.
I think the setup is ok, but I think everyone here is more experienced than I am, and I'd appreciate any advice or comments.
To get the plate parallel AND tight with the bolt, take note of which side of the rotating plate is closest to the fixed plate. Then remove the bolt and rotating plate and put some material under the plate (where it meets the shaft) to shim it outward. I used an aluminum pie plate and cut small pieces with shears and kept adding them in inder the rotating plate until it was parallel with the fixed plate. Took some trial and error, but it's dead parallel and solid now.
Hope this makes sense and good luck with it.
rico567
Well-Known Member
Well- they're not available for $22 shipped any more, so I used the "make an offer" button and offered them that. If they were selling them for that a short time ago, they can do it now. For $22 shipped, I'll pull the trigger.....and then tinker the thing into a correct grind.
LakeErieBrew
Well-Known Member
LakeErieBrew
Well-Known Member
Everything is assembled and ready for action! I pretty much copied Wilserbrewer's awesome creation.
Here are the pics:
The mill is mounted inside the bucket so once milled, the grain is contained.

Here it is with the lid on. No flying grain. Notice my brewing assistant coming over to check out what all the noise is about.
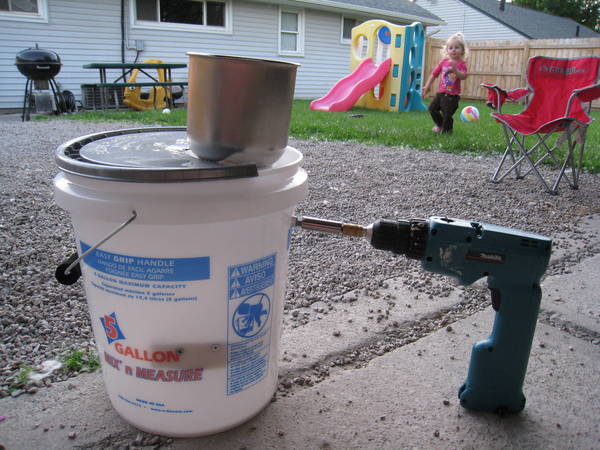
Finally, here's the obligatory shot of the crush. This is some leftover Chocolate malt I had laying around.

Many thanks for all of the awesome posts and ideas in this thread!
Here are the pics:
The mill is mounted inside the bucket so once milled, the grain is contained.
Here it is with the lid on. No flying grain. Notice my brewing assistant coming over to check out what all the noise is about.
Finally, here's the obligatory shot of the crush. This is some leftover Chocolate malt I had laying around.
Many thanks for all of the awesome posts and ideas in this thread!
Thanks and nice job Lake, looks to me like you could tighten just a smidgen??? not really sure. Oh, and straighten that mill up, earthquake zone...j/k around, but we do need keeep up the rep of these cheap useful mills. Oh, and whats w/ the insurance, this is supposed to be about "low budget" milling. Sorry, the insurance just seems contradictory. Happy milling!
LakeErieBrew
Well-Known Member
They strong-armed me into taking the insurance. Discount Tommy doesn't mess around.
First brew session with the new mill is done. 72% efficiency isn't too bad for my first try with it.
First brew session with the new mill is done. 72% efficiency isn't too bad for my first try with it.
rico567
Well-Known Member
I don't think I had to pay insurance, but I bit the bullet...........for $24 shipped I couldn't refuse. Not out that much if I can't make the Victoria / Corona work and have to buy a BC or something. I'm thinking about the "single bucket ugly junk" approach.....
secinarot
Well-Known Member
I just got one of the Discount Tommy mills and I'm not sure if I got a really bad model. Everyone talks about putting washers between the bracket that holds the grinding plate in place and the frame of the grinder. Well, let me see if I can explain mine. When the whole thing is assembled, the bracket doesn't touch the frame so you have the whole assembly wobbling. I need about 1/2 - 3/4 " spacer between the frame and the bracket to get it sung enough so that you can start to adjust the plate gap with any precision. All of the pictures I have seen on this thread show the bracket touching the frame and 1-2 washers are used to give a minor adjustment. Well in my case I would need about 10-15 washers!I just bought a grinder from Discount Tommy on eBay. I'll post some pics once I get it set up.
Did anyone else have this problem? I am wondering if I should send it back and try another one.
Just guessing here, but you might need to loosen the bolt that threads through the center of the bracket, reducing the amount of bolt that protrudes toward the mill. This is the adjustment bolt that determines the distance that the two grinding plates are separated. If this "bolt", w/ wingnut, is way out of adjustment, the mill cannot be asembled. If you still have trouble, post a photo. I doubt your mill is defective to the point where assembly is impossible.
OP
OP
Just guessing here, but you might need to loosen the bolt that threads through the center of the bracket, reducing the amount of bolt that protrudes toward the mill. This is the adjustment bolt that determines the distance that the two grinding plates are separated. If this "bolt", w/ wingnut, is way out of adjustment, the mill cannot be asembled. If you still have trouble, post a photo. I doubt your mill is defective to the point where assembly is impossible.
Secenarot, I agree with wilser here, that's my first inclination as well...
But can you post a pic of yours, or a link to one online so we can get a better look to make sure?
secinarot
Well-Known Member
I have backed that center bolt out as much as it can go. There's a ball bearing inside the chamber where the end of the auger shaft goes. With that in place, the end of the shaft is too long to allow the arms of the bracket to meet the frame. I'll try and post a picture when I get home tonight. I actually put a couple of large nuts in the gap in addition to the washers and that will allow it to be adjusted just fine. It just bugs me that the unit won't assemble as it's supposed to.Just guessing here, but you might need to loosen the bolt that threads through the center of the bracket, reducing the amount of bolt that protrudes toward the mill.
rico567
Well-Known Member
Interesting....mine arrived yesterday, apparently is the same machine -has the ball bearing in the front "clamp" housing, and yet it assembles correctly, and doesn't seem too out of whack. Of course, I immediately yanked the cotter pin out, to be replaced with a better fitting 8-32 x 1.5" bolt. The more I think about it, too, it seems like a better idea to go with the "Two Homer Bucket Ugly Junk, with duct pipe hopper and some of that truly fugly technicolor duct tape...."
LakeErieBrew
Well-Known Member
I have backed that center bolt out as much as it can go. There's a ball bearing inside the chamber where the end of the auger shaft goes. With that in place, the end of the shaft is too long to allow the arms of the bracket to meet the frame. I'll try and post a picture when I get home tonight. I actually put a couple of large nuts in the gap in addition to the washers and that will allow it to be adjusted just fine. It just bugs me that the unit won't assemble as it's supposed to.
I need to see a picture to understand what you're saying. I can't see how you would need that many washer to make it work.
Laughing_Gnome_Invisible
Well-Known Member
- Joined
- Jan 4, 2008
- Messages
- 12,262
- Reaction score
- 733
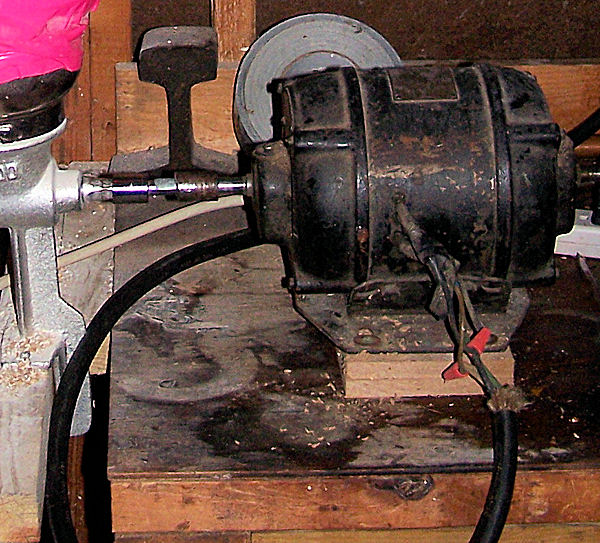
I decided that my mill was not ugly enough, so I replaced the drill with an old bench grinder that has extremely dodgy wiring. I light up if I touch it when it's running! The motor runs too fast for this operation, and I have no means to make gears for it. I will have to pulse it on and off to stop it getting carried away.
Do I win the ugly junk mill award yet? Anything I can do to make it uglier?")
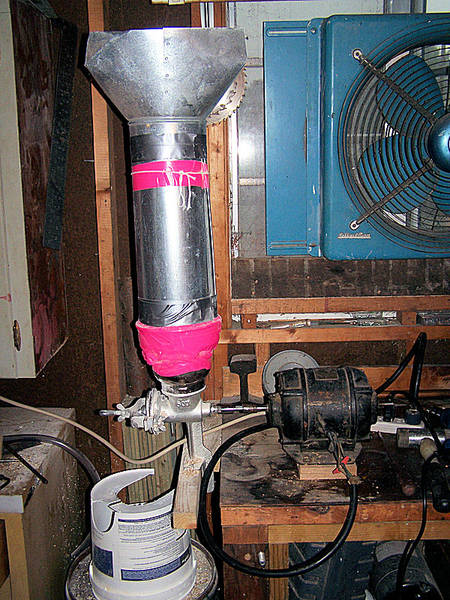
Do I win the ugly junk mill award yet? Anything I can do to make it uglier?
You have my vote.
+ 1, my vote is in! I love how I can see some bare copper wire under the top wire nut. The RR track anvil is a nice bench adornment, the cut bucket grain deflector looks to be "early" Biermuncheresque. The stained patina of the work bench reminds me of my own, and w/ all that deflected spare grain laying about, the neighborhood mice are as happy as the butcher's dog.
I'd be tempted to let that grinder motor go full on just to see how quickly you could empty the hopper.
I'd be tempted to let that grinder motor go full on just to see how quickly you could empty the hopper.
Laughing_Gnome_Invisible
Well-Known Member
- Joined
- Jan 4, 2008
- Messages
- 12,262
- Reaction score
- 733
You spotted the RR track/anvil. I'm weeping with pride!
Yea Gnome, just be sure to keep your sweaty palms away from that dodgy grinder while its energized, we do want you around another day to keep us entertained!
LakeErieBrew
Well-Known Member
Holy hell, that's an quite an abomination Gnome. I love the pink tape and exposed wiring. It's like modern art.
Laughing_Gnome_Invisible
Well-Known Member
- Joined
- Jan 4, 2008
- Messages
- 12,262
- Reaction score
- 733
Holy hell, that's an quite an abomination Gnome. I love the pink tape and exposed wiring. It's like modern art.
You missed the string around the top at the same level as the duct tape. It is tethered to the wall with string. Without the string it all falls over when it has 10 ponds of grain in it.
I saw the string! Didn't realize that it tethers the stack...duly noted w/ additional points added.
LakeErieBrew
Well-Known Member
+10 cool points for the string tied to the wall!
Laughing_Gnome_Invisible
Well-Known Member
- Joined
- Jan 4, 2008
- Messages
- 12,262
- Reaction score
- 733
OK. I'm off to make a build page for the wiki. I would hate to think that new brewers might not know how to electrocute and/or dismember themselves in style.
OP
OP
Gnomy, you won long ago purely by merit of the hot pink duct tape...but this takes ugly junk to the highest level possible....Methinks, you have dethroned king biermuncher himself for who deserves to wear the "My junk is ugly" crown.....
Laughing_Gnome_Invisible
Well-Known Member
- Joined
- Jan 4, 2008
- Messages
- 12,262
- Reaction score
- 733
Gnomy, you won long ago purely by merit of the hot pink duct tape...but this takes ugly junk to the highest level possible....Methinks, you have dethroned king biermuncher himself for who deserves to wear the "My junk is ugly" crown.....
I want a certificate!
Anything I can do to make it uglier?
I'm thinking a third ribbon of pink duct tape at the top of the hopper, two or three good wraps folded back over could extend the hopper another inch or two for increased capacity. It would finish it off sort of like the cherry on a sundae. What the hell, that pink tape was gararge sale priced anyways right.
aeonderdonk
Well-Known Member
I'm definitely going to build one of these with a victoria mill from discount tommy using the style of wilserbrewer.
camiller
Well-Known Member
Hey wilserbrewer you might want to use this link:
https://www.homebrewtalk.com/1308996-post144.html
in your sig rather than
www.homebrewtalk.com/f51/my-ugly-junk-corona-mill-station-90849/index15.html
Your current link assumes the person clicking it has left the default number of posts per page set to the forum default and your linking to page 15, but I have it set to 40 posts per page so your post is on page 4. Following your link just takes me to the top of page 5. The link I put above takes a person following it straight to your post.
secinarot
Well-Known Member
I need to see a picture to understand what you're saying. I can't see how you would need that many washer to make it work.
Here is a picture of my mill (hope it posts OK). You can see how the bracket doesn't meet with the body of the mill. The end of the auger shaft does not sit in the bracket all the way. The main problem is the ball bearing in the bracket where the adjusting screw is prevents it from going in all the way.
OP
OP
Here is a picture of my mill (hope it posts OK). You can see how the bracket doesn't meet with the body of the mill. The end of the auger shaft does not sit in the bracket all the way. The main problem is the ball bearing in the bracket where the adjusting screw is prevents it from going in all the way.
For some bizarre reason it didn't post.....
Let me try...
That looks exactly like all of our mills...I'm still confused...it they don't meet, then just put your spacer washers on the left and right where the wing nuts are...put enough in there to create a gap between the front grinder and the rear plate....
secinarot
Well-Known Member
Do you have a ball bearing in the chamber where the tip of the auger shaft fits into the bracket? That is what's preventing the ends from meeting in mine. When I look at some of the other photos, it looks like the auger shaft slides into that chamber all the way up to the cotter pin that holds it in pace. However with mine it doesn't go in all the way. In any event, I put a couple of large nuts to fill the gaps on each side of the bracket and I can adjust the grinding plates just fine. It looks ugly but then again isn't that the title of this post?That looks exactly like all of our mills...I'm still confused...it they don't meet, then just put your spacer washers on the left and right where the wing nuts are...put enough in there to create a gap between the front grinder and the rear plate....
secinarot,
Just guessing again here, but I am inclined to think that the ball bearing in your front bracket is binding and is not all the way inserted into the front bracket. I would try and press the bearing fully into the bracket by tapping lightly w/ a punch and hammer, or just by simply tightening the two outer bolts to force the bearing home. I'm guessing that during manufacturing and assembly of your mill, the bearing was not full placed in the front bracket of the mill.
Give it a little wack and reporrt back.
Synovia
Well-Known Member
I'm definitely going to build one of these with a victoria mill from discount tommy using the style of wilserbrewer.
Anyone know where else to get these cheap? DiscountTommy went from 15.95 + $8 shipping yesterday to $39.95 each
rico567
Well-Known Member
Anyone know where else to get these cheap? DiscountTommy went from 15.95 + $8 shipping yesterday to $39.95 each
Well, my purchase from "Tommy" went something like this:
Week before last, someone on this forum said they got it for $16 + $8. That rang my bell, because I'm not paying $50 for a Corona mill. I go to the link, and they're no longer available for that ; $20 + $8.
But- there's a "make and offer" button there, so.....I offer $16 + $8. The next day, I get an e-mail rejecting the offer.
Then- the day after that, I get an e-mail from Flea Bay, click on the link and go back, and it's back to $16 + $8!
I bought it, of course, and went back the next day out of morbid curiosity, and 'ol "Tommy" was back up to $20 + $8. Obviously, his pricing is just on a yo-yo that has nothing to do with his actual cost on these things.
Anyway, I've got the mill, and now we'll see what kind of Ugly Junk Award I can win....
Similar threads
- Replies
- 15
- Views
- 2K
