Soldering Stainless steel

Homebrew Talk - Beer, Wine, Mead, & Cider Brewing Discussion Forum

Help Support Homebrew Talk - Beer, Wine, Mead, & Cider Brewing Discussion Forum:

This site may earn a commission from merchant affiliate links, including eBay, Amazon, and others.
  1. clean coupling and keg very well. any solution of product I should use?
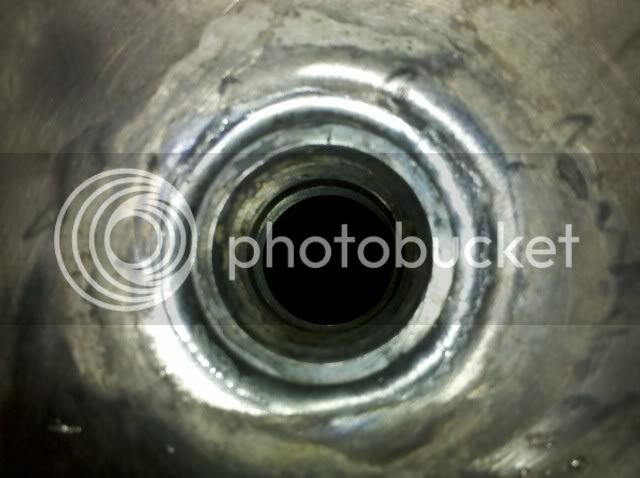
  2. apply flux around coupling in the gap
  3. insert ring of solder or rings of solder depending on solder thickness ( I have plumbing solder that is pretty thick, and the kit I just bought has very thin solder)
  4. fire up torch of Mapp gas and heat a good distance from the coupling getting the surrounding area hot circling closer to coupling.
  5. solder should melt once proper temp is achieved
  6. wipe with damp rag or cloth to clean.
  7. ??????????
  8. profit
Here's what I do. I'm sure others have equally valid techniques:

1: I use grease and wax remover, followed by 150/220 grit sandpaper. I use acetone for a final cleaning before applying flux. You can use acetone for the whole cleaning, but I have the grease and wax remover on hand, so I use that first.
2. Yes, and I use a dental pick to wipe the puddle of flux around to make sure everywhere I want solder has wet flux on it.
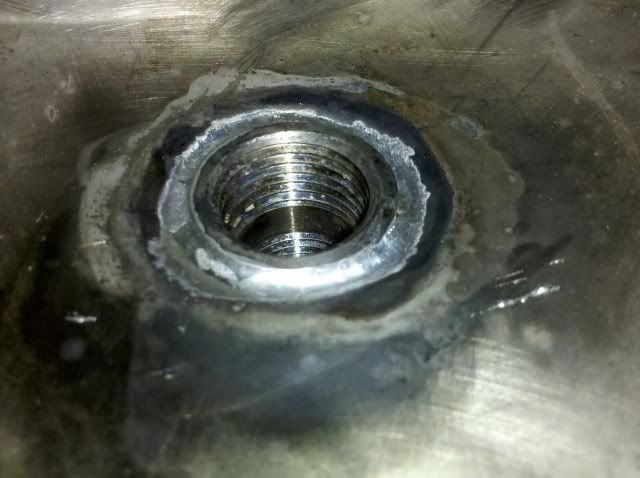
3. Yes. I wrap the solder around the outside of the coupler first to shape the ring.
4. Sort of. I do heat up the surrounding area a bit, but mostly focus on the fitting itself. Since the keg is so relatively thin compared to the coupling, once the coupling is hot enough to melt the solder, the keg will already be there. So I start out warming up the keg around the coupling, but then pretty much exclusively concentrate heat on the fitting, since it will have the most thermal mass.
5. Yes. Once the solder flows, I heat for another second and stop.
6. After the joint is cool, yes. This may take longer than you think - don't move the keg if you don't want to flow solder everywhere. Ask me how I know ;)
7. Have a homebrew.
8. Win!

-Joe
 
Oh also, be sure to thoroughly clean the fitting before pulling it into the keg! After sanding and acetone, I apply a little bit of flux to the fitting as I'm pulling it through to make sure the joint is super-clean.

-Joe
 
sand paper really well, clean with acetone, heat mostly with direct heat on coupling.
I have no Home Brew to partake in I'll have to swing by the store and pick up a sixer of some thing different.

I hope all goes well this time for me.

my brew kit and Hefeweizen arrive on monday I can't wait to brew on the weekend of the 11th so long as I have everything in order. which I should once the keggle is soldered up.

-=Jason=-
 
Another tip is to have a fan to keep the fumes out of your face / lungs.

Definitely don't move anything until the joint has froze. Don't try to hurry it by spraying with water or flux or a wet rag until the solder is fully solid or you will have to reheat the joint to smooth it back out.

I'm no expect at this just yet, but I have soldered hundreds of stainless parts together now and it goes fast once you do about 4 or 5 solder joints.

Wayne
 
thanks guys my first go around was a complete disaster I have more confidence now that I have the correct solder and flux.

I did use a mini fan last time to blow the fumes away from me and out of the garage.

-=Jason=-
 
Another tip is to have a fan to keep the fumes out of your face / lungs.

Definitely don't move anything until the joint has froze. Don't try to hurry it by spraying with water or flux or a wet rag until the solder is fully solid or you will have to reheat the joint to smooth it back out.

I'm no expect at this just yet, but I have soldered hundreds of stainless parts together now and it goes fast once you do about 4 or 5 solder joints.

Wayne

+1 to this, something about getting a feel for when you're "almost there"...and stopping once it turns to liquid. I guess welding is the same way, except you're working with the liquid in the form of a puddle.
 
ok so I successfully soldered one coupling in tonight. it was the keg i used the wrong flux on and had to do some serious clean up on. I used a hammer and towel and make my hole slightly smaller as I could see a little bit of light and it wasn't as tight as it was the first time i pulled it through.

I used paint thinner to clean my keg and coupling as I didn't have acetone. it worked well.

I loaded up the flux all around the coupling and laid a 2 coil tall piece of solder in there.(I was using the skinny stuff that comes in the kit) I heated around the base of the coupling and into the inside from the outside of the keg, when I saw the flux start to bubbled out I pulled the torch off and went inside the keg and heated around the coupling and melted the solder.

t looked decent looked it it needed more solder. I let it cool wiped it clean and cut another coil fluxed and heated it up.

the results are as follows.

****ty cell phone pics, and i don't think my D80 would even focus at such a close distance anyways.

IMG_20101202_174426.jpg

IMG_20101202_174508.jpg

IMG_20101202_180245.jpg

IMG_20101202_175517.jpg

IMG_20101202_175551.jpg


lil man was NOT happy to be put in the keg right after I did a leak test, still kinda wet in there and he was bare footed.
IMG_20101202_175957.jpg


my next coupling I'll recess it slightly lower than this one. and it will look much better.

over all I am very happy and convinced you need the Harris Stay-Clean Flux not sure if its the liquid or just the stay-clean flux, but for anyone else reading DO NOT EVERY TRY UNLESS YOU HAVE STAY-CLEAN FLUX. Preferably Liquid Flux

-=Jason=-

EDIT:I realized after I drilled my hole that my valve was right above a vent hole do you think the extra heat will effect my valve at all? if so I can use some of the lid and solder a heat shield type of device to block the hole.
 
Hit that with some Bar Keepers Friend and that will be a beautiful solder joint. Hell it looks great as is.

I think the fact that your coupler is all the way on the outside plus the hex nipple moves the ball valve out of harms way, but you could always stuff the hole with tinfoil if it's a problem.
 
cool BKF can be had at a local Super Market or a hardware store?

-=Jason=-

Yeah, it tends to get hidden among the cleaning supplies either way on the top or bottom shelf. I find it at Target and at Home Depot, pretty sure the local supermarket has it as well. It's a gold, tubular canister.
 
As much as I admire the pull through tool, it would been just as effective soldering the flat of the hex nipple directly to the keg wall. It would also keep the ball valve over an inch closer to the vessel.
 
...

-=Jason=-

EDIT:I realized after I drilled my hole that my valve was right above a vent hole do you think the extra heat will effect my valve at all? if so I can use some of the lid and solder a heat shield type of device to block the hole.

I would be concerned about the heat venting from the hole in the keg skirt.
I don't think you will be able to solder a heat shield... the propane will be too hot. You might be able to bolt something in place.

Ed
 
I would be concerned about the heat venting from the hole in the keg skirt.
I don't think you will be able to solder a heat shield... the propane will be too hot. You might be able to bolt something in place.

Ed

keg number two does not have the hole right over a heat shield hole so its possible I can still use this keggle for some thing other than a BK ?

@ Bobby, for my second keggle I have the hole drilled and keg toole already dimpled for a coupling would it be worth it to just solder my hex nipple into the keg rather than a coupling?


-=jason=-

It would make a great MT if you are not direct heating with propane.

If you drilled and dimpled for a coupling, I think the hole will be to big for the hex nipple.

Sounds like you're making good progress :mug:

Ed
 
here is my second attempt at the coupling soldering. This time it went flawlessly. made sure I had a clean coupling and keg. used the liquid flux it puddled nicely in the groove around the coupling. I put my 2 coils of solder in the groove. heated from the outside directly on the coupling. once I saw the flux start to smoke and solder wick its way through I stopped.

here is the result.
IMG_20101205_173515.jpg

IMG_20101205_173312.jpg

IMG_20101205_173210.jpg

IMG_20101205_173104.jpg


I'm very happy with the way this turned out. I didn't use anything to clean it up, I just wiped it down with a damp rag and a little flux.

-=Jason=-
 
if theres anything that pisses me off bad is seeing people solder stuff....but damn dude you did a killer job on that....
 
if theres anything that pisses me off bad is seeing people solder stuff....but damn dude you did a killer job on that....

Tigmaster, like I said in your thread going rate was $75 an hour to have it tigged locally at a fab shop. not sure how long it takes to do one coupling, but for my broke ass, a step bit, keg tool, and Harris Stay-Brite solder and flux kit was much cheaper.

-=Jason=-
 
for sure....it takes me about 35-40 min per coupling....thats hole drilled prepped and fitting tacked backpurged welded and polished!
 
Tigmaster, like I said in your thread going rate was $75 an hour to have it tigged locally at a fab shop. not sure how long it takes to do one coupling, but for my broke ass, a step bit, keg tool, and Harris Stay-Brite solder and flux kit was much cheaper.

-=Jason=-

... 'course, weldless is even cheaper; mine's never leaked.
 
Only problem with weldless is it can't be flush and won't work as a bottom drain.....
 
Well, flush is relative. The height of a locknut would leave like 1/2 oz of liquid in the bottom of a keg. I'd still solder it because I think it's better overall, but being flush is not necessarily the biggest reason for me.
 
On this subject... my local dealer for the Harris liquid solder only carries it in 16 ounce bottles and those are $17. If I would ever use that much, which I won't, I wouldn't mind buying the pint, however, I will never use more than a couple of ounces in the rest of my life. Do any of you know who sells smaller quantities?
 
On this subject... my local dealer for the Harris liquid solder only carries it in 16 ounce bottles and those are $17. If I would ever use that much, which I won't, I wouldn't mind buying the pint, however, I will never use more than a couple of ounces in the rest of my life. Do any of you know who sells smaller quantities?

you can buy online or look for another distributor local who might have the "kit" which has solder and flux i paid $6 and change for mine.

see if you have a local "airgas" store thats where I bought mine from

EDIT:http://www.airgas.com/customer_service/site_locator.aspx

i just check out location near Lowell MA and it looks like there are a few locations near you.

-=Jason=-
 
$9 for a hex nipple is way out of control. Even after my markup, I'd probably sell them for around $4.50 if I decided to go that route.

You can buy Stay Brite 8 kits with the flux for under $10.
 
Tigmaster, like I said in your thread going rate was $75 an hour to have it tigged locally at a fab shop. not sure how long it takes to do one coupling, but for my broke ass, a step bit, keg tool, and Harris Stay-Brite solder and flux kit was much cheaper.

-=Jason=-

that's why i learned to solder. :mug:
 
here is my second attempt at the coupling soldering.
IMG_20101205_173104.jpg


I'm very happy with the way this turned out. I didn't use anything to clean it up, I just wiped it down with a damp rag and a little flux.

-=Jason=-


I'm confused. Why can't this be used as a bottom drain? It looks like it wouldn't leave any in the kettle.

Are folks worried about the solder melting?
 
I'm confused. Why can't this be used as a bottom drain? It looks like it wouldn't leave any in the kettle.

Are folks worried about the solder melting?

I believe they were talking about not using a traditional weldless assembly as a bottom drain. As for the solder melting, I'd only be worried if I accidentally dry fired the kettle, then again I wouldn't use a bottom drain on a NG/LP rig either.
 
I used my soldered-up system for the first time last night. The bottom drains are really nice :) Every drop comes out of the kettle, and one fewer pokey thing inside the kettle to hurt myself on when cleaning.

The solder joints performed as they should. Quietly and leak-free :) Now we'll see how they stand up to years of abuse.

-Joe
 
Meh.. I was all about soldering all of my fittings. Long term, if anything like a valve is on the fitting, mine cracked. Fixed it.. looked beautiful, nice wetting up the sides of the joint, huge flat surface on a hex fitting to solder.. cracked again. Fixed... cracked. TIG welded for $20 each at a local shop here in Ca and no more troubles. All my main valves are now TIG, and now one of my soldered thermowells just started a candy stalagmite on the last brew. Maybe I just don't know how to solder stainless, but the joints always look so pretty then they develop hairline cracks.
 
$9 for a hex nipple is way out of control. Even after my markup, I'd probably sell them for around $4.50 if I decided to go that route.

You can buy Stay Brite 8 kits with the flux for under $10.

Or you could buy this really pretty one from MMC for only $21.80 each.. :(

48805K480L.jpg
 
I just pulled my first two fittings and I have to say this is really easy once you have the things you need. I Used a 1/2" bolt instead of the 5/8" because I had no way to enlarge the washer or tapered fitting. It still worked fine, but it is harder to center the pull to get an even flare. I am going to try on more thing before breaking down and getting what I need to enlarge the fitting and washer. Didnt take a picture of it, but it is basically the same as what was posted by nostalgia.

The liquid flux and solder from the kit mentioned earlier worked great along with the idea of wrapping it around the fitting twice. Two rings of the solder seems to be the right amount.

When I pulled it I first did the tapered fitting and the I reloaded with a coupler that I got from More Beer and used it to pop out the tappered fitting since it is slightly smaller in size than the tappered fitting or the ones I bought from buyfittingsonline.com. Checking the actual size in a test hole would be recomended since not all of them are the same size. I wanted a nice tight hole so it was snug in there. The coupler from More Beer was to small, not sure about the ones from other sources. Of course this is based on the tapered coupler from McMaster.

IMAG0147.jpg


Stopped by my local big box tonight. Picked up a tungsten carbide bit for my Dremel, which allowed me to open the tapered coupler up enough for the 5/8" bolt to pass through. So I was able to finish the tool properly.

Left to right parts are:

5/8"-11 x 4 1/2" bolt
5/8" washer
3/4" to 1/2" stainless steel butt-weld pipe fitting
1" stainless socket weld low pressure coupling
1/2" washer (drilled to 5/8" with the step bit)
5/8" washer
5/8"-11 nut

dimple_tool.jpg
 
yeah my 3/4 x 1/2 reducers OD was a hair larger than my 1/2" coupling OD so I didn't pull the tool all the way through I probably stopped right at the top where it start to straighten out.

-=Jason=-
 
It would be great if all your couplings had the same OD and you turned down the stepped reducer allowing for a .010" interference fit.
This makes for a much stronger joint than a gap filled solder joint.
 
Back
Top