Mill Advice

Homebrew Talk - Beer, Wine, Mead, & Cider Brewing Discussion Forum

Help Support Homebrew Talk - Beer, Wine, Mead, & Cider Brewing Discussion Forum:

This site may earn a commission from merchant affiliate links, including eBay, Amazon, and others.
I got the Monster Mill MM-3

I have the same mill, good choice.

I run mine at .040 and get a very nice crush. If you take the bolt out of your feeler gauge and just use the one leaf/gauge, you can flip the mill on it's side with the hopper attached and check your gap from the bottom of the mill. I just slip the gauge in kind of sideways on one side and then the other. Read your directions about how to turn the adjustments knobs, so you get them going in the right direction.
 
Golddiggie said:
Actually, back in the day where mechanic's were actual mechanic's not "service engineer's" they were the proper/correct tool to set spark plug gaps. With multi-point plugs, you don't set the gap anymore, but for any single point plugs, you want to make sure they are set to the correct gap for your vehicle, and that plug. Otherwise it won't run either right, or as well as it can/should.

Actually, wire gages were used for spark plug gaps. Feeler gages were used for setting the gap on distributor points before electronic ignition.

Sent from my SGH-T959 using Home Brew Talk
 
Actually, wire gages were used for spark plug gaps. Feeler gages were used for setting the gap on distributor points before electronic ignition.

Sent from my SGH-T959 using Home Brew Talk

The resourceful mechanic would use the tool that worked for both...

Every spark plug I ever changed/installed listed the gap in inch measurements, not wire gauge numbers... So the feeler gauges worked perfectly... Of course, that was back when there were only single ground spark plugs... Yeah, I've been driving for a while...

I remember working on our 73 Chevy Luv pickup truck with my father (in the late 70's/early 80's)... Putting it up on ramps to change the oil and such. Back when you didn't need a computer setup to do anything to a vehicle... You could diagnose almost any issue with an engine (and most of the mechanical parts) with your eyes, nose, or ears... Also back when there was enough room under the hood to actually get your HANDS in there and work. Without needing a small Asian child to snake his arm around from underneath to guide your wrench (that just sounds so wrong, I know :drunk:)... These days, you almost need a bore scope to find key items to check on engines. Or you have to lift the engine out to change the plugs.

I also remember working on my 78 Fairmont (loved the 302 V8)... More than a few times I would go out with my tools and work on it... Managed to get a few extra years out of it that way... It was running until late 1996. It would have gone longer, but it was abused for the first 60k miles... Plus, Florida isn't too kind to car bodies, if they're left outside... I do so miss the sound of a powerful V8 under the hood...
 
The resourceful mechanic would use the tool that worked for both...

Every spark plug I ever changed/installed listed the gap in inch measurements, not wire gauge numbers... So the feeler gauges worked perfectly... Of course, that was back when there were only single ground spark plugs... Yeah, I've been driving for a while...

LOL... The 'wire gauges' referenced were sized in inches also.. The difference between the two methods, is that wire gauges were made for spark plugs 'only'.. while feeler gauges were made for multiple uses..

The wire gauges were better and more accurate, because it was much easier to keep the gauge perfectly flat in the plug gap unlike with the feeler gauge..

Setting gaps with feeler gauges was a total PITA, as it was easy to 'skew' the setting by not having the gauge blades perfectly perpendicular to the plug tip...

With the wire gauge it was much easier, because it was round.. But a .030 feeler gauge, and an .030 wire gauge were the same thickness... .030...

You're confusing the term 'wire gauge' as it applies to the gapping tool with the term 'gauge of wire' (and the tools to size them I suppose) as it applies to electrical wire gauge.....

This is the wire gauge being referenced that is designed for gapping spark plugs... Notice the 'sizes' printed on it.. The other advantage of using these for gapping is that you didn't have to stack multiple feeler gauge blades to get the desired thickness... Notice also the gap setting tool on it.. feeler gauges did not have this, you had to use a screwdriver and needle nose pliers, switching back and forth between them.. Not only a PITA but also a way that was prone to weaken/damage the plug... These were a far superior tool for plug gapping, as it was made to do only that...
41oscMSie%2BL._SL500_AA300_.jpg
 
I might have seen that tool once or twice, but I don't recall ever seeing it in my father's tool boxes. We always used the feeler gauges to gap plugs, and check spacing on anything that we needed to set a gap on (in the range of the feeler gauge set)... Unless the wire gauge comes as multiple in a set, I see it as a very limited tool, with a very set range.

BTW, we never had an issue properly gaping plugs with the feeler gauge. When you know how to do it, it's very easy. Plus, if you want to target a set gap, you can. Looks like with the wire gauge, you're limited to what THEY dictate. So, basically, if I wanted to gap to .037, I can (easily) do it with the feeler gauge, where it looks like you can't with the wire gauge tool...

My BC arrived just a short time ago, today, so I'll be heading out in a bit to get the feeler gauges. That way I can check the gap before we use it for the first time. After that, I might [eventually] start playing around with the gap setting on it. I know I've been getting good efficiency with a crush of .039" with BIAB, so it will be interesting to see how I do with the MLT/cooler...
 
I believe its the difference between a wire gage, and wire guage. A wire gage is a thing, wire guage is a unit of measure.
 
You're arguing about the weaknesses of a tool designed for the purpose and preferencing one not designed for the purpose, even though you've never used the one that is the intended and recommended tool..

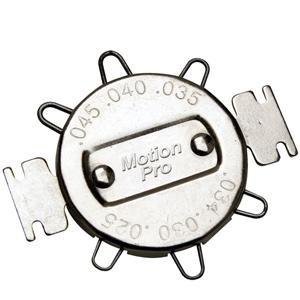
The gauges given on the gapping tools, are 'all' the recommended gaps... Why would you set it to something to other than the recommended gap for your engine/compression ratio, etc?..

Unless you were into racing, in which case there are gappers with a wider range of settings?

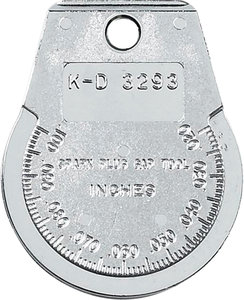
There was also another kind that involved a graduated lip around the circumference of the tool, with markings along the way that would allow you to set 'any' gap you wanted.. It was a flat gauge but very narrow, and as such was still a far superior way of setting gap over feeler gauges... And it could be kept on your key ring..

You are arguing that it is better to not use the right tool for the job.. That is an argument you will lose every time... If you actually try one some time, you will instantly understand that they are 'not' easy in comparison..

and LOL @ the "if you know how to use one" comment.. I could teach my dog how to use one.. They're not rocket science... unless you can't do basic addition..

Feeler gauges 'can' be used in a pinch if that's all you have.. They will get you close... But they are no where near as accurate as the 'right tool for the job'... because it is near impossible to keep them perfectly flat inside the gap.. Not to mention that they were 'much' more time consuming and difficult to use

I found an example of the other kind I was talking about.. I had one similar on my key ring back when I was into bracket racing.. as I had to set the gap on my plugs 2-4 times a week...
0246033.jpg
 
And that tool would work for a malt mill how?? Oh, that's right, it won't...

You seem to be overlooking a common issue with the ring/coin style plug gap tools... Getting to the exact one actually takes a lot more effort, and time, than using a feeler gauge tool. I've used both, and can say from actual experience that the round plug gap tool sucks when put up against the feeler gauge set...

Use what you like there, but you won't be using the last pictured tool on a malt mill...

Doing a quick search on Sears web site, there are more than a few feeler gauge sets available. Some even have the wire gauges included (for those few measurements)...

For setting plugs different than the default... I guess you've never modified an engine at all. Or had a vehicle old enough that the current 'standard' gap isn't the actual correct one. Or where you wanted the engine to run a little cooler, or warmer, than the standard gap will give you... Standard gap is set for a WIDE range of engines and conditions. Doesn't mean it's going to be the correct one for you...

Enough on that already... I'll use a tool that's good for a wide range of tasks, while you can use the one that's good for a very small number of tasks...
 
You've never used one, right?.. I give up.... you know better..

The man who already knows 'everything' can no longer learn 'anything'...

And you 'know' I was not suggesting using one for setting the gap on a mill... So don't be ridiculous..
 
I have a barley crusher. I like it.....I hooked up a 12A corded drill to it, and as long as I can keep the chuck from slipping, the thing does great on factory gap settings. Really, I'm not sure a third roller is even warranted on a homebrewing level. There's plenty of other things you can overdo; your grain just needs to be crushed...nothing more, nothing less.
 
One time I had to set the gap on some plugs to a size that my various wire gages (hand me downs from my dad) didn't have. I found some wire from some other unrelated application that measured (with a digital caliper) the exact size that I needed. Worked perfectly.

Sent from my SGH-T959 using Home Brew Talk
 
I have a barley crusher. I like it.....I hooked up a 12A corded drill to it, and as long as I can keep the chuck from slipping, the thing does great on factory gap settings. Really, I'm not sure a third roller is even warranted on a homebrewing level. There's plenty of other things you can overdo; your grain just needs to be crushed...nothing more, nothing less.

Used my Barley Crusher for the first time yesterday... Used a new set of feeler gauges (picked up from Sears on Friday) to check the gap first. Left it at the factory setting and went to town with it...

Went through 24.5# of grain with it using my DeWalt 18V cordless drill... It's a 1/2" keyless chuck that had no slipping issues (never has actually) and didn't even blink at running the mill. Went through the grain really FAST too (probably about the 6#/minute they say), even at the lowest speed setting option (has three speed ranges, used the lowest of the three)... Amazing how a 6.5 gallon bucket isn't large enough to hold much more than 22.5# of grain (our base malt for the 10 gallon batch)... Still, with how the first run went yesterday, I'm confident the Barley Crusher will give me many, many brews/years of service...

I don't think I'll get/make a hopper extension for my mill... Thinking about how it worked, it was well balanced with just 7 pounds (max) in the hopper at one time. I do have a large metal scoop that I can use to put more grain into the hopper (or a brew-buddy can feed) so that's not really any kind of issue. Can add more grain with one hand, while holding the drill (not running) with the other and then just keep on going until all the grain has been crushed.

We hit a 72% efficiency with the 10 gallon batch, with a MLT that really wasn't large enough for the grain bill (had to put a good chunk of the grain into a kettle with a nylon bag for mash/sparge)... Still, got good numbers with the brewing... Can only imagine how it will go with a 5 gallon batch...
 
Used my Barley Crusher for the first time yesterday... Used a new set of feeler gauges (picked up from Sears on Friday) to check the gap first. Left it at the factory setting and went to town with it...

I bought feeler gauges too and I think it was a waste (albeit a $5 or $6 waste). The factory settings seem fine.

I don't think I'll get/make a hopper extension for my mill... Thinking about how it worked, it was well balanced with just 7 pounds (max) in the hopper at one time. I do have a large metal scoop that I can use to put more grain into the hopper (or a brew-buddy can feed) so that's not really any kind of issue. Can add more grain with one hand, while holding the drill (not running) with the other and then just keep on going until all the grain has been crushed.

I got the 7lb hopper too. My scale (KitchenAid digital) only holds about 2lbs of grain, so I measure the entire grain bill out beforehand and then put it all in a Homer bucket. Then dump as much grain as possible in....when I'm nearing the end, I'll dump the rest of the bucket.

If I did bigger batches (I do 5gal), I would probably look into a heavier duty scale and an enlarged hopper.
 
Way I see it, I'll have other uses for feeler gauges, so they're not a waste. I'm sure, at some point, I'll want to adjust the gap of the mill, or need to check the gap on something else...

I have a digital scale that goes up to 11 pounds. So, I'll be able to measure my normal base malt amount in one, maybe two, pours. With the metal scoop I picked up (marked 58oz) I can scoop out of the grain bag a decent amount at a time... The scoop means you can put more grain in with one hand, so it's going to be easier when I'm doing it by myself. Although, I do plan on having help when I brew future batches (will have to brew at someone else's place for the near future)... So, that person can scoop into the hopper while I hold the base (just to make sure it doesn't flip) and run the drill...

I think the 7# hopper will work just fine for the occasional 10 gallon batch. I would get a scale that can handle more weight though.

Are you using the hand crank or a drill to power your mill?
 
Back
Top