Brewstand build finished! 1st brew today

Homebrew Talk - Beer, Wine, Mead, & Cider Brewing Discussion Forum

Help Support Homebrew Talk - Beer, Wine, Mead, & Cider Brewing Discussion Forum:

This site may earn a commission from merchant affiliate links, including eBay, Amazon, and others.

Wayne1

Well-Known Member
Joined
Mar 12, 2008
Messages
1,501
Reaction score
586
Location
Littleton, CO
A little over a year ago I decided to get back into homebrewing after a seven year layoff. I used to brew professionally and I guess I just got tired of having to please everyone with my brews.

I borrowed a burner from jds and made an extract brew last year. It was good and got me anxious to have my own rig.

Bobby M was very kind and shared some plans he had of his brewstand. I modified the layout slightly. My cousin was able to locate the Unistrut used for the frame as surplus. The stainless steel floor and front panels were also surplus. He had a friend of his cut them to size.

I had one keggle left over from my old rig. I purchased another from my LHBS. I found a welder who installed four fitting for a 6-pack of Bud Light. That hurt.

The MLT is my old Gott 10 gallon cooler. All the valves and close nipples are stainless steel. I wanted to use stainless for everything, but I really couldn't afford all stainless disconnects.

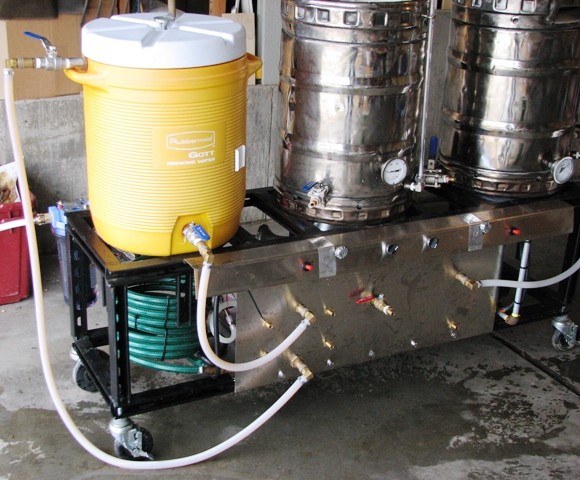
Here is a picture of the rig earlier today during the first brew.

Brewstand_HLT.JPG

I followed Bobby's instructions for keg polishing and I also purchased the fittings for the sightglasses from him. I did change out the glass for polycarbonate.

I have two banjo burners under the kegs. On the top front panel and piezo push switches to cause a spark to the burner to ignite the propane. I used needle valves to control the propane to the burners. The two switches in the middle control the two March pumps mounted behind the bottom panel.

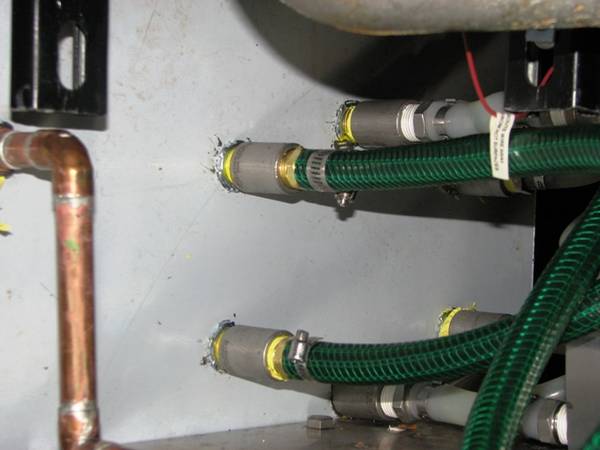
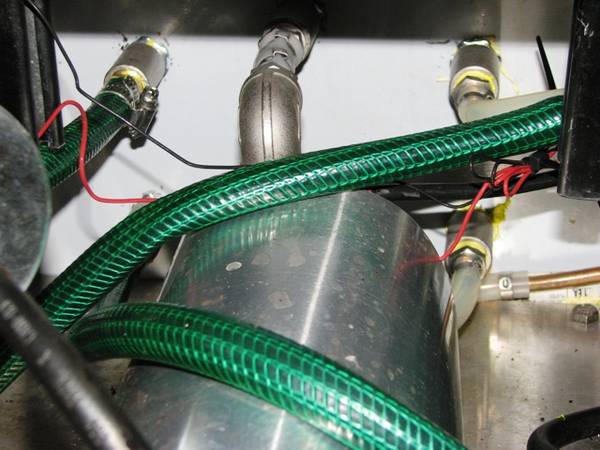
I chose to use disconnects mounted to a panel to replicate the diverter panels I used in the brewpubs I worked in. I made up silicone hoses to use. I can connect the hoses from the different valves and pumps inlets and outlets to move the liquids anywhere I want.

The valve in the middle of the front panel is connected to a cold water line. I use a sanitary grade water hose into a filter. Then that is hard piped with copper to the valve.

I have my CFC heat exchanger connected to disconnects on the front panel. It makes brewing and cleaning very easy.

In the picture above, I was heating up water more mash-in. I have a valve on the top of the HLT so I can recirculate the water while I am heating. It will ensure no stratification.

Brewstand_sanitize_fermenter.JPG

This shot shows water being transferred from the HLT prior to mash-in and at the same time I am using the other pump to recirculate SaniClean through the fermenter and the heat exchanger to sanitize it.

Brewstand_Recirculate.JPG


Here is the wort being recirculated in the MLT prior to transfer to the kettle and sparging.

Brewstand_to_Kettle.JPG

Here is the set up for transferring the water from the HLT to the MLT for sparging and then runnig the sweet wort to the kettle while the burner is heating it up.

Everything went very smoothly with the brew today. All the different elements came together and worked just the way I hoped they would.

It did take me over a year to gather all the parts and put it all in one system. I tried to get it to work last weekend, but my original TEEL pump died. A quick order from AHS and all was fine.

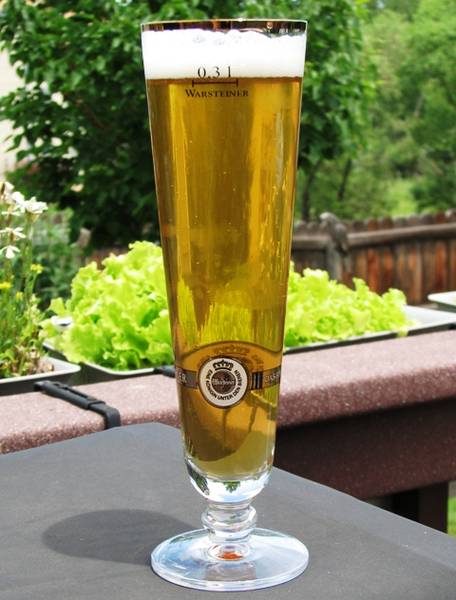
I brewed an American Pale Ale today. I based the recipe around the taste profile of Dale's Pale Ale. That is one of my favorite beers. This version is more of a session sipper. I planned on OG of 1.045. It came in at 1.044.

I used a new base malt from Colorado Malting Company. It is a new "Craft" malting company in southern Colorado. All the hops used are pellets.

My brew kettle is set up to use the pump to whirlpool. The final picture is the trub pile in the bottom of the kettle after the brew was transferred to the fermenter. I also used Five Star's Super Moss and defoamer in the kettle. Very little trub went into the fermenter. There was NO hop residue in the heat exchanger when I cleaned it out.

Brewstand_Trubpile.JPG

I have had a lot of fun putting this system together. I couldn't have done it without HBT. I learned a lot about how homebrewing has changed since I started 20 odd years ago. Hopefully some of you will pick up a thing or two from this build.

Happy National Homebrew Day! :mug:
 
Congrats on the successful brew on your new rig! Sounds like you got a great deal from the welder. What hurt, that he wanted buttlight over your homebrew? He has probably never had homebrew. I bet if you brought him a couple bottles as a bonus thankyou, he will be kicking himself for requesting that swill. He might also offer his services and materials for any future mods you might want to make.;)
 
Having to go into a store and actually buy Bud Light is what hurt.

He did request a six of homebrew, whenever it was ready. I do plan on brewing an American Wheat for the BMC types.

It is worth a making a lighter brew now and then to keep anyone who can weld stainless happy.
 
velotech,

Thanks for the comments. You are welcome to come by some weekend and brew with me. Check out the system and see what might work for you.

culaslucas,

Please DO give them a call or send them an E-Mail. They are great to work with. They used to supply COORS with barley. Their maltster used to work in the pilot malting plant in Golden. They definitely know what they are doing.
 
Awesome rig! Im considering going to silicon hoses myself. Do you have any pump issues with the long run up to the top of the MLT?
 
Nice set up! I'll also have to look up Colorado Malting.... I have a few friends still at Adams State up there. I had no idea there were decent malting companies in the SW.
 
Cool, I was thinking along the same lines for a single tier, using unistrut and a cooler I already have. Now I see an example...
 
Truly impressive brew system you have made there Wayne1.

First time I have seen a diverter panel incorporated into a home system..neat idea.

Cheers
BeerCanuck
 
Im considering going to silicon hoses myself. Do you have any pump issues with the long run up to the top of the MLT?

The silicone hoses are still under consideration. They are MUCH better then the PVC hoses. They are very flexible and will work with all temps of liquid.

They do balloon out with higher pressure. If I open up my cold water line a bit too much they expand out like a water balloon. That does not happen with the pumps. I may have to install a pressure limiter on the water line.

The March pumps have no trouble pumping from one side of the frame to the other and then up to top of the MLT. I do have to restrict the flow at the MLT.

That hose is 65" long. The height of the MLT inlet is 43". No problems.

Very nice, I love the flexibility of the pump connections in the front.

Thank you,

Flexibility was what I was going for. I have been fortunate enough to brew on a few different pro systems. From totally manual, portable pump, move hoses everywhere, to completely hard piped and automated PLC controlled steam valves and push button controlled, air actuated butterfly valves. Of all the systems I have brewed on, I like the diverter panel design the best. I do feel I have made my best beers on these systems. They are mechanically simple and no electronics other than an on/off switch to go wrong.

With this system, I can connect the HLT to the heat exchanger and recirculate. I can connect the MLT to the copper tubing inside the HEX and recirculate. So, if I want, I CAN use the system for a CFHERMS. I am not sure I will, but I do have the ability.
 
One of the best builds I've seen yet. Would love to see a pic from the back side as well. I'm changing my build after seeing you panel. Great work. Tells me I have a ways to go on my brewing and system knowledge.
 
Great looking rig, Wayne!

I'd love to sit in on a brew with that rig sometime. I definitely have to look into CO Malting, since I'm tired of (a) paying LHBS prices for grain, or (b) having to pre-plan well enough to get an order from a reasonably-priced OHBS.

I'm liking the diverter panel!
 
That rig is very purdy. I likes. On the silicone, you're right about city pressure ballooning it out. When that happens, that spot is forever softened unfortunately. I've been watching Ebay for a long time for someone to sell some surplus reinforced silicone.
 
You have to atone this horrible, but likely necessary, sin. Do the right thing and bring him a sixer of you maiden brew.:tank:

I don't think he will be getting a sixer from the maiden brew (American Pale Ale). The next brew will be a Blonde Ale. That is the one where he will get a six pack from. That is if I can remember how to put beer in bottles. I have only used kegs for TOOO long. I think I still have my bench capper. I'm pretty sure I saw the bottle filler the othe day. I guess I have to get some caps and recycycle/buy some bottles. Most of what I have been drinking lately is Oskar Blues and SKA which both come in cans.

Great looking rig, Wayne!

I'd love to sit in on a brew with that rig sometime. I definitely have to look into CO Malting, since I'm tired of (a) paying LHBS prices for grain, or (b) having to pre-plan well enough to get an order from a reasonably-priced OHBS.

I'm liking the diverter panel!

Thanks Joe,

I've been trying to get hold of you but your mailbox was full. Colorado Malting Company are a GREAT company. Very friendly. They are currently only making 2-row. But at $1.00 a pound it is inexpensive and very high quality. VERY clean taste. The son of the owners drives up here every couple of weeks to deliver. You can get it pre-crushed or whole for no extra charge.

If you are thinking of specialty malts, let me know if you are going to order any. The selection of the LHBS is rather poor and prices are a bit on the high side. I did just get hops from Nikko and hopsdirect. If you want to get some more, well, I don't think you can ever have too many hops.

You and anyone else in the area who would like to stop off for a brew session, please let me know. I would love to have people come by and offer suggestions and maybe a homebrew or two.

I'll try to get a behind the scenes picture posted this week. It is a bit crowded back there with the burners, tubing for the burners, two pumps, water line and the CFC.

Thank you for the comments on the rig and panel. As I stated in the OP, I have tried a few different system designs and something like this has just made the most sense. Diverter panels are very common in lots of industrial plumbing applications. Most of the early breweries and pubs re-purposed old dairy equipment. Including diverter panels.

Until I get pictures up, I can tell you a bit about what is behind the panel. I used the disconnects from McMaster-Carr with 1/2" MPT. They are held onto the panel with 1/2" conduit locknuts. Each disconnect has a 1/2" SS female coupler threaded onto it with lots of Teflon tape. There is a SS 1/2" hose barb threaded onto that. Each pump is raied up and sits on Uni-strut. The pump head is rotated 90 degrees so the outlet in on the bottom. There is a SS elbow and hose barb adapter on each connection. I used a very short piece of Silicone tubing to connect the hose barbs together.

The AC is run from a GFCI through a run of extension cable. It goes to two switches I found on E-Bay for $5.00 each. They are mounted in the top stainless shroud to protect them from any water and most of the heat.

The burners are piped with 3/8" tubing. It reduces to 1/4" to fit the needle valves. I run hose from Cajun Cooker direct from the needle valves to the burners.

Thanks for all the comments. I hope some of what I have done is found useful.
 
That rig is very purdy. I likes. On the silicone, you're right about city pressure ballooning it out. When that happens, that spot is forever softened unfortunately. I've been watching Ebay for a long time for someone to sell some surplus reinforced silicone.

Thanks Bobby!

Your rig was the inspiration for the frame. Thank you so much for sending me the "plans" I had the height lowered to 22" with the wheels on. That lets 5' 8" (on a good day) me be able to look into the kettle, stir up the mash, and add hops with no steps tool involved. I also had the frame built a little longer to give more space between the heating elements. When the burners are on, there is no thermal transfer going to the next vessel. So I have can run my kettle at a vigorous boil and have no fears about my GOTT melting.
 
Brewstand_Trubpile.JPG


Is the whirlpool effect caused by the right most internal fitting? I like that idea instead of making a whirlpool immersion chiller.

How well does it work?

Also, the left most fitting looks like it faces down. Is that your valve to the fermentor? Is the purpose so you don't pull trub from the center?
 
I'm looking into building a single tier setup similar to yours, do you have any problems with the cooler being so close to the hlt? It looks like the cooler might melt when you turn up the heat.
 
That is a sweet effin rig u got there. I love how the keggles are all shiny and purty. Also good heads up on Colorado Malting. That looks like something I am really interested in since I do AG myself, although my rig is more ghetto Fabulous. I might need that welders info some day. I know all about having friends that drink the Bud light. I just do not get it myself
 
That is a sweet effin rig u got there. I love how the keggles are all shiny and purty.

Thank you. You too can have shiny keggles with just a mere 8-10 hours of labor invested per keg ;)

Follow the link in Bobby M's sig and you can find out how.

Send Colorado Malting an E-mail. They are great to deal with and they WANT to work with homebrewers.

Brewstand_Trubpile.JPG


Is the whirlpool effect caused by the right most internal fitting? I like that idea instead of making a whirlpool immersion chiller.

How well does it work?

Also, the left most fitting looks like it faces down. Is that your valve to the fermentor? Is the purpose so you don't pull trub from the center?
The fitting on the left is the wort outlet. It is a double female fitting welded in place. There is a close nipple screwed into it and an elbow with a close nipple attached screwed into that. It pulls from the side of the keg to leave the trub pile behind. I factor into my brewing calculations the .625 gallons that stays in the kettle. It connects to my pump inlet. The right hand street elbow is the outlet from the pump.

As to how well it works, you can see the results. I have used this design on two different homebrew kettles for well over 15 years.

Whirpooling has been used in commercial brewkettles since the '50s. The bigger gear has tangential inlets and outlets and can achieve a better, tighter trub pile, but for the price of a few fittings, this works very well.

I'm looking into building a single tier setup similar to yours, do you have any problems with the cooler being so close to the hlt? It looks like the cooler might melt when you turn up the heat.
The HLT is roughly 30" away from the cooler. It is on the far right of the brewframe. The cooler in on the far left. The kettle is between them. I was concerned about the thermal transfer through the Unistrut before I used the system. When I did some tests the frame got very hot. However, the HLT heating barely transfers 10". From that distance on, the frame remains cool to te touch. When the kettle is boiling right next to the MLT, the cooler is cool ;). Using such large burners, you do not need to use a lot of energy in small area. You end up using a small amount of BTU spread out over a large area. Very little thermal transfer down the frame.
 
Here are some photos of the backside of my brewframe.

Brewstand_back1.JPG


This shows the water filter and copper line that runs to the brass valve on the front of the brewframe. You can see one of the March pumps with a shroud to protect it from spills. There is also the CFC wire tied to the frame. The Banjo burner is very visible along with the wind shield and flex line for the propane.

brewstand_back2.JPG


Here is a closer look at the fittings used to connect to the bulkhead quick disconnects on the front of the panel. The dangling red wire connects to the spark gap igniter.

Brewstand_back3.JPG


Here is another view of the fittings from the pump to the QDs. I used gas rated Teflon tape for most of the threaded connections. That tape is thicker and has less of a chance of leaking.
 
Hey Wayne!

Great looking rig!

I will take you up on your offer to brew w/you, or just to come by and share one or two and talk brewing.

I am working on the design of my rig, and your diverter panel is the sh*ts!

In a good way of course!

I live in the same neck of the woods of Colorado, I'll send a PM and send contact info.

BTW, I have some Dead Guy clone conditioning that I can share.....

Steve
 
Thanks for the pix Wayne. I just finished my stand, which was a gravity rig with 1 pump. I will be making some changes after seeing this. The mounting plate makes me wonder why I didn't think of it myself. I will be making a new stand once I get my new one operational. The need for a 2nd pump is obvious. The time saved when brewing with this type of structure is just 1 benefit. Thanks for the information and pix, only found on HBT. :rockin:
 
Thanks for the compliments.:D

The rig isn't all THAT big. It measures 60" x 20". That is the same size as our Weber gas BBQ with side burner.

Since I posted those pictures, the brew frame has been moved to the deck in the back of our house. It has been a bit of a challenge to brew outside this spring. The beer I am sipping on now was made during a rainstorm that turned into a hailstorm right in the middle of lautering.

Quite a lot of fun donning the rain gear to check water level in the mash tun. It all turned out well.

I have made 6 brews on the rig since. All have been fairly easy. No surprises on the mechanical side.

The last 2 have been 10 gallon batches. The first 10 gallon was slightly stressfull when there was a small boil over. Filling the keggle to 15 gallons, hitting boil and then adding hops was too much. The second batch I waited 30 minutes to add hops. The evaporation took the volume down to a point that reduced the boil over fears. I do use a de-foamer, but I simply need a bit bigger kettle to end up with 10 gallons in my serving tanks.
 
Wayne, do you have a picture of how you positioned your spark igniter with your burner. I want to do the same as you but I'm concerned about too much heat melting the wire sheathing.
 
That is a sweet effin rig u got there. I love how the keggles are all shiny and purty. Also good heads up on Colorado Malting. That looks like something I am really interested in since I do AG myself, although my rig is more ghetto Fabulous. I might need that welders info some day. I know all about having friends that drink the Bud light. I just do not get it myself

Another prop for Colorado Malting here.

I recently picked up a sack of 40 lb precrushed 2-row from Colorado Malting. At $1/lb, delivered to the back of my car, it's a good deal.

The first brew with their malt is still in the fermenter, but everything points to good quality, and my efficiency was 78%, which is typical for me. All signs point to good things.
 
MountainJack,

I don't have a picture right now, but I'll take one for you in the next day or so. I wouldn't worry about melting anything. They are designed for barbecues and temps will go over 500 F easy. I bought the CharmGlow ones from Home Depot and they include a spacing bar so you can set it to the correct distance for a spark.

I used an "L" bracket to move the element closer to the center of the burner. I mounted the "L" to the same brackets that hold the burner.

Joe,

I have made seven brews with the Colorado Malting 2-row. All have been great. Here is a shot of a Blonde Ale I made:

Blonde_Ale.JPG


95% Colorado Malting 2-row & 5% Melanoiden malt. 5 SRM

One addition of 0.60 oz of Cascades for 60 min.

SafAle S-05

Very clean and crisp :D

Perfect for the weather we have been having the past few days.
 
MountainJack,

Here is a shot of the underside of the burner showing how I mounted the igniter on a small "L" bracket. The bracket is mounted to one of the four supports that the burner and wind screen are mounted to:

Ignite.JPG


I just finished brew #8 today.

It was an American Wheat I named after my father, Waino. He was the first born in the US of his family and he was born on the 4th of July. He passed on over 35 years ago, but I think he would enjoy being remembered by a beer named for him.
 
Good looking brew rig!!
I'm getting ready to build one myself, and will certainly take bils and pieces as ideas!!

Keep the good beers coming!
 
Thanks Wayne, that makes sense. Unfortunately, my burners are a bit different and I don't think I can get the sparker to reach up over them. I'm still messing around with this.
 
Wayne,

Just picked up a bag of Colorado Malting and brewed a Pale Ale with it. Good stuff. I would love to come to your area sometime and see the brew stand at work. Let me know!
 
Back
Top