Whirlpooling/Chilling questions

Homebrew Talk - Beer, Wine, Mead, & Cider Brewing Discussion Forum

Help Support Homebrew Talk - Beer, Wine, Mead, & Cider Brewing Discussion Forum:

This site may earn a commission from merchant affiliate links, including eBay, Amazon, and others.

thelorax121

Well-Known Member
Joined
Apr 13, 2009
Messages
419
Reaction score
3
Location
Athens GA
So I am putting the finishing touches on my new single tier, 1 pump, keggle based system and I am looking for some feedback in regards to chilling and whirlpooling. I am looking at two options at the moment:

One
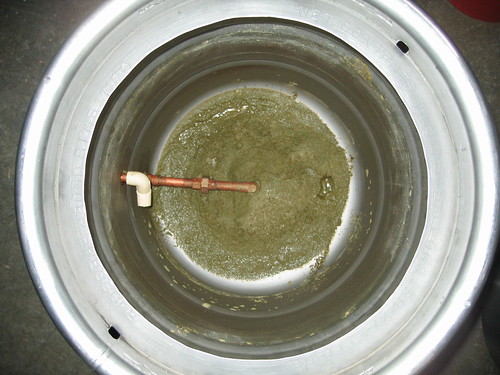
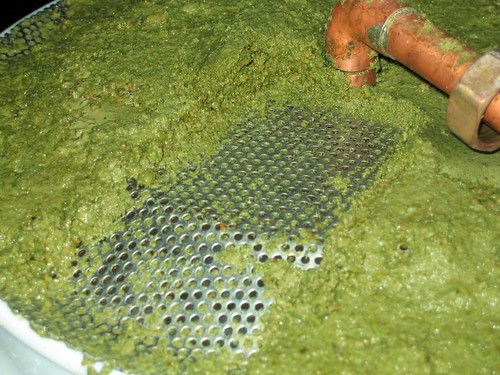
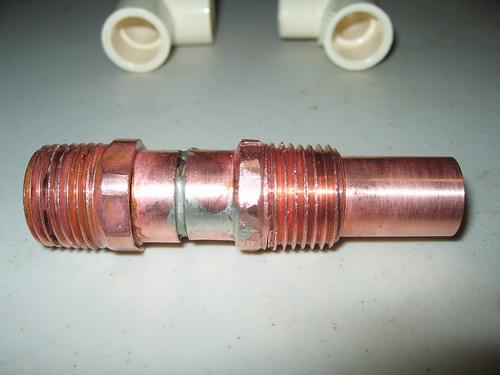
I have a CFC that I have not used yet, but I have seen that some people use their pump to draw from the kettle valve, pump the hot wort through a CFC then back through a whirl-pooling mechanism (I plan on having a whirlpool valve installed directly on the side of the pot with a weldless fitting and male cam lock connect) in the kettle and repeating this process until the wort is at pitching temps, letting the trub settle, then running clear wort to the fermenter. My concern with this is that the pump flow will be drastically reduced by running from 1/2" silicone tubing to 25 ft of 3/8" tubing significantly reducing the whirlpool effect and slowing the chilling down, has anyone experienced this?

Option Two
Use a 50ft 1/2" IC with the aforementioned kettle installed whirlpool arm. What I like about this option is that it gives me the option of using a bucket of ice water and a small aquarium pump to circulate the cooling water through the IC for lager and/or hot weather brewing, as well as saving water. My question with this method however is will having the whirlpool arm situated on the outside of the IC affect either the whirlpool effect or cooling rates negatively, as all the jamil-based whirlpooling ICs seem to have the arm inside the coils of the chiller?

Sorry for the length folks, and thanks for the help!
 
I don't think you'll have a problem with pump flow. If anything, it should increase when going to a smaller diameter tubing. At least...the speed at which the water is coming out will increase and you'll create a jet-like effect causing a better whirlpool.
 
i say a mix of both options.... weldless fitting on the kettle for the whirlpool, using the IC, of just go cheaper and go the straight jamil-o-chiller, then recirc your ice water once you hit the low temps. i do this and it's fantastic.
 
Pumping through the 3/8" OD tubing will slow the flow dramatically. You can easily check this with a plain water test. The tubing inside diameter is only about 1/4", which is very small and very restrictive.

I pump through my CFC and back to the kettle, but my chiller is built with 1/2" ID hard copper pipe, so there is very little resistance and the flow rate is very good. The return port to the kettle is about 1/3 up from the kettle bottom. It's important to direct return flow upward in order to get the warmer wort at the surface mixed in well. The temperature stratification can be much more than you might expect. A lot more actually. So, basically I am doing a pseudo Jamil whirlpool chill using a high flow rate CFC. It's working out very well for me.

I'm sure the IC would also work well for you. I don't think it makes a great deal of difference whether you have the return arm on the Jamil setup inside or outside. Again, the important thing is to keep the wort moving and get it mixed up well. In order to form a nice trub cone in the center, simply remove the chiller and give the wort a good stir, then wait 10-15 minutes to let the hop debris and break material settle out. Sometimes it is not well understood that there are two different types of whirlpool action. One is intended to better expose the late addition hops to the wort by keeping it mixed up while cooling and the other is to form a debris cone at the end after the swirling has stopped. At least that's my understanding of it.
 
I don't think you'll have a problem with pump flow. If anything, it should increase when going to a smaller diameter tubing. At least...the speed at which the water is coming out will increase and you'll create a jet-like effect causing a better whirlpool.

I completely disagree with this. The velocity will increase some, but only at the expense of a dramatic decrease in the flow volume and it won't improve the whirlpool effect.
 
I have been experimenting with whirlpooling and cooling the last couple weeks.
I have a 3/8" cfc and agree you will not be satisfied with the whirlpool you get from it.

Here are some examples of flow rates of 5 gallons of water from a March Pump through a 25' coil of copper:
5/8" = 1:33
1/2" = 2:21
3/8" = 4:04

Here is my current overkill plan because I already have all the pieces...
At flameout, I will re-circulate back to the BK to whirlpool.
I basically have a "tee" on the output of the pump so while re-circulating, the wort will travel from the BK > Pump > Pre-Chiller > BK. The pre-chiller is a 25' coil of 5/8" copper that I put in a bucket of overflowing tap water. During the whirlpool, the pre-chiller will probably knock close to 100f off the temp of the wort and cool the entire batch to about 100-120f pretty quickly.
When I'm satisfied with the whirlpool, I will re-direct the pump output so it flows: BK > Pump > CFC > Post-Chiller > Fermenter
The CFC is 25' x 3/8, and the Post-Chiller is a 25' x 1/2" coil submerged in ice water.

Using only the CFC and Post-Chiller, I was able to cool 10 gallons from 209f to 67f in about 13 minutes using 7lbs of ice.

I am very happy with the chill time, but concerned about clogging the 3/8" cfc, so I am considering adding the pre-chiller and making a new 1/2" cfc.

IMO, you have a good plan. Keep in mind what I said above about temperature stratification in the BK. Direct the return flow towards the surface to in order to ensure good mixing. Obviously, you don't want the return flow to actually break the surface. I direct the flow to the side of the kettle at about a 45 degree upward angle and this is working well.
 
IMO, you have a good plan. Keep in mind what I said above about temperature stratification in the BK. Direct the return flow towards the surface to in order to ensure good mixing. Obviously, you don't want the return flow to actually break the surface. I direct the flow to the side of the kettle at about a 45 degree upward angle and this is working well.

Here is an example of stratification...

The "spikes" on the cooling slope are where the water was stirred.

I adjusted my whirlpool return to point more upward like you described as a result.

ChillTest2.jpg
 
I was coaching a friend on his maiden voyage using a RIMS. He had the wort return port close to the bottom and pumped through a Chillus Convolutus back to the BK. I didn't give this a lot of thought and figured there would be sufficient mixing no matter what considering he had a very good flow rate. I was very wrong. He had a dial thermometer mounted low on the side of his keg kettle. The temp dropped very quickly and when it got down to 75F we started the transfer to the fermenters. This was a 12 gallon batch. All went well until near the last 1/4th when my friend noticed that the thermometer was spiking rapidly upward. I was shocked to see that it climbed all the way up to 140F. We halted the transfer, stirred up the wort and resumed the circulation back to the BK until the remaining wort was cooled down. I was really shocked that there could be that much heat remaining in the upper few inches of wort! Next batch we solved this problem by installing a riser from the return port up to just under the surface with an elbow at the top directed to swirl the wort. This fixed the problem. He has since installed a tee at about the 5.5 gallon level to use the same way for 6 gallon batches. He installed adapters at the top and mid level so he has the option of plugging either for different batch sizes. We had also sprayed down the kettle skirt, the burner and the sides of the kettle to improve the cooling rate, so that was not the cause. It was purely a temp stratification thing.
 
I was coaching a friend on his maiden voyage using a RIMS. He had the wort return port close to the bottom and pumped through a Chillus Convolutus back to the BK. I didn't give this a lot of thought and figured there would be sufficient mixing no matter what considering he had a very good flow rate. I was very wrong. He had a dial thermometer mounted low on the side of his keg kettle. The temp dropped very quickly and when it got down to 75F we started the transfer to the fermenters. This was a 12 gallon batch. All went well until near the last 1/4th when my friend noticed that the thermometer was spiking rapidly upward. I was shocked to see that it climbed all the way up to 140F. We halted the transfer, stirred up the wort and resumed the circulation back to the BK until the remaining wort was cooled down. I was really shocked that there could be that much heat remaining in the upper few inches of wort! Next batch we solved this problem by installing a riser from the return port up to just under the surface with an elbow at the top directed to swirl the wort. This fixed the problem. He has since installed a tee at about the 5.5 gallon level to use the same way for 6 gallon batches. He installed adapters at the top and mid level so he has the option of plugging either for different batch sizes. We had also sprayed down the kettle skirt, the burner and the sides of the kettle to improve the cooling rate, so that was not the cause. It was purely a temp stratification thing.

I did the same thing... I watched the digital temp gauge and when it reached pitching temp, I transferred it to the fermenter. Difference is, I didn't look back to see the temp sky rocket as the BK emptied. I now have 10 gallons of Blonde Ale that tastes like bananas... It is about to go down the drain. So I learned the hard way about stratification.
 
Alrighty, so I think I am going to go with the immersion chiller option, but now I have another question. Should I go with an installed whirlpool port on the side of the keggle, and if so where on the keggle should I install/angle it as I have read a few conflicting POVs (per usual) it? Or should I have a separate copper whirlpool attachment that I drop in with the chiller for flexibilities sake?
 
I would go with an installed return port on the kettle mounted at about the 5 gallon level or just above the lower rib of the keg. Do it so you can attach a fitting on the inside to direct the flow. IMO, it works best to direct the flow against the side of the kettle so that it creates the swirling effect. When using it for a 5 or 6 gallon batch you can adjust the elbow (that's what I use) to discharge horizontally just below the surface of the wort. For larger 10 or 12 gallon batches direct the elbow upward at an angle towards the surface. IIRC, Jamil has his return thingy attached directly to the IC, but I don't recall exactly how he positioned it; if it is adjustable for varying batch sizes or even if it needs to be. I think you can pretty much do it any of the different ways so long as the wort circulates and mixes well, that's the key IMO. I used the port on my converted keg that I had previously used for a dial thermometer. You will need a valve on the port if you go that way so that you can close it off when not in use.
 
How do you keep chunks from the bottom of the kettle from getting into the pump as you start this process of recirculating?

I have messed with various method of trying to keep things from clogging the outlet valve of my keggle. I have tried pickup tube in the center through a drilled false bottom. I have tried a SS scrubby at the end of the pickup tube with the tube located near the side of the kettle. Not much joy in either arrangement. I always seem to have a bunch of junk (break material, hop debris, etc.) end up clogging my pump.

Ideas, process change suggestions welcomed.

Thanks!
 
I agree with Catt22. I have a return in my BK with a SS compression elbow on the inside with a short piece of SS tube. The elbow is loose enough that I can move it up or down by hand to adjust the "height" of the output.

The one thing to remember with the return in the BK, is that you HAVE to make sure you have it plugged before you fill the BK... If you decide to clean the BK, you have to have a hose or plug on the return. It's not a problem.
 
I use a false bottom:

4128666264_ed991d3a84.jpg


4128977563_6546b3c64f.jpg


4706308525_328162223e.jpg


4706948354_d53bb9a7d9.jpg


In a nut shell, the way it works is the hops cake up on the FB and eventually, when a lot of hops are used, the flow will slow dramatically. At this point, I use the attached rod to lift the edge of the FB which restores full flow. The majority of the debris remains caked on the FB and only a minor amount of fine particulates make it past when lifting the edge. It works with pellet or whole hops. Just like you, I've tried almost every other method and none worked very well when I started pumping and doing the circulation back to the BK in a loop. This is working very well for me. I tried the paint strainer bag and the hop utilization was much less than I wanted and particularly so for the late addition flavor and aroma hops. So far, this has been the best solution for me. The first pic is without the lift rod installed, but you can get the idea anyway.
 
The one thing to remember with the return in the BK, is that you HAVE to make sure you have it plugged before you fill the BK... If you decide to clean the BK, you have to have a hose or plug on the return. It's not a problem.

That's exactly why I suggested putting a valve on that return port. My port is a welded in coupling. I made a custom fitting that allows the 1/2" pipe to extend into the kettle. I had to drill out the one threaded adapter so I could get the pipe to pass through. It threads into the coupling on the kettle and the outside threaded adapter accepts the valve and hose connector.

4701547711_c5e5584b47.jpg
 
As for plugging the whirlpool port, my plan was to install a 1/2" ball valve on the outside with a male cam lock fitting on the end that I could close during the boil, then attach my silicone tubing with female cam lock from to the ball valve about 10 mins prior to the end of the boil, starting circulation to sanitize, then chilling. Does that sound sufficient?

Also, is there a reason that you are drawing from the center rather than the side with your diptube? It seems that with your set up, the tube would be drawing from precisely where the trub/hop cone would form after whirlpooling which is one of the main benefits I am looking at from this technique.

Finally, how does this setup sound for a whirlpool arm: a length of copper tubing bent at an angle that roughly conforms to, and runs along the inside surface of the kettle wall that is soldered to a 1/2" male NPT fitting which would screw into the coupler inside the kettle. I would make the copper fitting long enough that it could be turned slightly up or down (at the connection of the male and female coupler joint) to adjust for 5.5 and 11 gal batches. I am pretty new at the copper work stuff, so does anyone see any problems with this?

The valve should work fine, I am planning to add one to my BK as well.

I have my siphon tube bent to draw from the edge of the keggle. Downside is you leave some wort behind. I leave about a quart.

Your description of your return sounds very close to mine. I use a ss npt to compression elbow and a short piece of ss tubing. If you make the "arm" too long you may not be able to screw it into the coupling.

Sounds like you are on the right track.
 
Thanks Ed

I am fine with leaving a bit of wort behind in the BK, as most of this is full of hop particulates and trub anyways, and that is why I brew 6 or 12 gal batches, to end up with 5 or 10 in the keg.

If I am working with soft copper tubing for the whirlpool assembly (and I guess this applies to the diptube set up as well) what is the advantage/disadvantage of using compression fittings vs just soldering/bending? I have never soldered before, but would like to learn, so if it is a better option I am more than willing to take some time to get the hang of it.
 
As for plugging the whirlpool port, my plan was to install a 1/2" ball valve on the outside with a male cam lock fitting on the end that I could close during the boil, then attach my silicone tubing with female cam lock from to the ball valve about 10 mins prior to the end of the boil, starting circulation to sanitize, then chilling. Does that sound sufficient?

Also, is there a reason that you are drawing from the center rather than the side with your diptube? It seems that with your set up, the tube would be drawing from precisely where the trub/hop cone would form after whirlpooling which is one of the main benefits I am looking at from this technique.

Finally, how does this setup sound for a whirlpool arm: a length of copper tubing bent at an angle that roughly conforms to, and runs along the inside surface of the kettle wall that is soldered to a 1/2" male NPT fitting which would screw into the coupler inside the kettle. I would make the copper fitting long enough that it could be turned slightly up or down (at the connection of the male and female coupler joint) to adjust for 5.5 and 11 gal batches. I am pretty new at the copper work stuff, so does anyone see any problems with this?

1. Yes, that appears to be a good plan with the valve etc.
2. Initially I was only using the dip tube without the false bottom and I wanted it in the center in order to fully drain the kettle. Later on I bought the false bottom and it had a center hole, so I just adapted the dip tube to work with that. IMO, the center vs outer edge location makes little difference. The suction at the mouth of the dip tube is not very strong even when pumping full throttle. It will only suck up stuff within about a 1/2" radiius or less. With the false bottom installed, its even less of an issue as most everything cakes solidly on the false bottom as you can see in the pic. Certainly some of the very fine stuff gets by the FB, but it has not proved to be detrimental in any way that I can detect. Any that makes it into the fermenter, which is not much at all, drops out quickly.
3. Your plan for the whirlpool arm will work OK I am sure, but IMO, it's not necessary to go to all that trouble. An ordinary elbow would work as well. The important thing is to have the ability to direct the output where you want it for varying batch size. Continuously and thoroughly mixing up the wort is the most important thing IMO. No need to focus so much on creating an actual "whirlpool". You can do that at the end, after the wort is well cooled, using a long handled spoon.
 
Thanks Ed

I am fine with leaving a bit of wort behind in the BK, as most of this is full of hop particulates and trub anyways, and that is why I brew 6 or 12 gal batches, to end up with 5 or 10 in the keg.

If I am working with soft copper tubing for the whirlpool assembly (and I guess this applies to the diptube set up as well) what is the advantage/disadvantage of using compression fittings vs just soldering/bending? I have never soldered before, but would like to learn, so if it is a better option I am more than willing to take some time to get the hang of it.

The reason I used hard copper pipe is that I wanted the dip tube to hold the false bottom firmly in place. I also wanted the full 1/2" inside diamter to match the rest of my hoses and fittings for minimal restriction throughout. Soldering (sweating) copper is really quite easy to do, but it would be best if someone showed you the technique first hand. Clean all of the fittings and pipe very well where they join. Use plumbers emery paper and/or a wire brush for this. Use a suitable flux and use it liberally. Heat the pipe and fitting until it is hot enough to melt the solder. You can test for this by touching the far side of the fitting with the solder and it should melt instantly. At this point, remove the flame and apply the solder to the joint. The solder will be sucked up by capillary action as the pieces begin to cool which happens right away. No need to apply the solder in more than one spot. It will flow around the entire connection on its own if you are doing it correctly. Use a damp cloth to immediately wipe off any globs of solder for a more professional look. I would suggest practicing on a few pieces before you go for the gold. I like to use pipe unions for anything that needs to be disconnected on a regular basis. Compression fittings will also work well. You can get compression fittings for either soft copper or hard pipe, but be sure you buy the right ones as they are sized differently. Soft copper is easy to work with as you can bend it, whereas, you would need to install fittings to change direction with hard pipe.
 
Awesome info Catt, I am trying to keep all of my tubing at a 1/2" ID to avoid and flow restriction in my system, and I forgot that the soft copper would be slightly smaller, so that makes my decision easier, as well as the fact that hard copper pipe is sold in shorter lengths than the tubing, so I wont have to barbarize my IC. Thanks a ton for all your help!
 
Good luck with it. Post back and let us know how you make out. FYI, I also wanted to maintain the full 1/2" throughout. I even upgraded my hoses to 5/8" ID because the inside diameter of a 5/8" barb is only 1/2". The 1/2" fittings fit 1/2" hose, but the inside opening was only about 3/8". It is not often realized how much this difference can make in the cross sectional area of the openings. It's a huge difference and it is quite noticeable in the flow rate.
 
Awesome info Catt, I am trying to keep all of my tubing at a 1/2" ID to avoid and flow restriction in my system, and I forgot that the soft copper would be slightly smaller, so that makes my decision easier, as well as the fact that hard copper pipe is sold in shorter lengths than the tubing, so I wont have to barbarize my IC. Thanks a ton for all your help!

You could use 5/8" soft copper which has an id of 1/2" and is compatible with 1/2" hard copper fittings.

Compression fittings are more expensive than soldered fittings. I used compression fittings so the siphon and return tubes in my vessels can be removed/adjusted/replaced... Catt used a union which is just as good, I think it's just a personal preference.

I used 1/2" stainless steel tubing in place of copper because I had it. I'm not worried about it restricting the flow... look at the output on your march pump head... what is the id of the threaded fitting?

On my previous kettle, I used 1/2" hard copper for the siphon tube and had a 1/2" return that was separate and hung over the edge into the BK.

I agree with Catt that you should concentrate on mixing the wort to avoid stratification instead of making a whirlpool. For the whirlpool method to work you have to have a lot of patience. Once you get the whirlpool moving, you then have to wait for it to stop and give things a bit of time to settle which seems to take forever when you are waiting to chill.

Forgot to mention... I used a drill press and drilled out the id of my brass barb fittings to enlarge them as much as possible.
 
Back
Top