OP
OP
Ace_Club
Well-Known Member
Please report back on how this works for you, it looks really good. What did the insulation cost?
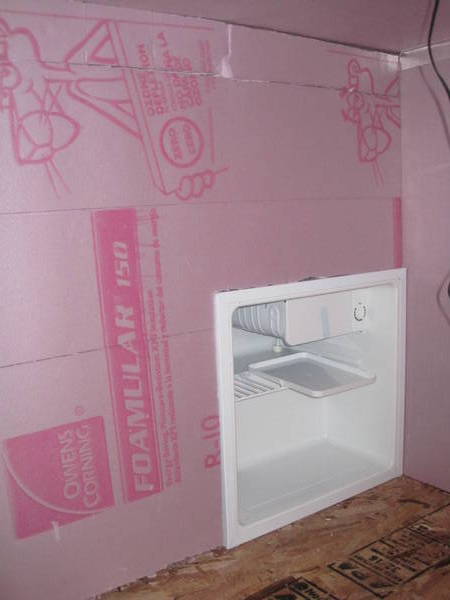
IIRC, the insulation ran between $15 and $20 per 4'x8' sheet.

Please report back on how this works for you, it looks really good. What did the insulation cost?
IIRC, the insulation ran between $15 and $20 per 4'x8' sheet.
I'm so jealous. All I can find is .75" thick sheets... No Menard's down in TX...
2 x 0.75 + glue = 1.5
This is a cool idea! You have me thinking about building one. A question - what type of controller are you using, and does it control both heat and cooling?
Thanks!
2 x 0.75 + glue = 1.5
WOW, REALLY?!:cross:
WOW, REALLY?!:cross:
Well you don't have a Menards, fair assumption you don't have math either.
Hey, let's keep it civil in my build thread. Capice?

")
Would something like this work well in the winter? Could I hook up a 100w incandescent light bulb to the 'heat' side of the temp controller for use in the winter? I'm thinking of making one of these in my non-insulated garage. It gets mighty cold up here (Ontario, Canada), but I figure a well insulated box with a light bulb might be able to keep it slightly warm.
ok, maybe not ale temp warm, huh?
-runstop
Something like this would easily work for keeping the fermenters warm in colder temps. Again, your best bet would be to calculate the required BTUs/hr needed to maintain your desired temp inside the box and use that to size the insulation and heat source. I plan on eventually installing a reptile heat cable in mine to provide heating if necessary.
runstop said:Interesting idea with the reptile heat cable. Any idea how many BTUs/hr that will put out?
I was restricted on space and built mine just big enough to fit two car boys. I use a digital johnson controller A490? to controll the cooling element in the summer and throw a small space heater in there in the winter. Works great for me. Sensor is place in a thermowell through the carboy bung.
Depends on the wattage rating of the cable (they come in different sizes). For example, a 15W cable would produce about 51 BTU/hr, IIRC.
runstop said:Would these be cumulative? Ie - two 15w heat cables = ~ 102btus/hr?
I'm in Ontario as well and right now I use 10W brewbelts I already had. But it's a chest freezer with much less heat loss.
On this particular design with these dimensions, 50W of heat would only really achieve a temperature delta of 10° Fahrenheit. That's still far less than you'd need even to just br able to keep it from freezing!
You'd need to get some serious wattage for it to ferment even a lager when winter is at its coldest... to the point that I'd be concerned with it being a potential fire hazard.
Where in Ontario are you from anyways?
runstop said:Hey Scottsr123,
If you buy one of these on ebay, the hong kong supplier will have both a 110 and a 220. They wil send you the right one based on where they're shipping.
runstop


nice work! so what is ambient temp and what is the lowest temp that the fermentation unit can reach?
Subscribed. This is exactly what I was thinking of doing. I may have to brush up on some electrical technique for the controller build though.
Bring out the GIMP! Good work my man. You are a true inspiration to the garage brewers of the world.
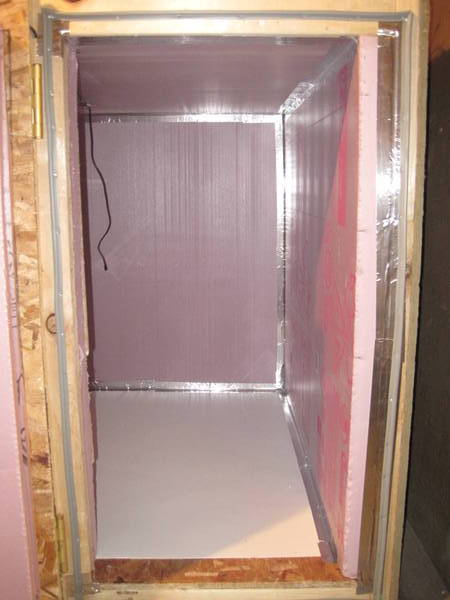
He'll likely do what several people around here do and butt the opening of the fridge (door removed) up to an opening of the chamber and seal the edges. Essentially expanding the interior of the mini fridge.


Also, one last bit of advice. When working inside the chamber (taping seams, caulking, etc.) never, ever fart. It's horrible, and it lingers.


Enter your email address to join:
