You are using an out of date browser. It may not display this or other websites correctly.
You should upgrade or use an alternative browser.
You should upgrade or use an alternative browser.
Open ArdBir - definitive BIAB/RIMS controller arduino based
- Thread starter mysobry
- Start date

Help Support Homebrew Talk - Beer, Wine, Mead, & Cider Brewing Discussion Forum:
This site may earn a commission from merchant affiliate
links, including eBay, Amazon, and others.
Let me correct myself. The Chinese uno works fine. I have a Chinese nano but was unable to get the newest build to load as it said there was not enough space. Also the pin out seems different
Yeah, I thought I'd mention that with my clone *minis* that the pin out can vary. So just something to look out for, didn't know if it applies to nanos
bionut
Well-Known Member
So i still need to buy the original Arduino Nano?
Where to you use the Uno for?
LE:
I found this Nano, it says "Bootloader all ready, just plug in USB and play", does that means that it have the driver already installed?
This the review that got me to that page http://www.epanorama.net/newepa/2014/05/04/cheap-arduino-nano-review/
Where to you use the Uno for?
LE:
I found this Nano, it says "Bootloader all ready, just plug in USB and play", does that means that it have the driver already installed?
This the review that got me to that page http://www.epanorama.net/newepa/2014/05/04/cheap-arduino-nano-review/
I've never ordered a PCB, but I've heard there are companies/websites that do one off boards. I don't have any recommendations. Sorry.
For printing your own there was no print ready image for the Nano like those in the first post for the uno version. As others said the Daniel version or Ardbir version are in the original post.
Does anyone have a print read image of the traces for the nano version? Alternatively how can you make the pcb traces in eagle?
bionut
Well-Known Member
Now i am confused... aren't these the files for the ArdBir Nano? In contains some .brd files that you can print.
LE: I realised that i was looking at the GTO version like it was the Daniel Xan one. That's why i was asking where do you use the Uno board. Both seems to have the same difficulty to build. Which one can you recommend or think would be easier to make (having in mine all the soldering and programming needed, if it is a difference)?
Hi guys
I have created a GitHub repository with all files fro ArdBir NANO version including Eagle schematic and PCB
You have two building options: one with LCD mounted component side and other one solder side !
https://github.com/arzaman/Open-ArdBir-NANO
enjoy and let me know your feedback
br
Davide
LE: I realised that i was looking at the GTO version like it was the Daniel Xan one. That's why i was asking where do you use the Uno board. Both seems to have the same difficulty to build. Which one can you recommend or think would be easier to make (having in mine all the soldering and programming needed, if it is a difference)?
bionut
Well-Known Member
I have a PCB for this project made from the drawings and I'll build it up over the next couple of months.
There a number of things I like to ask about,
What's the best way to mount it all in a enclosure/box? Are there any pictures?
The small display, do I just cut a matching hole in the enclosure and push the LCD into it?
There seem to be two possible sets of buttons a matrix membrane and real buttons.
How would I mount the matrix membrane so I could press its keys?
Or
If I use real buttons how do I connect them to the arduino?
Many thanks. Aamcle
If you are making the GTO version you can 3D print this http://www.thingiverse.com/thing:1016737
to make it look like this

You can print either the membrane or push button face mask. The push buttons should connect the same as the membrane switch, on your PCB, not on the Arduino board...
I see at the moment you cannot buy the Ardbir printboard anymore (out of stock) and if I understand their last post on facebook, they are working on something new and this PCB will no longer be produced. But in the meantime (maybe months?) we cannot buy a PCB from them.
So I'll be waiting then") I see the price difference between the ready package (99 euro) from ardbir is not that much higher when buying all seperatly. So i'm not going to go trough all that trouble
I see the price difference between the ready package (99 euro) from ardbir is not that much higher when buying all seperatly. So i'm not going to go trough all that trouble
So I'll be waiting then
I see the price difference between the ready package (99 euro) from ardbir is not that much higher when buying all seperatly. So i'm not going to go trough all that troubleMy friend, who runs a small company in Taiwan, has manufactured a small batch of ArdBir compatible boards. Instead of using Arduino Uno, he uses Arduino Mega, which has much more memory built-in.
If anybody is interested in it, I can provide more information.
If anybody is interested in it, I can provide more information.
bionut
Well-Known Member
My friend, who runs a small company in Taiwan, has manufactured a small batch of ArdBir compatible boards. Instead of using Arduino Uno, he uses Arduino Mega, which has much more memory built-in.
If anybody is interested in it, I can provide more information.
Please do provie more information

bionut
Well-Known Member
Double post.
Although a arduino mega would help with the memory limitations it sounded like the Ardbir team would only be providing bug fixes and small updates for the uno based system.
As for what the new products are exactly or when they be available we'll have to wait and see.
As for what the new products are exactly or when they be available we'll have to wait and see.
snowtires
Well-Known Member
- Joined
- Sep 7, 2012
- Messages
- 621
- Reaction score
- 92
Here is a tutorial of how I build my Ardbir
https://www.homebrewtalk.com/showthread.php?t=568549
Its still not 100% complete yet, I'm currently building the rest of the control panel, SSR, plugs, element etc
https://www.homebrewtalk.com/showthread.php?t=568549
Its still not 100% complete yet, I'm currently building the rest of the control panel, SSR, plugs, element etc
Here is a tutorial of how I build my Ardbir
https://www.homebrewtalk.com/showthread.php?t=568549
Its still not 100% complete yet, I'm currently building the rest of the control panel, SSR, plugs, element etc
Nice post and tutorial but I really don't understand so much effort to produce PCB at home when with few dollars you can ask one of the dozen PCB service and get ready made at home
Davide
Let me tell the whole story about the ArdBir "clone".
In May 2015, a group of home brewers in Taiwan, where I am from, discussed about making Open ArdBir by their own. They wanted to reduce the cost and lower the barrier as well. Possibility of improvement was also discussed. Knowing the original Open ArdBir had used almost all 32K flash of Uno, Mega was the way to go. We (I was one of them) concluded that Open ArdBir had almost everything for brewing. The only things left might be User Interface and Wireless capability. However, unless migrating from Arduino to Raspberry Pi with a 7 inch touchable LCD, there is limited space of improvement in User Interface. Wireless capability was more desired, then.
One of the members who runs a company which has the ability to make the PCB boards decided to make a batch of them. Including Mega upgrade, ports for bluetooth and WiFi module are also available.
I, as a software engineer, contributed a little in this project. It's a shame that I couldn't make the original AriBir sketch to support wireless easily, so I decided to re-implement the sketch. The result software is named BrewManiac, which is to honor the name of the home-brew group in Taiwan- Homebrew Maniac.
The sketch has been finished for a while, but I don't yet have a chance for a test drive. Therefore, I haven't shared in this forum.
The maker of the PCB has sent me the prototype of his production, and I've tested Open Ardbir and BrewManiac with bluetooth functionality on it. I will post the picture under the agreement of him later.
snowtires
Well-Known Member
- Joined
- Sep 7, 2012
- Messages
- 621
- Reaction score
- 92
Nice post and tutorial but I really don't understand so much effort to produce PCB at home when with few dollars you can ask one of the dozen PCB service and get ready made at home
Davide
Because it's fun!
bionut
Well-Known Member
Let me tell the whole story about the ArdBir "clone".
In May 2015, a group of home brewers in Taiwan, where I am from, discussed about making Open ArdBir by their own. They wanted to reduce the cost and lower the barrier as well. Possibility of improvement was also discussed. Knowing the original Open ArdBir had used almost all 32K flash of Uno, Mega was the way to go. We (I was one of them) concluded that Open ArdBir had almost everything for brewing. The only things left might be User Interface and Wireless capability. However, unless migrating from Arduino to Raspberry Pi with a 7 inch touchable LCD, there is limited space of improvement in User Interface. Wireless capability was more desired, then.
One of the members who runs a company which has the ability to make the PCB boards decided to make a batch of them. Including Mega upgrade, ports for bluetooth and WiFi module are also available.
I, as a software engineer, contributed a little in this project. It's a shame that I couldn't make the original AriBir sketch to support wireless easily, so I decided to re-implement the sketch. The result software is named BrewManiac, which is to honor the name of the home-brew group in Taiwan- Homebrew Maniac.
The sketch has been finished for a while, but I don't yet have a chance for a test drive. Therefore, I haven't shared in this forum.
The maker of the PCB has sent me the prototype of his production, and I've tested Open Ardbir and BrewManiac with bluetooth functionality on it. I will post the picture under the agreement of him later.
That sounds really good, please feel free to post anything about that.
snowtires
Well-Known Member
- Joined
- Sep 7, 2012
- Messages
- 621
- Reaction score
- 92
I just saw this video of the Bluetooth in action.
https://youtu.be/L7-Ymt2KGAk
https://youtu.be/L7-Ymt2KGAk
View attachment ImageUploadedByHome Brew1452461662.428912.jpg
Here is the picture of the MRE168 with Bluetooth & WiFi modules attached.
The hardware configuration is almost the same as Open ArdBir in standard functionalities.
The Bluetooth module is in fact HM10 BLE transceiver connecting by D10&D11 with SoftwareSerial.
The WiFi module is supposed to be an ESP8266 module. However, I am still working on it. It does not work for now.
There are two 10A SSR built-in. One is for Pump while the other is marked as AUX, reserved for future extension.
The SSR for heater has to be external attached for its high current requirement.
There is also a port designed for BMP180, but I have not dug into it.
I have a page for software part. You can find all information there, including Arduino sketch and iPhone App.
http://vito.tw/brewmaniac/
Let me reiterate that I have not used it in a real brew. use at your own risk.
What in the video is my development platform, which is a Arduino Uno with a protosheild, I2C LCD, and LEDs to indicate the status of heater and pump.
I have to admit that this is my first Arduino sketch, so I might have made some mistakes and struggled to make it fit into 32K program memory. My sketch does fit in Uno's 32K Flash by removing some functions like delay start and Bluetooth menu. However, I don't think I can make it after adding WiFi menu, which should includes network setup. Mega is really a relief.
I have to admit that this is my first Arduino sketch, so I might have made some mistakes and struggled to make it fit into 32K program memory. My sketch does fit in Uno's 32K Flash by removing some functions like delay start and Bluetooth menu. However, I don't think I can make it after adding WiFi menu, which should includes network setup. Mega is really a relief.
snowtires
Well-Known Member
- Joined
- Sep 7, 2012
- Messages
- 621
- Reaction score
- 92
Well, a cheap mega is $10, and the BT module is less then $5. Is there any reason your software wouldn't work with any of the existing shields? have you re written pin outputs and such, or is the new shield directed at accommodating the BT adapter and WiFi?
Well, a cheap mega is $10, and the BT module is less then $5. Is there any reason your software wouldn't work with any of the existing shields? have you re written pin outputs and such, or is the new shield directed at accommodating the BT adapter and WiFi?
The PIN setting is surely configurable in the sketch.
The problem I have is the limit of 32K flash of Arduino Uno. I've spent two weeks just to reduce a few hundred bytes! I couldn't build a image to fit in 32K flash of Uno without removing some functions.
Supporting WiFi won't add too much code on Arduino, but network configuration is necessary, IMO. I am still at the stage of studying ESP8266, but my plan of the WiFi menu should include
- AP/Station setting: to allow connection without a router.
- IP information: to know how to connect.
- Network selection: selecting network for internet access. Input of password is also necessary.
Even these are very basic, it might take about 2k+ flash space. Since current code already takes about 31k flash, I don't think it is possible to fit in 32K flash.
(It is the reason that I don't want to do WiFi at first. The setting are annoying, even for a person who works in wireless industry over 10 years like me.)
Regarding the bluetooth, it must be a BLE module. The reason of using BLE module is to allow iPhone connection without a certificate of peripheral from Apple, which costs a lot.
In fact, it must be HM10 for now because the interface of different BLE modules might be different.
ESP8266 is powerful yet cheap. I see no reason to use other more expensive shield. I am going to make a WEB-based interface based on ESP8266, which might be difficult, if not impossible, for shields. Programming ESP8266 will takes longer than that on Arduino, though.
bionut
Well-Known Member
Does any of you have a print ready image for the NANO version? I thought would be easier to print the file from eagle, but i was wrong. I have no idea what layers should i keep for printing.
bionut
Well-Known Member
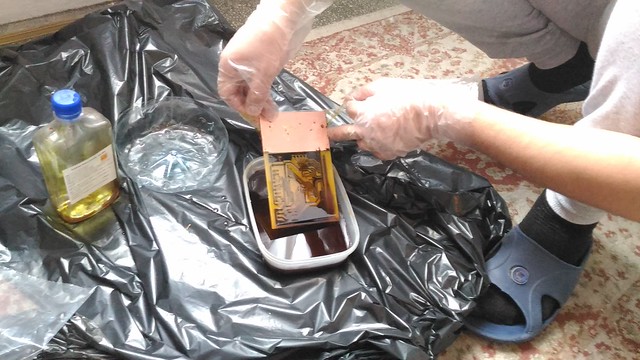
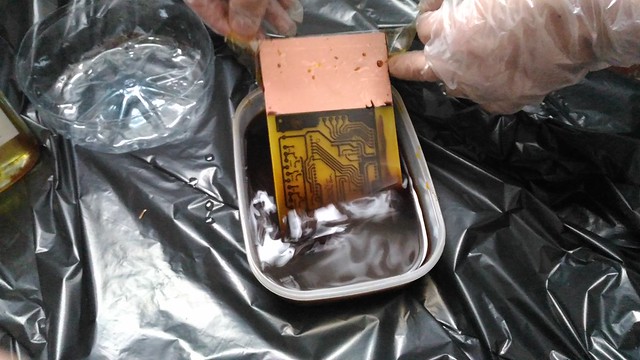
I just made the DanielXan version. I used the toner transfer method for making the PCB and ferric chloride for etching it.
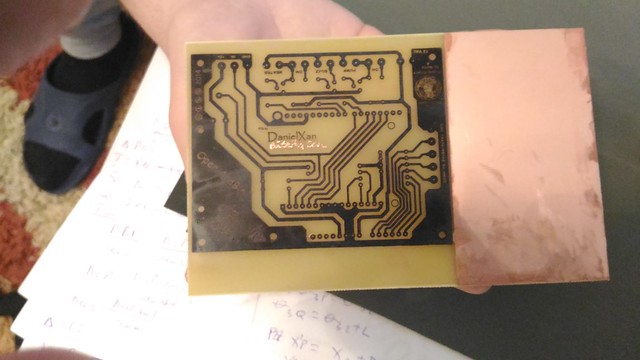
I had two small places where the toner came off, so i used a marker for touch ups. I also writen my ninja name under DanielXan signature, hope he wont mind
This is after the etching, under the black toner should be copper.
I wiped the toner marks with some pain thinner and, voila:
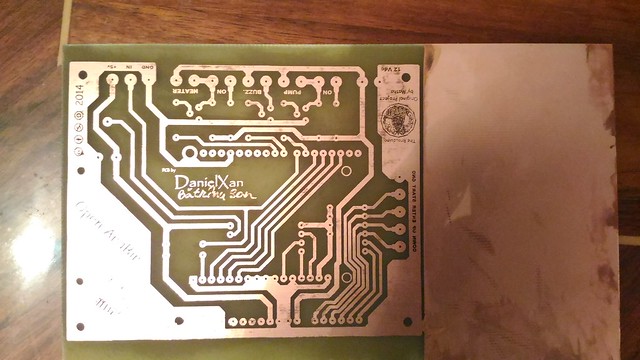
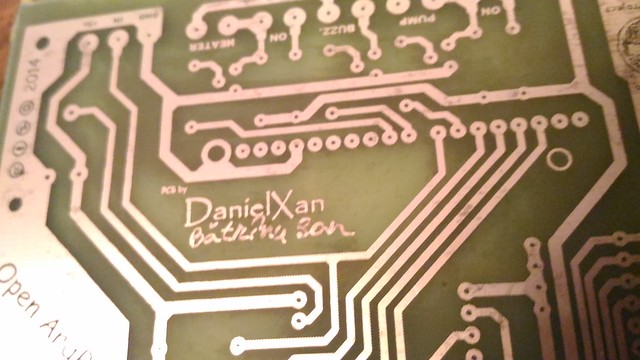
I will say that's good enough for the first PCB i ever made Now i need to find a way to drill some small holes in the center of the pads... I ordered all the parts from China, in 2-3 weeks i should have them.
I had two small places where the toner came off, so i used a marker for touch ups. I also writen my ninja name under DanielXan signature, hope he wont mind
This is after the etching, under the black toner should be copper.
I wiped the toner marks with some pain thinner and, voila:
I will say that's good enough for the first PCB i ever made
Now i need to find a way to drill some small holes in the center of the pads... I ordered all the parts from China, in 2-3 weeks i should have them.bionut
Well-Known Member
My laser printer is very old so i asked a friend to print it for me. He got some photo paper on hand and use it. It was quite thick paper, a little glossy on both sides. I soaked it in warm water and it cam off easy enough. I can ask for the paper brand, altough i am not sure if you can get find in the USA.
bionut
Well-Known Member
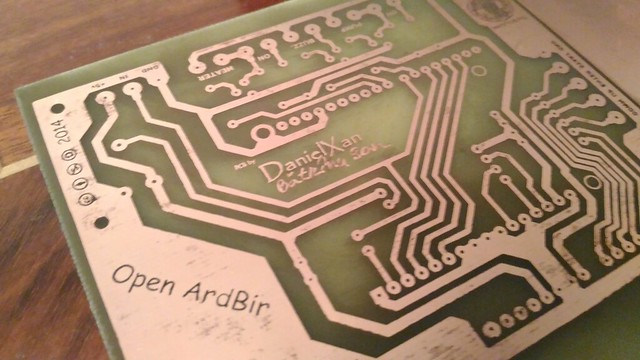
This is a picture with better colors.
LE: My friend can't remember the brand of the photo paper he used, it was bought a long time ago and he only had left 2 sheets without the label.

LE: My friend can't remember the brand of the photo paper he used, it was bought a long time ago and he only had left 2 sheets without the label.
For those that have memory issues when trying to upload to a Arduino Nano the trick is to reduce the size of the file. JoeFarmer indicated that by removing the credits you can reduce the size to below 32K. In the LCD file for your setup/language search for the credits and delete a few of the peoples names. The program should then upload just fine. Alternatively download joefarmers version from github. His post containing the link is on page 2 or 3 of this thread. Hope this helps.
sadowski25
Active Member
Hey,
Somebody know how to set JoeFarmer software for HW ArdBir NANO pcb from mysorby ?
Or just better will be to make JoeFarmer PCB and use his version ?
Somebody know how to set JoeFarmer software for HW ArdBir NANO pcb from mysorby ?
Or just better will be to make JoeFarmer PCB and use his version ?
joefarmer
Active Member
Hey,
Somebody know how to set JoeFarmer software for HW ArdBir NANO pcb from mysorby ?
Or just better will be to make JoeFarmer PCB and use his version ?
I changed the pins around so it matched my smaller board better. I haven't added pinouts for any other PCB.
sadowski25
Active Member
OK, Your version is nice
But maybe could you tell me replacements for your MOSFETs ?
I can't get them here in Poland
LM is not problem, but I can't get BUK9275-100A and SI2302CDS-T1-E3 .
Maybe some IRL type will fit ?
I don't need to power pump from board, I just need voltage to drive SSR for Heat element and classical relay for pump.
joefarmer
Active Member
OK, Your version is nice
But maybe could you tell me replacements for your MOSFETs ?
I can't get them here in Poland
LM is not problem, but I can't get BUK9275-100A and SI2302CDS-T1-E3 .
Maybe some IRL type will fit ?
I don't need to power pump from board, I just need voltage to drive SSR for Heat element and classical relay for pump.
Sure. I sent you a PM as well. Any mosfet with the same pinout should work. I have used IRLR2705PBF, NTD4804NT4G, IPD040N03L G, NTD4855NT4G for the BUK. The other MOSFET can be replaced with any SOT23 mosfet that can handle current for the SSR.
sadowski25
Active Member
Thanks a lot for help.
This will give the beggining for 10 Ardbir Nano eBIAB/Brauduino sets ( for me 2x + friends)
This will give the beggining for 10 Ardbir Nano eBIAB/Brauduino sets ( for me 2x + friends)
Similar threads
- Replies
- 9
- Views
- 3K
- Replies
- 4
- Views
- 5K
- Replies
- 177
- Views
- 24K
Latest posts
-

-

-
-
 Withdrawn Brewhardware Pull Through Tool
- Latest: storunner13
-
-
