52 qt Coleman Xtreme Mash Tun help/?

Homebrew Talk - Beer, Wine, Mead, & Cider Brewing Discussion Forum

Help Support Homebrew Talk - Beer, Wine, Mead, & Cider Brewing Discussion Forum:

This site may earn a commission from merchant affiliate links, including eBay, Amazon, and others.

brettwasbtd

Awesomeness Award Winnner
HBT Supporter
Joined
Apr 20, 2010
Messages
1,793
Reaction score
165
Location
Damascus, MD
So i bought the parts I believed would allow me to transform the cooler into a mash tun. I got a 1/2" brass nipple - I really had to work to get the cooler's original rubber ring to go over the nipple and now that I have, it seems that it has expanded the ring and it will not fit into the hole any longer. Most of the online guides make it seem like the original rubber ring fits without a problem... maybe I should have gone 3/8s" on everything?

I was unable to find large enough brass/stainless steel washers to fit the 1/2" brass nipple. I really want to finish this, this weekend. i was wondering if the good people here at HBT could provide suggestions on how I should proceed. Here is what I have come up with

A) widen the hole in the cooler
b) Go buy some aquarium silicon and just seal everything up without the ring
C) combo of both

Thanks in advance for your expertise
 
I am guessing that your original sealing washer is a step gasket that goes outside and insied the cooler hole. Rather than guess what you have and then try and figure out what you need...I would suggest you take "everything" to your local friendly hardware store or home center and get help from the "plumbing" geek.

Enlarging the hole or smearing w/ sealant does not seem like the best route to me.

I have heard that baby bottle nipples can be cut to make gaskets...got any kids that have been weened?

If you have any threads on the nipple where you are trying to make a seal, you will need teflon tape or some other form of sealant as the threads will not usually seal.
 
Unfortunately (or fortunately depending on you stance) I don't have any kids haha. You are correct that part of the rubber gasket goes inside the hole and the other part forms and "O" seal around the coolers inner lining. I think the rubber gasket was like a 7/16" or something as the 1/2" brass nipple widens it just enough that it will not fit back in

I was at the local hardware sore and they didnt have anything, Home Depot is the closest of the big-chain hardware stores and I might have to go back there
 
I ended up getting some zinc 3/4" washers and placing them over the nipple, between the ball valve and the outside cooler wall. Allowed me to tighten my CPVC adapter and provide the O-ring with a flush fitting
 
Don't use zinc washers! Bad!

You don't want that in your beer and the washers are going to corrode quickly.
They are on the outside of the tun, outside of the brass nipple which wort goes through. It doesn't come in any contact with the wort and merely acts to tighten the space between the ball valve and cooler. It is safe, I assure you!
 
So i bought the parts I believed would allow me to transform the cooler into a mash tun. I got a 1/2" brass nipple - I really had to work to get the cooler's original rubber ring to go over the nipple and now that I have, it seems that it has expanded the ring and it will not fit into the hole any longer. Most of the online guides make it seem like the original rubber ring fits without a problem... maybe I should have gone 3/8s" on everything?

I was unable to find large enough brass/stainless steel washers to fit the 1/2" brass nipple. I really want to finish this, this weekend. i was wondering if the good people here at HBT could provide suggestions on how I should proceed. Here is what I have come up with

A) widen the hole in the cooler
b) Go buy some aquarium silicon and just seal everything up without the ring
C) combo of both

Thanks in advance for your expertise

I just converted that exact cooler and didn't have any problems and used a 1/2" nipple.. here's the video, although it doesn't show the process..

 
Last edited by a moderator:
Jake - Nice Video! ya I am not sure why, but my 1/2" nipple had some wiggle room inside the coolers premanufactured hole. I will try and post some pictures of mine later so weirdboy can see what i meant about the washers
 
jakecpunut, i'm hoping you can let me know the specs of the plastic washer you put on the inside of the cooler. i just bought this cooler and like brett, i'm having a very hard time finding a SS washer that fits a 1/2" nipple. What's the brand? I'm assuming it handles heat well and all that? As much info. as you can give me would be much appreciated so I know what to look/ask for at the hardware store. Thanks!

UPDATE: Strike that, I found something that'll work. Or so it seems (held water, no leaks..but the true test will be brew day tomorrow). I had a nut from a kettle valve that screwed right on and up against the original cooler rubber.

Ya, the washers I found went on the outside of the cooler. This allowed the cpvc connector to tighten and be flush on the inside!

coolerwashers.jpg
 
well, while we're on the subject of this particular cooler, i had an unfortunate setback in my brew day today (my electric stove top started to buckle under the weight of the brew kettle while i was heating the strike water!), which has forced me to order a propane burner and put the whole brew on hold. so anyway, in order to do something productive with this doomed brew day, i figured I would test out the insulation of the cooler and see how well it maintains the temp. of the water alone. i poured the water in at 167F, and the transfer from the kettle to the cooler brought it down a few degrees. I took the temp, it was right at 164F (which is good to know for the future). I noticed after closing the lid however that there was steam escaping from the front of the cooler, where the "open handle" is. I left it alone and opened it after 1 1/2 hrs. and the temp is now at 155F. So, I'm brand new at this, but would you say this an excessive loss of heat? Do you guys normally see steam escaping out of the closed lid directly after pouring in the water?? B/c it just doesn't seem right to me. Perhaps the addition of the grains actually helps to insulate the heat??
 
well, while we're on the subject of this particular cooler, i had an unfortunate setback in my brew day today (my electric stove top started to buckle under the weight of the brew kettle while i was heating the strike water!), which has forced me to order a propane burner and put the whole brew on hold. so anyway, in order to do something productive with this doomed brew day, i figured I would test out the insulation of the cooler and see how well it maintains the temp. of the water alone. i poured the water in at 167F, and the transfer from the kettle to the cooler brought it down a few degrees. I took the temp, it was right at 164F (which is good to know for the future). I noticed after closing the lid however that there was steam escaping from the front of the cooler, where the "open handle" is. I left it alone and opened it after 1 1/2 hrs. and the temp is now at 155F. So, I'm brand new at this, but would you say this an excessive loss of heat? Do you guys normally see steam escaping out of the closed lid directly after pouring in the water?? B/c it just doesn't seem right to me. Perhaps the addition of the grains actually helps to insulate the heat??

I don't think I see steam. The cooler will loose a decent amount from heating up. I put the water in around the 195 range, close the lid and let it sit for at least 5 minutes. This allows the cooler to warm up. Then open it up and it is usually in the 170s or low 180s, I then stir until the temp gets down to strike, add the grains and stir some more. With this method, I set the thermal loss of strike water calculators to 0. Think my last brew grain bill was like 9.25 lbs and had 2.75 gallons of water. Strike was 167 for a 154 mash temp. Works well, however you have to stir for a good amount before the temps are stabilized. Put a blanket over top of it and it will lose less heat, like maybe a degree or so in an our. Hope this helps!
 
brettwasbtd, can you post a picture of your fitting from the inside? I'm dealing with this exact issue right now and that's what's holding me up...
 
brettwasbtd, can you post a picture of your fitting from the inside? I'm dealing with this exact issue right now and that's what's holding me up...

I can try and get you an exact picture tonight, but I used the rubber grommet or whatever its called from the cooler itself, and slid the nipple through it. Then I used the CPVC fitting below and just tightened it real well. Originally, with the fitting fully tightened it was still a little loose, thats why I added the Washers on the outside to bridge the gap! In hindsight I would have just bought a shorter nipple. Let me know if you still want the other pic.

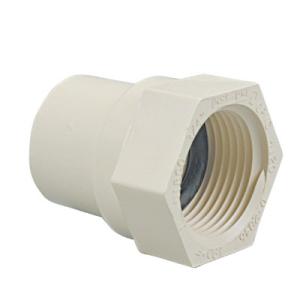
CPVC 1/2" thread to 1/2" CPVC piping
17958d1237906103-male-brass-female-cpvc-threaded-connections-53010963-670b-403d-9602-30fb40615c8b_300.jpg
 
Thanks for the info man... I'm using a similar fitting on the inside that is a cpvc/brass converter (threads are brass, round end is cpvc). The fitting is actually pushing the grommet/gasket into the hole in the cooler when it gets tightened... I think the fitting is too small for the factory drilled hole.

I've discovered that there is a Fastenal less than a mile from my house, so I'll be going there to pick up a s/s washer (or 10) this week.

My next problem is going to be that the factory drilled hole is so close to the bottom of the cooler that the washer is going to have to be fairly narrow. May have to take the grinder to the bottom of it.

Luckily I still have one more extract kit to get out of the way before I launch into A/G, and an immersion chiller to build.

If for nothing else, homebrewing has become an excuse to stock up on tools!

You get your mash tun figured out and brew up an AG batch?
 
I did! I picked up a Stainless washer from a Fastenal, and then ground it down:
washer.JPG

groundwasher.JPG


The washer was far too wide to fit between the fitting and the bottom of the cooler, thus keeping it from tightening, and fitting properly. Now I've got a perfect seal that doesn't drip a drop!

I think I've got AG batch #'s 3 & 4 in the fermenters right now... plenty more to come. I feel that now that I've geared up it's time to expand my knowledge. Hop varieties, grain types, etc... I'm jealous of people who know what a beer is going to taste like from reading a recipe. I'll get there though.

Next on the list is a sour raspberry beer...

Awesome man! I too want to get to that stage where I can tell what its going to taste like. I have started chewing some of my grain from each batch prior to mashing, not sure how much I am learning by dong this, but it makes me feel cool!
 
There you go encouraging me to get another piece of gear... a grain mill.

Currently, I just have the LHBS mill the grain for me (they've got a great mill and I get great efficiency from their milling). Not wanting to be a dick, I just let them mill it all in one large batch. Maybe if I mill my own, I won't feel as bad asking them to separate a few ounces of specialty grain ;)

Then there's a plate chiller, a second burner, a three tier wooden brew stand...

Gotta remind myself to make beer between brewing gear projects, lol.
 

Latest posts

Back
Top