iijakii
Well-Known Member
Do you guys know of any way to insulate a pot in a blingy-fashion? The reflectix stuff is a bit of an eyesore if you have the stuff to go with some flashy stainless-steel connections etc.
Damn 120v
Damn 120v


How do you like jays false bottom over the braid?
All-in-all I am loving the system. I wasn't happy with the boil vigor as my 7 gal boil kettle is wide and short. I have 240 available in my brew area, so I swapped out my 120v 2000w element for a 240v 4500w element. Now I can get the total volume of water from 50F to 170F in around 15 minutes, and I can boil 6 gals of wort vigorously at 60% on the PID.
jkarp said:I'm in the same dilemma tonight, shopping for a new brew kettle. I'm tempted to go bigger, and I can easily run 240, but I know I'll never do more than a 4 gallon batch. Even though I've never brewed out of the kitchen, I still like the idea that I could brew anywhere I could get a 120V 20A outlet. Quality 28-30 qt pots are scarce and cost just as much as 36 qt ones...

Float switch?
IrregularPulse said:Finally I have my control box finished. Tonight I get to make my cable for my float switch and then I am ready for autotuning the PID and calling the system ready (I think, I probably forgot something else). Here's the left side of my control box showing the element switch/outlet combo and my thermocouple and float switch disconnects.

Thanks JKarp! also, looking at the upgrades you made, did you go with a longer TC on that new tee fitting or are you still using a 4"?


Jeff,
Thanks for the guide and personal attention to this long-running thread. I know you posted a "typical" brew day in a post many moons ago, but could you give a couple of recipe examples and walk through the process step-by-step? Folks new to brewing (like myself) would benefit, especially as we learn how to scale 5 gallon recipes down to 3 or 3.5 gallons.
I was inspired to put a system together based on your design and am very happy with it so far, but have only used it twice (once for an extract recipe and once for an all grain recipe). The latter was a challenge because I jumped the gun and bought the ingredients for a 5 gallon recipe (milled and mixed at the local store), so couldn't easily cut it down. Worked out pretty well anyway, I just had to add water as the boil proceeded to avoid over-filling my boiler/kettle.
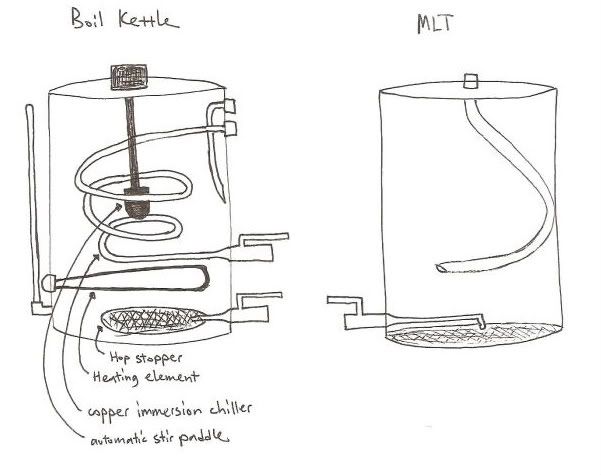
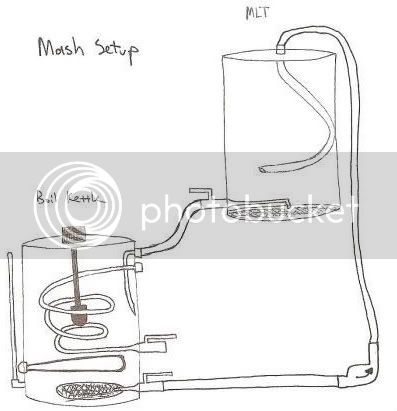
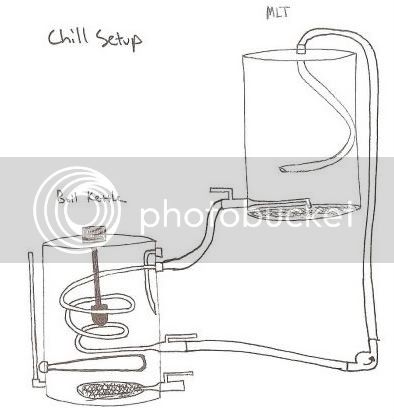
Here are a few picks of my system:
More recently I've reconfigured my kettle valve with a "T" so I could get the PID temp reading direct from the flow.
It's just a switch that floats with liquid level. When the level is high enough it closes the switch. I wired it in series with the +lead going from the PID to the SSR. So if the PID sends the signal to the SSR to turn the element on, but the water level is below the element, it won't be able to turn the element on and burn it up in open air.
I bought this one.
So do you screw the RTD into the T now instead of the sightglass, or am I misunderstanding something?
I'm curious, since this is my first time using a pump, what the typical flow rate is that folks are getting in chill mode assuming a build almost identical to the original....
). That was with a pump-in-a-bucket (piab) like jk posted, but then I added a bypass valve for non-chilling transfers and that helped speed things up (other than chilling).I posted about 2 yrs ago that I was getting ~1gpm during chilling (I haven't been concerned enough since then to measure the flow rate
I've found that the ~1gpm can be too fast sometimes for chilling, but overall, the piab w/bypass works great.
Can anyone provide a more complete parts list? I really want to build this, but I am unsure as to whether the nipples are 3/8x1/2 or 3/8x1/4?? Same story on the barbs, tees, etc.
HarkinBanks is right. I had lots of 3/8 bits about in junk bins. The only 1/2 stuff in mine is from the kettle to the pump input.
dragonlor20 said:Where you connected your silicone tubing to your cfc, did you clamp the tubing down on top of the 3/8s copper or is it clamped onto a 1/2 in coupling?
Output of pump has a 1/2 female to 3/8 barb. From there it's 3/8 silicone tubing to the 3/8 copper.
Enter your email address to join:
