Electric brewery plans - need help

Homebrew Talk - Beer, Wine, Mead, & Cider Brewing Discussion Forum

Help Support Homebrew Talk - Beer, Wine, Mead, & Cider Brewing Discussion Forum:

This site may earn a commission from merchant affiliate links, including eBay, Amazon, and others.
Hello, love this forum! Great ideas and great people.

I have a question... In this link (http://www.wortomatic.com/articles/Baltobrewer's-Electric-Stand) the guy uses a CFC as both a HERMS and a chiller. I wondered why more people don't do this? I mean, a CFC is just a heat exchanger right... Instead of just cooling my wort when I'm done, I want to keep it hot or hotter while I'm brewing . Is it sanitation reasons? What do you guys think?

Also I know SS is better than copper but its a PiTA to bend to your will unless you buy it pre-made ($$$$) or have tools to make it so. Just wondering benefits to either.

I'm planning to build my ebrewery soon and have begun buying parts here and there as I go along.

Thanks again!
D
 
PacificNWBrewer said:
the guy uses a CFC as both a HERMS and a chiller. I wondered why more people don't do this? I mean, a CFC is just a heat exchanger right... Instead of just cooling my wort when I'm done, I want to keep it hot or hotter while I'm brewing . Is it sanitation reasons? What do you guys think?

Also I know SS is better than copper but its a PiTA to bend to your will unless you buy it pre-made ($$$$) or have tools to make it so. Just wondering benefits to either.

I was asking this question a couple months ago. Now i am in the process of selling my immersion chillers. I had one as a prechiller in icewater and the other in the beer. Once i finished building my e-brewery, i tested out the herms. Basically, at some point during the boil, i hook up the hoses and sanitize a pump and the herms by pumping boiling wort through it and back into the boil keggle. After the boil, i fill my hlt with about 10gal of cold tap water and start the pump. As the pump runs, the 64 degree hlt and the bk start to even out. When it starts to feel like the temp is taking longer to adjust, i start draining a bucket of hot water out of the hlt and replacing it with a bucket of cold. After doing this about 3-4 times, the boil keggle is down to about 120 degrees. I fill up the hlt with cold water and then empty my icemaker into the bucket and dump it in the hlt. I then take the herms output coil hose into the carboy and slow the flow to a trickle. Beer comes out at about 80 degrees. By the time i fill two carboys and get them set up with a blanket and blowoff tubes, i am ready to pitch.

Making a herms from ss coil was the hardest part of the brewery. If you want a more informative rant, just pm me and i'll share whatever advice I can.
 
Just read this thread P1, P20 onwards. Great build! Can you step me through your post-brew CIP process.?

Thanks!
 
Just read this thread P1, P20 onwards. Great build!
Thanks!


Can you step me through your post-brew CIP process.?

Thanks!

Sure! I top off the HLT with more water after the sparge, and heat to about 170 during the boil. Once the boil is done I'll rinse the kettle and scrub any heavy debris out of it via the bottom dump valve. Then I take that hot water from the HLT and add PBW, then pump that mixture through all the valves, both pumps, the kettle, and the chiller. Empty, rinse with cold water, then pump cold water through the same route that I pumped the hot PBW water.

Lately I've been doing the CIP just prior to brew day, or the morning of. That way I know there isn't anything crawling, growing, or rotting in any of the equipment before I start to brew.
 
...Then I take that hot water from the HLT and add PBW, then pump that mixture through all the valves, both pumps, the kettle, and the chiller. Empty, rinse with cold water, then pump cold water through the same route that I pumped the hot PBW water.

Sounds easy enough, anything that's difficult to clean or something you'd add to make it easier? Brewing is cleaning I always say, so anything that can make cleaning easier, makes brewing easier.

...Lately I've been doing the CIP just prior to brew day, or the morning of. That way I know there isn't anything crawling, growing, or rotting in any of the equipment before I start to brew.

Good idea. In the breweries and bev plants I have worked in, they CIP at the end of the day and leave the lines full of sanitizer till the next AM.

You've given me some great ideas for my build, I'm still collecting parts and I'll be sure to start a build thread when its time. Thanks TB.
 
So I decided to not buy/use an immersion chiller and instead is my HERMS to both heat and cool. During mashing the HERMS holds the temp I want. When mashing is finished, I run sparge water through it into the MLT to help clear out all the good liquid. After its transferred to the BK and I've started boiling, I run hot PBW throught the HERMS do about 10-15 minutes then rinse completely with fresh hot water. I save the PBW water for later. Ill even run sanitizer through it for a bit just to be sure its sterile. At the end of boil, i dump 3 bags of ice into my HLT with a small amount of water and recirculate the boiling wort though the coil to cool it. When the ice melts, wort is about 100-120 and I dumb the HLT water into my MT (use to help clean that later) and dump 3 more bags of ice over the coils. This gets me down to 70 and it only takes 5-7 minutes from flameout to fermenter. Works amazingly fast!!! At 70, I start adding o2 and it goes into the fermenter. Done and done.

That k you for the advice! It works very well!
 
Sounds easy enough, anything that's difficult to clean or something you'd add to make it easier? Brewing is cleaning I always say, so anything that can make cleaning easier, makes brewing easier.
The most difficult to clean by far is the kettle. I just use hot water and a 3M pad to get the majority of the gunk off, then the subsequent PBW soak tends to take care of the rest. What's left behind after that is negligible.

Good idea. In the breweries and bev plants I have worked in, they CIP at the end of the day and leave the lines full of sanitizer till the next AM.
You could do that. You'll still need to do a thorough rinse the next morning, though (assuming you're using a cleanser, not a sanitizer).

You've given me some great ideas for my build, I'm still collecting parts and I'll be sure to start a build thread when its time. Thanks TB.
Sounds good! Glad to help.

TB
 
This build is fantastic and has giving me inspiration to start my own. Thank you Tiber, P-J, Kal, and everyone else who has shared their knowledge in this thread. I will be stealing all your great ideas for my own build. :D. :mug:
 
Wow! Just discovered this thread. What a fantastic tutorial you've created. I'm now seriously considering the switch from manual propane to electric hermes.
Thanks for making this a viable option...rather than just a pipe dream.
Best regards,
Keith
 
I just found/realized a new reason want electric: I tried to brew over the weekend (my returning batch of beer) and discovered (or re-remembered) that a propane tank simply will not heat up 6 gallons of wort to a boil in a snowstorm.
 
Do you find the 4500w elements sufficient for boiling? Or do you find yourself waiting?
Did you wish you went bigger on the element or doubled them up?

I have read through this, but to clarify the primary purpose of the 240v contractors are to void running 240v through the hand switch.

If I were to have 3 elements, but only able to run/control 2 at a time.
I would need 2 PID's, 2 SSR's but then 3 Contractors with a means to switch/lock-out only 2 elements.
 
Do you find the 4500w elements sufficient for boiling? Or do you find yourself waiting?
Did you wish you went bigger on the element or doubled them up?

I think the 4500W element is adequate for the HLT and is more than adequate for the BK. I'm considering getting a 5500W element to replace the 4500W in the HLT, and moving the existing one to the BK since the element in the BK will need replacement soon. But, the two 4500W elements have been just fine for almost 3 years of operation.

I have read through this, but to clarify the primary purpose of the 240v contractors are to void running 240v through the hand switch.

Exactly right. They are there to avoid sinking that kind of current to a switch that is toggled by the operator. Another measure of safety.

If I were to have 3 elements, but only able to run/control 2 at a time.
I would need 2 PID's, 2 SSR's but then 3 Contractors with a means to switch/lock-out only 2 elements.

If you're only going to be energizing two elements at a time, you'd still only need two contactors. You could utilize a selector switch for the 120V relay circuit for the contactor, which I would recommend.

Hope this helps.
TB
 
Thanks!

It was this thread that brought me to homebrewtalk. I am making the jump from 5 gallon stove top to 10 gallon all grain and after reading this thread decided to go with your electric setup over propane. Just ordering all the parts now. I'm sure I'll have more questions in the future. Thanks for sharing your awesome setup!

That's great! I'm glad my build helped. Hope your build goes well!
 
do you think you needed the 10" deep enclosure or could you have gotten away with 6 or 8 inches deep?
 
do you think you needed the 10" deep enclosure or could you have gotten away with 6 or 8 inches deep?

You might be able to get away with 8", but unless you use all DIN components, I wouldn't go much less than that. Just a recommendation. It makes it easier to arrange and wire the components, and helps with thermal management. (My control panel is purely natural convection.)
 
Tiber, i'm still only half way through this thread, but it's awesome and it's answering so many of my own questions. Thanks for putting it together, and thanks to all the other people who are contributing as well.

edit - I answered my own question. Lol... This is a lot to wrap my head around at times...
 
kingbrew said:
do you think you needed the 10" deep enclosure or could you have gotten away with 6 or 8 inches deep?

A lot of people use 8" deep enclosures with no problem. Some people have used 6" but you really have to plan out where you put stuff on the back plate so they don't hit the switches, pids, etc. I went 8" and wouldn't go smaller
 
A lot of people use 8" deep enclosures with no problem. Some people have used 6" but you really have to plan out where you put stuff on the back plate so they don't hit the switches, pids, etc. I went 8" and wouldn't go smaller
+1 to this. 8" deep is what I used. Some of the door components are very close to the backplate components but there's room. 6" means you have to plan ahead and make sure it'll all fit before you buy the enclosure.

That said, you should always plan ahead anyway and lay everything out to make sure it'll not only fit on the inside for wiring but also work well on the outside and leave enough room for labels/tags and what not.

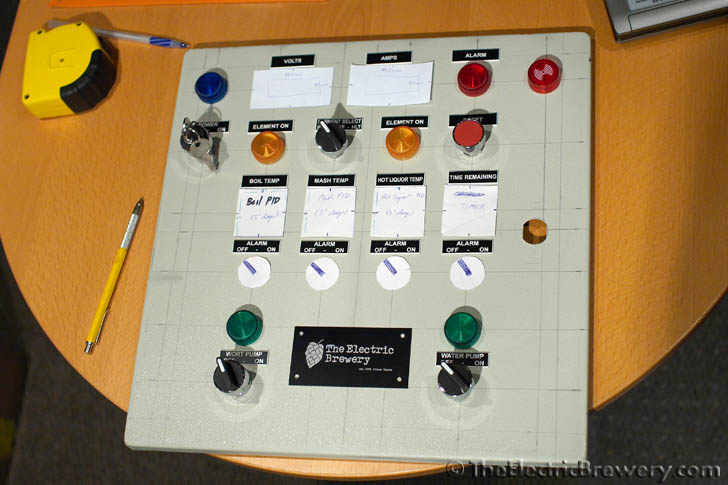
I played around a long time with my layout before finding one I liked:

IMG_0797.jpg


Don't be in a hurry. Lay things out, go through your brewday pretening to flick switches and press buttons. See how it feels.

Kal

Ayup. +1

I 3D modeled my enclosure and its components before making any cuts. I made my drawings from those models, which made it easy to CNC the holes and cutouts. I knew I had some room to work with, but I wasn't taking any chances, and I had access to the software. With a shallower box, planning is a must.

:off: just got around to listening to the BN podcast in which you were a guest, Kal. Thought you did very well for how many times you were interrupted! :mug:
 
TB,

Hey man I just wanted to let you know I finally completed my build about a week ago, and brewed on it for the first time yesterday. Still have a few kinks to work out but overall very happy, thanks for all your input and assistance. Happy Brewing!!!
 
TB,

Hey man I just wanted to let you know I finally completed my build about a week ago, and brewed on it for the first time yesterday. Still have a few kinks to work out but overall very happy, thanks for all your input and assistance. Happy Brewing!!!

Great! I'm glad I could help! You will love electric brewing.

:mug:
 
You might be able to get away with 8", but unless you use all DIN components, I wouldn't go much less than that. Just a recommendation. It makes it easier to arrange and wire the components, and helps with thermal management. (My control panel is purely natural convection.)

A lot of people use 8" deep enclosures with no problem. Some people have used 6" but you really have to plan out where you put stuff on the back plate so they don't hit the switches, pids, etc. I went 8" and wouldn't go smaller

+1 to this. 8" deep is what I used. Some of the door components are very close to the backplate components but there's room. 6" means you have to plan ahead and make sure it'll all fit before you buy the enclosure.

That said, you should always plan ahead anyway and lay everything out to make sure it'll not only fit on the inside for wiring but also work well on the outside and leave enough room for labels/tags and what not.

I played around a long time with my layout before finding one I liked:

Don't be in a hurry. Lay things out, go through your brewday pretening to flick switches and press buttons. See how it feels.

Kal


Awesome, thanks. Just wanted to be sure before I dropped $120+ on a steel box. Being a welder I thought about making one but after pricing out the steel, hinge, backplate, lock and waterproofing seal it would be about the same. I like the idea of having plenty of room and since I'm copying Timber_Brew's control box internals I'm gonna go with the Hammond EJ161410 box.
 
Hi, first, let me say that your built really inspired me. I read the entire thread :cross: , and am now ready to try to build something similar. BTW, big thanks to P-J for his easy to understand wiring diagrams.

I am now looking for and buying parts for the project. Searching for th momentary kill switch, I can't find which one is needed, since there are a lot of different ones. For instance, 600V 10A 1 N/C 1 N/O, 380V 10A 1 N/C 1 N/O, 415V 10A (you get the picture...)

Sooo, which one is needed in your particular system ?

Thanks
 
Great ! Thanks guys.

Quick question for P-J, about the small fuses. Are all the 1A fuses fast-blow or just the ones protecting the PIDs ?
 
Great ! Thanks guys.

Quick question for P-J, about the small fuses. Are all the 1A fuses fast-blow or just the ones protecting the PIDs ?
Yes. They are all fast-blow. The only time you would need to have a 'slow-blow' fuse is with an inductive load that has a higher than normal initial current draw that is close to the circuit rating.

Hope this makes sense and helps you.

P-J
 
Yes. They are all fast-blow. The only time you would need to have a 'slow-blow' fuse is with an inductive load that has a higher than normal initial current draw that is close to the circuit rating.

Hope this makes sense and helps you.

P-J

Yes it does :mug:

I might have more question along the way... Thanks again guys
 
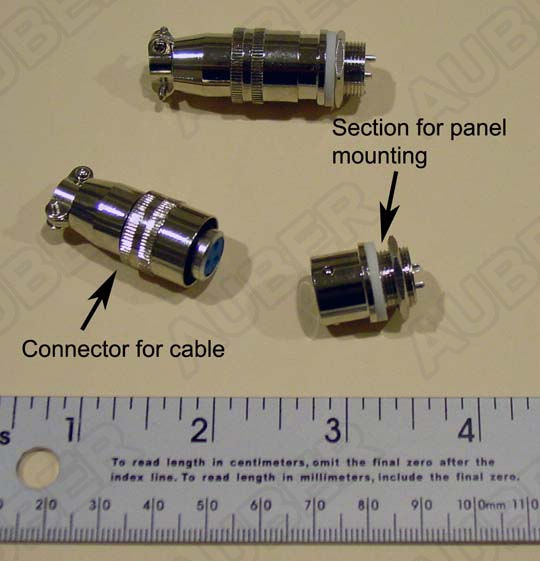
What kind of connector do you use for probe wire? I imagine that is possible put a connector that be able remove the probe wire when you finish you brew day.

Thanks,

Fabiano
 
What kind of connector do you use for probe wire? I imagine that is possible put a connector that be able remove the probe wire when you finish you brew day.

Thanks,

Fabiano

I used these panel mount connectors from Auber Instruments. It requires a steady hand to solder these, but with proper tools and some patience, it's a great connector.

RTDconnector2.jpg
 
Hi guys, still gathering the parts before I begin buiding this system.

I want to adapt it with a HERMS coil in the HLT. So what I'm wondering is do I need a third PID to read the wort temp exiting from the mash tun to the HERMS coil ? If so, how would that change the wiring diagram ?
My guess would be that the first PID reads a probe in the HLT and contols its element, the 2nd PID would read the probe placed at the output of the mash tun, without controling any element, just to know when the desired wort temp is reached, and the 3rd one to read and control the temperature of the BK.

Am I right ?
 
Hi guys, still gathering the parts before I begin buiding this system.


I want to adapt it with a HERMS coil in the HLT. So what I'm wondering is do I need a third PID to read the wort temp exiting from the mash tun to the HERMS coil ? If so, how would that change the wiring diagram ?

My guess would be that the first PID reads a probe in the HLT and contols its element, the 2nd PID would read the probe placed at the output of the mash tun, without controling any element, just to know when the desired wort temp is reached, and the 3rd one to read and control the temperature of the BK.


Am I right ?


That's how a lot of people have done it and is how the system at theelectricbrewery.com is setup. It works well.
 
Back
Top