Another Bar Build

Homebrew Talk - Beer, Wine, Mead, & Cider Brewing Discussion Forum

Help Support Homebrew Talk - Beer, Wine, Mead, & Cider Brewing Discussion Forum:

This site may earn a commission from merchant affiliate links, including eBay, Amazon, and others.

kpr121

Well-Known Member
Joined
Jul 30, 2009
Messages
3,117
Reaction score
138
Location
Pittsburgh
Hey all, first off I want to say thank you to everyone who has posted their bar builds on here. Without your help I would be lost in the water when it came to this project.

To the bar:

I bought our house a few months ago, and wanted to turn the game room into a bar/mancave area. I had two Frigidaire Mini Fridges that I wanted to incorporate. Unfortunately, I wanted the capability of putting multiple kegs, and/or full size commercial kegs under the bar. I came here and saw the threads by -TH- and others and decided I would take on the task.

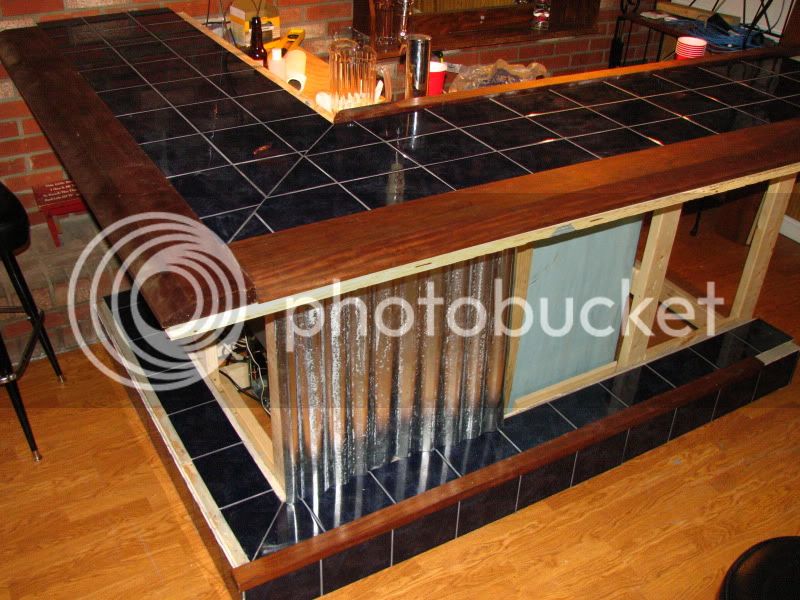
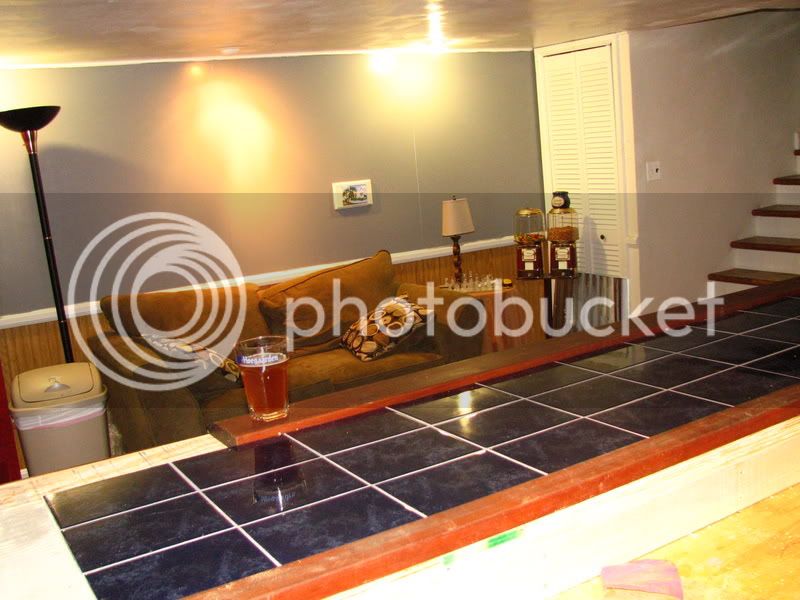
The overall bar measures approximately 7 foot long by 6 foot deep. After many nights (and days) visiting/testing various bars I decided to have the bar height set at 41 inches. All of this was SWMBO approved of course. The top bar will be blue-tiled and trimmed with epay hardwood. I havent decided what the bottom bar will be made of. Possible a simple countertop material that is easy to clean/maintain. The front and sides will be corrugated galvanized roofing material.

I took the door of the fridge, used 2 inch foam insulation board to construct the cold box, caulked and aluminum taped the whole thing to prevent air leaks, and added some FRP paneling from Lowes. I got lucky that the framing job I did for the bar gave me a good compression fitting so the cold box is essentially "stuck" to the fridge. Did some test runs with a full keg of water and some bottles and it hit 32 degrees last night. Now all I have to do is add the tap tower permanently!

Heres some pics. I didnt take any until most of the framing was up, but it should tell the story I think. If anyone has any questions or wants to see more detailed pictures, I am more than happy to help!


IMG_0958.jpg

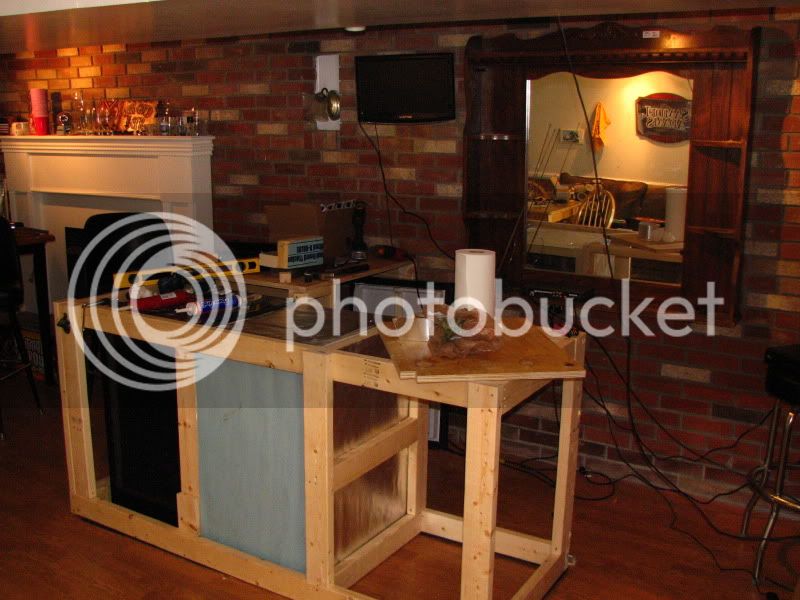
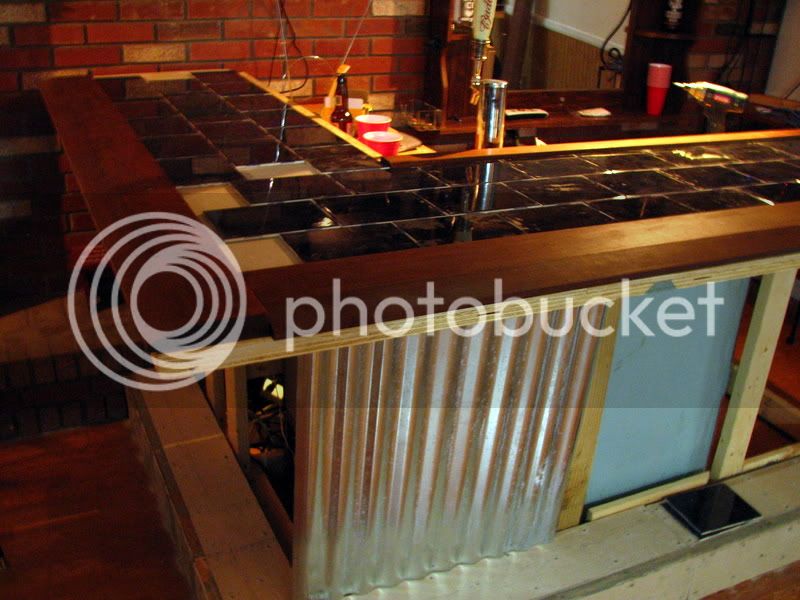
Here is most of the framing for the bottom bar complete, as well as some of the cold box.

IMG_0956.jpg

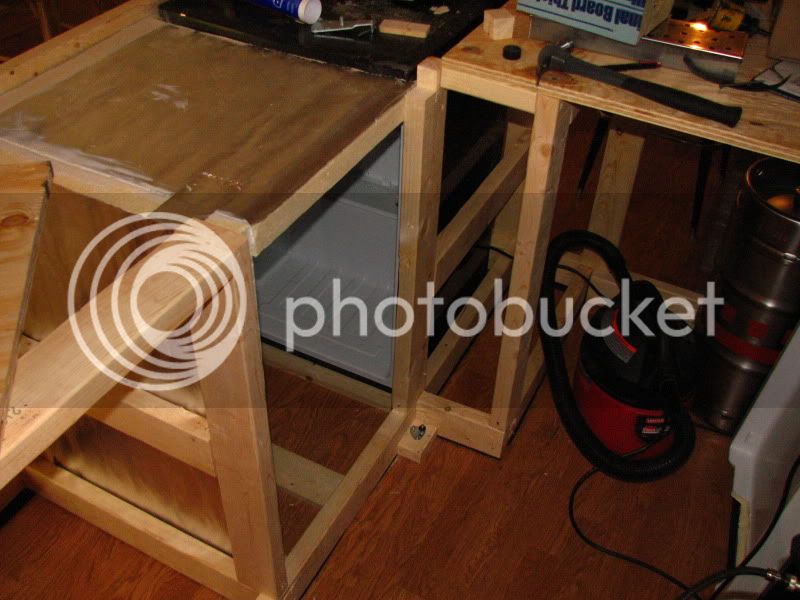
I glued all edges with titelock paneled adhesive and sealed them with 100% weatherproof silicone. The second fridge will go in the top right where the 1/4 keg is sitting.

IMG_0961.jpg

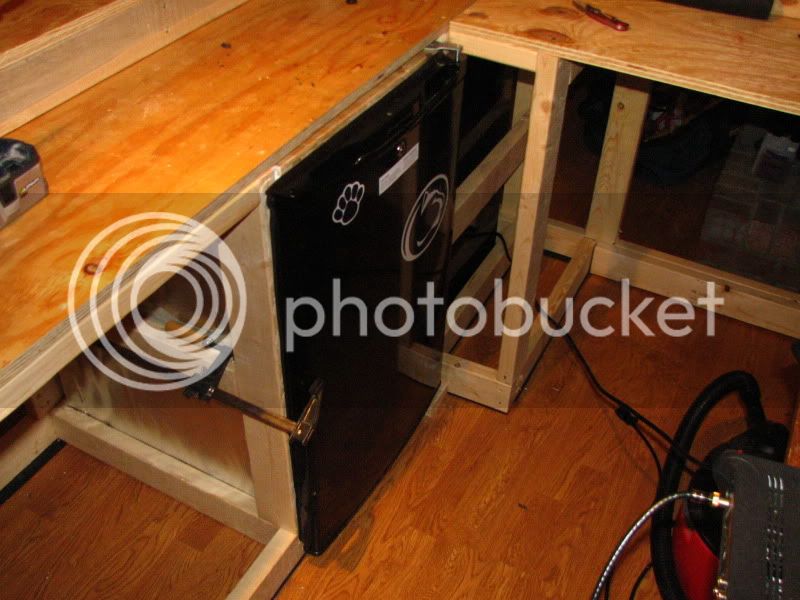
The door does not hold closed by itself. For now I am just using this wood clamp to hold it shut against some rubber foam stripping I installed along the perimeter of the door seal. I tried screwing around with sheet metal and allowing the manufacturers magnetic seal, but I couldnt get it perfect and there would be air leaks. I am thinking of some sort of latch that is simple to open and close. Does anyone have any ideas?

IMG_0962.jpg

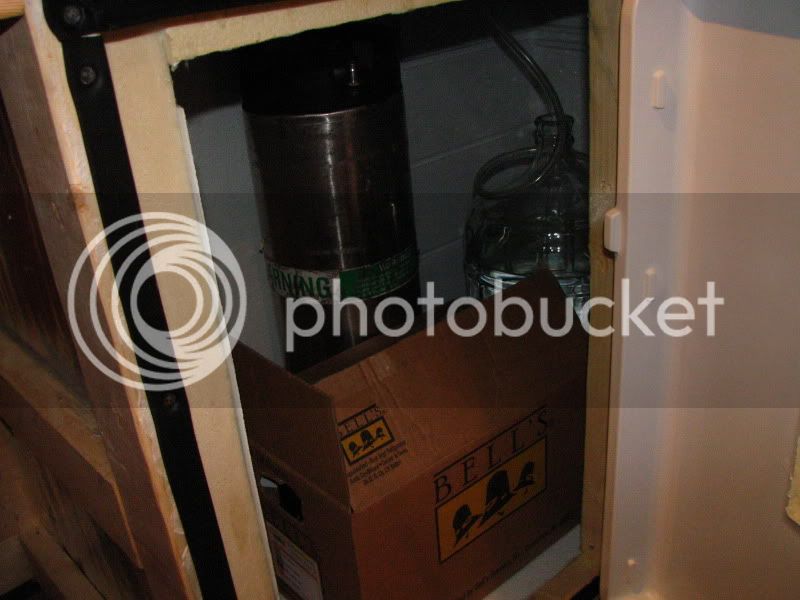
Should be able to fit up to 5-6 cornies, multiple quarterbarrels, a full keg, or some combination. Right now its holding water in my carboy, corny, and a case of bells variety that my little beer distributor down the street just got in!

IMG_0960.jpg

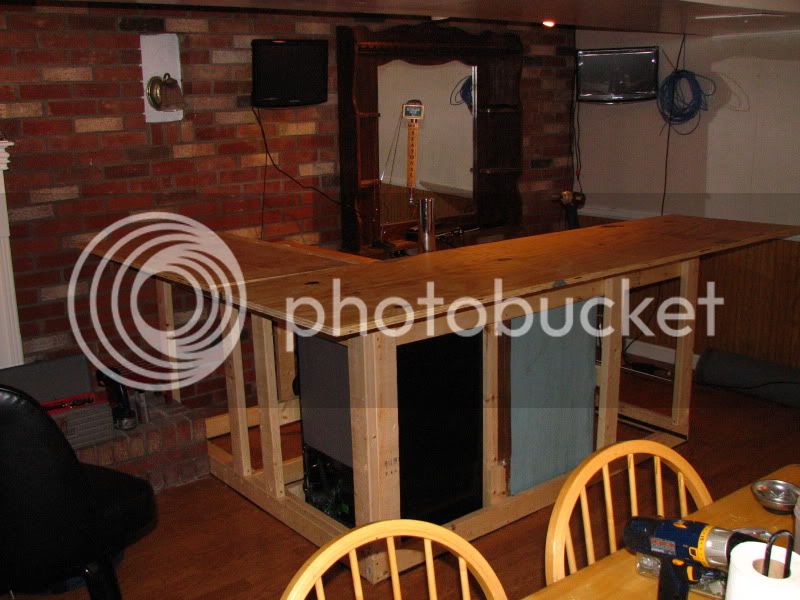
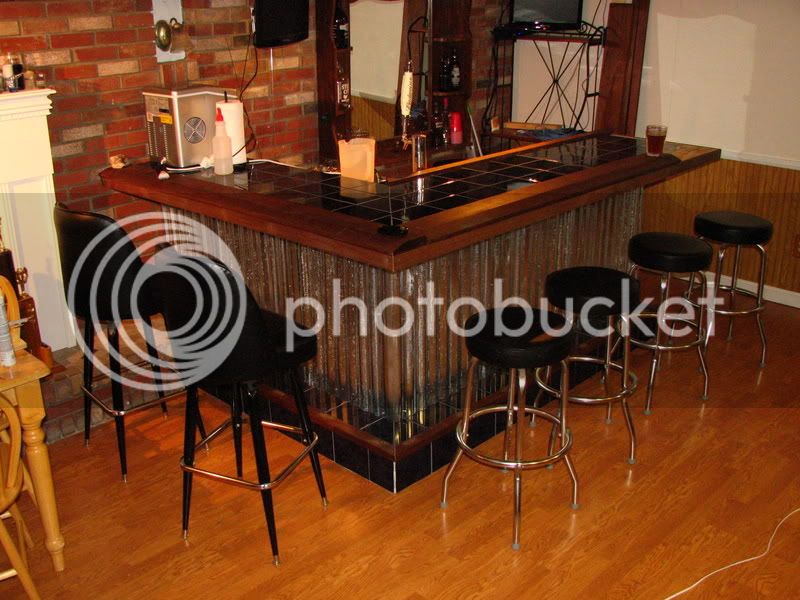
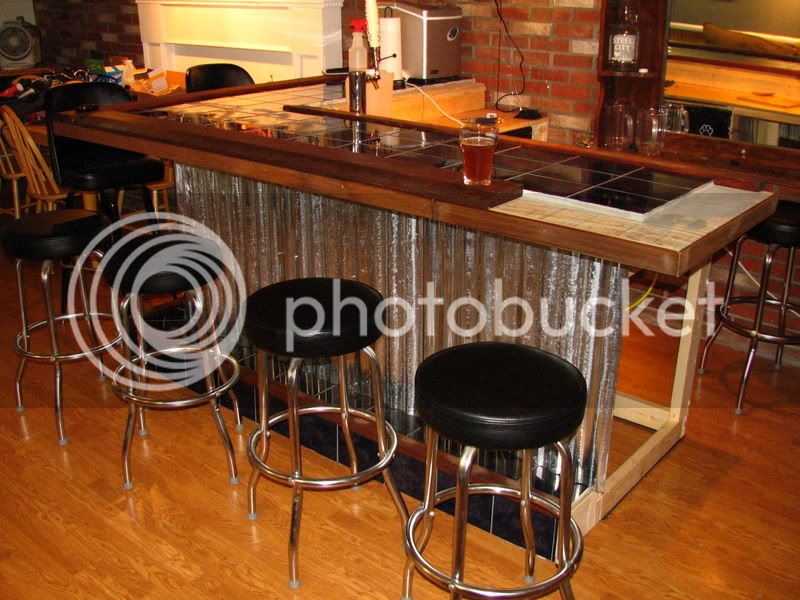
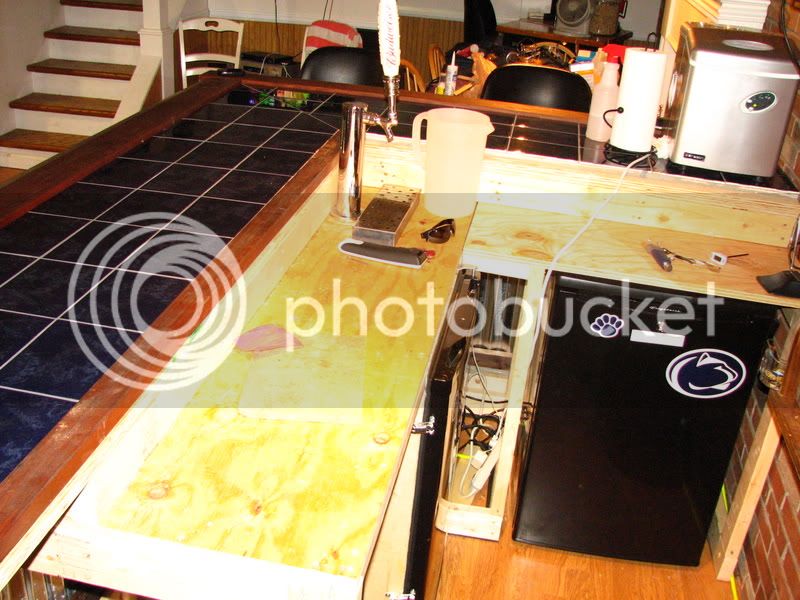
Heres an overview shot. I will try to keep taking pics as this build progresses!
 
Very nice! I really like the exposed brick. How many taps do you have planned? Leaving room for expansion?
 
do you have a way to get the fridge out once the bar is finished if you do it will run for ever if you don't it will die the day after you finish the bar.
 
I have a single tap now. I'm planning on either buying a tap extension or drilling another hole in the tower itself.

I'm not sure that the fridge is going to die. I have read the threads on here and noone has really said that they've had any real problems. If you have evidence to the cibtrary I'd be interested. Either way, there are plans to create an access panel on the left of the bar. I also installed a PC fan and AC vent at the top of the bar to push hot air out and away. Right now it's wired to run all the time, I may look into trying to tie into the compressor turnon switch to allow it to only run while the fridge is running, since it is somewhat annoying.

the fridge walls were pretty warm for a good 8 hours but I think it was just trying to get al that thermal mass down to temp. Once everything cooled down I don't think the compressor needs to run all that often. We shall see.
 
mjohnson, I will edit that post. Please edit yours so there is no evidence! I don't want to piss off the beer gods!
 
Am i correct in assuming that with a large amount of thermal mass (say 4 cornies or so) at desired temp would decrease the amount of hardships the compressor would see? Of course this is all assuming that I have the box well insulated and sealed up...

You guys got me worried I'm gonna have to tear this bar down before it even gets completed!
 
bah, you'll probably be fine. However, if its not too late, you may just want to figure out a way to remove the fridge if need be. It doesn't need to be an easy access panel, but it would be a shame to have to completely dismantle the bar if you did need to replace it. If its already too late, well, then you may just have to cross that bridge later. RDWHAHB. It looks like its going to be a nice setup. I'm jealous.
 
how can you be certain nothing will happen to the fridge?

ever hear of murphy's law?

electrical problems? compressor problems?

that room looks good though. i like the brick!
 
So after looking at it last night, I put together somewhat of an EAP, or Emergency Action Plan.

With the removal of a few studs and bracing, I could slide out the kegerator fridge from behind the bar. I think that in the unlikely event that I have to replace it, I will be able to get away with having this framing removed temporarily.

Lets hope that I dont have to cross that path for a longgg time.

The compressor is kicking on and off quite a bit lately (in part due to the hot weather weve had). I put a large bowl of ice in there yesterday morning just to see if it would affect it all. It seemed to have been running a little less, and the ice is still relatively all there, only a bit of melting with the fridge set on "3" and a pitcher of water reading 35F.

I was thinking that the air temperature has been changing and making the compressor kick on and off. I had a few ideas to combat this:

1. Add a PC fan to get better circulation throughout the entire chamber.

2. Try to find the temp sensor and submerge it into a cup/bottle of water to get a more stable reading.

3. Purchase a separate temp controller and submerge the probe in the same cup/bottle. Although I wouldnt like to spend more money, this option would allow me to easily plug the exterior PC fan so that it ran only while the compressor was on.

I'd be interested to hear everyones thoughts/ideas on my options, and if there is something I am not thinking of.
 
Before I start making drastic changes I decided to borrow my dads Kill-A-Watt to see how much this thing was really running. Someone please check my math:

Given:
-0.75 KWh in approximately 35 hours
-I noticed the KillAWatt reading 85 watts while the compressor was running
-Fridge set at approximately 3.5 (out of 5)
-Internal temp at approximately 37 deg F
-A corny keg, carboy, and 2 gallon pitcher full of 37 deg F water
-Opened fridge 4 times during the day

(0.75kWh x 1000W/kW) / 85W = 8.9 hours total run time.

(8.9 hrs x 60 min/hr) / 35 hrs = 15 min/hr.

Does this seem reasonable? I'm going to let it read for a few more days to get a more accurate reading, and then switch it over to my (non-monstrous) other fridge full of beer to get a comparison...
 
I didn't read the post yet but, I got to say. Anything involving Penn State stickers is going to be bad ass.

I graduated from there a few years ago and still love back there. We Are.......
 
PENN STATE! Just wait until you see the finished product. To say that the bar will be PSU themed is an understatement
 
Didn't realize there were so many fellow PSU Alum here at HBT!!! :rockin:

Bar is looking good so far, keep us posted!
 
So I havent been able to work on the bar as much as Id like due to 70 hr work weeks, but this weekend is promising. I already got the galvanized steel roofing material for the bar front, and an additional piece of ply is installed (liquid nails and 1 1/2 inch screws) to give the bar overhang more sturdy support (I was worried about heavy elbows deflecting the top and cracking tile/grout.) Tomorrow morning will be hardibacker and possible some tile work if I can get to it. Then Monday will be working on the rest of the tile and/or trim and armrest/footrest.

Or I'll get dragged to 4 family functions and get drunk both days... either way I hope to have a good 4th, and that everyone else does the same!
 
Got the backerboard all down. Tile day is tomorrow. Heres a pic of my rough laydown.
IMG_0964.jpg

I have a couple aesthetic questions:

As you can see, I'm going to lay the tile three deep. I'll be mitering the ipe armrest at the corner, should I do a continue this joint through the tile, or continue running it in the same pattern up the left side of the L?

I was thinking white grout (for obvious reasons), but the more I think about it, the more i'm leaning towards a neutral gray to avoid dirt and stains showing up. Does anyone have any suggestions on grout?

Any other input/ideas would be appreciated.
 
First things first....great looking bar so far.

Tough call on the tile, but I think as you have it layed out in the photo would be my preference.

In my opinion it might look odd if you sat at one side of the bar and the consistent grout line was parallel to the edge of the bar but perpendicular at the shorter end of the bar.

I'd be tempted to put the tiles as close together as possible and use the darkest grout you could get.

Again, just my opinion but I'd be afraid it would look too much like checker board with lighter grout.

Hell, do whatever you're going to like.... Even if it's not right (just kidding):mug:
 
For all it's worth...
I think I would do a herringbone pattern with the tile in the corner.
Looks great.
 
Thanks for the ideas guys.

I got the tile done this weekend, just finished grouting (sanded grey mix from Lowes).

One word of advise. Layout your tile in advance and make all your cuts. Oh, and start in the corner. Obviously I didn't, and it could have looked better. But its done. No turning back now. Here it is mocked up with the trim.

IMG_0967.jpg


Next decision is whether to use epoxy/liquid nails for the trim or to just use screws (either wood filler or leave them exposed)
 
Does anyone know how I could make the galvanized roofing look "weathered?" Im thinking like some kind of acid wash stain or something?
 
Does anyone know how I could make the galvanized roofing look "weathered?" Im thinking like some kind of acid wash stain or something?

Leave it outside for 30 years.

But in all seriousness, some heat and cold should get you going. Blow torch + cold water. heat an area, splash water on it, repeat.

At least, that's how Ive aged copper in the past.
 
A friend of mine "weatherized" siding by brushing it with vinegar and laying it outside in the sun and elements for a couple of weeks. The vinegar eats through the galvanization apparently.
 
Thanks for all the ideas guys. I messed around with the galvanized (tried to sand it, spray vinegar, and even muriatic acid).

While the acid did the best taking away the galvanized layer and exposing the raw aluminum, we (SWMBO and I) decided we liked the original finish the best. So up it went:
IMG_0970.jpg

As you can see, the majority of the wood trim is also finished. Since the only saw I have is a Ryobi Circular, I am waiting to get a chance to go to my dads to cut the armrest. My miter cuts were shaky at best with the 2 inch trim pieces, and I dont have much extra ipe to allow for screwups.

Heres a few more pics:

Different angle:
IMG_0971.jpg


Other side of room with TV mounted:
IMG_0971.jpg


Opposite side of bar:
IMG_0973.jpg


Behind the bar:
IMG_0974.jpg


Latest question is what to do with the back of the bar. We're throwing around ideas of 1. white or gray tile, 2. clear acrylic or plexiglass with lots of cool photos / bar paraphernalia underneath, 3. FRP plastic (painted?), 4. Stained 1/4" hardwood facing, or 5. Painted hardwood.

Obviously there are positives and negatives with each of these options, does anyone have any opinions?

Thanks in advance.
 
I'd drill the tower for the extra faucet.

This has been my plan, although I have been having the best pours from my picnic faucet inside the keg plus it would mostly eliminate the errant pour of my House double IPA from a BMC drinker who is either too drunk or too stupid to read that the right tap is homebrew, and the left tap is swill. I kinda like the idea that only a select few at a given party will know where the good stuff is (85% of my friends wont even smell a craft brew, believe me I've tried), plus I'm a little greedy sometimes :D
 
Looks great! You're going to want to do something to waterproof that plywood on the inside deck of the bar. As for the tile, I would have layed it in a brick pattern and turned the corner with a herringbone pattern, but overall it looks like the project is turning out well. Given the extra volume of space that refrigerator is going to be cooling I would think of a contingency plan on how to get it out and replace it if necessary. Creative though!
 
Should I waterproof the ply even if I am going to cover it with something? My plan was whatever I used (tile, acrylic, stained wood) would need to be sealed with silocone caulking and waterproofed if wood.

My contigency plan is:
A. Cry
B. Either tear the fridge out from the inside with a little framing removal or
C. Leave it in place, attempt to tear a full sized fridge or freezer's coolant system and rig it up in my now expensive cooler.
 
you can get away with putting tile on wood but I don't recommend it (I'm a contractor). what happens is the wood absorbs all the moisture out of the thinset and it doesnt bond or adhere to the wood. I've pulled stuff out where you can see the grain of the plywood in the thinset on the back of the old tile, and there's almost no residue on the wood. If anything I'd recommend priming the plywood with some exterior grade primer before putting the tile down.
 
Thanks for the reply The Broonery. If I were to go tile, I would almost certainly put down a layer of hardibacker, which I've done on the top bar, not adhere the tile directly to the plywood. I apologize if there was a misunderstanding. I always assumed that the hardi was fairly good as a water resistant barrier (I've seen it used in shower installs). But I never thought to waterproof the ply underneath. I hope you don't have to, cuz there's no getting that tile off the bar at this point in time. But I do have some time do it on the back counter (where there will inevidibly be more spills) if needed.
 
The hardibacker is a great product, but its really just a cement board that provides a firm backing for the tile and has nothing in it that could get moldy if it does get wet. The waterproofing comes from grout and caulk. If I were going to tile a countertop, I'd screw 3/4" plywood to the top of the cabinet (from underneath, inside the base cabinets - so the screws are accessible), then spread thinset on that and screw down 1/4" hardibacker on the layer of thinset, then apply the tiles with thinset, grout it, seal the grout, etc.

Your project looks great though. If I had a space for that in my house I'd definitely build something of the like.
 
Anyone else have any opinions? Right now I'm leaning towards some large off white tile with either some ipe or angle aluminum trimming it out.
 
This has been my plan, although I have been having the best pours from my picnic faucet inside the keg plus it would mostly eliminate the errant pour of my House double IPA from a BMC drinker who is either too drunk or too stupid to read that the right tap is homebrew, and the left tap is swill. I kinda like the idea that only a select few at a given party will know where the good stuff is (85% of my friends wont even smell a craft brew, believe me I've tried), plus I'm a little greedy sometimes :D

i know the feeling.
my uncle wont drink it unless its a lager for one.
For two other than coors, he will only drink shiner bock.

At least your good stuff is safe.

lol
 
i know the feeling.
my uncle wont drink it unless its a lager for one.
For two other than coors, he will only drink shiner bock.

At least your good stuff is safe.

lol

Welp I just drilled the hole for the second tower faucet. Ill try to get some pics up.

I figured that this gives me an excuse to brew extra batches. My plan is to have a lighter beer light a wit or low ABV pale ale (more girly, or , friendly) and have the higher ABV, DIPA type beer hidden away for me and the select few at parties!
 
Last edited by a moderator:
Thanks for the ideas guys.

I got the tile done this weekend, just finished grouting (sanded grey mix from Lowes).

One word of advise. Layout your tile in advance and make all your cuts. Oh, and start in the corner. Obviously I didn't, and it could have looked better. But its done. No turning back now. Here it is mocked up with the trim.

IMG_0967.jpg


Next decision is whether to use epoxy/liquid nails for the trim or to just use screws (either wood filler or leave them exposed)

Just curious, why didnt you make miter cuts in the corner here? Still a badass bar!:tank:
 
Thanks ModoBrew,

I need to get some updated pics on here ASAP! That picture was taken simply as a mock up, I didnt have access to a miter saw until last week. I assure you all cuts are mitered! The corrugated aluminum is all placed as well. I'll try to get some pics up this weekend
 
Back
Top