If you travel to the following link, there are pictures to go with the steps. It is just easier for me to upload and keep pictures there.
Step by Step: Making and Canning Sterile Starter Wort
I didn’t see a true tutorial for making and canning sterile starter wort on HBT, so after doing my own little piecing together of things, I figured I would post one to help out some others.
Obligatory warning: All pressure cookers are different, and you should consult the manual for the one you have to ensure you are using it correctly. These are instructions on how to use MINE, not YOURS. I take no responsibility for any injury that may occur by you following these instructions.
OK then…
Advantages of Canned Sterile Wort:
Sterile, so no botulism or spores of any kind live in your wort. This is important for small starters, like when using slants.
Ready to use: You can just dump it on top of some yeast and watch it do its thing.
Cost: If you switch to 2-row (since you are now doing more than 1 starter at a time) you can cut the cost by 2/3.
Disadvantages:
Can take more time, depending on previous methods.
What you will need:
That’s really it.
Step 1: Making Wort
This step should be one you are familiar with, but I will go into it anyway. You are looking to create wort that is 1.040 in OG. If you are using DME, use this calculator and mix the DME and water together. If you are using 2-row, like I am, then it’s time to mash. 2-row can save some money, and that is really the only reason to use it, since we aren’t caring at all about taste here. Anyway, the exact volumes depend on your efficiency and size, but for example sake, I am using 5lbs for 3gal. This is calculated using a 70% efficiency since I am going back to my stovetop pot, because it makes me wistful of old brewing days, and because I am only making 3gal. I use beersmith to get the exact volume.
Mash the wort as normal, I target around 152-154F just so the wort is normal and similar to most beers, but I have thought about going lower to have more fermentables. I use a 2qt/lb ratio, but you can do what you like. I also use 60min and then do a mashout at 168F. Try not to mash at above 3qt/lb, it can make it taste funny I hear. Also, anything below 1.25qt/lb could hurt efficiency.
After you are done mashing, sparge the grains however you do it, and get the total volume to your target END volume, not what the pre-boil target would be. In my case, this is 3gal. (Note: If you do not decant your starter wort then there may be an advantage to boiling the wort before doing the canning process to drive off DMS. I myself do not care what the “beer” in my starter tastes like since it goes down the drain) (Also note that hitting your OG is more important than hitting your volume because you can half fill a jar, or throw some away, no biggie.) If you need a lower OG, add water. If you need a higher one, boil the wort down.
Step 2: Filling the jars
Now that you have 3gal of hot wort in a pot, comes the part that is actually different than things you have done before. If you have a ball valve, you are on easy street. If you don’t, like I didn’t on my old system, a funnel inside the jar should be all you need. If you feel precarious about a big pot of hot wort, cool it down, no biggie.
Many places will say watch out for air bubbles or headspace. This is mostly for making sure the veggies or fruits are covered. A good practice for food, but we don’t really care. If I want to top off, I use a turkey baster (stainless steel for heat) or just pour into a measuring cup and pour from there. You can use whatever size jars you want, I use quarts.
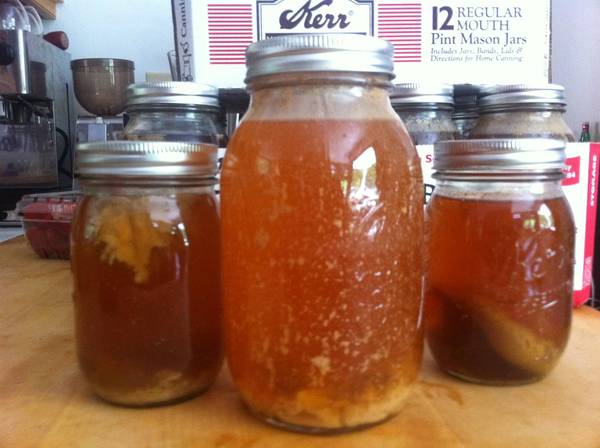
On a side note, since you have not boiled this wort, it will look a little messy in the jar, but still works great.
Step 3: Preparing jars for Canning
Tighten the caps on the jars. Prepare your pressure cooker according to the manual. Mine calls for the rack and 3qts water. Add a tablespoon or two of white vinegar to prevent water stains. Put the jars inside the pressure cooker, mine holds 7, so I need two loads.
Step 4: Canning
Can according to your manual, but here is what I do: Start the cooker on high heat until it has vented lots of steam. Add the pressure regulator and adjust heat until it hits about 15psi. Start time when it does, and go for 15min. Let your pressure cooker cool down after on its own, do not ice bath it or cool more quickly in any way. If you do, you risk breaking the jars, or the pressure cooker.
Step 5: Repeat and store
If you have more to do, repeat steps 3 & 4. If not, you are done. Store your jars wherever you want and get them starters on the stir plate!
Step by Step: Making and Canning Sterile Starter Wort
I didn’t see a true tutorial for making and canning sterile starter wort on HBT, so after doing my own little piecing together of things, I figured I would post one to help out some others.
Obligatory warning: All pressure cookers are different, and you should consult the manual for the one you have to ensure you are using it correctly. These are instructions on how to use MINE, not YOURS. I take no responsibility for any injury that may occur by you following these instructions.
OK then…
Advantages of Canned Sterile Wort:
Sterile, so no botulism or spores of any kind live in your wort. This is important for small starters, like when using slants.
Ready to use: You can just dump it on top of some yeast and watch it do its thing.
Cost: If you switch to 2-row (since you are now doing more than 1 starter at a time) you can cut the cost by 2/3.
Disadvantages:
Can take more time, depending on previous methods.
What you will need:
- Mason Jars
- A pressure cooker
- Light DME or 2-row grain
- A Mash Tun (if using 2-row)
- A ball valve on your MLT or a funnel
That’s really it.
Step 1: Making Wort
This step should be one you are familiar with, but I will go into it anyway. You are looking to create wort that is 1.040 in OG. If you are using DME, use this calculator and mix the DME and water together. If you are using 2-row, like I am, then it’s time to mash. 2-row can save some money, and that is really the only reason to use it, since we aren’t caring at all about taste here. Anyway, the exact volumes depend on your efficiency and size, but for example sake, I am using 5lbs for 3gal. This is calculated using a 70% efficiency since I am going back to my stovetop pot, because it makes me wistful of old brewing days, and because I am only making 3gal. I use beersmith to get the exact volume.
Mash the wort as normal, I target around 152-154F just so the wort is normal and similar to most beers, but I have thought about going lower to have more fermentables. I use a 2qt/lb ratio, but you can do what you like. I also use 60min and then do a mashout at 168F. Try not to mash at above 3qt/lb, it can make it taste funny I hear. Also, anything below 1.25qt/lb could hurt efficiency.
After you are done mashing, sparge the grains however you do it, and get the total volume to your target END volume, not what the pre-boil target would be. In my case, this is 3gal. (Note: If you do not decant your starter wort then there may be an advantage to boiling the wort before doing the canning process to drive off DMS. I myself do not care what the “beer” in my starter tastes like since it goes down the drain) (Also note that hitting your OG is more important than hitting your volume because you can half fill a jar, or throw some away, no biggie.) If you need a lower OG, add water. If you need a higher one, boil the wort down.
Step 2: Filling the jars
Now that you have 3gal of hot wort in a pot, comes the part that is actually different than things you have done before. If you have a ball valve, you are on easy street. If you don’t, like I didn’t on my old system, a funnel inside the jar should be all you need. If you feel precarious about a big pot of hot wort, cool it down, no biggie.
Many places will say watch out for air bubbles or headspace. This is mostly for making sure the veggies or fruits are covered. A good practice for food, but we don’t really care. If I want to top off, I use a turkey baster (stainless steel for heat) or just pour into a measuring cup and pour from there. You can use whatever size jars you want, I use quarts.
On a side note, since you have not boiled this wort, it will look a little messy in the jar, but still works great.
Step 3: Preparing jars for Canning
Tighten the caps on the jars. Prepare your pressure cooker according to the manual. Mine calls for the rack and 3qts water. Add a tablespoon or two of white vinegar to prevent water stains. Put the jars inside the pressure cooker, mine holds 7, so I need two loads.
Step 4: Canning
Can according to your manual, but here is what I do: Start the cooker on high heat until it has vented lots of steam. Add the pressure regulator and adjust heat until it hits about 15psi. Start time when it does, and go for 15min. Let your pressure cooker cool down after on its own, do not ice bath it or cool more quickly in any way. If you do, you risk breaking the jars, or the pressure cooker.
Step 5: Repeat and store
If you have more to do, repeat steps 3 & 4. If not, you are done. Store your jars wherever you want and get them starters on the stir plate!
")