Three tier Brew Rig Liquid Distribution System

Homebrew Talk - Beer, Wine, Mead, & Cider Brewing Discussion Forum

Help Support Homebrew Talk - Beer, Wine, Mead, & Cider Brewing Discussion Forum:

This site may earn a commission from merchant affiliate links, including eBay, Amazon, and others.

ClutchDude

Well-Known Member
Joined
Jan 11, 2008
Messages
417
Reaction score
5
Location
Austin, TX
Anyone who uses a three tier brew rig knows the somewhat worried idea of having 7-8 gallons of scalding liquid in the air, with only lengthy hoses to distribute.

With the propane delivery already working fine, I'm thinking that high temperature hosing beverage hosing + quick disconnects + a bunch of ball valves + 20' of 1/2" copper tubing + ton of solder & flux = a good distribution system for your liquids.

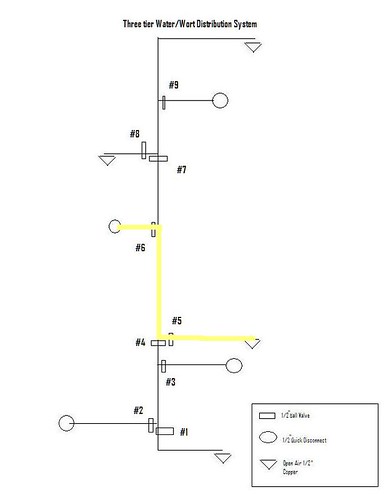
Below is a paintshop-tastic plan of the system. The black lines represent copper tubing. I'll try throwing together something more professional/user friendly tonight.

3326390028_632f547935_o.jpg


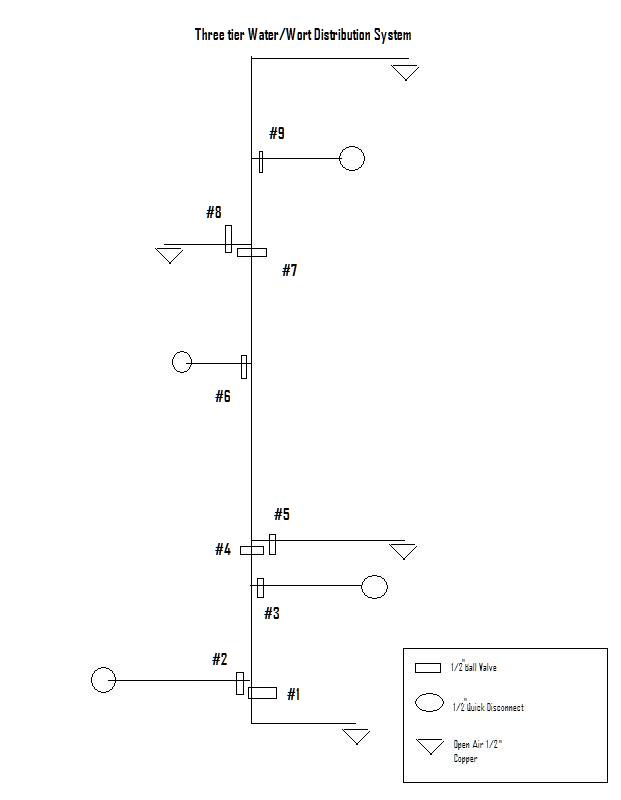
Here's the brew showplan:
Notes: A Keggle or Cooler will be under each triangle and it's ball valve hooked to the QD. To connect this to the QD, a high-temp beverage hose with proper fittings are used. I'm 99% sure I don't need a vents but someone may point out I need them.

1. Attach water source (Filtered hose water) to bottom QD.

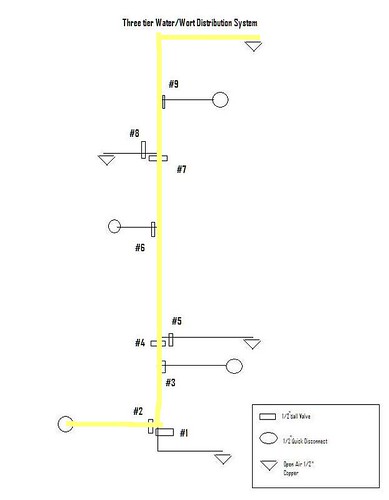
2. Filling the HLT- All valves but #2, #4 and # 7 are closed, water is forced to the very top. Fill HLT with needed water.
3326837330_341a5ef003.jpg


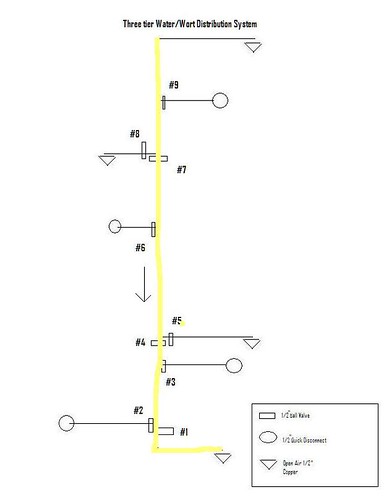
3. Disconnect water source. Open Valve #1 to drain any water in the system. Heat HLT to needed temp.
3326000337_e4b5bc0ca0.jpg


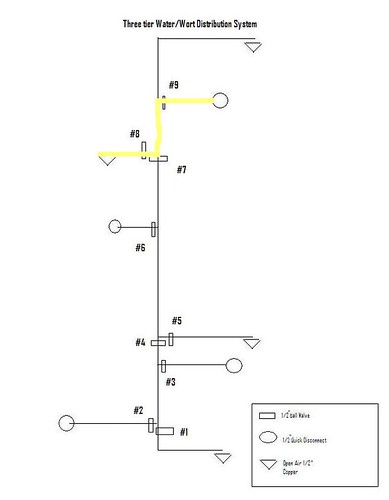
4. HLT hits needed temperature. Close #1, #2,#4, #7. Open HLT, #8, #9 to prewarm mash tun then mash grains. Close HLT when done.
3326000359_e8753ac7e6.jpg


EDIT: Add phots, so splitting post.
 
5. Mash over! Open Mash tun, #6 and #5, collecting Vorlauf (first 2 qts) to recycle, allowing rest into Kettle.
3326000371_dcd5585f0f.jpg


6a. Hopefully, you put enough water in you HLT and can simply pull your sparge water from that, at the proper temperature of course. All that's needed is to close the MLT valve and open the HLT valve, letting the sparge water flow in.
3326000359_e8753ac7e6.jpg


6b. You DIDN'T get enough water. Reconnect water source. Close #5, #6, #8, #9 and open #2, #4, #7. Sure, you MIGHT get some mash wort, but not enough to affect the sparge water. Heat water, then reverse the last opening process-close #2, #4, #7, and open #5, #6, #8, #9 . Then go to 6a.
3326837330_341a5ef003.jpg


7. Since this system is setup for batch sparge, simply repeat mash process. Open HLT valve, closing when you've got the water. Open MLT when you've sparged.
3326000371_dcd5585f0f.jpg


One last post to get the photos!
 
Last one...
8. Your runnings are collected in the kettle! Time to boil! Close all valves up.


9a. Last 5-10 minutes of boil, hook your CFC up to the bottom QD. Open valves on kettle, #3 and #2 to allow boiling wort to sanitize the system. This MIGHT be too much wort out of the keggle. Collect and return. Close Kettle valve.
3326837390_94d8d797ec.jpg


9b. As an alternative, why not just use your MLT/HLT to sanitize? Add water and star san to your HLT or MLT.
3326837330_341a5ef003.jpg


Connect your CFC to the bottom QD.
Then open the valve to whichever tun you utilized.
3326000407_a75de03306.jpg


10 Boils done! open kettle valve, allowing it to circulate through the CFC collect into your fermenter.

3326837390_94d8d797ec.jpg


11. System sanitizing time! Empty MLT and kettle when cooled. Rinse them down and then reconnect all hoses. Add star san to HLT at the very top. Close all valves but the initial ones, #2, #4 and #7. Connect your water source and fill HLT with water, mixing the star san. After disconnecting the water source, open #1 to empty the system. Close all valves.

After this, open each level of valves, first #9, #8, #7, #6. Let it sit, then open #5, #4, #3. After sitting, #2 and #1. All excess water will drain out via the bottom discharge. Keep in mind this only the SECOND TIME #1 opens.

Stuff something into the 4 open air pipes and store your tower away!

Caveats:
1. I'm not sure valves #9, #6, and #3 are even needed. With the valves already on the vessels, nothing enters the hosing. However, any liquid flowing down may fill that pipe all the way to the QD. But it should empty anyways as the pressure decreases. Then again, that's if I use the socket side here....

2. The bottom discharge could be eliminated if you had a hose with a QD fitting. One more thing to lose though...

3. Even with being sanitized, you have no way to air it out. bad stuff grows in the dark and wet. You might need to preclean the system before using or perhaps attach an air compressor to blow it clean.

4. Need to attach to tower (a concern if you don't have a beefy tower you can screw it to.)

5.The biggest problem: Can you honestly clean the copper enough to keep odd tastes from cropping up? If not, you're looking at using a LOT of high temp hosing.

6. One hose infection can affect the entire system.

Good things over current 3 hose/3 valves system.
1. upgrades to fly sparge easily.
2. No hoses can slip out, resulting in scalding, lost water, or precious wort.
3. Eyes automation, replacing valves with solenoids and temperature sensors.
4. MUCH easier to get water to HLT and to chill wort.
5. Pressures not a worry, since the three-tier already allows liquids to fall. The only pressure needed is your source water when filling the HLT.

So that's my plan. Probably over-engineered/too complex/dangerous/waste of money. I'll leave that to you guys to point out, so let me hear them.
 
What?
.....


The pics are really to small beyond the first and maybe try drawing in sketchup. I've got clue after reading that post what you're trying to do. Is it 3 seperate vessels?


ok I admit I stopped reading after step 3. Not the most user friendly instructions/diagrams.
 
What?
.....


The pics are really to small beyond the first and maybe try drawing in sketchup. I've got clue after reading that post what you're trying to do. Is it 3 seperate vessels?


ok I admit I stopped reading after step 3. Not the most user friendly instructions/diagrams.
Fixed the photo size.

Yes, it's three separate containers, in a tower configuration like bdavanza's rig. , Except a littler taller and a little more space between each level.


Imagine a Keggle under the top and the bottom triangles and a cooler under the middle.
 
Deos it really need to be so complex to gravity feed liquid? If your structure is stable, I have no problem with having vessles any where. Just me. I would get a pump to recirc and chill. Use it to pump to fermenter. Just too much thought for a simple problem. :D
 
Deos it really need to be so complex to gravity feed liquid?

Oh heavens no. The system I have now works well enough.

But what sort of brewer WOULDN'T take a chance to complicate his brew rig if only to make things more efficient or awesome?

However, if it turns out that I'm doing something stupid in this plan, I fully expect to get called out on it. It'd be better to hear y'all embarrass me or point out flaws than to suffer a tragedy on brew day.
 
But what sort of brewer WOULDN'T take a chance to complicate his brew rig if only to make things more efficient or awesome?

Well, I am all for modifying your rig, (In fact, I actually enjoy modifying my system more than brewing!! :p ).

I see what you are trying to accomplish, but I guess I'm not really seeing the benefit based on the cost, especially the ball valves. On my system I use a hose to fill the HLT, I have a copper -> cpvc drain that goes into the mash... and then a hose going to the kettle from the mlt. It's three valves + the water source, very easy to clean, and it's very simple to follow. I think if I had to do this everytime, I would find excuses not to brew: :drunk:
6b. You DIDN'T get enough water. Reconnect water source. Close #5, #6, #8, #9 and open #2, #4, #7. Sure, you MIGHT get some mash wort, but not enough to affect the sparge water. Heat water, then reverse the last opening process-close #2, #4, #7, and open #5, #6, #8, #9 . Then go to 6a.
 
The thing I'm aiming for is to have one pipe handling all of the plumbing duties of the brew process. To me, it's like a great game of pipe dream. Turning a valve takes, what, 2 seconds?

Heck, if I had the cash, I'd go the solenoid route and make it all push button, with the eventual hopes of automating even that.

I am thinking of isolating the MLT to Kettle line, removing two valves and making 6b more like flipping two switches. I'll sleep on it tonight and revise it tomorrow morning to reflect a few changes.
 
That's a lot of disconnects and valves. Why not just have the water go into the HLT, connect the HLT to the MLT, MLT to the Boil Kettle, and have a drain on the boil kettle for to the fermenter? If you want to have a CFC, then add a valve and splitter (or QD) to the water line so it can be connected to the CFC.

No offense to your setup, it just seems to be more expensive and complicated that it should be.
 
Ugh! Couldn't sleep with this bothering me.

Thank y'all for pointing out some of the ridiculousness I had come up with. It's funny what you think is a good plan turns out not to be...at all. But that's how we learn, I suppose.

I still want to have the ability to let the HLT sanitize the system and backwash the Kettle with a turn of the valve.
3327759740_7fe35229ac_o.jpg


Now, if there's no glaring defects, onto my next bad idea!
With only 5 valves, I could look into just using solenoids instead for easy valve opening. Lazy, I know, but my ultimate goal is almost full-automation.
 
If you're looking at full automation why do 3 tier? Make it easy on yourself and and do 3 vessel single tier with pumps and, Love controllers, and a control panel.
I understand the desire to design and build something "OUT THERE", but remember when it's done, you have to USE the thing. Don't design on seeing how complicated a design you can pull off, design based on what you'll enjoy using!
 
I am curious on your decision to automate a 3 tier. I have a 3 tier and it's is currently in the finishing stage of being automated.

I went 3 tier for two reasons. First, I have very little space left in my garage so every little bit helps. Second, I originally did not plan on having an automated HERMS setup at first and once I did my frame was already long since completed.

No regrets though. Maybe when I decided to move one day to a house with a basement (I'm on a slab) I will weld up a single tier with NG or electric but for now all I have is a 2' x 3' spot in the garage to park the rig and she currently fits perfect.
 
I wholeheartedly agree that a single tier would be easier for automating. No climbing ladders to set things up. No multi layer plumbing. Just have output from one tank go to the pump then to the input of another tank. Nothing's easier.

However, I really don't have a flat patch of concrete big enough to work with a single tier. There is no garage, the "guest house"(a half finished house the previous owner lost permits to finish and I'm just renting the house) we have is too enclosed to brew in and the driveway is all down hill. The yard is a little flat in some places, but getting a single tier to it would be very interesting.

I'm with TommyBoy. When I buy a house that will fit a decent workshop and brewshop, I'll weld me a single tier and never look back. That's at least a 1.5 years and a four-state move away.

On the plus side, all of the parts I buy now and put into automation can be reused when I switch to the single tier. A love controller is a love controller, regardless of what tier system it's attached to. I'm especially excited about the solenoids.
 
I am curious on your decision to automate a 3 tier. I have a 3 tier and it's is currently in the finishing stage of being automated.

Primarily, it's because I've already built a three tier. No sense in not using what you've already got!

Secondly, I want to get the kinks and other gotcha's out of the way so come time in a 2-3 years when I start having little ones around, I can get get a brewing process started and finished in a more concise manner. Not that brewing would take priority over kids.

I'm not looking for a "turn-key" operation but something I know if I need the sparge water to enter the tun in 5 minutes, I don't have to be there to flip a switch or manually turn off the burner once it's hit the temperature.

Third thing is that the more consistent your brewing process, the easier it is to spot something you are doing wrong or perhaps tweak things to end up with a different beer.

Oh, I was interested with your choice of the 3 tier, not the automation aspect. Just curious on your reasons to see how/if they differ from mine and my 3 tier.
 
Oh, I was interested with your choice of the 3 tier, not the automation aspect. Just curious on your reasons to see how/if they differ from mine and my 3 tier.

Ohhhh....well, same reasons. I didn't have enough floor space to store a 1 tier when I built it a .75 years ago and I knew I'd be moving into the place I live in now.
 
Here's a similar project using 3-way solenoid valves to automate the plumbing. I believe he's using a single tier (with pumps), but maybe it'll give you some ideas nonetheless.

Embedded Control Concepts Forum • View topic - 3 Way Solenoid Valves

Good! That gives me confidence. The three tier setup essentially replaces the need for a pump, but the valve setup is similar.

The only thing I noticed is that there was no valve between the CFC and the kettle, meaning they still manually handle the cooling process?

The valve's I'm looking at using, coming from STCValve, are 1x 2W200-3/4", 1x 2W160-3/8" and 3x 2W160-1/2".

The middle two digits are the orifice size in mm.

I'll draw a chart up when the time comes, but the 3/4" is hooked into the Kettle and will have a Viton seal that can withstand up to +248F.

Then again, someone with more experience may point out those solenoids are completely, if not dangerously, wrong for brewing applications.
 
I tested out that valve, but with the only pressure pushing it the fluid, it's flow rate was abysmal. An actuated ball valve or something with less restriction would work fine though.

Anyways, I finished up the system last night and gave it a quick test. It worked GREAT! I was able to attach the de-chlorinating filter for the water at the bottom and easily fill up the keg on the top tier. No more having to run a hose up to the HLT or worry about hoses falling out.

Good job, Good to see a working system came out of the design. I see and understand the desire to go 3 tier with limited space.
About the comment above about no valve on the CFC I would assume this was planned. With chilling you won't necesarrily be going wide open. you'll want control over beer flow and water flow to find the combo the gets you to temps in the time it takes to get to the carboy without wasting a ton of water.
 

Latest posts

Back
Top