Sub $125.00 Single Tier Brewstand

Homebrew Talk - Beer, Wine, Mead, & Cider Brewing Discussion Forum

Help Support Homebrew Talk - Beer, Wine, Mead, & Cider Brewing Discussion Forum:

This site may earn a commission from merchant affiliate links, including eBay, Amazon, and others.

aekdbbop

Well-Known Member
Joined
Sep 14, 2006
Messages
2,636
Reaction score
9
Location
Nashville, TN
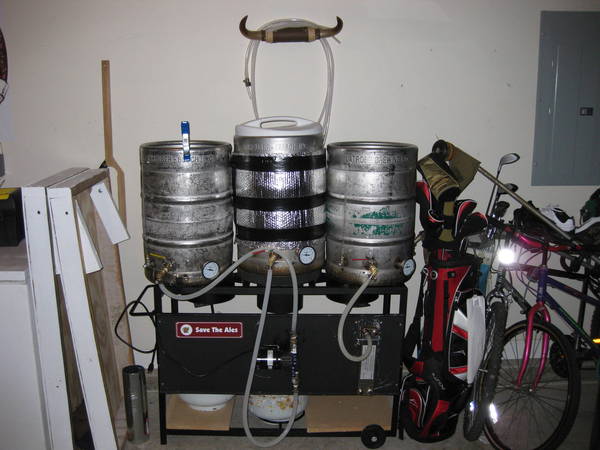
Ok, So for a while now, I have been using a two tiered system, right off the shelves of Academy Sports. I have been using a double burner stand (55k btu each, $100) and a single burner stand (160k btu, $25)

What you need:

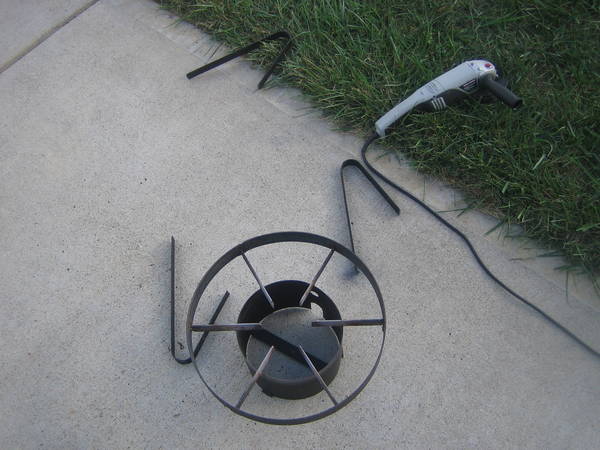
1. angle grinder with cutting disc
2. big hammer to bend a metal band
3. some heavy gauge wire
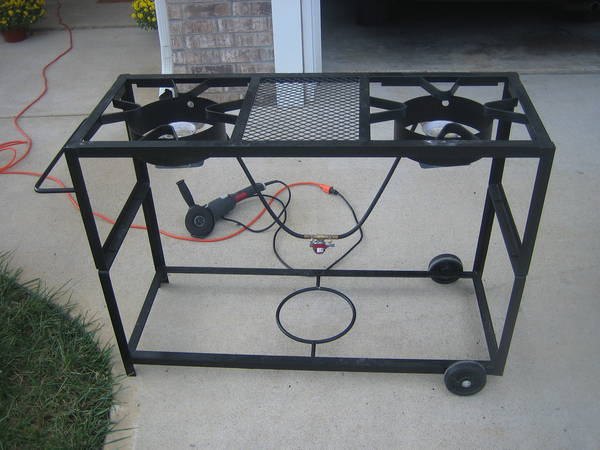
4. Double Burner Stand
Picture_0014.jpg


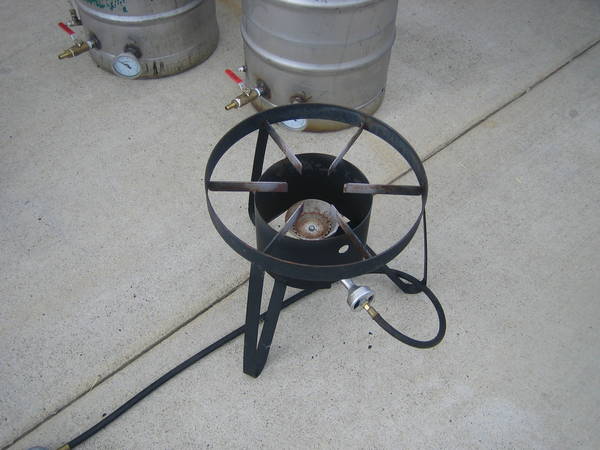
5. Single Burner (the one in the link is different then mine, make sure yours will work before you cut anything)
Picture_0025.jpg


I decided it was about time to join the ranks of the single tier brewers out there.. so heres how I did it.. it is really simple, so anyone should be able to replicate without any problems...
 
1. Take an angle grinder with cutting disc, remove the diamond mesh from the double stand.
Picture_0043.jpg


2. Use the cutting disc to remove the legs of your single burner..
Picture_0033.jpg


3. All three keggle fit just barely on the stand, but the two on either ends are a little off center after this, so we need to bend the burner support a bit, so the flame will be back on the center of the keg
Picture_007.jpg
 
4. I switched out the hi btu burner with the lower one, so the higher btus will be on my boil kettle (optional)

5. Set the single burner into the space created after removing the diamond mesh.. It should set perfectly in there...
Picture_008.jpg


6. I used some metal wire to secure the single burner to the cart... you may find an easier way..
Picture_0101.jpg


7. That's about it.. step back and enjoy!
Picture_011.jpg
 
are you sure that stand will hold all of the weight of all of the keggles filled with X amount of wort/water?
 
yep, ive jumped on it a few times, it is holing my fat ass pretty fine.. I am going to do a test run with some water first.. if it looks iffy, i will put some crossbars on it for some support.. but i think it is fine..

plus, only about 12 gallons of water (I would think) are in there at one time, cause after sparging, i take the MLT off to clean,
 
aekdbbop;893055 4. [URL="http://academysports.com/index.php?page=content&target=products/outdoors/grills/fryers&start=6&selectedSKU=0267-40037-0001" said:
Double Burner Stand[/URL]
Dead link. Great stuff though.
 
Having just built a 3 tier, I can say that 125 is a pretty impressive price. Very impressive. I might throw a couple of corner to corner braces onto that design, but overall good job.
 
I would think about adding two braces on the long side from the center of the top rails down to the bottom corners of the frame on both sides preventing any possible sag from the weight and heat of those burners acting on the top frame rails. A giant "A" frame bracing to spread the pressure onto the legs at the intersection of the bottom horizontal rails. Well you didn't go with 2"x2" by 1/4" thick box tube so you can to support a 30,000 pound bus. Even with all three keggles filled to 15 gallons plus the keggles weight, plumbing, burners, propane tank and pump your around 550 pounds max and when will all three keggles ever be filled at once with 15 gallons? Not going to happen. That added "A" bracing then you should have no worries at all plus gusseting the corners would increase the frames strength preventing twisting and flexing under heavy loads another consideration to think about. JMO's without having a bare frame that weighs 400 pounds alone.
 
Looks really nice, I would think you would need at least one pump. I'm sure you have it already. Cool and quick setup.
 
out of curiosity, what do people think about this as an option?

I'm not sure that it's sturdy enough...

For the price and what your getting that 3 burner stand allows you something to work with I would call this a good buy. It just needs a few modifications for our brewing needs to handle keg weight plus the added insulated keg width.
I like it being 3 burner but it's only 48" wide. The kegs will hang over the ends even when against each other, not a good thing. I would add some matching angle iron material and extend the frame longer allowing for the kegs even with added insulation to fit on the frame then relocating the burners to center under the kegs.
Add some bracing down lower where the leg extensions stubs end on the frame with horizontal bracing. Check to see if a "V" bracing is needed from center of this lower brace to under the top frame rail ends. I would weld tabs with a 1/4" hole a couple inches up from the ground on the legs allowing for a flat "X" cross bracing between the legs to prevent any spreading of the outward angled legs under the extra weight of filled kegs. This "X" bracing only needs to be flat stock something like 1/8" x 1" wide assembled with 1/4-20 bolts with wing nuts allowing for easy quick hand breakdown to transport or storage. JMO's on this 3 burner frame and what I woiuld do to it.
 
a little update..

here is the final product pretty much

random_006.jpg


I havent had any problems with sagging or stressing..

Someday I am going to get a larger 2 tier system built.. but this is a good starter cart!
 
If you decide "X" bracing would help, a quick & cheap way is 1/2" steel EMT conduit with the ends flattened & 1/4" bolts.....
 
it's still there search for

Outdoor Gourmet Double-Burner Fry Cart

SKU #:0014006555
Price: $129.99
 
Thanks. I'm trying to plan my move from the stovetop to AG this spring/summer. I have a 10 gallon mash tun cooler built and I'm leaning toward a stand like this versus two separate single burners or building a stand out of wood. It would require the eventual addition of a pump to get out of doing some lifting several times during the process but it looks like a good starter stand.
 
Hey, question on your brewstand, Did you add that metal panel across the front for support or just for mounting your pump and plate chiller? I'm debating doing an X brace across the back but I like the sheet metal look too. A diamond-plate liner on the bottom would look badass too.
 

Latest posts

Back
Top