My fermentation cabinet build

Homebrew Talk - Beer, Wine, Mead, & Cider Brewing Discussion Forum

Help Support Homebrew Talk - Beer, Wine, Mead, & Cider Brewing Discussion Forum:

This site may earn a commission from merchant affiliate links, including eBay, Amazon, and others.

Rhinocook

Member
Joined
Jan 15, 2014
Messages
22
Reaction score
7
Location
Victoria
Well, after many many hours of reading on here I have come up with the design for my fermentation cabinet.

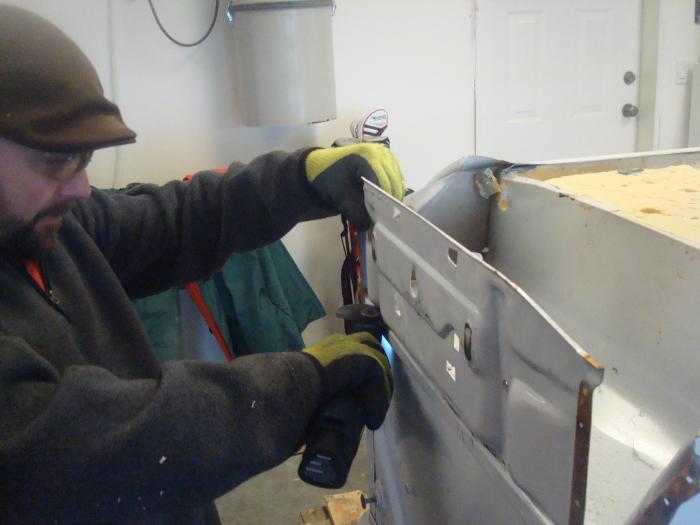
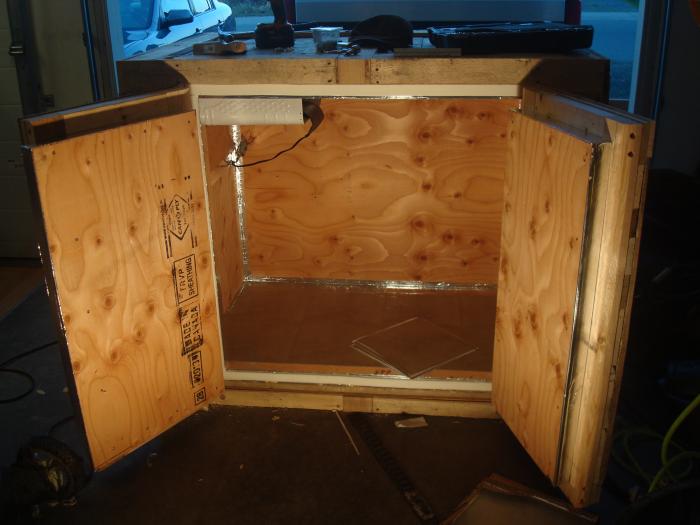
I picked up a mini fridge for $30 used and proceeded to tear out the guts. I am going to install this as it was installed in the fridge. It was a bit of a process, but nothing to tough at all. Took me about and hour. I HIGHLY RECOMMEND a dremel multi tool for this! Mine actually isn't a dremel, but whatever, you get the point. It was really slick using this tool.

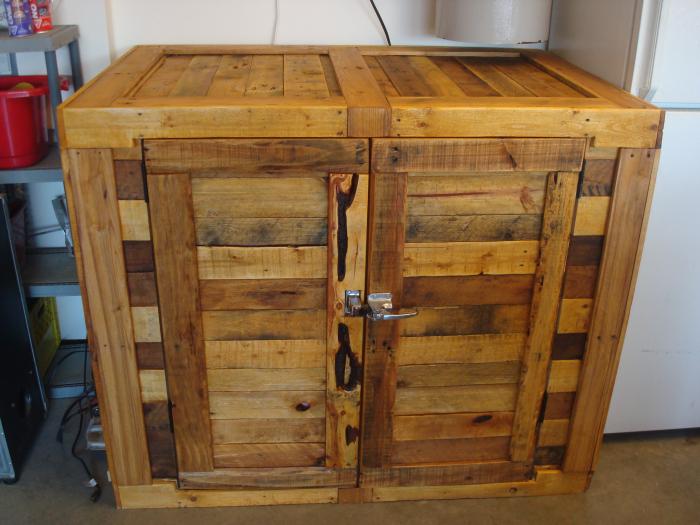
I got a bunch of free pallets and tore them apart for the outside of the cabinet.

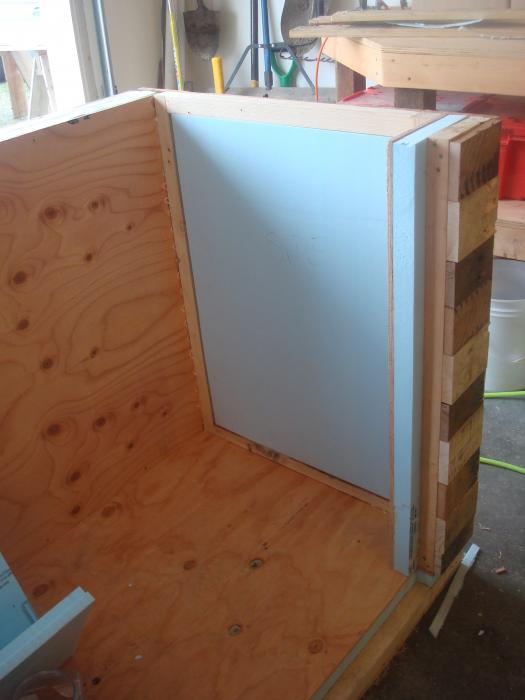
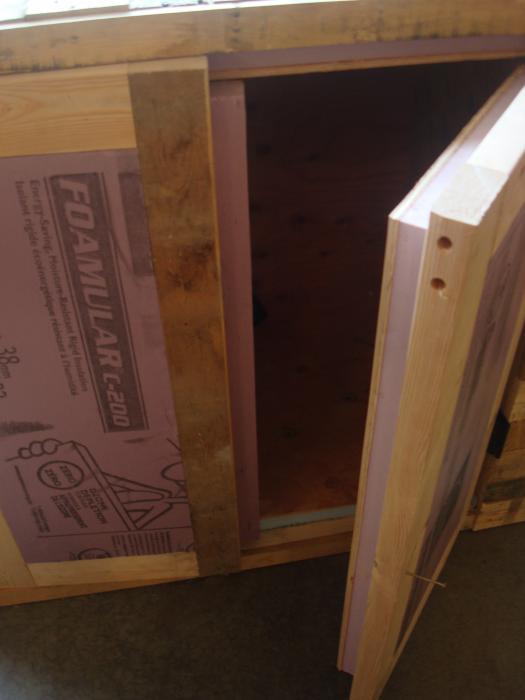
The walls, top and bottom are 3 inches of foam insulation with an R Value of 15. Then 3/8inch plywood on the inside which adds a R value of .5 and the pallets on the outside, I will say add .5, if that, as they are very rough so there are some small spaces. I would say total R value of 15.75 at the highest. 15.5 for sure.

I used 2x2 for the frames of the walls, floor and top to eliminate the wood studs breaking up the insulation. Meaning, there is solid 3inches of foam in all walls, top and bottom with only the very outside perimeter of each one being 1.5inches of solid foam.

I will be heating using a heating mat that is used under seedlings. Very similar to the Brewers Edge Space Heater from Williams Brewing, but about 1/2 the price.

Making good progress so far. Here are some pics. Would love to hear some thoughts. I will be sanding the outside and staining it with some sort of clear stain. I really want to see all the character of the old pallet wood.

More to come as the build comes along......and I actually get some beer in it!
Cheers!

006.jpg


009.jpg


014.jpg


015.jpg


017.jpg
 
Lookin good so far! love the cheap/free costed stuff!

Yeah, would love to have not bought the plywood, but couldn't do the inside with the pallet wood as it is not uniform in thickness, so I would not have been able to get a proper fit with all the sides and walls.

Looked for free insulation as well...... couldn't find it! Oh well.
 
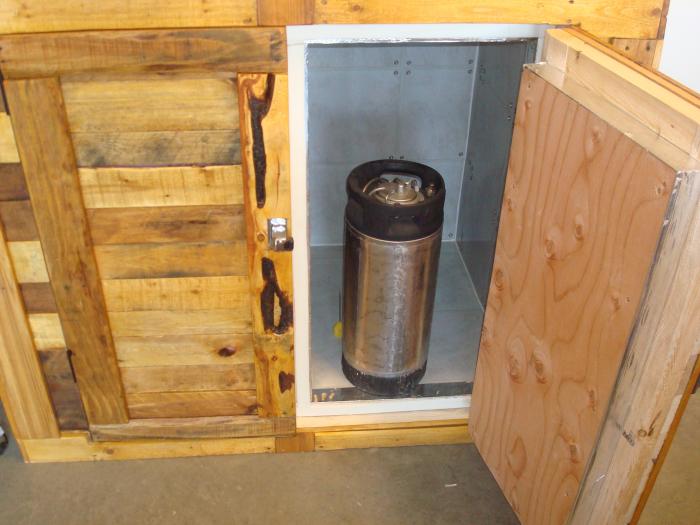
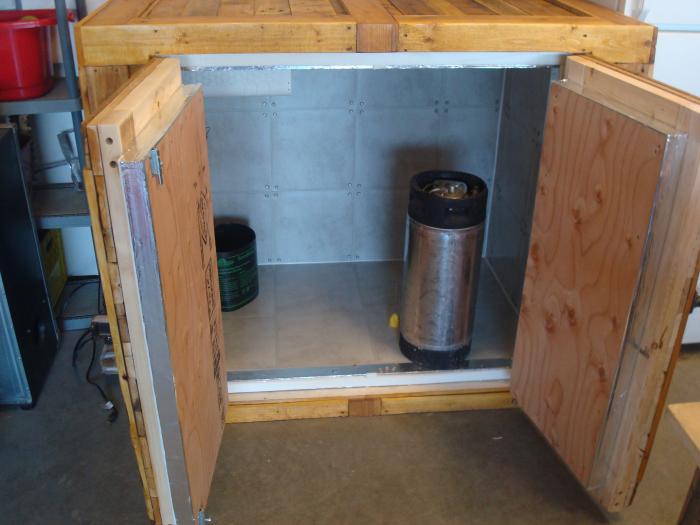
So here is the final product! Has some issues along the way, but it all seemed to work out in the end. I was going to use FRP board on the inside so that the whole inside would be washable, but I wasn't looking forward to the cost. Instead, I found a cheap box of vinyl stick tiles and used them. $16 for the whole inside! Problem is they are a bit to cheap I guess, the glue wouldn't hold on the walls and ceiling! They went on fine, but the next morning several had fallen off and others were lose. So as you can see I solved that with 1/2" screws and finishing washers.

A quick sand and a coat of stain and she is done! Can't wait to post a couple pics with some beer in it!

055.jpg


058.jpg


060.jpg


064.jpg


065.jpg
 
Hey pretty cool build. How does it do with keeping temp? Does it have any trouble keeping up with that amount of space?
 
Yeah, good question. The cooling has no problems. I actually got it down to -2 yesterday, just seeing what it could do. The heating..... well that is a problem right now. I used a seedling mat but it can't quite get it up to where I need it. I was going to get The Brewers Edge mat but decided to try this first as it is cheaper and in stock at the hardware store (the brewers edge I have to order on line). Turns out I will be getting the Brewers Edge mat. All the info and reviews on it say that it can heat a space 25 cubic feet or less up to 20degrees warmer! My cabinet is about 25.4 cubic feet. So, this should do it.

I will be controlling both heating and cooling with a Ranco 2 stage controller.
 
Very pretty. Mine won't look anywhere near as nice. LOL.

Question about your doors. I have been racking my brain on how to build the doors so that the insulation on the doors fits snugly into the insulation inside. I thought I couldn't do squared off edges because the door swings open. Your's look like flat edges.

Do you know how tightly the door foam fits into the interior foam? I need to do a 1" recess on mine and I would love for them to be no more than a felt strip apart.

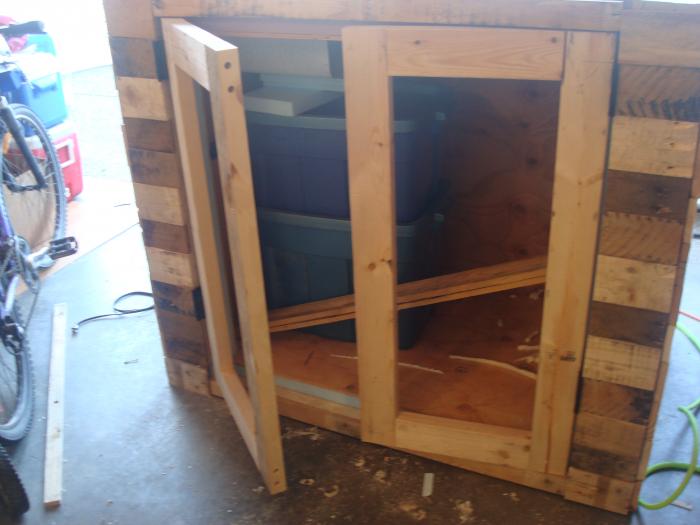
So I think I understand what you are asking. You are concerned that if you fit the doors to snug, they will not swing open due to the overlap? Mine has a 1.5" overlap all the way around and my doors were very tight. Snug to the inside foam. Once I installed the hinges and then a gasket that is about 1/16" - 1/8" think My doors didn't close! So a hand plainer and sanding and I got them to close snug! They seat very very tight, actually compressing the gasket all the way around!
I'm not a carpenter so allowing for all the variables (hinge gap, gasket and such) in my original door measurement wasn't easy. I wanted this thing to be as air tight as I could get it, so I just errored on the side of too tight, that way I could shave and sand to get the perfect fit.

All my walls and doors are 3inches of insulation. The total thickness of the doors is about 4 inches or more. So with doors this thick I did sand the leading edge that closes in the center on an angle a bit to clear the jam as it closed. But only on that one side.

I'm not sure if I answered your question here. Let me know.
 
Yeah, good question. The cooling has no problems. I actually got it down to -2 yesterday, just seeing what it could do. The heating..... well that is a problem right now. I used a seedling mat but it can't quite get it up to where I need it. I was going to get The Brewers Edge mat but decided to try this first as it is cheaper and in stock at the hardware store (the brewers edge I have to order on line). Turns out I will be getting the Brewers Edge mat. All the info and reviews on it say that it can heat a space 25 cubic feet or less up to 20degrees warmer! My cabinet is about 25.4 cubic feet. So, this should do it.


I will be controlling both heating and cooling with a Ranco 2 stage controller.


Just a suggestion for heating. I use a small $10 space heater (Home Depot, Walmart, etc.) inside of my chamber, I use the lowest heat setting and keep the fan on high to circulate the heat really well. I guarantee it could heat up that space really fast. Mine draws 10 amps or so on the high setting, I'm guessing its about half that on low. Just make sure your temp controller can handle the load.
 
I'm not sure if I answered your question here. Let me know.

Yep! Totally. So build out my doors and interior to a fit if you slid it in, then do some planing on the closing side of the door to pass that edge as it is closing.

This way I assume you are still getting some right angles to butt up against each other and seal.

I'll try it.
 
Yep! Totally. So build out my doors and interior to a fit if you slid it in, then do some planing on the closing side of the door to pass that edge as it is closing.

This way I assume you are still getting some right angles to butt up against each other and seal.

I'll try it.

yeah, just be sure to allow for the space that will be taken up by the hinges in between the door and the door frame. And if you are like me, be ready to shave and sand to make it all fit once you have actually hung the doors in the jam.

Post some pics as you go! Would love to see it.
 
First of all I LOVE the look of your chamber. I am curious how many pallets approximately it took to cover the outside. I can get them in my area for 2 bucks apiece. Need to crunch the numbers if I am better off with nice plywood.
 
First of all I LOVE the look of your chamber. I am curious how many pallets approximately it took to cover the outside. I can get them in my area for 2 bucks apiece. Need to crunch the numbers if I am better off with nice plywood.

Hey, thanks. I'm really happy with the way it turned out as well.

I actually got my pallets for free. I just called around and found a cold storage place (food distributor) that had tons and they give them away. The ones I got were pretty banged up, so I couldn't use every board, and the age of them is what really gave it the look in my opinion. I would guess I went through about 16-20 of them? LOTS of nails to pull. I would recommend this to anyone that has the time! It took quite a while to pull all the boards and nails, but since I have the time I didn't mind.

good luck! I would love to see it when you get it going!
 
Nice build, I didn't have the guts to strip my frig, wish I could have. I used the old 25 watt bulb in the paint can for the heater. I can keep a 70 degree temp in my 35 degree shop with no problem.
 
Did you try wrapping the keg with the seedling heat mat? I use the same thing for my carboys when needed and have no trouble getting to temp, also, I use the bigger heat mats, it looks like you have the 9" x 19", I use the 4 ft x 2 ft and can wrap 2 carboys in an "S" pattern.
 
Did you try wrapping the keg with the seedling heat mat? I use the same thing for my carboys when needed and have no trouble getting to temp, also, I use the bigger heat mats, it looks like you have the 9" x 19", I use the 4 ft x 2 ft and can wrap 2 carboys in an "S" pattern.

Yeah, I wanted a bigger one, but this is all the store had at the time. I have larger, hotter mat coming as of today. I want to be able to just hang it on the back wall and heat the space, but worst comes to worst I will try wrapping it around the ferment.
I'll post the results when it gets here.
 
Nice build, I didn't have the guts to strip my frig, wish I could have. I used the old 25 watt bulb in the paint can for the heater. I can keep a 70 degree temp in my 35 degree shop with no problem.

I was skeptical that the light and can set up would do the job, so I went this route. Now, hindsight being 20/20, I wish I had just built in the light bulb set up. Oh well, I'll get the temp for sure, the box is insulated like crazy so it's just finding the best/safest heat source I can. I have been reading about people using hairdriers and ceramic space heaters, but honestly, that just scares the *#&$ out of me! I wouldn't sleep at night with a set up like that! But maybe that is just me, maybe I worry to much haha
 
ok! Heating issue figure out! I ordered another seedling mat that is almost the size of the entire back wall of my cabinet! I just plugged it in and threw it in the cabinet against the back all with the cord coming out the door and closed the door as best as I could. Had the cabinet up from about 40 to 78 in half an hour. So with the wire run properly and the doors closed it should have no issues at all. Tested the insulation by unplugging it and closing the doors properly. 2.5 hours later it was 69 still. I"m thinking this is pretty good.
Once I have installed it properly I am going to hook it up the the ranco and run it to test how often it has to cycle on.
 
This is a beautiful build! I really like the look of those old pallets on the exterior.
I'm in the design phase of a cabinet build and seeing how easily you got your refrigeration unit into your cabinet is pretty inspiring. I have been planning on building a smaller cabinet that would fit into a closet and hold four six gallon carboys on two levels, so that I can have secondary fermenters high enough off the floor so that I can rack to Corneilus kegs without moving the fermenter from the cabinet. I was going to have a little nook below the lower level of carboys that I could alternately put a large playmate-type cooler or space heater that I would duct to the fermentation area of the cabinet. This way I could add dry ice to the cooler and chill the cabinet in a slightly modified "Son of Fermentation Chiller" method or just drop in a small space heater if my temperature is too low... But now you've got me thinking...

How did you mount the refrigerator compressor? Did you have to insulate the compressor pump to reduce the noise? Are you having any issues with condensation from/on the chilling unit? How has it held up over time? Have there been any issues with coolant leaking from the refrigerator parts? If you need to swap out the cooling system due to damage/leakage will it be easy to do so?

Again... That thing is both beautiful and inspiring!
 
Looks great, for heat i always recommend the Lasko MyHeat small heaters. Although im sure some would disagree, for such a large space i think it would work very well.

I realize it says 200W, which may seem like it would put out incredibly hot air but in reality the air coming out of my car vents when i turn on the heater is way more hot.

The additional built in fan is great as well, not to mention the thermal shutoff if things fail and it starts to get too hot in there.
 
This is a beautiful build! I really like the look of those old pallets on the exterior.
I'm in the design phase of a cabinet build and seeing how easily you got your refrigeration unit into your cabinet is pretty inspiring. I have been planning on building a smaller cabinet that would fit into a closet and hold four six gallon carboys on two levels, so that I can have secondary fermenters high enough off the floor so that I can rack to Corneilus kegs without moving the fermenter from the cabinet. I was going to have a little nook below the lower level of carboys that I could alternately put a large playmate-type cooler or space heater that I would duct to the fermentation area of the cabinet. This way I could add dry ice to the cooler and chill the cabinet in a slightly modified "Son of Fermentation Chiller" method or just drop in a small space heater if my temperature is too low... But now you've got me thinking...

How did you mount the refrigerator compressor? Did you have to insulate the compressor pump to reduce the noise? Are you having any issues with condensation from/on the chilling unit? How has it held up over time? Have there been any issues with coolant leaking from the refrigerator parts? If you need to swap out the cooling system due to damage/leakage will it be easy to do so?

Again... That thing is both beautiful and inspiring!

Thanks for the compliments on the build. It is still holding up strong!
Now for your questions.
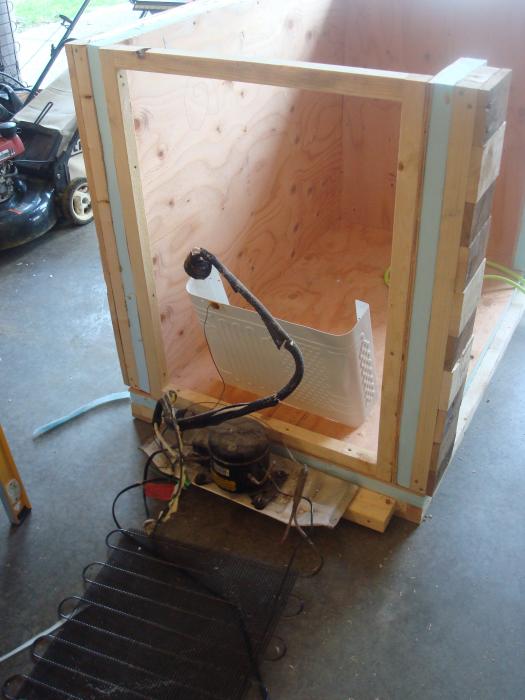
1. I actually cut off the metal pan it was mounted to under the fridge and built a bit of a ledge out the side of the cabinet, then just screwed the metal mounting pan down to this shelf. If you look back at the pictures you can see where it is sitting.
2. No problems with the noise, but it is in my garage so I'm not concerned with it.
3. When I cold crash, I do get some condensation on the cooling tray on the inside, but not enough to worry about. If I crash for a long period it will freeze on there and then I have to be careful when I turn it up again as it drips everywhere, but I just put a towel in to catch the drips.
4. It's held up great! Going strong.
5. Never any coolant leak issues and this was the hardest part. Because I'm not a refrigerator guy, I didn't want to take any part of the actual cooling system apart. And I had to be very careful not to kink or break any of the metal tubing. So I cut the entire unit all in one piece, then had to actually build AROUND the unit. H there are pictures, I think at the start of the thread that show the condensing unit out side the wall and the cooling tray hanging inside with the tubing going through the wall. I then had to build the wall around the cooling tubing. Quite a tricky thing to figure out, but once I did, it wasn't so hard.
6. To be honest, if I had to replace it, it would be tough, but possible.
Good luck! Let me know how it goes!
 

Latest posts

Back
Top