
I've been looking for ways to expand my mini-fridge capacity for more than one fermenter at a time. I was inspired by TH's build, since he was able to use the refrigerator door. Unfortunately, due to my brewing area configuration and space limitations, I had to modify his build. I had to remove and remount the door.
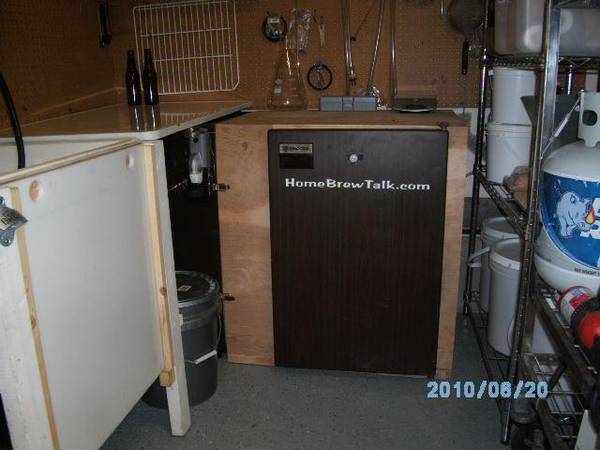
I made it big enough for at least 3 fermenters. I also made it tall enough for storing cornies as well, for bright tanks and general storage. Four cornies in there now with room for 2 fermenters as well.
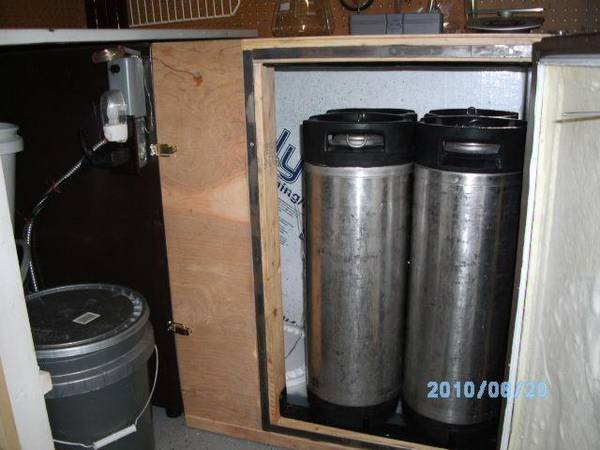
The process was to measure the opening of the mini-fridge sans door. The overall length is optional. I framed using 1" x 3" lumber. The insulation is 2" Dow polystyrene with a vapor barrier facing as well as a reflective foil facing. It's important to install the foil face out, towards the heat/cold source. I didn't glue the panels in. I found out that if you frame it with being able to insulate it in mind, you can cut your insulation to fit securely between the framing. Original plans were to use magnetic tape to secure the fridge unit to the box. That may work if everything, including the floor, was plumb, level, and square. I'm no cabinet builder, and I know my garage floor is not level, so I opted for weather stripping around the perimeter of the fridge opening and latches to pull everything tight. I was able to use the top hinge from the refrigerator, but I had to fabricate a bottom hinge with an "L" shaped metal strip with a bolt as the pin. I would have been able to use the original bottom hinge if I had planned it out better. I used a fluorescent light lens for the floor. Much cheaper than Melamine, and nearly the same thickness.

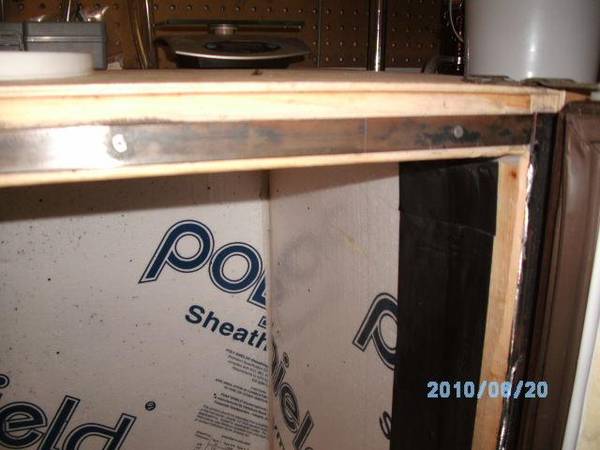
I used 3/4" X 1/8" metal strips around the new door opening for the magnetic seal of the original refrigerator door to seal to. This worked ok, except for the hinge side. When I close the door, the magnetic seal deforms somewhat, despite grinding a bevel on the new door frame and metal strip. It still seals fine, just irks me a little bit. And the sparks made a mess of the insulation.
I attached the strips using liquid nails and rivets, which were later ground flush. In retrospect, I could have foregone the rivets, as the liquid nails alone seems to hold fine, as long as you can weight the perimeter down while it cures.
I sealed the door opening with rubber butyl tape. All interior seams were caulked with exterior caulking. All significant gaps were filled with Great Stuff.
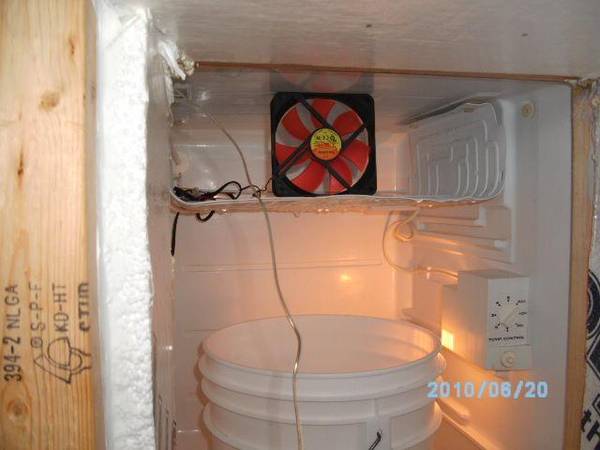
I use a Johnson Analog Controller. I wired the outlet box, for a muffin fan dc power supply, to be switched hot when the controller turns on the compressor. That way the fan only operates when the fridge is cooling. The night light is just temporary, so I can monitor the cycling times.
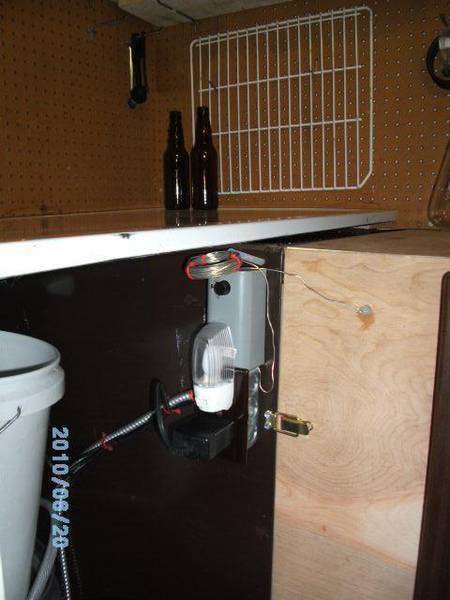
Here's the fan located in the freezer compartment. I have a lot of condensation, but I had that problem when using the mini-fridge alone. I've ordered an Eva Dry 5000, which should solve that problem. I still have to install the controller probe wire which is just dangling down now.
So far it seems to work great. Holds temperature well. Now I just have to calibrate the actual temperature of the compartment with what the dial on the controller indicates. That is one shortcoming of the analog controllers. May stain and finish it at a later date, even though it fits the decor of the garage now. Brewing tomorrow, so I'll put it through the shakedown cruise then. And the good thing about this build is I can remove the box and still use the refrigerator since it was not modified, except for removing the plastic shelving on the inside of the door.
I made it big enough for at least 3 fermenters. I also made it tall enough for storing cornies as well, for bright tanks and general storage. Four cornies in there now with room for 2 fermenters as well.
The process was to measure the opening of the mini-fridge sans door. The overall length is optional. I framed using 1" x 3" lumber. The insulation is 2" Dow polystyrene with a vapor barrier facing as well as a reflective foil facing. It's important to install the foil face out, towards the heat/cold source. I didn't glue the panels in. I found out that if you frame it with being able to insulate it in mind, you can cut your insulation to fit securely between the framing. Original plans were to use magnetic tape to secure the fridge unit to the box. That may work if everything, including the floor, was plumb, level, and square. I'm no cabinet builder, and I know my garage floor is not level, so I opted for weather stripping around the perimeter of the fridge opening and latches to pull everything tight. I was able to use the top hinge from the refrigerator, but I had to fabricate a bottom hinge with an "L" shaped metal strip with a bolt as the pin. I would have been able to use the original bottom hinge if I had planned it out better. I used a fluorescent light lens for the floor. Much cheaper than Melamine, and nearly the same thickness.
I used 3/4" X 1/8" metal strips around the new door opening for the magnetic seal of the original refrigerator door to seal to. This worked ok, except for the hinge side. When I close the door, the magnetic seal deforms somewhat, despite grinding a bevel on the new door frame and metal strip. It still seals fine, just irks me a little bit. And the sparks made a mess of the insulation.
I attached the strips using liquid nails and rivets, which were later ground flush. In retrospect, I could have foregone the rivets, as the liquid nails alone seems to hold fine, as long as you can weight the perimeter down while it cures.
I sealed the door opening with rubber butyl tape. All interior seams were caulked with exterior caulking. All significant gaps were filled with Great Stuff.
I use a Johnson Analog Controller. I wired the outlet box, for a muffin fan dc power supply, to be switched hot when the controller turns on the compressor. That way the fan only operates when the fridge is cooling. The night light is just temporary, so I can monitor the cycling times.
Here's the fan located in the freezer compartment. I have a lot of condensation, but I had that problem when using the mini-fridge alone. I've ordered an Eva Dry 5000, which should solve that problem. I still have to install the controller probe wire which is just dangling down now.
So far it seems to work great. Holds temperature well. Now I just have to calibrate the actual temperature of the compartment with what the dial on the controller indicates. That is one shortcoming of the analog controllers. May stain and finish it at a later date, even though it fits the decor of the garage now. Brewing tomorrow, so I'll put it through the shakedown cruise then. And the good thing about this build is I can remove the box and still use the refrigerator since it was not modified, except for removing the plastic shelving on the inside of the door.
