Wooden BIAB Stand

Homebrew Talk - Beer, Wine, Mead, & Cider Brewing Discussion Forum

Help Support Homebrew Talk - Beer, Wine, Mead, & Cider Brewing Discussion Forum:

This site may earn a commission from merchant affiliate links, including eBay, Amazon, and others.

JPicasso

Hackbrewer extraordinaire
HBT Supporter
Joined
Mar 21, 2007
Messages
482
Reaction score
27
Location
Arlington Heights
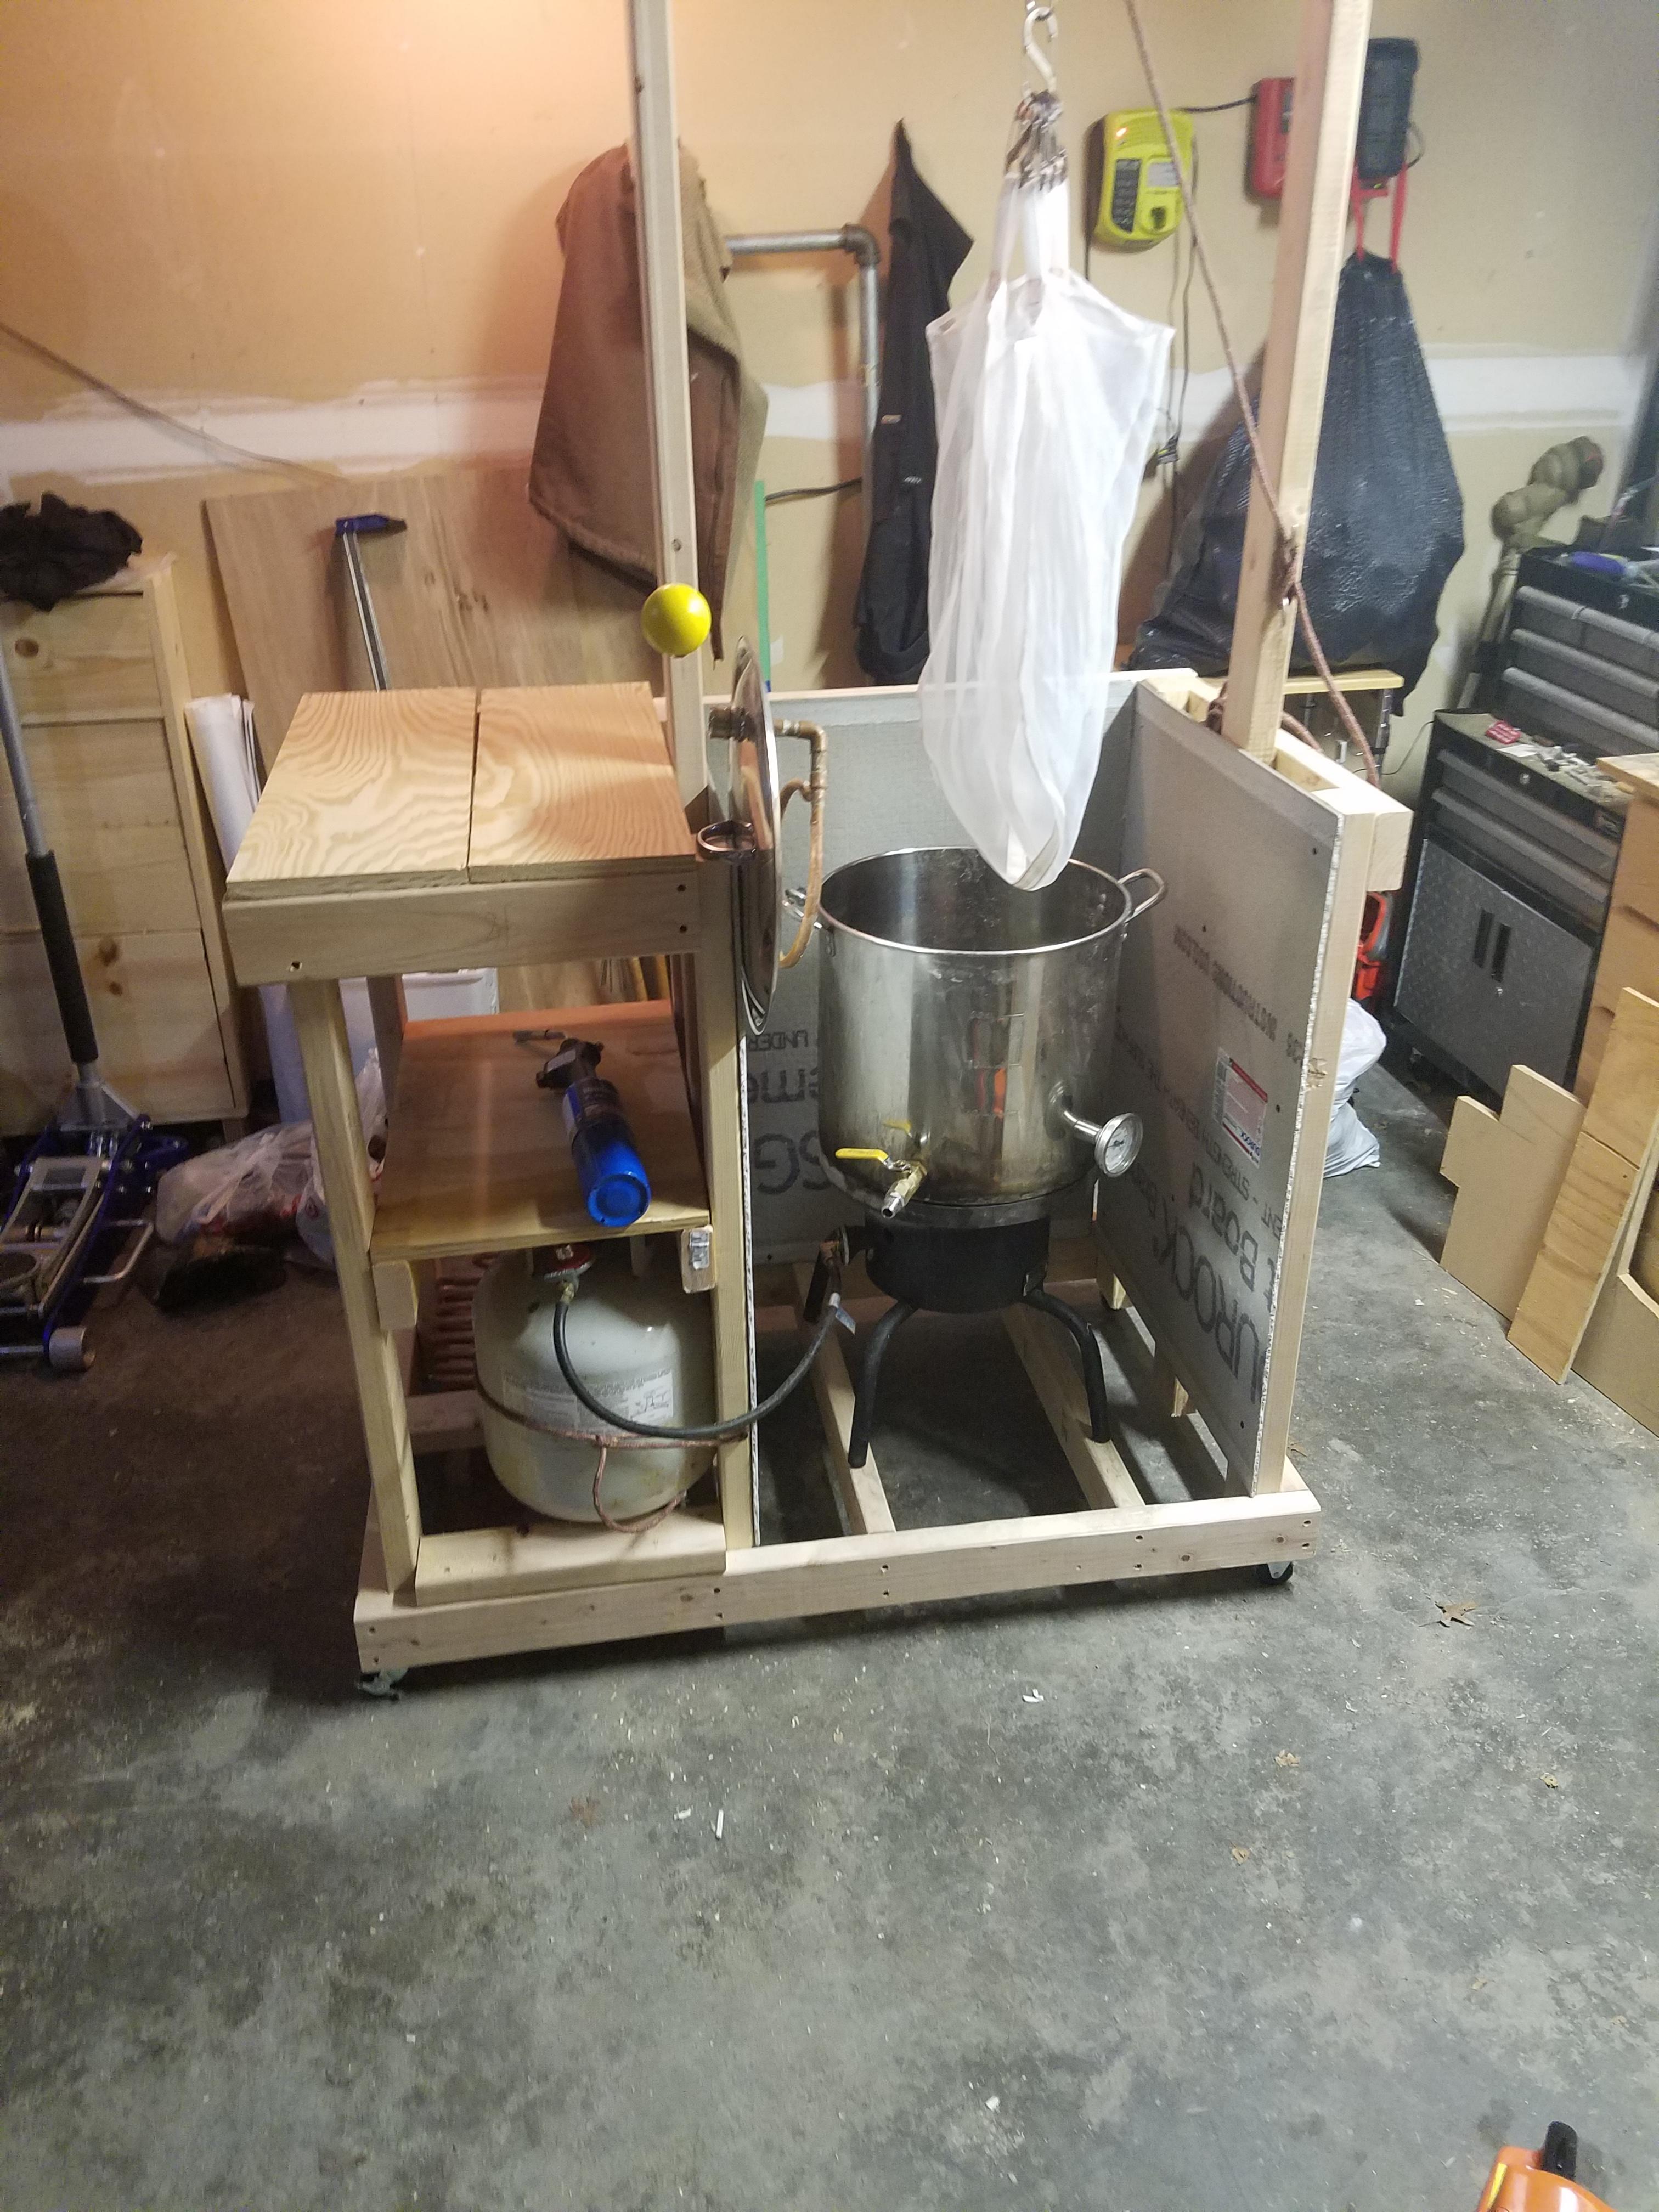
Trying for a compact stand with some storage for everything I need on brew day.

The plan is for the overhead part to be able to be lifted out and brought down as a large "u" shape so that storage of this guy is easier. It's going to store my kettle, immersion cooler, spoons, blanky, propane tank, etc. on the stand with not in use. Possibly covered on the back porch when not in use this summer.

I plan on making this for Fathers day. (Wife is giving me some solid garage time) :)
I think this is coming along nicely in design, but looking for suggestions.

thanks

BIABStandSnapshotv01.png
 
Looks like fun to me - I like DIY projects. Couple of questions / observations:

You have the kettle almost on the ground, so I assume you are using a pump for transfers?

How easily will it be to clean the material you are putting on three sides of the kettle?

Will you have a sight glass, temp probe, and valve at the bottom of the kettle? If so, do you have a plan to have access to all of those things as needed?

How will cleaning work with the wood stand? You will have spills.

What are you using for cooling? How will it fit in / on the stand?
 
Great observations.

The gray part is cement board. My whole turkey fryer will sit in that enclosure. I need to be able to pull it out for when I want to use it for turkeys! I do have a secondary pot, so there's that. Since BIAB, the only transfer is to dump it into a fermentor when I'm done cooling. There will be a pully at the top crossbar for hoisting the bag.
My immersion chiller will store in the pot, and just be put to the side when the fire is on.

The bottom was just going to be particle board. Cleaning will be terrible! Good point on the spills, I'll poly the bottom. For sure it will be outside or in the garage. :ban:

No sight, no ball, no probe. Spoon markings, tippy, and IR thermometer.

Thanks for the feedback. Definitely some good things to consider, especially if I end up adding ball valve, I'll want to make sure the bottom of my pot is high enough for easy transfer.
 
When I built my stand, I made it just tall enough to fit a 6.5 gallon ale pail under the kettle.

I use a pump and a CFC, but I wanted to be able to drain out of the kettle if it was necessary.

I still have not put a finish on mine yet. I probably will someday. Maybe just shellac or linseed oil, but it should have something to cover it.

8NFrBllh.jpg
 
Two quick comments:
You might consider wheels, at least on one side for transport (maybe handles on the other).

re the 29.5" boom height, not sure what size batches you are doing nor what size bag you have, but I was surprised at how much stretch I had in mine and was glad for the additional height when doing larger grain bills...

Cheers!
 
Thanks for the insights.

I will be putting two wheels on one end so I can wheelbarrow it out to where I'd brew! The only issue with that, is that it will raise the height by an inch or so. The top of the stand is at 40" as it is, and that's starting to get a bit high. But maybe not.

<aside> compare price of equally rated swivel wheels to fixed wheels at harbor freight, and the price of fixed wheels is about $1-2 more. scratching my head at that.

For now, I'm doing 5 gallon batches. There is enough room in the kettle compartment to fit my 15 gallon pot, but I don't trust my fryer to hold up that kettle with 10 gallons+grains in it, so if/when I convert to 10 gallon batches, I'll mount up a fixed burner and pot grate, and make sure it's at bucket height.

For now, I'm going to keep the "lift" bar at it's current height, Right now, I can remove it, swivel it 90° and it will straddle the stand.

Thanks for the feedback. Build pictures coming soon.
 
Something else I just noticed, with a width of 50-1/2 inches, it would probably save me much effort if I just shorten the shelf side by 2-1/2 inches to accommodate 48" lumber. So that will probably happen.
 
Made some basic progress this weekend.
Found out my leftover cement board is not enough to cover all three sides comepletely, so I'm trying to figure out the best way to proceed using what I have.

The cart itself is mostly square, but when you're using lumber off the scrap heap from HD, you get bananas!


sorry for the grainy lame picture.

IMG_20150623_165025.jpg
 
How heavy do you figure it'll be? I dig the design and might copy it, but I want to be able to lift the cart onto my deck or into the back of my truck by myself.
 
It's heavy. But you could save weight by A. only building the right half of it. Just a three sided cart to hold the overhang. and B. using 1/4 inch hardie board for the flame protection. I put 1/2 cement board from the top to about 6" from the bottom of each of the three walls around the boil pot, and it's not something I'd want to lift. To protect from the heat, you only realistically need about 12" centered on where the main flame is, but I built all three walls to the top to shield from wind. Winter brewing and all.

Or, even if it's heavy, if you put 8 or 10" wheels on it, you'd only have to lift 1/2 of it up, then wheel the other half onto the patio. Maybe a ramp for the truck?

I just wanted my portable enough to be on the back patio, or the driveway. If I was looking to brew offsite, honestly, the aluminum ladder sounds very good. :)
 
You could also not permanently attach the hardy board. Just drill it and attach it with a couple of wing nuts on brew day. That way if it is a pain to move with the weight you can carry the board out separate.
 
As with any brew or hobby equipment I have, it will never truly be finished, but yes, It's in working order. I've made a couple batches on it, needs more shelving on the left side, but it's up and functional. Loving it. I'll try and get a pic up by this weekend. We've got stuff stored in the garage right now, so getting it out for a pic is tricky. Maybe I'll use it as an excuse to brew something.
 
I'm super intrigued with this but am really curious about how the pulley system is going to end up above the system.
 
So yeah. Works and everything. Where the pulley is (or o-ring as I have now) pulls out and is three boards. The two side boards have a dowel in the end of them, and the cross bar has holes that line up. First pic shows it down, going to make a cover for it like my grill. Second pic shows the boards in, and a sack of grain hanging from the o-ring. Box on left holds the grain crusher. Sorry for the grainy pic.
You can see I surrounded the burner with cement board I had from a project. Nothing here gets hot, probably overkill, but it does serve to block the wind.

brewstand.jpg


Brewstand2.jpg
 
Cool idea on the pulley system. Working on my rig this weekend. Nothing special as I just do extract and BIAB, but I think I'm going to incorporate the pulley system into my rig as well. Thanks for the idea!
 
Nope. Other than wet grains are heavy, and I still have that eye-bolt on there, and not a pulley. But it works like a champ.

I should make a video or something, but I've been woking on the house and kids and life, etc.
 
i was thinking of building something similar for when I have to move to Lincolnshire in the spring. I doubt im lucky enough to find a rental that will have the electric requirements I need for either of my electric setups but something like this i can definitely do. I will just want to find a way to use one of my Inkbirds to control a gas solenoid and add a pilot ignition.
 
Nope. Other than wet grains are heavy, and I still have that eye-bolt on there, and not a pulley. But it works like a champ.

I should make a video or something, but I've been woking on the house and kids and life, etc.

It's a game of inches:)

I really like your design. Thank you for documenting!
 
So did I lol

Nice builds, both yours and greybush's. I'm definitely swiping that idea. With my back not what it used to be, I am always thinking of ways to organize and streamline workflow. And I have plenty of 2x4s and a sheet of leftover Durock sitting in my garage.

I like the spot to isolate the propane tank from the burner. And I can never have too much counter space on brew day.
 
I'm in the process of designing mine.

One question for those who have built one already. Does the 1/2" cement board work well as a refractory material? I'm curious how hot it gets on the other side, particularly the areas close to the burner. Does the cement board work well as an insulator? I don't want too much heat passing through to the wood supports on the outside.

My wood (no pun intended) is cool to the touch. The cement board also acts as a nice wind blocker as well.
 
Update on the BIAB stand build. The wood has 2 coats of clear polyurethane, as it will get wet at times. All that I have left to do is build a 2x4 frame for the hoist. I plan to attach it by having the bottom ends lap over the two center boards that are protruding on top. Attach with carriage bolts and wingnuts for easy assembly and disassembly. I just need to measure how high it needs to be to allow the bag to clear the kettle.

As you can see, the kettle sits high on that Blickman w/legs. I rack directly out the drain valve through a short length of silicone tubing, passing through a sieve placed atop a funnel, into a 6 gal. carboy, so I need it up high.

I did a little "fire test" to see how hot the sides would get. I heated some water for about 30 minutes. The outside surfaces of the cement board were warm to the touch, but not hot. I might get some high-temp paint for the insides of the cement board to make it a little less ugly.

BIAB_Stand4.jpg
 
Guys these are some great stands!

The top cross piece could be constructed such that it has a rail that protrudes to one side (it overhangs the side of the cabinet). The thought is that your pulley would be attached to a roller that rides in the rail. You could hoist the bag, trolley it along the rail, then lower it directly into a bucket (for sparge and/or disposal).

Another way to accomplish the same thing would be to make a single upright support that can pivot. The support pole would have a braced horizontal piece at the top that supports the pulley attachment over the kettle. After the bag is lifted, it could be pivoted around so that it can be lowered into a bucket.

... I might get some high-temp paint for the insides of the cement board to make it a little less ugly.

You could line it with sheetmetal. Corrugated panels or flat panels aren't that expensive. They would reflect heat, and be easy to clean. They can be easily cut with an abrasive blade in a skilsaw, with a metal cutting blade in a jigsaw, or with a beefy set of hand shears. To install just screw them on (or contact cement the flat panels if you want slick no fastener attachment).
 
Guys these are some great stands!

The top cross piece could be constructed such that it has a rail that protrudes to one side (it overhangs the side of the cabinet). The thought is that your pulley would be attached to a roller that rides in the rail. You could hoist the bag, trolley it along the rail, then lower it directly into a bucket (for sparge and/or disposal).

Another way to accomplish the same thing would be to make a single upright support that can pivot. The support pole would have a braced horizontal piece at the top that supports the pulley attachment over the kettle. After the bag is lifted, it could be pivoted around so that it can be lowered into a bucket.


You could line it with sheetmetal. Corrugated panels or flat panels aren't that expensive. They would reflect heat, and be easy to clean. They can be easily cut with an abrasive blade in a skilsaw, with a metal cutting blade in a jigsaw, or with a beefy set of hand shears. To install just screw them on (or contact cement the flat panels if you want slick no fastener attachment).

I finished the frame, and installed an eye bolt for now. I'll see how that goes. I have a Wilserbrewer ratchet pulley to hoist. I thought about some kind of trolley. However, the swing out idea is intriguing, I hadn't thought of that. That may be a good add-on for later, as I could simply fasten a folding arm made from a 2x4 that pivots outward. It could then be folded back for storage.

I have a big scrap of aluminum flashing left over from having our house re-sided. It's big enough to line the bottom, which might be a good idea to protect from spills.

All good ideas, thank you.


You might want to check Lowe's or Home Depot for some Concrete dye or stain.

I hadn't thought of concrete dye. Excellent suggestion, thanks! Maybe I should get a color close to that of wort, so I won't see spills. ;)


I'll try to post a pic of the completed stand in the next day or two.
 
Update on the BIAB stand build. The wood has 2 coats of clear polyurethane, as it will get wet at times. All that I have left to do is build a 2x4 frame for the hoist. I plan to attach it by having the bottom ends lap over the two center boards that are protruding on top. Attach with carriage bolts and wingnuts for easy assembly and disassembly. I just need to measure how high it needs to be to allow the bag to clear the kettle.

As you can see, the kettle sits high on that Blickman w/legs. I rack directly out the drain valve through a short length of silicone tubing, passing through a sieve placed atop a funnel, into a 6 gal. carboy, so I need it up high.

Yeah that is going to sit up real high. I think mine is 7ft assembled but my burner sits much lower than yours, at least a foot. I made my uprights slide into channels, then i used dowls in the top of the uprights and drilled holes in the top cross piece to line it up. Then used swage locks for extra security and super quick setup and tear down .

20160723_224437.jpg


20160723_224427.jpg


20160725_222948.jpg


20160725_222620.jpg
 
+1 for tile. I built my kitchen countertops and backsplash with 4" sq. glazed porcelain tile. Easy cleanup, and I can set a hot pan anywhere with no worries. I used coffee colored grout, so stains aren't an issue.

When considering hoists and derricks and such, be sure to keep the center of gravity inside the footprint of the legs. Youtube is full of videos illustrating what happens when you don't.
 
You could tile if you wanted, its probably pretty cheap insurance. I dont think it is neccessary, but i am usually the first one to overbuild something in the name of cheap insurance, plus it would look nicer. I also roughly sanded mine and coated it all in a stain/poly mix
 
Here are pics of the completed stand. I haven't used it to brew yet. The hoist frame is held in place with carriage bolts with wingnuts for easy assembly and disassembly. I will probably use concrete stain on the Durock, and maybe tile the bottom. I've never done tile work, so that would be a good practice run. :)

BIAB Stand 01r.jpg


BIAB Stand 02r.jpg


BIAB Stand 03r.jpg


BIAB Stand 04.jpg


BIAB Stand 05.jpg


BIAB Stand 06.jpg
 
Ill be interested to see how the concrete stain works. I have had some spillage on my concrete board, no issues yet but it is kind of crumbly stuff to begin with. Figured id be replacing it ever so often. Stain and tile bottom might be worth while for longevity + it will look better.
 
Ill be interested to see how the concrete stain works. I have had some spillage on my concrete board, no issues yet but it is kind of crumbly stuff to begin with. Figured id be replacing it ever so often. Stain and tile bottom might be worth while for longevity + it will look better.

That's why I'm waiting a while before I apply some finish. I'm now even rethinking the concrete stain, as I might want to use something more in the way of a high-temp topcoat, something that seals up the cement. I too am concerned with the crumbly nature of the cement board. In its normal use (bathrooms and such) it's just painted and it is effectively sealed. But I will need something that will endure at least a couple hundred degrees. While the outsides don't get more than warm, areas of the inside do get somewhat hot and I don't want the finish burning off in the middle of a brew. Maybe some kind of fireplace paint. Grill paint is a possibility. I might still tile the bottom, but don't want to tile the sides, as I'm concerned that the board will flex and the tiles come loose.

The 40 lb. tank was something I picked up at a local home center store a few years back for around $70, IIRC. Fewer trips to refill, which is nice. I think you can get them at places that sell RVs, as that's a popular size for them.
 
Tile it my man! It makes it looks a hundred times better and it won’t stress under working pressure. Tile is clay, takes thousands of degrees to stress it. Cement board is made for bathrooms a lot more humidity than your open air set up will ever take.
 
Back
Top