• Please visit and share your knowledge at our sister communities:
  • If you have not, please join our official Homebrewing Facebook Group!

    Homebrewing Facebook Group

We no need no stinking beer gun...

Homebrew Talk

Help Support Homebrew Talk:

This site may earn a commission from merchant affiliate links, including eBay, Amazon, and others.
I just used my beer gun to bottle a whole keg's worth of beer. But for one bottle here and there, the tube on the tap is the way to go.
 
I recently made one of these and I'm content with the results. The equipment ran me a little more than I thought it would at ~$50 starting from scratch - this includes the picnic pump, hose, liquid disconnects, racking cane, clamps, etc.

Of the bottles I've opened, I have seen a small white cloud (CO2). I'm assuming/hoping this means that the carbonation will hold for an extended amount of time.

My ONLY complaint is that it can be a little messy and is tough to do solo. It'd be great with someone filling bottles and someone (with clean hands) capping - nice little production line.

Either way, I'm pumped to finally be able to bottle my beers and distribute it to friends. Thanks for spreading the word on this BierMuncher!
 
I'd agree... I built one of these over the last couple of months, according to that schematic I re-posted. Finally got around to trying it last night, to empty my kegs so I can redesign my Pleaser-Keezer. Anyway, I agree with TheCrowsNest about 'a little messy' but by the 4th bottle, I had a routine:
(1) With one hand, hold the picnic-tap head (pipe wedged into it) while pushing the stopper down into the bottle
(2) with the other hand, push the tire valve release slowly to let the pressure out of the bottle so the beer-level slowly rose-up without foaming.
(3) use one hand to steady the bottle and the other to pull the stopper loose
(4) swished a cap in some sanitizing solution, placed it on top of the bottle
(5) pressed the cap down with my thumb and turned the bottle over twice to start it foaming a bit
(6) just as the foam started to push the cap up, I capped the bottle

During the first 1-3 attempts, I was absolutely convinced to buy a beer-gun but like I said, by the 4th, I was glad I hadn't given-up. (the first 3 just had too much head-space because they got a bit foamy and I panicked and capped them too soon)

Maybe I'll get inspired and post a video on YouTube
 
I'm not using a valve, just a stopper. I squeeze the side to relieve pressure. This may be a huge contributor to the mess as I let it foam up and around the stopper before removing it. Then cap it right away - no shaking.

My guess is shaking it probably does a better job of purging the bottle of any oxygen. Just make sure your thumb is locked down on that unsealed cap.
 
Does this need to be done with a picnic tap or has anyone figured out how to make it work with a kegerator in-door perlick tapper? Thanks.

Edit: I discovered this awesome feature called 'search thread'. Oh the wonders of Al Gore's Internets. But seriously I still didn't find an answer for me, my perlick tips dont screw off. I guess I will pick up a picnic tap. Thanks again
 
I bought the parts and did this today for the first time. It took me a bottle or two to get it down, but it works great! Thanks!!!
 
Does this need to be done with a picnic tap or has anyone figured out how to make it work with a kegerator in-door perlick tapper? Thanks.

It just takes a bigger tube to fit over a faucet. Measure the faucet OD and then buy a tube with that ID.
 
This post sold me on becoming a member when I was searching for a beer gun. Just wanted to say thanks to everyone for the kick ass ideas and saving me my $$$!
 
It just takes a bigger tube to fit over a faucet. Measure the faucet OD and then buy a tube with that ID.

I thought of that but if the tubing was bigger, the other end of the tubing would not be the correct size to fit on my racking cane...
 
This may sound dumb, but will this only work when filling from a keg? Would it work and be any better than from a bottling bucket and wand?
 
This may sound dumb, but will this only work when filling from a keg? Would it work and be any better than from a bottling bucket and wand?

The object though is to bottle already carbonated beer that is in your keg.
 
I'm not using a valve, just a stopper. I squeeze the side to relieve pressure. This may be a huge contributor to the mess as I let it foam up and around the stopper before removing it. Then cap it right away - no shaking.
I still have the stopper on my 'bottling cane' but a I never use it anymore. I just fill the bottle until the foam reaches the top, remove the cane, and cap on foam. No burping or squeezing or anything, very little foam and very little headspace. The keys are to chill the beer to <35* F, use cold but not frosty bottles, and use low pressure to push the beer.

Exactly 19 each 12 oz bottles fit perfectly in an old 4 gal Aluminum pot I have so I usually bottle in batches of 19 plus a growler or two (the growlers are to get the beer flowing perfectly clear). With all the bottles in the pot you can just go from one bottle to the next without ever closing the tap or worrying about the spillage getting on stuff.
 
Just tried this method and it works GREAT! I have never owned a beer-gun and do not plan to buy one... this method is extremely easy and fast.

I was able to get by with very minimal spillage...used a small shallow rubbermaid container to do the bottle fill - this worked perfectly. Burping the air was simple - I simply held the rubber cork on tight enough to keep a seal but then just pulled the whole cork out to burp.

Couple things to consider.

1. If using different size bottles - start with the taller ones first and adjust the rubber cork accordingly.
2. If using different geometry bottles - make sure the capper does not break the bottle!! Learned this trying to re-use some anchor steam bottles.
3. Use a loose koozy to hold the bottle during filling and capping - helps out with possible tipping.
 
It just takes a bigger tube to fit over a faucet. Measure the faucet OD and then buy a tube with that ID.
Alternately, if you have the Perlick 425SS you can get one of these spouts I worked with Mike at Centerline Machining to design. Here's the thread on it.

I don't know if I posted this in this thread yet (that's a lot of pages ;) ) but here's a video of me doing the BMBF thang off the taps. Make sure to stick around for the closeup at 2:08.

[youtube]7IgVx3h5llA[/youtube]

-Joe
 
This works awesome! I just tried it yesterday here's a I found if anyone needs more clarification.
 
Last edited by a moderator:
Nostalgia thanks for pointing out your awesome perlick threaded adapters these are genius and I DID find these when I searched the thread, but I posted that I do not have the perlicks with screw off tends. :) Thanks again for replying to me!

ksbrain I dont know why I thought I HAD to have the ranking cane on the other end.... You sir are brilliant and I will get that tubing ASAP! Do you know the inner diam? Thanks everyone!
 
I think it was 5/16" but I'm not sure. I just used a tape measure to measure the OD of the faucet. I hope the tube works well for you!
 
it cost me like $3 to get what i needed to build this, and maybe 15 min to bottle a 12 pack. AMAZING METHOD!!!!!!!!!!

p.s. beninan, nice quote
 
I bought/built this rig last night. It worked incredibly well. Surprisingly, none of the guys at my LHBS heard of it. I bottled up a case of BM's Blonde Ale. Being able to distribute beers to "non homebrewers" just became infinitely easier because I don't need to give them pouring instructions.
 
If 50+ threads weren't enough to verify that this works well, I just built one and am very happy with the results. Cost me $0.99 for the stopper at Rebel Brewer.

You will discover this for yourself, but I will say it anyhow: When you are filling, you can kind of "ride" the stopper with your thumb. There is a constant pressure pushing against the stopper as you fill, you just release it every time the beer stops. I am hoping this will be a way for me to add my kegged beers to my vintage box...
 
Instead of using the #2 stopper, I did what someone else posted elsewhere. I used a carboy bung, and put it upside down on the bottle. Its easy to keep pressure on it down and let it come up easy. The other person put a small hole in theirs to burp the air, but I run mine at about 5psi, so it barely trickles out once I get about half full. Found I really dont need the hole, but its an option depending on your setup. Works better than a stopper of you ask me.
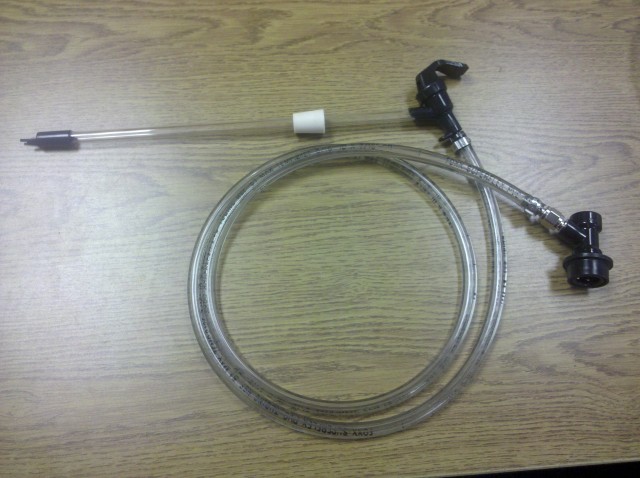
 
Instead of using the #2 stopper, I did what someone else posted elsewhere. I used a carboy bung, and put it upside down on the bottle. Its easy to keep pressure on it down and let it come up easy. The other person put a small hole in theirs to burp the air, but I run mine at about 5psi, so it barely trickles out once I get about half full. Found I really dont need the hole, but its an option depending on your setup. Works better than a stopper of you ask me.

You mind posting a picture?
 
I just got back from LHBS and acquired the parts needed for my own BMBG.

anyone see a problem using the bottling wand instead of a racking cane?

its just what I had from a "KIT" and it fit the bill

-=Jason=-

IMG_20110211_142159.jpg
 
Flomaster said:
I just got back from LHBS and acquired the parts needed for my own BMBG.

anyone see a problem using the bottling wand instead of a racking cane?

its just what I had from a "KIT" and it fit the bill

-=Jason=-

Absolutely. That's what I use.
 
Back
Top