• Please visit and share your knowledge at our sister communities:
  • If you have not, please join our official Homebrewing Facebook Group!

    Homebrewing Facebook Group

Want to switch to electric...

Homebrew Talk

Help Support Homebrew Talk:

This site may earn a commission from merchant affiliate links, including eBay, Amazon, and others.
No, unfortunately. He also has something on his website about vacation in early August, so I suspect it's a couple weeks at the earliest. I'm also going to do the steam condenser he's got coming, but that's supposed to be in relatively soon.

I'm putting an element in my 10-gallon Spike kettle; got that ordered today.

I also ordered the element you showed on Amazon; all I need now is the RIMS tube as you spec'd above.

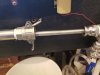
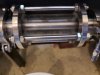
BTW: Do you have a pic that shows how you set yours up? And what are you using to control the BK element?

When/if you do put together a RIMS, ensure the element does not make contact with the tube. A little persuasion will line it up (they’re pretty tough so bending it requires some leverage). If it touches it will arc and the wort will burn onto the element creating a tough cleanup job. It doesn’t hurt the wort but it is pretty tough to get off the element. If it does not touch, and flow thru the tube has been maintained while the element is in operation, cleaning is nothing more than disassembly and wiping it off.
 
Edit: Here’s my two ‘pot’ setup. In this photo I have transferred my strike liquor to my MLT underletting the grain. I moved my hoses to recirculate and I am at a step in my Hochkurz mash. After I mash out, I’ll move the top return hose to the whirlpool inlet on the HLT/BK and begin the boil.

View attachment 582106
I like this setup. I am thinking about mashing in a cooler until i get a bigger kettle. I would rather move water then grain if i cant go full volume on 10g batches in my kettle. I will just do it manually.
 
he's using a 3 vessel setup and wanted to stick with it so I'm imagining he's gonna need 2 of each of what you linked. I was also assuming he would want a Herms/rims setup but of course it's not required. I guess the real question is how much money does he have to spend on this. But again my main point was if the only reason he wanted to switch over was his friends offer to do the labour of the outlet free it's not a big enough savings to rush into it on too tight a budget and make compromises to have it now. Cheers
Since its just a simple controller without a temp probe he simply needs to unplug and switch kettles or wire up a switch to switch between the two kettles as most do when they use a gas burner...
 
No... since its just a simple controller without a temp probe he simply needs to unplug or wire up a switch to switch between the two kettles as most do when they use a gas burner...
My point was more so if the only reason he wanted to go electric was because he could have the labour of installing the 240 outlet free it's not really much a savings in the big picture. Cheers
 
...

BTW, I'm trying to marry this to a BK that uses something like BrunDog's steam condenser approach so I don't have to have a vent in my garage. Something like a RIMS would produce less steam which, in the winter, is NG in my insulated garage.

This is my solution to remove steam and heat from the brewery (aka laundry room).

IMG_1178.jpg
 
When/if you do put together a RIMS, ensure the element does not make contact with the tube. A little persuasion will line it up (they’re pretty tough so bending it requires some leverage). If it touches it will arc and the wort will burn onto the element creating a tough cleanup job. It doesn’t hurt the wort but it is pretty tough to get off the element. If it does not touch, and flow thru the tube has been maintained while the element is in operation, cleaning is nothing more than disassembly and wiping it off.

Here’s an example of how easy cleanup is with an element that doesn’t touch the inside of the tube. This sludge simply wipes off.

IMG_1347.jpg
 
Last edited:
Here’s an example of how easy cleanup is with an element that doesn’t touch the inside of the tube. This sludge simply wipes off.

View attachment 584395
I've NEVER seen buildup like that on my RIMS setup. I have Bobby's 18" RIMS Tube with his 5500Watt Element w/$2 offset (worth every penny) and run 120v to and EZBoil controller making the power only 1375watts and I have ZERO buildup of any kind. I disassemble the RIMS when I am done mashing and rinse with tap water to wash off the wort sugars. Never any buildup at all.
 
When/if you do put together a RIMS, ensure the element does not make contact with the tube. A little persuasion will line it up (they’re pretty tough so bending it requires some leverage). If it touches it will arc and the wort will burn onto the element creating a tough cleanup job. It doesn’t hurt the wort ...
This isn't entirely accurate. You will NOT get arcing, but you could possibly get a hot spot and scorch your wort at this location. This will caramelize the wort and affect the flavor. The elements are tough to bend.
...but it is pretty tough to get off the element. If it does not touch, and flow thru the tube has been maintained while the element is in operation, cleaning is nothing more than disassembly and wiping it off.
Scorched wort is tough to remove, involves some PBW and some scraping (learned the hard way, but not with a RIMS system).

But a well build setup where the element doesn't touch the tube should be super easy to clean and just involve rinsing the element after mashing is done.
 
Here’s an example of how easy cleanup is with an element that doesn’t touch the inside of the tube. This sludge simply wipes off.

View attachment 584395
I have the same element and it look about the same after a session. I run water from the hose thru the pump tube and hoses for a few minutes and most is gone. What is left wipes/brushes right off.

I normally pull the element out to take a look before running the hose to see if there was any scorching. Not sure why but sometime there is almost no build up, most of the time it looks similar to brewbama's pic.
 
this is what my cartridge heater looks like after running about 2 gallons of water through everything immediately after brewing. no protiens cooking to the side of the element and denaturing going on like many rims setups. I get 91% efficiency so it works well enough. its heating gently like a herms.
 

Attachments

  • rims2.jpg
    rims2.jpg
    3 KB
  • rims3.jpg
    rims3.jpg
    3.2 KB
Cool. I like the cartridge heaters. I don’t do a clean in place run after brewing but if I did I may get the same clean element. The buildup simply wipes off so it may come clean with a water/PBW cleaner run.

I agree with the above comment about the element being tough to bend but they will bend with persuasion. If it touches I say it ‘arcs’ which may be the wrong word but it does burn the wort to the element like the OP’s photo.
 
It's been a while since I've revisited this thread i started. 240 outlet installed as of this morning! Cost me $67 and a trip to home depot. Luckily for me, my friend had all the wire and a couple of other things that saved me some money on the front end.

My plans have definitely changed. Im selling my camaro and by doing so, my wife is on board with buying the Spike Brewing turnkey setup! Especially since you can finance it right through Spike!

Long story short, moving on up in the brewing world!
20190105_175447.jpeg
 
On a turnkey controller it wont be easy but you could supply the needed 120v circuit with a separate 120v line. I think SSbrewtechs system has a 3wire 240 and a 3 wire 120v plug separately.
Thanks Bobby. I'll run that by our friend that installed this and see if he can do that, when the time comes.
 
On a turnkey controller it wont be easy but you could supply the needed 120v circuit with a separate 120v line. I think SSbrewtechs system has a 3wire 240 and a 3 wire 120v plug separately.
Does anyone have a link to the ssbrewtech system? All i could find is their new ebrewing systems. Is that the one you're referring to Bobby?
 
Damn, just saw where i went wrong with this thing. My buddy and i went to the store and bought the outlet for a lone heating element that used the 3 prong plug. I assumed that the spike system used the same plug but it doesn't. I just found the electrical information for that. Dammit...

Running the wire wasn't bad actually so maybe just to do it right, i'll ask my buddy to give me a hand fixing this.
 
New 14-30 receptacle ordered as well as some more wire. Im just going to pull this setup apart and see if i can push a 4th wire through this conduit and hook it up. We'll see how it goes
 
Hey OP. All the advice here is true. The one thing I want to add is that these projects are always more involved than you think. As a home brewer, I'm sure you know that.

There are a ton of different ways to go electric from simple cheap systems to borderline microbrewery systems. Think about what you want in the end and what it's worth to you. If it's a hot plate and a sketchy dimmer switch, great. If it's a rims tube, and propane boil, great. Just know what you want and find the path to get there.

I started the electrification project because a friend gave me a couple PIDs. I thought I was basically done, how much more could I need?? A lot!!!!

Systems that handle high power in a safe way can get expensive. Switches, lights, wire, 30 amp receptacles, breakers, contractors, an enclosure. It can really add up. By the end of my build the free PIDs was a small amount in comparison. And I was really lucky that I could scrap so much of my panel together from old projects, odds and ends and friends who had parts from similar projects and the scrap bin at work.

Sort out what you want. Build a parts list and price it out. Take the time to plan your build. You will be way happier and have the systems you want in the end.

Good luck and I hope you make it. Electric brewing takes more commitment but it's way worth it.
 
There are a ton of different ways to go electric from simple cheap systems to borderline microbrewery systems. Think about what you want in the end and what it's worth to you. If it's a hot plate and a sketchy dimmer switch, great. If it's a rims tube, and propane boil, great. Just know what you want and find the path to get there.

I could not agree more. If you do know where you want to go, you may have checkpoints along the way. For example, I wanted to end up at a eBIAB, but I initially just made an electric kettle for my boil and strike water while using my cooler mash tun for about a year before making that jump further to the eBIAB.
 
I could not agree more. If you do know where you want to go, you may have checkpoints along the way. For example, I wanted to end up at a eBIAB, but I initially just made an electric kettle for my boil and strike water while using my cooler mash tun for about a year before making that jump further to the eBIAB.
This is the exact point I'm at, as my funds toward my eBiab goal dwindle under the pressure of shipping, tax, and gotchas. Onward and upward!!
 
Am I reading that correctly...Water is H2O . if you drive off the O ,you have only H left.

When you boil water you aren't splitting the water molecule as you would be with something like electrolysis.

Instead, water has air dissolved in it; some of that air (21 percent in fact) is oxygen, and that's dissolved in the water similarly to how CO2 is dissolved in beer.

Boiling the water for 5 minutes drives that off, leaving me with strike water in which there is no O2 that would produce oxidation of the grist.
 
Hey OP. All the advice here is true. The one thing I want to add is that these projects are always more involved than you think. As a home brewer, I'm sure you know that.

There are a ton of different ways to go electric from simple cheap systems to borderline microbrewery systems. Think about what you want in the end and what it's worth to you. If it's a hot plate and a sketchy dimmer switch, great. If it's a rims tube, and propane boil, great. Just know what you want and find the path to get there.

I started the electrification project because a friend gave me a couple PIDs. I thought I was basically done, how much more could I need?? A lot!!!!

Systems that handle high power in a safe way can get expensive. Switches, lights, wire, 30 amp receptacles, breakers, contractors, an enclosure. It can really add up. By the end of my build the free PIDs was a small amount in comparison. And I was really lucky that I could scrap so much of my panel together from old projects, odds and ends and friends who had parts from similar projects and the scrap bin at work.

Sort out what you want. Build a parts list and price it out. Take the time to plan your build. You will be way happier and have the systems you want in the end.

Good luck and I hope you make it. Electric brewing takes more commitment but it's way worth it.

Thanks for the advice man, I appreciate it. I get what you're saying for sure. Time is a very precious resource for me, especially with a kid on the way and working as much as my wife and I do. Building something from scratch wasn't a very appealing option for me, but originally I was willing to do it. However, after many conversations with the wife and talking about what we want when it comes to brewing, nixing the cheap electric route that I was going (DIY element kit with still dragon small controller) and deciding to go the turn key setup is what we both wanted to do. She loves beer as much as I do and wants to quit buying propane so this wasn't a hard sell. The Spike Turnkey system, which I initially thought was not an option due to budgeting, is now an option because we're selling some vehicles in preparation for the kid. So that's what we're doing. I'll probably pull the trigger by the end of the month. Just waiting for the new outlet to show up in the mail to wire that up instead of the 3 wire outlet that I put in there first.
 
When you boil water you aren't splitting the water molecule as you would be with something like electrolysis.

Instead, water has air dissolved in it; some of that air (21 percent in fact) is oxygen, and that's dissolved in the water similarly to how CO2 is dissolved in beer.

Boiling the water for 5 minutes drives that off, leaving me with strike water in which there is no O2 that would produce oxidation of the grist.
Im not sure I understand what it is you're doing. The whole LODO thing , I mean. The grist will already have oxygen in it. and do you or do you not aerate your wort before pitching? I'm rather confused why one would go to the trouble of all this . what does it do ,really.
 

Latest posts

Back
Top