Vintage Kelvinator freezer restoration

Homebrew Talk - Beer, Wine, Mead, & Cider Brewing Discussion Forum

Help Support Homebrew Talk - Beer, Wine, Mead, & Cider Brewing Discussion Forum:

This site may earn a commission from merchant affiliate links, including eBay, Amazon, and others.

Joe C

Well-Known Member
Joined
May 13, 2008
Messages
1,025
Reaction score
5
Location
Gate City
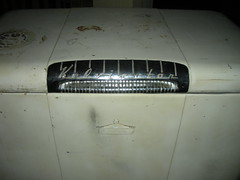
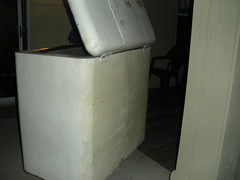
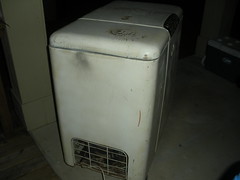
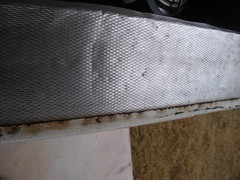
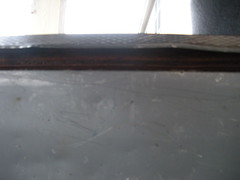
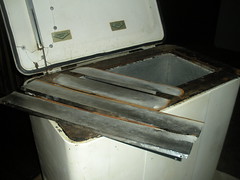
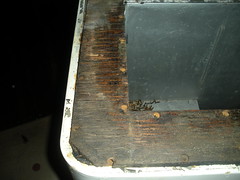
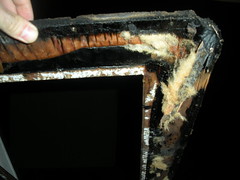
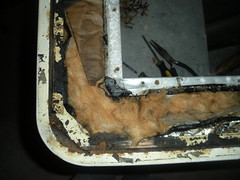
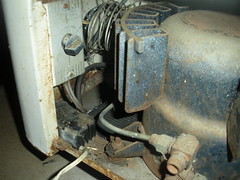
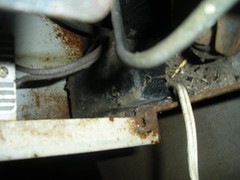
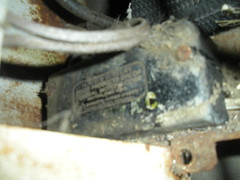
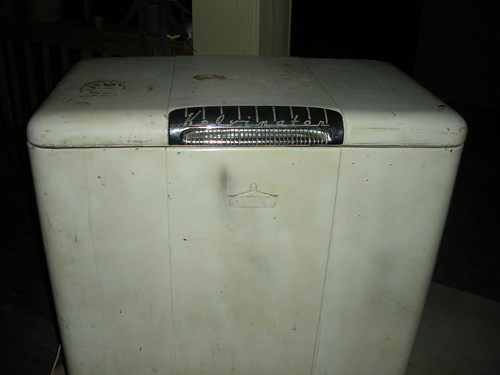
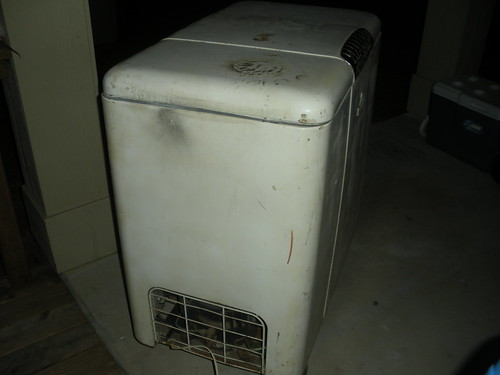
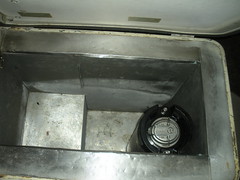
Here is the shell of what I am working with. I would like some ideas and interest into some possibilities of what I could turn this old school bad boy into. It is a 1950's "Kelvinator" chest freezer that can hold 2 cornys with out a collar and 4 with a collar. Ideas have been tossed around to make it into some sort of hot rod style theme based on the fact that I grew up in a racing/car show/hot rod family tradition.

The final cost of the total build is limited to about $500. Any suggestions?

4270084287_ab44f10f89.jpg


4270085697_2596676a05.jpg

You copied the url not the actual link to the picture. Cool project!
 
89OctaneStang:
To keep the clean lines of that vintage freezer intact, I'd use a collar rather than a tower, maybe skin the collar with metal plate like brushed stainless or aluminum, find some nice looking gearshift knobs for tap handles, and do a paint job that will work with the room. It does run well, right?

When I got it home yesterday evening, I let it sit for about an hour and then I plugged it in. It was running maybe an hour and it was already ice cold on the inside. I let it run for a little longer then unplugged it. I think one of the hard tasks to complete is going to be getting the smell some what dimenished out of the side walls.
4270831762_88992ecec3_m.jpg

If you notice, the walls have a thin alluminum plate on top that is held in with two screws on each side. When I pulled one up, it was wood underneath. And that wood smelled strong of(?).., you know when you went and got into grandma's fridge when you were younger, that smell it had. Not of anything spoiled, but it had its own unique smell. Well, this fridge has that going on strong.

I think I will go with a collar for this one.
 
Would it be difficult to remove the wood and replace it?

That is the plan. It does not look difficult to do. I'm also going to remove the plastic cover that is on the interior side of the lid since it is cracked anyways, and see if I can get the insulation out of the lid and make a new cover and reinsulate that... You think that would work?
 
That is the plan. It does not look difficult to do. I'm also going to remove the plastic cover that is on the interior side of the lid since it is cracked anyways, and see if I can get the insulation out of the lid and make a new cover and reinsulate that... You think that would work?

Shouldn't be hard at all to cut out insulation and re-apply.
 
I spent some time searching for internet sites with information on old school vintage freezer restoration with little results. When I picked up this freezer, I thought for sure this had already been done a time or two before so it should have been easy to get instructions and tips on what to do. But, with the help of the people on this site and just diving straight into it head first, we will create a step by step process of this vintage Kelvinator restoration.

A little history that I have been able to dig up so far about this freezer. It did not have a model # sticker or any pertinent information on it so I had to try and find as many pictures lurking around the internet to match up mine with another. Turned up a lot of results but no positive year it was made or model number. I did however, learn that it was produced sometime between 1949 and 1952.

Bottom line, Kelvinator was established in 1916 and based their ideas, designs and Company name off of a famous British scientist who had pioneered in the principles of refrigeration and William Thompson, Knighted Lord Kelvin for his noteworthy scientific accomplishments.

And Project "Kelvin-Keger-Ator" begins...
 
First thing was first in my thought process. I really needed to locate where the strong musky mildew smell was coming from. Upon looking for possibilities, I noticed that there was a thin aluminum cover on top of the side walls and was only held on with 4 screws total. I gently lifted it up and looked under it, surprised to find that a lot of the interior works are made of wood. And that wood was definitely rotten and appears to have some black mold of some sort going on. The closer I got to the wood with my nose, the more positive I was that the smell is coming from that area.
4275433020_c593f88b50_m.jpg
4274687155_80cea49115_m.jpg


I then began carefully taking out the 4 aluminum cover screws. Removed all 4 covers and started taking out the screws that were holding the wood piece down. A couple of the screws were so rusted that I couldn't unscrew them by hand so I just prayed that when I went to pull the wood out, that it was rotted enough to just fall apart around the screw. And I was glad to see that is exactly how it happened.
4274760285_53565c93f1_m.jpg
4274760927_d7bedb68c3_m.jpg


The next step will be to expose all the insulation in the sides and lid, remove it, and replace it with some updated insulation. Now, anyone have any knowledge about the current insulation that was used in the late 40's early 50's? Did it contain asbestos? Anything else harmful that we should be aware of when removing it and handling it?
4274761447_379aa42148_m.jpg
4275508450_ef221d6cb4_m.jpg
 
Not sure what kind of insulation would be in there, thats OOOLLLDDD. I'd probably wear some kind of dust mask just to be safe.

You plan to keep the stock guts? If it ever dies you might be able to adapt the guts of a modern dorm fridge into the old shell. If nothing else that should save some $$ on your electric bill.

Cool project. You don't see many (any) old appliances get restored.
 
I plan to wear gloves, mask, and some eye protection while I am removing all the insulation.

Not sure about the stock guts. I looked to see if I could take off the outer shell and get to the inside from that perspective but its welded on. So removing anything inside the walls is going to be almost impossible. I'm hoping that I am successful in just getting the insulation out and new insulation back in. I did find that people have posted the average increase in electricity a year for these vintage kegerators was approx $30 - $40. So with putting a better rated insulation inside, it should help keep that increase relatively friendly.

I am not sure how long the compressor will last, but I would like some insight on the parts I can replace, like the electrical unit. This thing is old and I would not be totally comfortable with an old electrical unit in this for the sake of causing a fire. Anyone have any suggestions on where I can get a new electrical unit? Is that what it is even called?
4274814511_bacf80df5a_m.jpg


It is an old AC Delco unit that even has the old style two prong electrical chord. Wasn't able to find any info about it online and can not find a part number located on it.
4275561186_fc4638a251_m.jpg
4274814995_e3a5d9cbfb_m.jpg
 
Found the type of insulation used. It is ALFOL Aluminum Foil fiberglass insulation Type II. No information on whether it contained asbestos but the theory behind its design later showed was not the best performer. Dead air trapped between the double layers of foil above the kraft paper provided a slight increase in the R-value of this product.

So R-25 Fiberglass Insulation found at Lowes for $9.95 should do much better and comes with a good price tag.

~ For this project, I am going to keep a running total of man hours in restoration and total accumulative cost. Just would be neat to see in the end if it was worth it.

*1 hour/$10
 
Heres another thing that is going to make replacing the insulation difficult. Hope that it doesn't do this all the way through and it is just at this one spot.
4275505980_43ee57f43b_m.jpg
 
I've subscribed to the thread. Looks like your project is going to be cool when it's all done. :mug:

Thanks! I have been wanting to build one and new that it was going to be sooner or later and now that the shell is sitting on my back patio, I can't stop thinking about it and researching everything! Gonna be a long hard road, but fun :tank:

:mug:
 
Thank you BM! I hope the compilation of information that I gather and create from this thread is helpfull to the next person. As I stated before, there is nothing on the local internet that gives any information to this process. So there is going to be a lot of questions and references placed here within this thread in order to help others and myself complete this type of restoration.

The goal is to complete this project within the next month and to keep the restoration cost under $200. Then I have figured about another $400 for the completion of the system to total $600 and about 48 man hours in time.

Now I know that might be a little more than you would generally put into a kegerator but this is a vintage freezer that will be completely restored. These freezers go for approx $3k online restored. In my opinion, it is worth it to say I have a completely restored vintage collector freezer as a kegerator! :mug:
 
[/IMG]
In my opinion, it is worth it to say I have a completely restored vintage collector freezer as a kegerator! :mug:

And not to mention, it comes just after the great era of the prohibition. Which really determined which brewery's either went under or kept a float. Our fist contribution to successful breweries during that time will be Blatz Brewery. I have found two tap handles that I will purchase for their contributions. Rather expensive as they are original tap handles, but for the love of beer, It Is Worth It!
4278468016_77f13b3123_m.jpg
 
antiqueappliances.com has parts and discusses their restoration process. I'm inbterested in your process as I have a vintage Philco fridge I'm converting.
 
Did some research on the liquid insulation. As it will most definately provide the best R value over batt insulation, I am not sure if it will actually work for my project.

I would have to spray it into the wall from the top down. There is no guarantee that I will get everything inside the wall covered and in the attempt to get it all in there, I will face a possible problem with getting it all over the coolant lines and interior wall face. Thinking about that, it could pose a few problems. It will definately work the best to keep the heat and elements outside the walls, but I am afraid that if I try it I will get it all over the place and it will also keep the refrigerant inside the walls instead of into the freezer. Does this make sense or am I looking into it too much?
 
You should be ablt to attach a piece of tubing to the foam applicator and drop that to the bottom of the cavity. Fill some.. let it expand upward..fill more on top. Research cavity fill for existing structures and you will see the process for filling existing home walls with expanding foam...should be same process.

I agree that you may not want to completely encase the cooling tubes. Is there a way to segregate the space and fill only between the tubes and outside wall?

Not really. The void is about 3" thick but it has a few coolant lines running in and out that would keep me from sliding a thin rigid material in between the outside walls and coolant lines. I think my best bet is going to be batt insulation.

Ideally, I would like to take the shell off from around the internal hardware and do everything that way. But I don't know anyone around here that is good at welding. The shell is spot welded together and to the base. If I had the shell off, I could do a lot more to it.
 
What about loose fill or cellulose insulation? Would that provide the necessary R-value? It looks like the R-value is about R 3.6 to 3.8 per inch. It should be easy enough to get in there without the mess of expanding foam.

Nice project!
 
I love this project:mug: I got a new seal for my '52 International Harvester refrigerator from antiqueappliances.com. They're nice folks and about the only place I could find information on the old stuff! Hopefully, I'll get around to repainting my refrigerator soon. Here are a few pics of my project.
356464590.jpg
356464600.jpg

Original instruction sheet still inside the door!
356464642.jpg
 
WOW.. Yours has a lot more rust than mine. What year is it? Did it have the same or similar smell to it that I described about mine?

Well... Gonna rip out the old insulation right now and get an even better look at what I am dealing with. Will post up more pics here soon!
 
WOW.. Yours has a lot more rust than mine. What year is it? Did it have the same or similar smell to it that I described about mine?

It's a 1952 model. That is just surface rust, and it comes off easily with some 120 grit :) Mine didn't have the smell because it didn't leak or have the condensation issues that I'm sure your chest freezer did. God knows my modern chest freezer sure builds up condensation. The fridge works great and the issues it has are strictly cosmetic. However, those will be alleviated once I get off of my butt and hit it with a DA and some new paint ;) I've also been in the market for an old IH chest freezer similar to your Kelvinator, but they seem to only find their way to Craigslist in the midwest. If I ever find one I'll be using your restoration as a guide. Best of luck!
 
Well got some bad news. It was a lot harder than I thought to try and get that old insulation out. The majority of it came out in hand fulls and crumbled. I was only successful in getting about 12-14 inches out off the top all the way around and all of it out of the lid. Only good thing from that was the remaining insulation looks to be ok. Most of the smell was in about the first six inches from the top on just the front side. The rest was just old crumbly stuff...

So the new plan is to get the rust and everything off from around the top edge and lid, repaint, and put a 16" wide batt insulation into the empty top portion. I figure that if there is any light smell still remaining in the bottom half of the insulation that the new insulation, wood, and caulking should mask it into the walls..

Anyone see why this wouldn't work?

4288661177_e62773bb8e_m.jpg
4289407770_81b27d6237_m.jpg

4289404222_5681333a4b_m.jpg
4288662573_ef1a0fbd87_m.jpg

4288663907_4dded287f2_m.jpg
4289405634_b3432406f5_m.jpg


*2 hours/$10
 
Stang,
try this, get a 3 ft. small (1/4 - 3/8") piece of steel rod. chuck it in a drill, and wind that stuff around it. you prob. wont get it all, but i bet you'd get mor than you think!
 
How about leaving the rest of the insulation in there, but isolating any smell by laying down a layer of plastic and then generously caulking it around the inside of the two walls. This should create a smell barrier to help 'discourage' any stink from making its way up the freezer.
 
Stang,
try this, get a 3 ft. small (1/4 - 3/8") piece of steel rod. chuck it in a drill, and wind that stuff around it. you prob. wont get it all, but i bet you'd get mor than you think!

As I was pulling it out, I was curious how hard it was going to be to get more insulation back in because that stuff isn't exactly rigid. I will try that but only take it down a little further on one side to see if it works and then test trying to put some new insulation back in.

Thats probably going to be my best bet unless I try the plastic barrier idea. I will keep you updated. Thanks for the ideas! :mug:
 
i did a simmilar resto on a 1952 frigidair for my kegorator. On the electrical side of things i replaced the old "yt" style relay(a points/contact style relay) with a universal 3 in 1 solid state(start,run,overload) relay from my local appliance repair store. I belive it was a RCO810 from Supco. really easy to wire and no more fear of sparks. i continue to use the origional thermomstat in the fridge and it sits at a steady 3C. Your best bet is to replace the relay and wire it in with some newer temp control unit (love etc) and you'll be set.
 
If you use the "steel rod in drill" or some other method to get the existing stuff out can't you replace it with some kind of expandable foam?
 
If you use the "steel rod in drill" or some other method to get the existing stuff out can't you replace it with some kind of expandable foam?

I been looking around and researching insulation and If I am going to go through all the trouble of getting out the old stuff, I might as well do it right. Looked at loose fill insulation because it seemed to be easier to install than trying to hook up a hose to a can of expanding foam insulation shooting it 37" into the cavity. There are three primary types of loose fill; cellulose, fiberglass, or mineral wool (rock wool or slag wool).

Several pros and cons of different types of insulation. End result of the research is I will either go with expanding foam or mineral wool. Expanding foam is possibly one of the best options when referencing R value and moisture. But, I also think it will be the harder of the two to install. Mineral wool has a better R value and can withstand more moisture than cellulose or fiberglass loose fill and its easier to install than foam. But I will have a lesser chance of mold and mildew coupled with higher R value if I go with foam... TORN :confused:

Pros and Cons of different types of insulation: http://greenhomeguide.com/know-how/article/buyers-guide-to-green-insulation
 
There is a pourable kind of foam insulation, it is a two part product, in other words, it has a separate activator. It's used in marine applications, this could be your best bet, it's also not as expanding as the spray cans so it's less likely to damage something in there.
 
Back
Top