[Version 2 Release] RaspberryPints - Digital Taplist Solution

Homebrew Talk - Beer, Wine, Mead, & Cider Brewing Discussion Forum

Help Support Homebrew Talk - Beer, Wine, Mead, & Cider Brewing Discussion Forum:

This site may earn a commission from merchant affiliate links, including eBay, Amazon, and others.
small 3 wire QD's and the 3 in 1 wire. and the 6+ wire transfer.
For the 3 wire QDs I cut them off then creates my own wiring system by stripping two wires where the flow sensors would connect and soldering the flow sensors to the wire. I then ran a dedicated wire for the pulses and used electrical tape to wrap them all together.

I then used crimp on pins on each individual wire to convert from the wire to the shield.

Of course 6 pin mini XLR would work depending on how you want it to look.
 
Is there a way to make my brewery logo smaller and see more taps on the screen? I have tried resizing the image and posting the image link under the brewery tab but no matter what I do to the image it is still showing up too big.
 

Attachments

  • Raspberry Pints.jpg
    Raspberry Pints.jpg
    1.6 MB · Views: 126
Is there a way to make my brewery logo smaller and see more taps on the screen
check style.css in the RPints root directory for .breweryimg (.poursbreweryimg controls the image in the pours list if you have issues with that as well) if it exists it should have a width defined you can set a smaller width which should shrink the img. if it doesn't exist then add:

.breweryimg{
width: 500px;
}

of course set a smaller width to get the image smaller
 
if you upload the xml I will test when I get a chance and fix any issues.


I only had issues with foaming when I used less than 1/4" hose. Switch to 1/4" hose and john guest fittings and the foam went away.

Here are some examples from brewersfriend
 

Attachments

  • beer.zip
    4.4 KB · Views: 24
check style.css in the RPints root directory for .breweryimg (.poursbreweryimg controls the image in the pours list if you have issues with that as well) if it exists it should have a width defined you can set a smaller width which should shrink the img. if it doesn't exist then add:

.breweryimg{
width: 500px;
}

of course set a smaller width to get the image smaller


Thank you, I really appreciate it. I will try this tonight.
 
brewersfriend
Ok I tried on my latest and they did import. A few times they didn't take me back to the beer list, but I cant seem to reproduce that now.

Try uploading and if it doesn't take you back to the beer list open a new tap and go there manually and see if they are there.

If not verify you have the latest from GitHub. I made updates to the XML a few weeks ago.
 
/var/www
or /var/www/html

Alright so I still can't figure this out. Do I need to do a sudo command prior to the /var/www? or where am I going wrong?

Edit: I finally figured it out. I really appreciate your help.

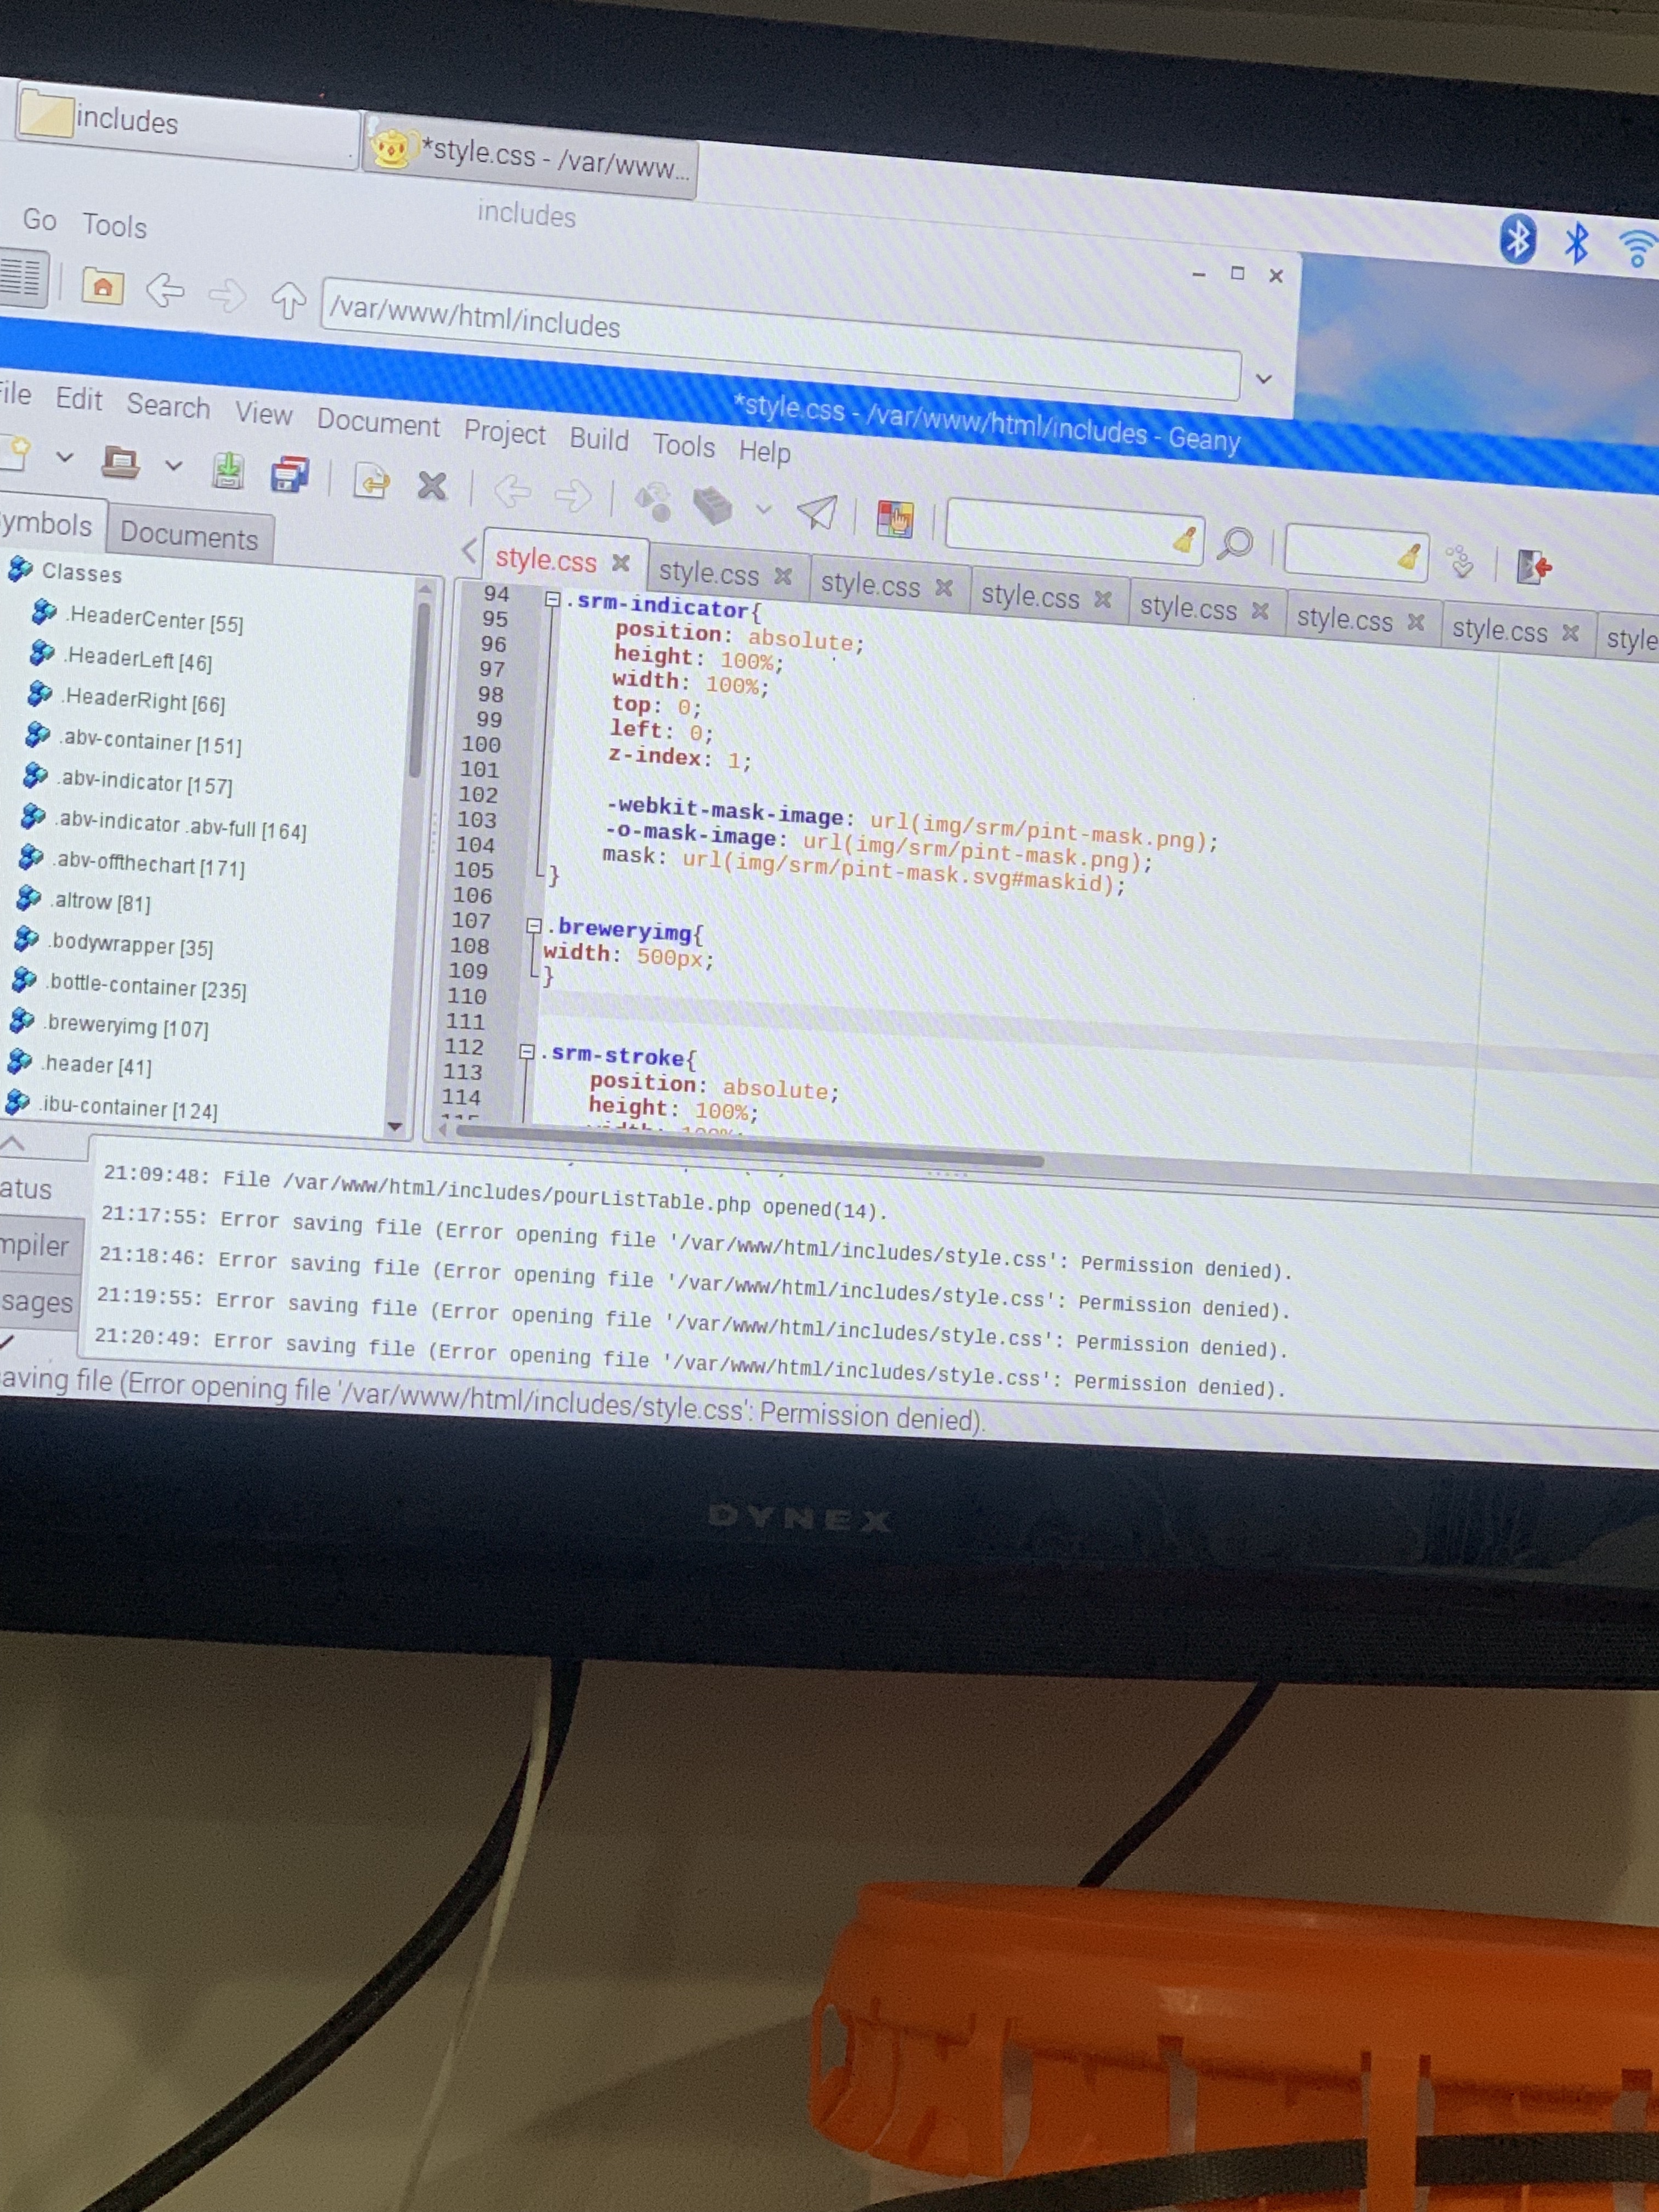
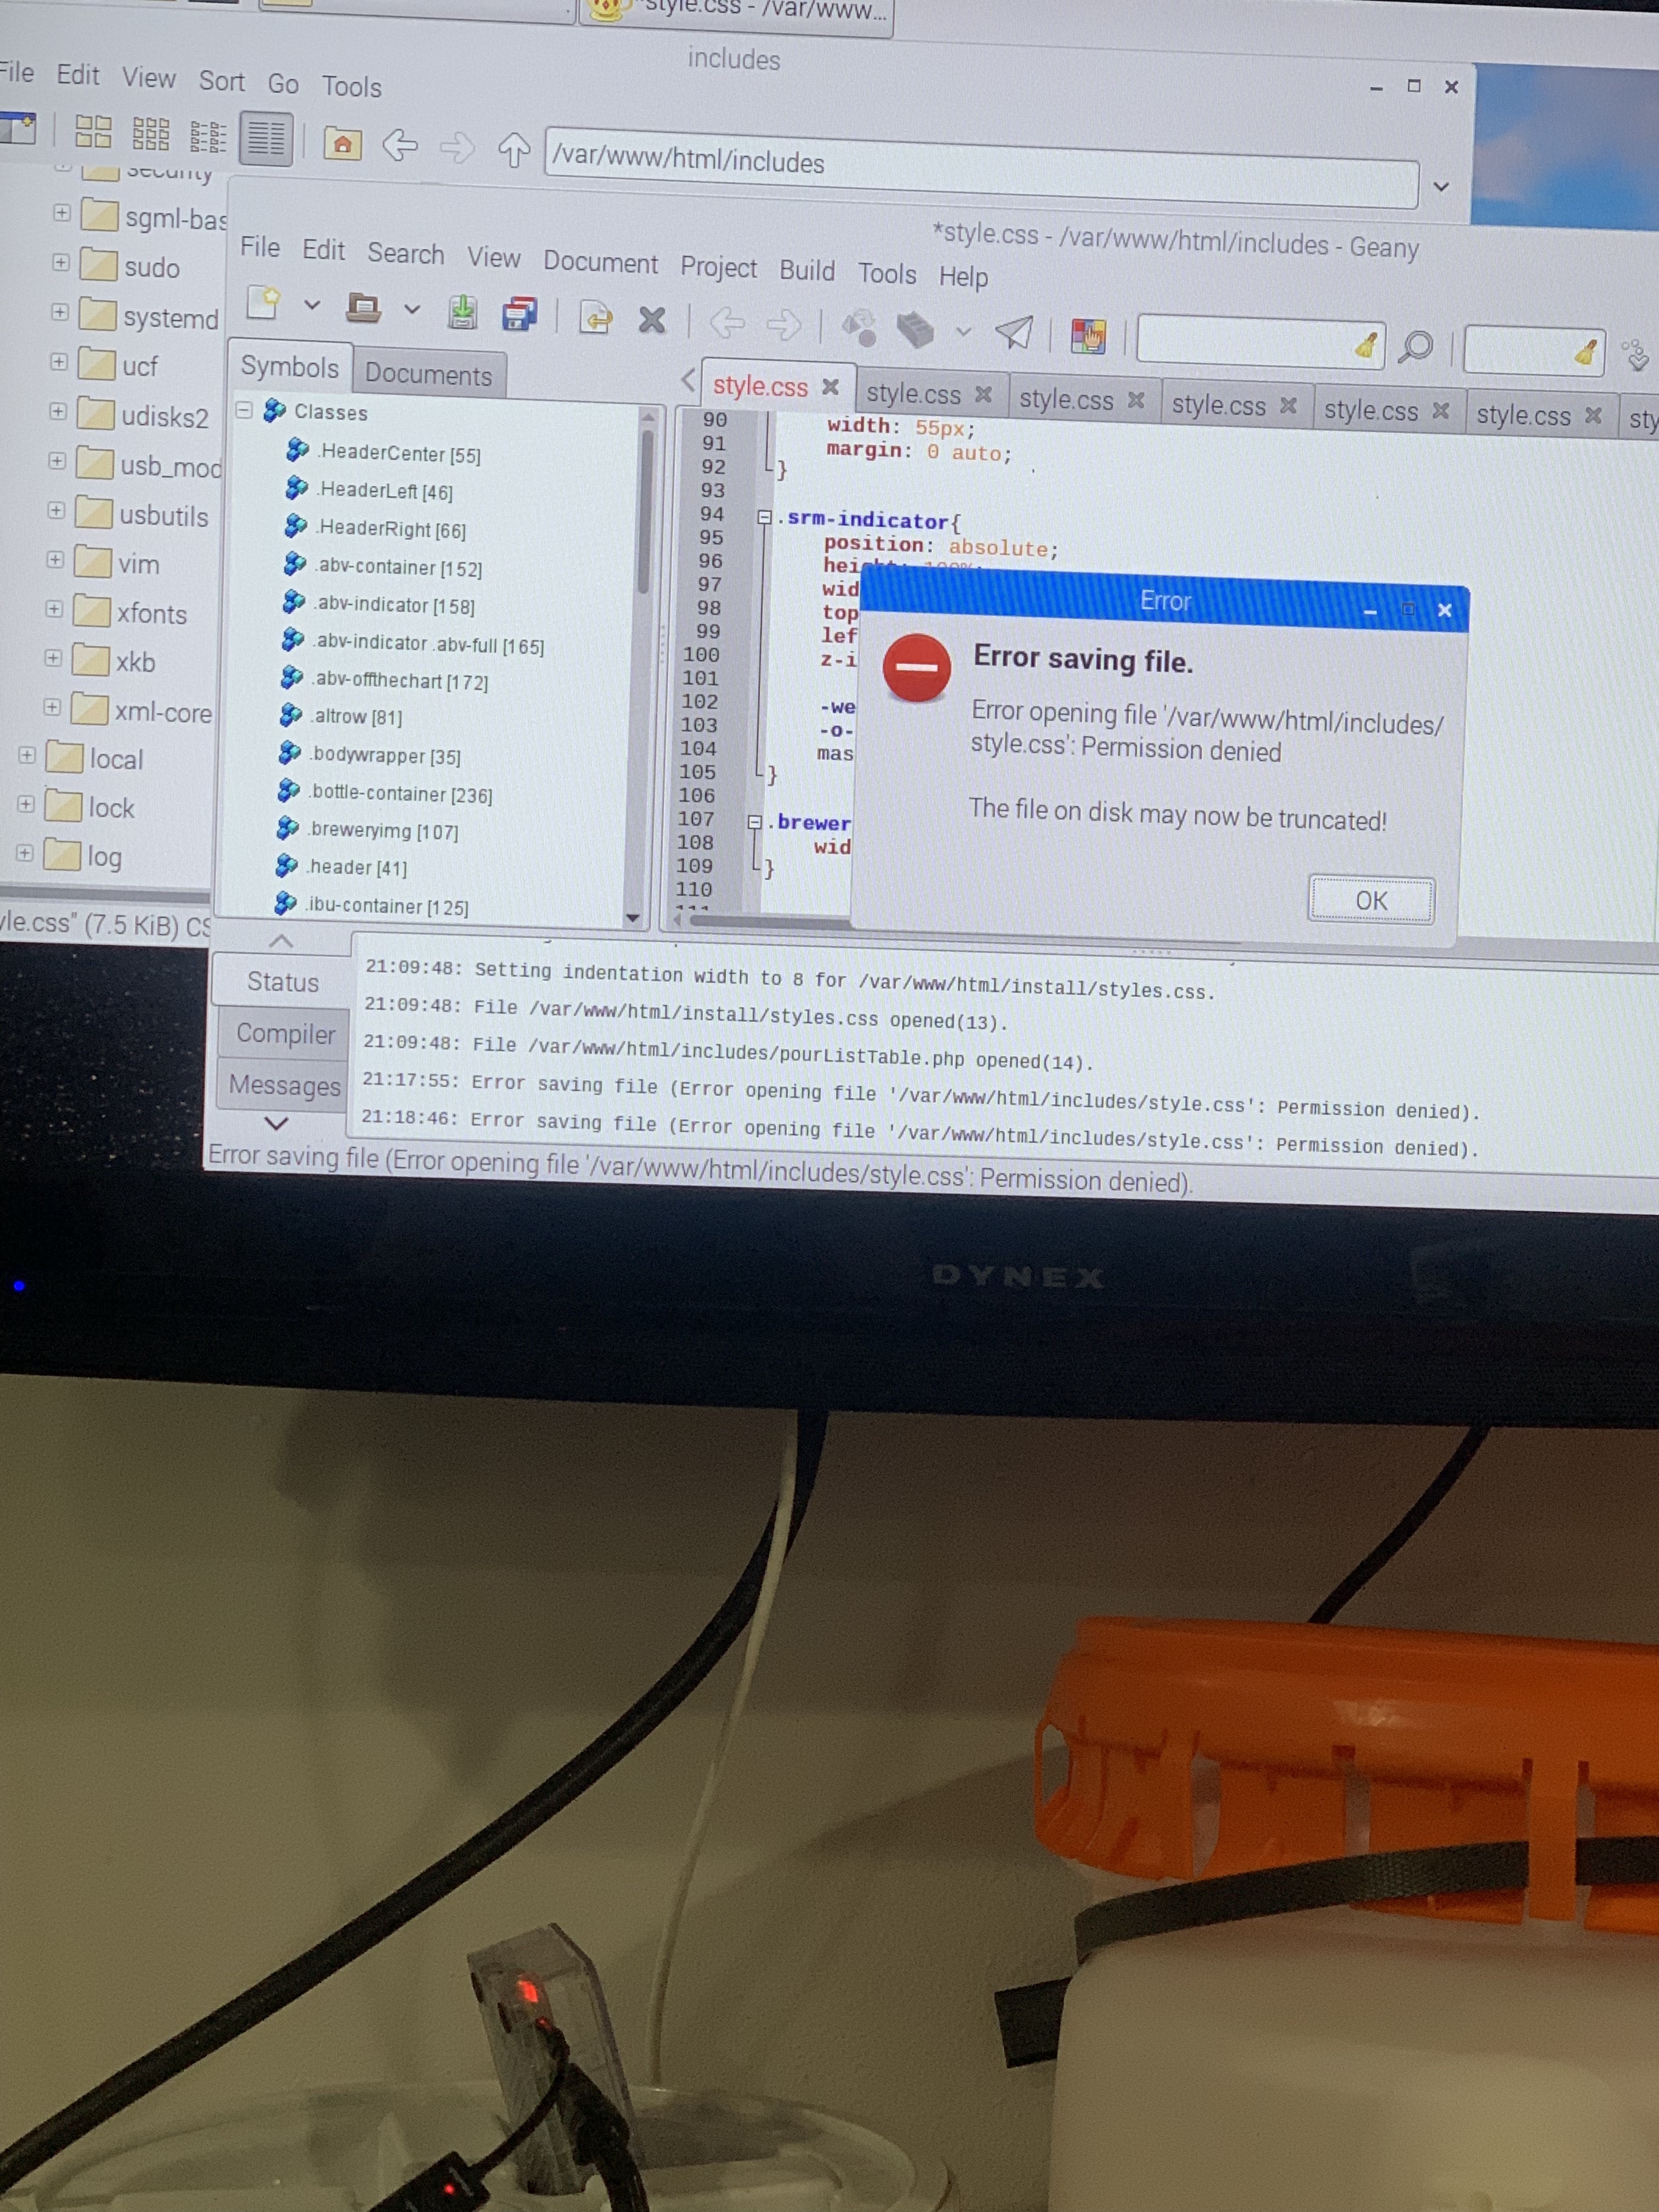
** I figured out how to get into the .style.css, however when I enter this info it gives me an error when trying to save it.
stylecss.jpg
stylecss1.jpg
 
Last edited:
The easiest way is to change the permission on the file using the terminal:
sudo chmod +777 /var/www/html/style.css

then try to save again.

Alternatively if you want to make many updates to Rpints
sudo chmod +777 /var/www/html -R
 
The easiest way is to change the permission on the file using the terminal:
sudo chmod +777 /var/www/html/style.css

then try to save again.

Alternatively if you want to make many updates to Rpints
sudo chmod +777 /var/www/html -R

Is there supposed to be a reaction when I do this command? There wasn't. It lets me save it now without issue, but nothing changed on RPints page. I tried rebooting as well with no effect.
breweryimg.jpg
 
Random hardware question. My flow meters have about 6ins of wire and those small computer (JST-XH) connectors. Im looking for small, 3wire quick disconnects i can replace these with and a spool of small wire that containes 3 wires inside i can run from each flowmeter. These will end with the mini xlr plugs into a box. In that box, I will run the combine all the PWR and GND wires and have my 4 data wires. Coming out of that i want a 6+ wire connector to run to my RPints box. Anyone have an idea for that, i saw daytripper used that huge serial plug but i dont need that much? would a USB-C plug and cable work?

So the 2 questions. small 3 wire QD's and the 3 in 1 wire. and the 6+ wire transfer.

I used two Cat 6 cables that run into my keezer. Those carry the data and power. Inside, I connected the power to a drone power distribution board. From the meters, I connected a three wire fan extension and clipped off one end, which were connected to the Cat 6 and distribution board. I wired my keezer for 7 meters.
 
Is there supposed to be a reaction when I do this command? There wasn't. It lets me save it now without issue, but nothing changed on RPints page. I tried rebooting as well with no effect.
There is no reaction to the command if it completes normally.

The other thing you can try is using the developers tools on chromium to change the size and see the results on the fly. then go back and change the style.css file.

To use the tools open RPints page and hit ctrl+shift+c then click on the image. on the right will be a panel with all the css information. you will then need to click on the td tag above the img tag to adjust the width
 
i set this up without flow sensors. If I want to add them in the future how do I do this? Redo the enitre setup?
 
If I want to add them in the future how do I do this? Redo the enitre setup?
Adding flow meters does not require redo the setup. You will have to install the extra software needed to run the flowmeters (Arduino, alamode....) but the rpints installs the same with or without the flowmeters there are just extra steps to configure them.

Did you follow the instructions of the orginal rpints or did you use my install script?
I used your script
 
Here are some examples from brewersfriend
After a little review I found a rogue exit command when the XML contained an unknown Yeast, so after it added the yeast it then stopped.

I will have the fixed committed to GitHub soon.
 
I used your script
The easiest way to setup flowmeters is to rerun the script. But that will remove all the data you had so far.

Eventually I will update the script to make it better and allow reconfiguration without needing to start all over.
 
The easiest way to setup flowmeters is to rerun the script. But that will remove all the data you had so far.

Eventually I will update the script to make it better and allow reconfiguration without needing to start all over.
That's fine. I actually don't have any data in there yet...this is my first venture into raspberry pi so feel accomplished just getting this far. Rerunning the script will be good practice
 
Raspbeery Pints code to run in the latest Debian 9.x, php 7.2.x, MariaDB, et al.
Believe enough have tested.

Only thing we're missing are the download/setup/configuration instructions (for Debian, php, etc) write-up.

Zip file with latest code attached.
 

Attachments

  • RaspberryPints-2.1.0.000.zip
    2.3 MB · Views: 250
What are the prerequisites? Stretch and ?
Aside from the Alamode setup (if used vs an Uno or equivalent) can the better part of the original instructions more or less work (with Stretch-specific changes vs the old Wheezy setup)?

Is there a way to export/import an existing database (like, one that's going on 6 years old :))?

If we get a rainy day or two I'd be willing to give it a try...

Cheers!
 
What are the prerequisites? Stretch and ?
Aside from the Alamode setup (if used vs an Uno or equivalent) can the better part of the original instructions more or less work (with Stretch-specific changes vs the old Wheezy setup)?

If we get a rainy day or two I'd be willing to give it a try...

Cheers!
day_tripper. Thanks, you've just reminded me about the flow meters. The flow meter code didn't need changing, but I'm unsure if anyone tested.

Let me find my install notes and PM you.
 
What I did to install latest OS, php, MariaDB, etc and use the Raspberry Pints code I modified for the latest items. If someone would like to provide a better write up including flow meters.

Need at least 32GB microSD card

Raspberry Pi
Set a default user name
Set a default password

Command terminal
type sudo su and press enter

update things by typing
apt-get update && apt-get upgrade

When starts select Graphical install.

The graphical install indicates this is debian 9
Select American English keyboard
Install to one partition (recommended for new users)

Install LAMP on Debian 9 Stretch
http://tecadmin.net/install-lamp-stack-debian-9-stretch/

sudo su
ssh root@debian9
sudo apt install ca-certificates apt-transport-https

Install Apache 2
sudo apt-get install apache2

Install MariaDB (replacement for MySQL) MariaDB 10.1 installed
sudo apt-get install mysql-server

Install PHP
wget -q https://packages.sury.org/php/apt.gpg -O- | sudo apt-key add -
sudo echo "deb https://packages.sury.org/php/ stretch main" | tee /etc/apt/sources.list.d/php.list

Then install Latest PHP version on Debian 9. (installs php 7.2)

sudo apt update
sudo apt upgrade
sudo apt install php php-mysql libapache2-mod-php

Verify Setup
To verify LAMP setup on Debian 9, Create a PHP script with phpinfo() function under Apache document root. To do this, edit /var/www/html/info.php file in your favorite text editor and add below content to the file and save it.

<?php
phpinfo();
?>

Now access the info.php file in the web browser using your system IP address. Host name is raspberry. Surf to http://raspberry/info.php or localhost/info.php

** Install phpMyAdmin on Debian

First, update the Apt package manager cache on your Debian system to make the sure system have the latest version of packages.

sudo apt-get update

Now, Install phpMyAdmin by running the following command. This will also install required dependencies automatically.

sudo apt-get install phpmyadmin

The package configuration will ask for the basic configuration for phpMyAdmin. The first, you need to select web server to configure. This tutorial is using Apache web server.

MySQL application password for phpmyadmin (use phpmyadminPW)

** Configure Apache for phpMyAdmin

The phpMyAdmin setup is completed now. Just to make sure that phpmyadmin.conf is created under /etc/apache2/conf-enabled/ directory. Now you can access phpMyAdmin using system’s hostname or IP address.

browser surf to http://localhost/phpmyadmin
If not working ensure mariadb is running. At command prompt type systemctl status mariadb

If running configure phpmyadmin with dpkg-reconfigure -plow phpmyadmin
See http://manjaro.site/how-to-install-phpmyadmin-on-debian-9-stretch/

Also do
sudo nano /etc/apache2/apache2.conf
insert: "Include /etc/phpmyadmin/apache.conf" at the bottom of file.
restart apache2 sudo /etc/init.d/apache2 restart

** Configure Apache for phpMyAdmin

Surf to http://localhost/phpmyadmin is now working

This requires MySQL username and password to login to phpMyAdmin

I get "#1698 - Access deined for user 'root'@'localhost'

MySQL 5.7 changed the secure model: now MySQL root login requires a sudo.

I.e., phpMyAdmin will be not able to use root credentials.

The simplest, safest and permanent solution will be create a new user and grant required privileges.
1. Connect to mysql

sudo mysql --user=root mysql

2. Create a user for phpMyAdmin

Run the following commands (replacing some_pass by the desired password):

CREATE USER 'phpmyadmin@localhost' IDENTIFIED BY 'some_pass';
GRANT ALL PRIVILEGES ON *.* TO 'phpmyadmin@localhost' WITH GRANT OPTION;
FLUSH PRIVILEGES;

Verify use has correct permissions.
SHOW GRANTS FOR 'phpmyadmin'@localhost;
If your phpMyAdmin is connecting to localhost, this should be enough.

Update phpMyAdmin

Using sudo, edit /etc/dbconfig-common/phpmyadmin.conf file updating user/password values in the following sections (replacing some_pass by the password used in Step #2):

# dbc_dbuser: database user
# the name of the user who we will use to connect to the database.
dbc_dbuser='phpmyadmin'

# dbc_dbpass: database user password
# the password to use with the above username when connecting
# to a database, if one is required
dbc_dbpass='some_pass'

Now surf to http://localhost/phpmyadmin
Log in with phpmyadmin@localhost password used in Step #2

I'm in!

Server type: MariaDB
Server version: 10.1.37-MariaDB-0+deb9u1 - Debian 9.6
PHP version: 7.2.13

***********

Copy the RaspberryPints-2.1.0 folder and files into /var/www/html

Set permissions sudo chmod -R 777 /var/www/html

Browse to localhost/index.php
provide all values!

Now at the "Welcome to Raspberry Pints!" page.
Root Password: (required)
Database Username: beers
Database Password: beersPW

RPints Username:
Your Name:
Admin password:

If just want to test, play around, include sample data otherwise must enter data.

**** I get the following
Validating Entries...Success!
Checking DB connectivity...Success!
Checking config folder permissions...Success!

***

If encounter the following error then all required values were not supplied during the Raspberry Pints setup.
Checking DB connectivity...
Warning: mysqli_connect()" (HY000/1698): Access denied for user 'root'@'localhost' in /var/www/html/install/includes/configprocessor.php on line 52
Success!
Checking config folder permissions...Success!
 
I was actually coming back to apologize for being salty. What I should have said is this:

As a guy that's put in (I'm not going to say how many) hours fixing someone else's code, I appreciate your position. It's my experience however that providing an install script that avoids most of the pitfalls saves you time - if you are the sort that's gonna be here answering questions.

However, I'll put my time where my mouth is. I'd be happy to wrap a lot/most/all of that into a script. Can I accomplish that with only a Pi and an Arduino (no A La Mode or flow meters)? I've never messed with RPints at all.
 
[...]I'd be happy to wrap a lot/most/all of that into a script. Can I accomplish that with only a Pi and an Arduino (no A La Mode or flow meters)? I've never messed with RPints at all.

You can certainly use the Pi and the Arduino (if it's an Uno or a Nano as both use the ATmega328) to get your feet wet. To be honest it's functionally a better way to go than the Alamode (though that still needs supporting) as there are a couple more GPIOs available and an Uno is hella cheaper than an Alamode.

You can simulate the flow meters by running a signal generator on the RPi and use the GPIO output as an input to the Arduino. It may work without a level up-shift - I currently have an Uno and a Mega that work just fine with the RPi output directly connected - but keep an eye on that. I found this script on the intertubes and used it to simulate flow meters when I was developing my RO system controller. If you leave the last two lines commented out as shown it'll run until you manually kill the process, then use a flying lead and steady fingers to simulate a pour :)

Code:
#!/usr/bin/python
#######
# This program would generate PWM on GPIO 7 Pin 26 of P1 with 50% Duty cycle at 1kHz
#######
import RPi.GPIO as GPIO
import time
from time import sleep

GPIO.setmode(GPIO.BCM)
GPIO.setup(17,GPIO.OUT)
p=GPIO.PWM(17,31.5)
p.start(50.0)

while 1:
    time.sleep(100)
  
##raw_input("Press Enter key to Stop 1kHz PWM @ 50% duty cycle")
##GPIO.cleanup()
[code]

Cheers!
 
You can certainly use the Pi and the Arduino (if it's an Uno or a Nano as both use the ATmega328) to get your feet wet. To be honest it's functionally a better way to go than the Alamode (though that still needs supporting) as there are a couple more GPIOs available and an Uno is hella cheaper than an Alamode.
Alamode should be here today actually. Since it will be here before my new BrewPi Shields (*sigh*) I can play with it. What GPIOs are not available on the Alamode? I had a quick look at the data sheet and don't see anything important missing but just having a header and having functionality is different I suppose.
You can simulate the flow meters by running a signal generator on the RPi and use the GPIO output as an input to the Arduino. It may work without a level up-shift - I currently have an Uno and a Mega that work just fine with the RPi output directly connected - but keep an eye on that. I found this script on the intertubes and used it to simulate flow meters when I was developing my RO system controller. If you leave the last two lines commented out as shown it'll run until you manually kill the process, then use a flying lead and steady fingers to simulate a pour :)
You answered my next question without me asking. :) I was just gonna go all morse code on it actually, but that scriptlet is sexier.
 
When we were getting flow meters working years ago I had trouble using GPIO 3 for a flow meter, and iirc GPIO 4 as well. As I only needed six I used GPIO 2 and 5 through 9, and didn't work the problem far enough to a solid conclusion. But GPIO 3 is shared with the RTC chip as its SQW/Interrupt, and GPIO 4 is shared as well (along with other pins).

As an Uno doesn't have the RTC or the AVR to/from RPi level shifters there are fewer opportunities for conflict...

Cheers!
 

Attachments

  • alamode_schematics.pdf
    460.3 KB · Views: 34
Well, I ended up with VIP tix to the races this past weekend. So I got two things done: Jack and $h17. :) Did end up hanging out with some Chiefs players as well as the cheerleaders, soaked up sun and free booze. All for the kids of course! (actually they did collect quite a bit for Big Brothers/Sisters).

So, my Alamode is on my bench sans headers. None of the boards from the other project showed up though so I should be able to do some evenings on this here soon.

I suppose this will also give me the opportunity to create a scripted means by which BrewPi and RPints can coexist.
 
I apologize if this was already asked, but I'm looking for a recommendation on a monitor/tv for 8 taps. I found an IPS 21" Asus monitor with a USB hub for ~$100. Will that be too large for an 8 tap setup? Is a tv a better option? On the raspberry pints site they recommend IPS monitors over tv's. Also, is it best to follow the instructions on the raspberry pints page for setup (w/o flow meters), or are there better instructions found here? Thanks!
 
recommendation on a monitor/tv for 8 taps
I cant speak too much about monitors/tvs as I use a small 8" tablet for my 8 taps which requires scrolling to see everything, but it was very cheep and isn't stuck to the PI.

are there better instructions found here
This really all depends on what Raspbian you are going to use. The original doesn't work on the latest (Stretch), if using an older version you can use the original

That being said there are modifications to RP to get it to work on Stretch
My version that has many upgrades and new features. It has an install script that makes it easy to install
see
https://www.homebrewtalk.com/forum/...-taplist-solution.487694/page-96#post-8457261


or tobor_8thman and kaljade (and others I might not be aware of) that worked to take the original and just update to work on stretch
See tobor_8thman posts
https://www.homebrewtalk.com/forum/...taplist-solution.487694/page-116#post-8609646
https://www.homebrewtalk.com/forum/...taplist-solution.487694/page-116#post-8611274
 
I cant speak too much about monitors/tvs as I use a small 8" tablet for my 8 taps which requires scrolling to see everything, but it was very cheep and isn't stuck to the PI.


This really all depends on what Raspbian you are going to use. The original doesn't work on the latest (Stretch), if using an older version you can use the original

That being said there are modifications to RP to get it to work on Stretch
My version that has many upgrades and new features. It has an install script that makes it easy to install
see
https://www.homebrewtalk.com/forum/...-taplist-solution.487694/page-96#post-8457261


or tobor_8thman and kaljade (and others I might not be aware of) that worked to take the original and just update to work on stretch
See tobor_8thman posts
https://www.homebrewtalk.com/forum/...taplist-solution.487694/page-116#post-8609646
https://www.homebrewtalk.com/forum/...taplist-solution.487694/page-116#post-8611274

Thanks for the reply. Doesn’t the current site show version 2, not the original? Would I be able to follow those steps or are you saying that if I buy a Raspberry Pi and install stretch I would have to follow your instructions? Sorry for the beginner questions.
 
Version 2 just relates to the version of RaspberryPints where they added the flow meters. You can use those instructions if you put an old version of Raspbian on your Pi. I'd suggest going with Stretch and using the RandR+ install script. It works well.
 
Back
Top