
I acquired a commercial style 2-door freezer a while ago. I had an upright fermenter fridge which was awesome it held two carboys, blowoff, and a milk crate full of bottles for conditioning. The problem arose when my wife "made" me buy a couple of 60L Spiedels. They didn't fit. . . even one didn't fit. What, oh what, was I to do? A local micro-brewery was selling this 2-door freezer so I jumped at it.


My goal was to make this a 2-zone cooler, with one half cooling to 9C (50F) and the other to 19C (68F) so that I could cellar/lager and do ale-fermentation at the same time. Here's what I picked up. It cools great had some holes drilled in one of the sides and in one of the doors (it had been used as a tap fridge for a local micro-brewery.) I took some masking tape, covered one side of the hold and filled it with expanding foam, then put masking tape over the other side.
You need to know how this type of freezer cools there is a condenser on top that uses convection to send cold air into the shroud at the top of the inside section. This is open on either end and has a fan that blows UP and OUT when the door is opened. I needed to block off one end and disconnect the fan I don't want cold air to be sucked out and blown up and out of the freezer.
So here's what I did. First I got some rigid foam insulation 2" thick. This was left over from a larger construction project. I cut it so it was VERY snug fit at the center partition. It only rose 48" so did not come up to the shroud and fan. How convenient! I had to trim two of the shelves so they would allow the foam insulation wall. No big deal little grinding and the cut was smooth.

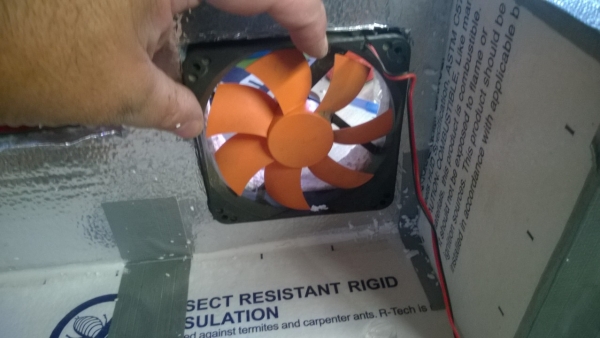
Now to insulate the shroud. At first, I thought the fan blew IN so I blocked off both sides. I did remove the one at the bottom of the pic since that flows to the cold side. I used duct tape and spray adhesive (on both surfaces, wait until tacky, then put it on and tape it together to get good hold).

Next I shrouded around the fan so that it would also make a good flow of cold air to the cold side. You can see the wall plus shroud in this pic.


Now comes the wiring. I have two STC-1000's (as you can see in the pic of the whole freezer)
I got a three-gang box for the plugs one is always hot (for the lights), one (blue) is for the lager/cellar side, and one (black) is for the ale fridge.

The wiring did confuse me, even though the STC-1000 is extremely simple. To clarify for myself, I laid it out using a free CAD program. This made it MUCH easier to get everything together. I do recommend color coding and labeling EVERYTHING makes it much easier. I did have an issue where the cold side was getting colder and colder while the warm side was getting warmer and warmer. . . I traced it to the fact that I had the temp sensors swapped! DOH fixed that and it was stable.

The cold side has no heater in it it just activates the cooler for the freezer. The warm side has a reptile heater element for the heater, and a fan blowing from the cold side to supply cold air. This fan is in the shroud I will be upgrading this to a higher flow fan, but for now it works fine.
There is a flap that lays flat against the fan when it is not on when the fan activates, it blows the flap out and cold air flows nicely.

All cables come from the top the STC-1000s and the electrical box are mounted to the fascia the fascia is removable so it makes working on it pretty easy.

I did cut a couple of holes in the roof of the freezer they're on top so should not impact cold (which falls) too much, but I've also sealed around them and, once everything is completely finalized, I will fill with foam.
Future Plans:

My goal was to make this a 2-zone cooler, with one half cooling to 9C (50F) and the other to 19C (68F) so that I could cellar/lager and do ale-fermentation at the same time. Here's what I picked up. It cools great had some holes drilled in one of the sides and in one of the doors (it had been used as a tap fridge for a local micro-brewery.) I took some masking tape, covered one side of the hold and filled it with expanding foam, then put masking tape over the other side.
You need to know how this type of freezer cools there is a condenser on top that uses convection to send cold air into the shroud at the top of the inside section. This is open on either end and has a fan that blows UP and OUT when the door is opened. I needed to block off one end and disconnect the fan I don't want cold air to be sucked out and blown up and out of the freezer.
So here's what I did. First I got some rigid foam insulation 2" thick. This was left over from a larger construction project. I cut it so it was VERY snug fit at the center partition. It only rose 48" so did not come up to the shroud and fan. How convenient! I had to trim two of the shelves so they would allow the foam insulation wall. No big deal little grinding and the cut was smooth.
Now to insulate the shroud. At first, I thought the fan blew IN so I blocked off both sides. I did remove the one at the bottom of the pic since that flows to the cold side. I used duct tape and spray adhesive (on both surfaces, wait until tacky, then put it on and tape it together to get good hold).
Next I shrouded around the fan so that it would also make a good flow of cold air to the cold side. You can see the wall plus shroud in this pic.
Now comes the wiring. I have two STC-1000's (as you can see in the pic of the whole freezer)
I got a three-gang box for the plugs one is always hot (for the lights), one (blue) is for the lager/cellar side, and one (black) is for the ale fridge.
The wiring did confuse me, even though the STC-1000 is extremely simple. To clarify for myself, I laid it out using a free CAD program. This made it MUCH easier to get everything together. I do recommend color coding and labeling EVERYTHING makes it much easier. I did have an issue where the cold side was getting colder and colder while the warm side was getting warmer and warmer. . . I traced it to the fact that I had the temp sensors swapped! DOH fixed that and it was stable.
The cold side has no heater in it it just activates the cooler for the freezer. The warm side has a reptile heater element for the heater, and a fan blowing from the cold side to supply cold air. This fan is in the shroud I will be upgrading this to a higher flow fan, but for now it works fine.
There is a flap that lays flat against the fan when it is not on when the fan activates, it blows the flap out and cold air flows nicely.
All cables come from the top the STC-1000s and the electrical box are mounted to the fascia the fascia is removable so it makes working on it pretty easy.
I did cut a couple of holes in the roof of the freezer they're on top so should not impact cold (which falls) too much, but I've also sealed around them and, once everything is completely finalized, I will fill with foam.
Future Plans:
- BrewPi I think this would make a great BrewPi project.
- Dehumidifiers especially in the lager side, there is some significant amount of humidity and condensation. I am going to get the majority of it out with DampRid, and then work on a circulation fan.
- Seal the access holes with foam (once everything is completely finalized) possibly add a couple of extra connections for future expansion.
- FILL WITH BEER! Lager/Cellar side is already full of cider/mead in cold crash prior to racking and blending; some beer-roulette (unknown beers from a contest I helped judge); couple of full kegs. Ale side will get some water (for now thermal mass) and I'm brewing this weekend so it'll get a Spiedel full of pale ale.
- Make a chalkboard on the left door chalkboard paint plus some wood molding around it. Help keep track of what's going on inside.
