• Please visit and share your knowledge at our sister communities:
  • If you have not, please join our official Homebrewing Facebook Group!

    Homebrewing Facebook Group

Turning your Fermonster into a complete closed transfer system for cheap!

Homebrew Talk

Help Support Homebrew Talk:

This site may earn a commission from merchant affiliate links, including eBay, Amazon, and others.
interesting, does speidel not offer a solid cap? I wonder if the speidel is a little more rugged, holds more pressure, or less prone to cracking?

I've been looking to upgrade from 10g keg fermenters I have the funds and approval to go spike conical and new fridge to hold it (about a $1k upgrade)... But I'm wondering if I would be just as happy or even happier with this set up. Easier cleaning, less parts to clean, keep my smaller fridge and still have good pressure transfers and low o2 dry hopping… all for under a hundred bucks. Hmm 🤔
 
As far as I know they do not make a solid cap for the 7.9 gal. As far as pressure I've had not had a chance to test it yet as I have recently put it together and have beer fermenting in 3 fermonsters and have no more room to do anything ( but it will probably be more room after the Wifey's family visits this weekend). Only downside I see so far is not being able to see what going on inside when it is fermenting.
 
Last edited:
Looks like morebeer no longer sells the pressure kit, but they sell another one where the posts look significantly bigger ( for fermzilla ). Where have you folks bought the posts? I see Williamsbrewing sells individual posts as does brewhardware. This is what morebeer sells now. Stainless Steel Pressure Kit for FermZilla | MoreBeer

If I remember correctly I got mine from morebeer. With that being said: I've never had the chance to use mine. Unfortunately I've barely even unpacked it so I would be happy to part with it if you would get more use out of it than I have or will in the foreseeable future. If you're interested shoot me a PM to avoid further hijacking this thread.
 
Yeah, you're right. Wonder why such a big change?

The original kit was for the Fermentasaurus, not the FermZilla. A google search for "fermentasaurus pressure kit" turned up a couple vendors listing the product for different prices (some in stock, some on backorder). I see an eBay listing for $28.

I picked up the kit, but personally I was really more interested in just adding a quick disconnect post to the top of my Fermonster (in combo with the spigot for closed transfers). I think you would be able to build the full setup with the following parts (plus the solid cap):

Gas Post: Gas In Ball Lock Post with 1/4" Bulkhead Assembly - KL03179
Liquid Post: Beverage Out Ball Lock Keg Post with 1/4" Bulkhead Assembly - KL03162
Floating Tip Tube: Torpedo Keg Buoy Floating Dip Tube - Pour the Clearest Kegged Beer

MoreBeer also has most of these items, but I don't see a Floating Dip Tube with the "dip tube post" and I am not sure this one Dip Tube for Corny Keg - Gas In (Stainless) | MoreBeer is long enough.
 
I assumed it was only a matter of time until fermentasaurus parts were no longer available because it had been replaced by fermzilla (which uses different posts).

This was a fun modification. But with fermzilla all-rounders only costing $55, I think that is a better option. No spigot, but there are other ways to deal with that.

I'm currently using the fermzilla and the modified fermonster. And if I had to choose one, I'd go with fermzilla (though others' preferences may differ).
26A32452-3D23-4087-9AEC-6A20C1524C39.jpeg
 
@GoodTruble
I wonder if they saw this thread ever and thought “look at how many folks are looking for a mor affordable wide mouth clear fermenter with pressure transfer capabilities” lol
 
@GoodTruble
I wonder if they saw this thread ever and though look at how many folks are looking for a mor affordable wide mouth clear fermenter with pressure transfer capabilities lol

Not unheard of. KegLand openly seeks user input on Australian homebrew sites.

https://aussiehomebrewer.com/threads/kegland-questions-and-answers.98306/page-274
(Off Topic - I am genuinely excited about their $5 2-gallon plastic kegs getting released in the states (discussed in that thread)).
 
BTW, I did my first ferment with the Fermonster with one disconnect post. I was very happy with how well it worked and the extra convenience over something similar using a stopper.

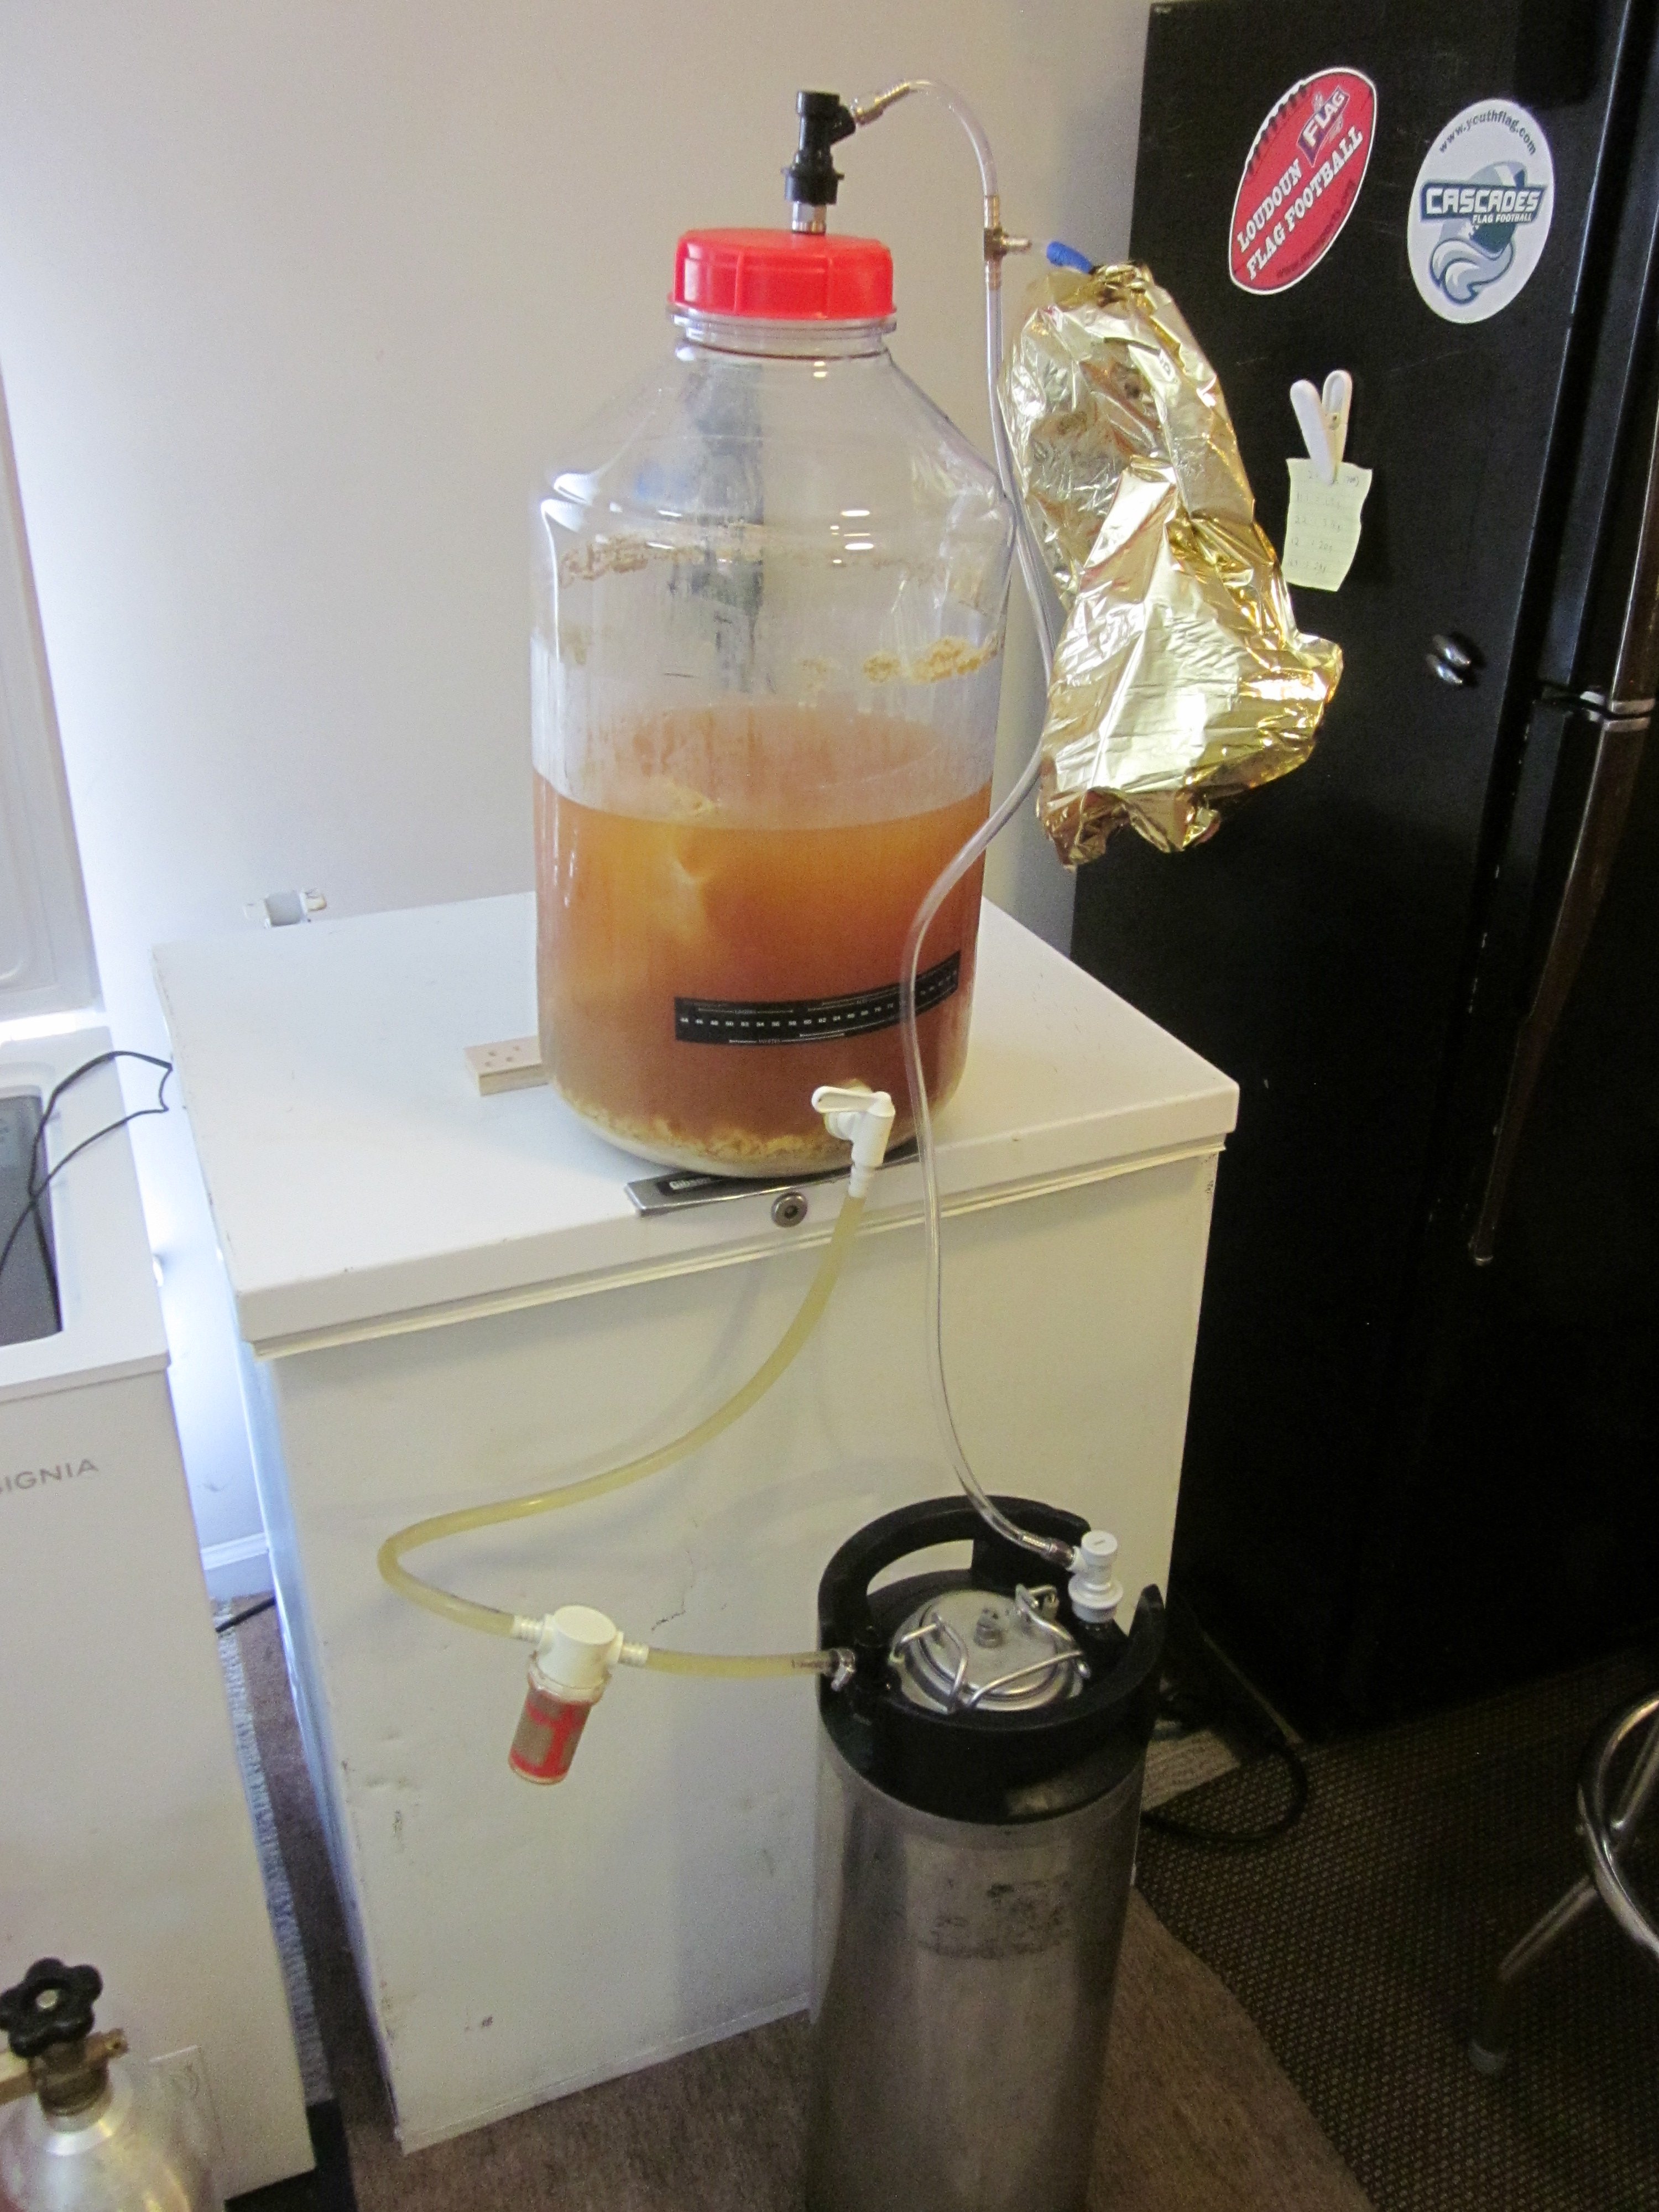
During fermentation, I ran a line from the fermenter post to a keg liquid post (with a mylar balloon to avoid suckback when cold crashing). I purged out the keg with the CO2 from fermentation. Then when it came time to keg, I swapped the black disconnect over for a grey one, and use that line as the CO2 return from the purged keg. Since the fermenter is sealed up, I used the "dry hop with magnets" approach, which seemed to work well.

The pressure kit was $25.49 after 15% off discount. A pretty good deal for a pair of posts (can mod 2 lids...I have 4 Fermonsters), a PRV (rated at 35 PSI), and a floating dip tube that I can put to use in a keg.

Picture during keg transfer:
IMG_3412.JPG
 
BTW, I did my first ferment with the Fermonster with one disconnect post. I was very happy with how well it worked and the extra convenience over something similar using a stopper.

During fermentation, I ran a line from the fermenter post to a keg liquid post (with a mylar balloon to avoid suckback when cold crashing). I purged out the keg with the CO2 from fermentation. Then when it came time to keg, I swapped the black disconnect over for a grey one, and use that line as the CO2 return from the purged keg. Since the fermenter is sealed up, I used the "dry hop with magnets" approach, which seemed to work well.

The pressure kit was $25.49 after 15% off discount. A pretty good deal for a pair of posts (can mod 2 lids...I have 4 Fermonsters), a PRV (rated at 35 PSI), and a floating dip tube that I can put to use in a keg.

Picture during keg transfer:
View attachment 739478

Nice. What is the canister attached along the liquid line?
 
It is an inline filter that helps to filter out hop particles. It is not a Bouncer brand, but a cheaper version I got off Amazon.
3/8" Hose Barb in-Line Strainer with 20 mesh Stainless Steel Filter Screen 3/8" Hose Barb in-Line Strainer with 20 mesh Stainless Steel Filter Screen: Amazon.com: Industrial & Scientific
my first concerned with that is oxidation while passing through the filter. Are you experiencing any? Can you remove air or purge the filter?
 
I assumed it was only a matter of time until fermentasaurus parts were no longer available because it had been replaced by fermzilla (which uses different posts).

This was a fun modification. But with fermzilla all-rounders only costing $55, I think that is a better option. No spigot, but there are other ways to deal with that.

I'm currently using the fermzilla and the modified fermonster. And if I had to choose one, I'd go with fermzilla (though others' preferences may differ).

Fermzilla's biggest limitation in my mind is it doesn't fit in my mini fridge for temp control. Like many others, I only have 12 inches diameter - perfect for 5g or 10g corny kegs and the fermonster (12 in diameters). Fermonster sets itself apart with an easier lid to get in and out of quickly for dry hopping.
 
When I built my fermentation setup, the all rounder just came out afterwards lol. Its pretty much the exact setup as here with a few exceptions: 1) As @ihavenonickname stated, the all rounder doesn't fit into a 4.4cf standard mini fridge without having to add a collar on the front end. I wasn't really interested in doing that myself although Ive seen people do it successfully. 2) the all rounder allows for a bigger head space (7.9gal) which is a nice plus, 3) the all rounder is pressure rated, and 4) I like being able to use the standard Fermonster lid with a big blow off tube to start fermentation for yeasts that are super active like the Belgian strains or Juice. I am not sure the all rounder setup allows for a nice blowoff tube that is wide enough to accommodate those top cropping yeast strains. After high Krausen but when the primary fermentation is still going crazy, I'll switch to the modified lid.

My setup doesn't have a spigot at the bottom and I exclusively use the floating dip tube for pulling hydro samples and kegging. The biggest learning curve is knowing how tight you can go with the lid without cracking it which Ive done a couple of times lol.

In the end, Im happy with the longevity with my beers using this modified fermonster setup so I figured Im doing something right in terms of minimizing O2 on the cold side.
 
my first concerned with that is oxidation while passing through the filter. Are you experiencing any? Can you remove air or purge the filter?

I run CO2 up through the line and filter that I hope purges it down to an acceptable level. The one time I had to recover from a clogged poppet during a transfer, I am sure I introduced much more oxygen that this filter risks.

I would recommend such a filter. The potential downsides are 1) potential source of oxidation and 2) another item to clean and sanitize. The cap does have some gaps that are hard to reach even with a small brush, though I have not experienced any issues in the 2 years I have been using this. On the other hand, I get almost zero hop particles into my keg.
 
A benefit of the Fermonster line are the smaller sized fermenters. I have the 7-gallon, a pair of 3-gallon and one of the 1-gallon fermenters. On the other hand, the Kegland lines scale up in size. Also, my local shops sell the Fermonster.

That (non-pressure rated) Flat Bottom Fermzilla looks quite nice and is just about the same price as the Fermonster. FermZilla Flat Bottom Fermenter - 7.9 gal. / 30 L | MoreBeer
 
I'm finally planning to join the hacked Fermonster community :) Just a couple of questions for you kind folks:

1) Does anyone see the need to add a filter to their floating dip tube? I've had some clogging issues with the floating dip tube in my dry hop keg before, so I had to add a stainless nut to weigh things down and a filter/screen to prevent all of the hops from clogging my liquid post.

2) Following up on @eugles comments, the original Pressure Fermenting kit is no longer being carried by MoreBeer. Does anyone see any issues using this stainless kit instead? Stainless Steel Pressure Kit for FermZilla

Or am I better off going with the plastic? Plastic Pressure Kit for FermZilla

If you are drilling through a solid lid with a 7/16" or 1/2" spade bit (that's what I did), you are going to need ball lock bulkheads for gas and liquid posts. The links you provided show carbonation caps that the fermzilla uses but you still need the ball lock bulkheads. Perhaps moreover or someone else sells the bulkheads, not sure. If anyone does, you might wanna check brewhardware.com.

I think the filter screen could work well potentially. Occasionally during a transfer, my floating dip tube gets almost stuck to the sides when near empty and it slows the transfer. That filter should stop that as well. I haven't used one of these myself though. As long as you get a solid hard cold crash to drop all the hops to the bottom, the transfer should still go smoothly.

IMG_0685.jpg

IMG_0684.jpg
 
I don't use a filter & have not had a clogging issue yet (just wait for it all to settle out). But I definitely had issues with floating dip tube sticking to the sides of fermenter and kegs. Total PITA. I attached stainless steel washers, but it's still a problem.
 
I don't use a filter & have not had a clogging issue yet (just wait for it all to settle out). But I definitely had issues with floating dip tube sticking to the sides of fermenter and kegs. Total PITA. I attached stainless steel washers, but it's still a problem.

I had that issue, too, and my plan is to buy one of those filters designed for the floating dip tube that has adjustable attachment points, like this one, and attach on the far end - that should keep the intake hanging low:
https://www.morebeer.com/products/floating-dip-tube-filter-attachment.html
 
very curious, what is causing people’s hoses to clog? The reason I ask is I’ve never had a clogging issue and I dry hop 8 to 10 oz of pellets. After cold crashing they all drop to the bottom and then I leave about a 1/2 inch of beer on top of them.

Is it because of not cold crashing? Maybe due to trying to get the very last bit of beer into a keg?
 
Last edited:
I've had my transfer slow way down towards the end a couple of times. I assumed I had a clogged poppet. Took it apart and was clean inside. I leave my Fermonster in the chest freezer ferm chamber while transferring to a keg. Hard to see inside towards the bottom.

After reading the last few posts I totally think it might just be the end of the dip tube getting too close to the side of the fermentor. I know that looking from the top the dip tube was right up against the side. May give a filter of some sort a try. If nothing else, just to keep the pickup away from the side of the fermentor.
 
Back
Top