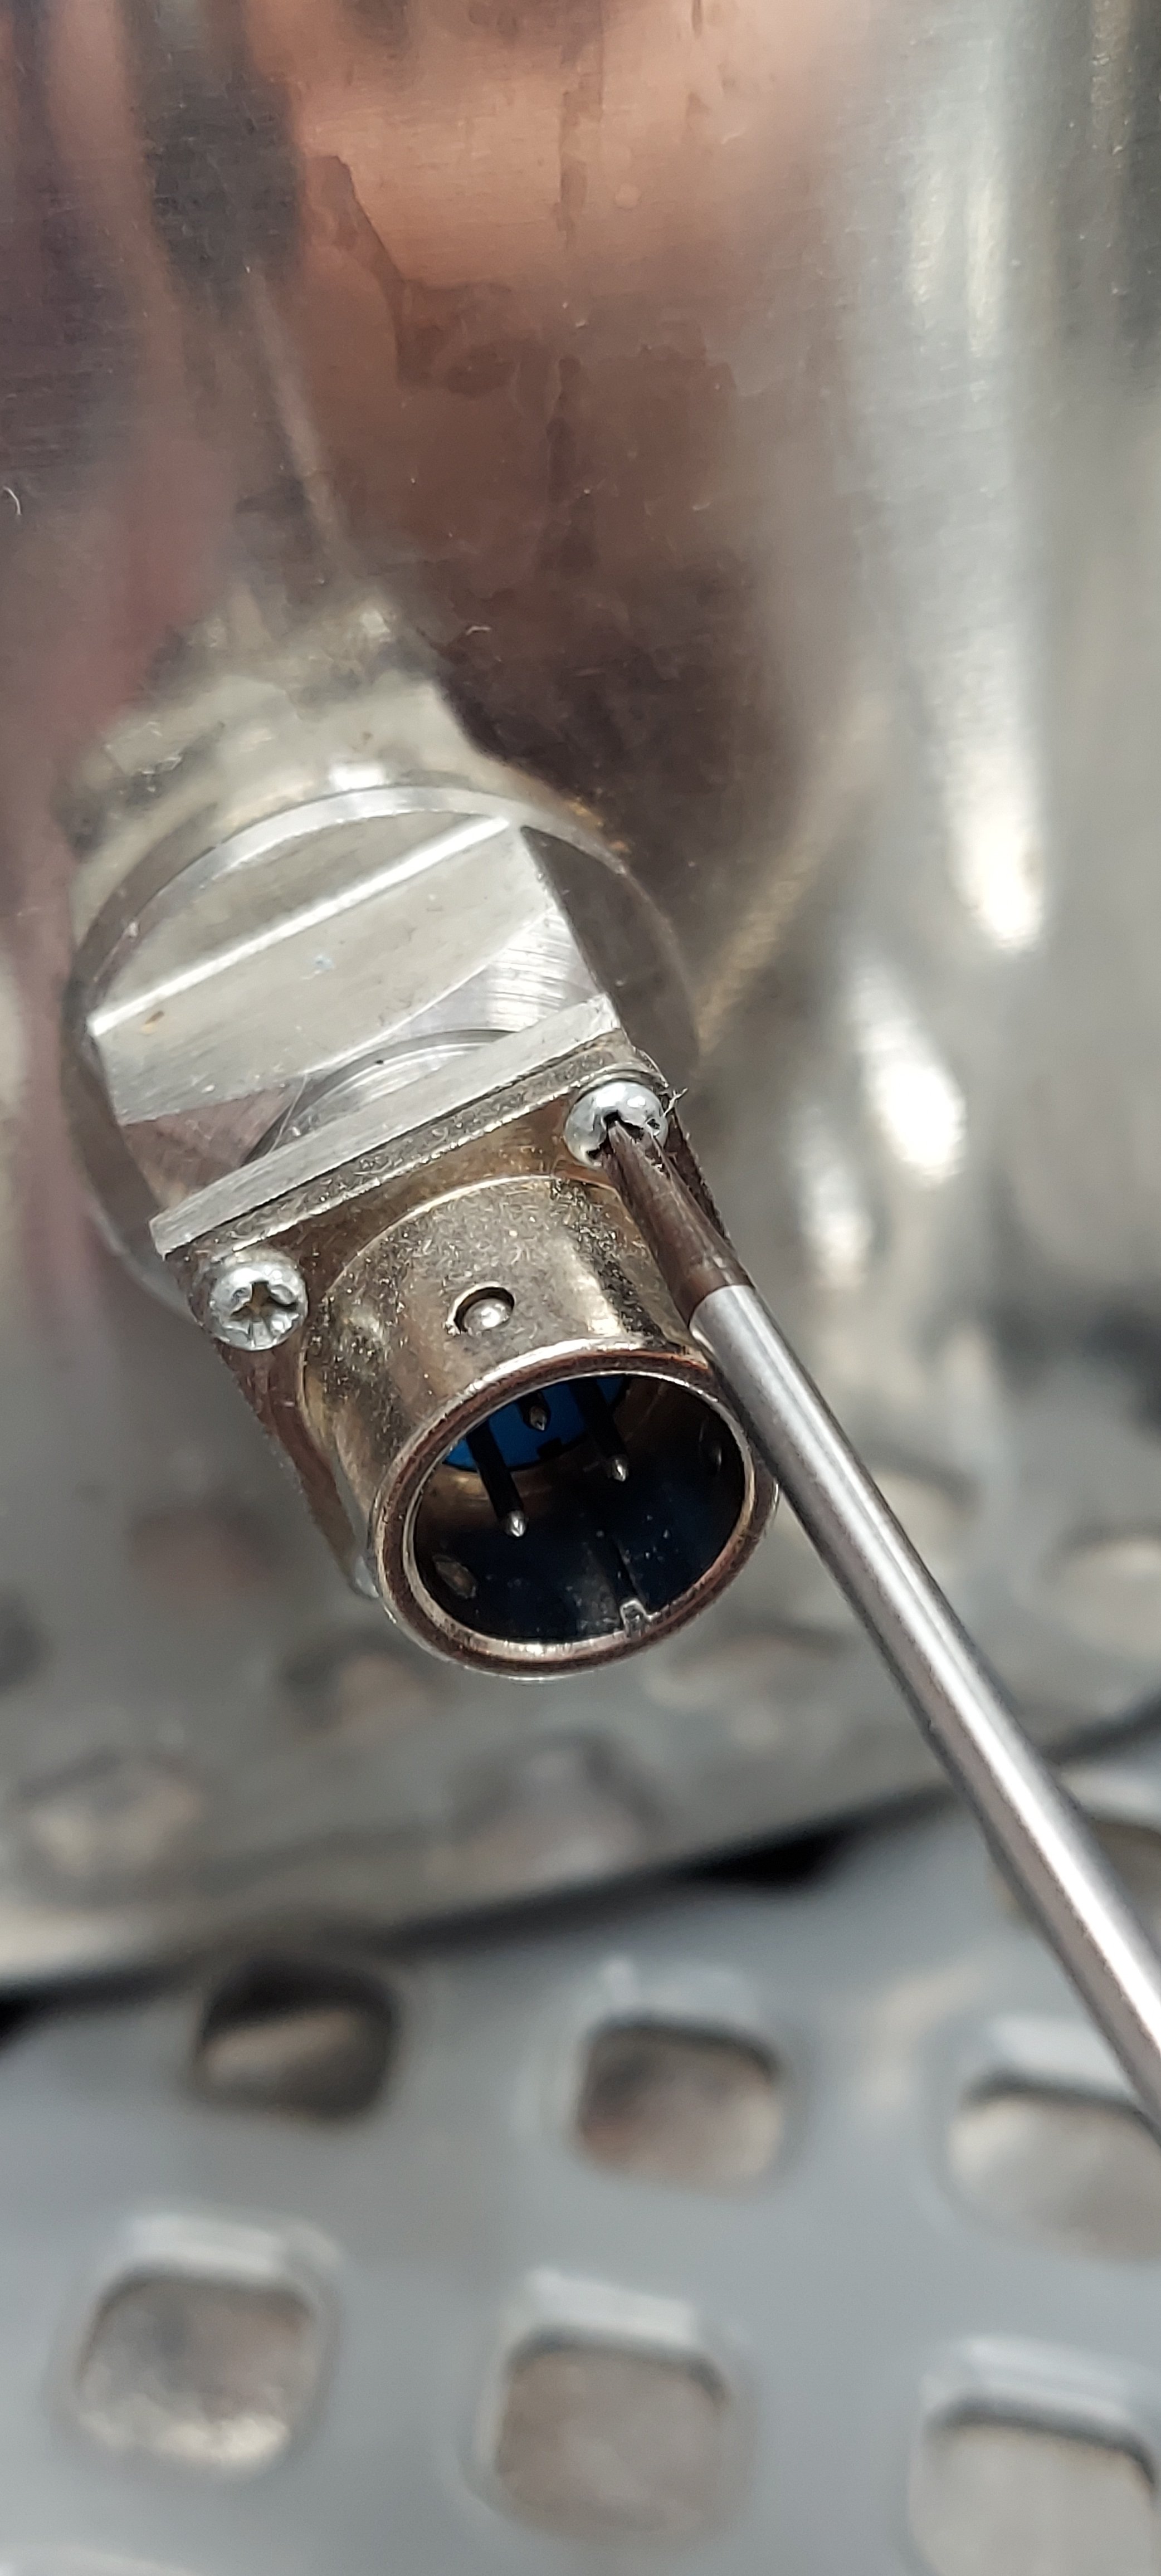
Hey, my brewery has been working great for like ~70 batches, and all of a sudden my thermal probe connector is acting wonky. Last brewday while it was chilling, I was watching the readout on my EZboil creeping down towards pitching temp, when all of a sudden it started showing 214f. I wiggled the connector which brought it back to reality. Obviously the contacts in that connector need some attention, what should I do?
You are using an out of date browser. It may not display this or other websites correctly.
You should upgrade or use an alternative browser.
You should upgrade or use an alternative browser.
Thermal probe connection issues
- Thread starter Jayjay1976
- Start date

Help Support Homebrew Talk:
This site may earn a commission from merchant affiliate
links, including eBay, Amazon, and others.
Oh also, I want to buy a separate probe I can stick into the mash for more accurate step mashing, I'm having a hard time locating a pt100 probe with the 3-prong connector that my setup has. I bought it from theelectricbrewery.com but it seems to be a non-standard configuration.
Last edited:
Okay nevermind the new probe. I ordered one from theelectricbrewery.com for $45...
Still would like some tips on contact cleaning to get my kettle probe to read accurately again.
Just curious, doesn't the Auber box sport a screw-type terminal block?
Or do you have some intervening cabling?
Cheers!
Or do you have some intervening cabling?
Cheers!
I have the Auber controller built into a junction box with removable cabling. It does offer maximum flexibility and a modular design, but the truth is I've only disconnected the temp probe cable maybe a handful of times. Just wondering how to maintain the contacts, and I have never had any boilover events or really any reason why the connector should be dirty, though apparently it is.Just curious, doesn't the Auber box sport a screw-type terminal block?
Or do you have some intervening cabling?
Cheers!

$53.24
1pc Hose Barb/MFL 1.5" Tri Clamp to Ball Lock Post Liquid Gas Homebrew Kegging Fermentation Parts Brewer Hardware SUS304(Liquid Hose Barb)
Guangshui Weilu You Trading Co., Ltd

$10.99 ($31.16 / Ounce)
Hornindal Kveik Yeast for Homebrewing - Mead, Cider, Wine, Beer - 10g Packet - Saccharomyces Cerevisiae - Sold by Shadowhive.com
Shadowhive

$7.79 ($7.79 / Count)
Craft A Brew - LalBrew Voss™ - Kveik Ale Yeast - For Craft Lagers - Ingredients for Home Brewing - Beer Making Supplies - (1 Pack)
Craft a Brew

$176.97
1pc Commercial Keg Manifold 2" Tri Clamp,Ball Lock Tapping Head,Pressure Gauge/Adjustable PRV for Kegging,Fermentation Control
hanhanbaihuoxiaoshoudian

$33.99 ($17.00 / Count)
$41.99 ($21.00 / Count)
2 Pack 1 Gallon Large Fermentation Jars with 3 Airlocks and 2 SCREW Lids(100% Airtight Heavy Duty Lid w Silicone) - Wide Mouth Glass Jars w Scale Mark - Pickle Jars for Sauerkraut, Sourdough Starter
Qianfenie Direct

$53.24
1pc Hose Barb/MFL 1.5" Tri Clamp to Ball Lock Post Liquid Gas Homebrew Kegging Fermentation Parts Brewer Hardware SUS304(Liquid Hose Barb)
yunchengshiyanhuqucuichendianzishangwuyouxiangongsi

$479.00
$559.00
EdgeStar KC1000SS Craft Brew Kegerator for 1/6 Barrel and Cornelius Kegs
Amazon.com

$719.00
$799.00
EdgeStar KC2000TWIN Full Size Dual Tap Kegerator & Draft Beer Dispenser - Black
Amazon.com

$22.00 ($623.23 / Ounce)
AMZLMPKNTW Ball Lock Sample Faucet 30cm Reinforced Silicone Hose Secondary Fermentation Homebrew Kegging joyful
无为中南商贸有限公司

$58.16
HUIZHUGS Brewing Equipment Keg Ball Lock Faucet 30cm Reinforced Silicone Hose Secondary Fermentation Homebrew Kegging Brewing Equipment
xiangshuizhenzhanglingfengshop

$20.94
$29.99
The Brew Your Own Big Book of Clone Recipes: Featuring 300 Homebrew Recipes from Your Favorite Breweries
Amazon.com
Allowing the assumption it's just environmental contamination ("It's everywhere!") I'd think a well-placed shot of contact cleaner might do the trick, especially if delivered via one of those red capillary tubes...
Cheers!
Cheers!
bjhbrew
Well-Known Member
- Joined
- Oct 15, 2016
- Messages
- 159
- Reaction score
- 90
I hate to guess but I would assume just some corrosion on the pins or in the sockets could cause behavior like you described. I would try some electronic contact cleaner which is probably just acetone in an aerosol then assemble/disassemble a few times. If it works put a little dielectric grease on the socket to prevent further problems. Idk might work?
Another possibility : an intermittently failing solder joint in the connector cable. Twice, I've had to re - solder a failed connection in an Auber 3-conductor connector.
I’d try some dielectric grease on the contacts. I had the same problem. The grease helped but didn’t solve the issue completely so I just purchased a new cable… problem solved. I believe the female connection loosens up after repeated connecting and disconnecting and can lead to whacky readings.
I assembled the cable myself so this is a real possibility...Another possibility : an intermittently failing solder joint in the connector cable. Twice, I've had to re - solder a failed connection in an Auber 3-conductor connector.
Agree. Those quick disconnect cable connectors can stress because of the twisting back & forth movements needed to line up the cable to the probe. Seems like one of the more fragile components of an electric brewing system. I have marked the connection points with a sharpie to avoid excessive twisting/stress.Another possibility : an intermittently failing solder joint in the connector cable. Twice, I've had to re - solder a failed connection in an Auber 3-conductor connector.
Why would you want to put a "dielectric" grease on something you want to make a good connection on. Seems self defeating to me.
Cheers.
Joel B.
Cheers.
Joel B.
Since the second incident, I've finally learned to pre-check the connector orientation, minimizing the aforementioned twisting. I also have a spare (repaired) cableAgree. Those quick disconnect cable connectors can stress because of the twisting back & forth movements needed to line up the cable to the probe. Seems like one of the more fragile components of an electric brewing system. I have marked the connection points with a sharpie to avoid excessive twisting/stress.
As long as you don't apply it to the mating surfaces of your connections, it will prevent corrosion from moisture.Why would you want to put a "dielectric" grease on something you want to make a good connection on. Seems self defeating to me.
Cheers.
Joel B.
When I had issues with mine, I thought it was the cable as well. Carried on even after putting in spare cable. Turned out the back connectors of the front panel had corrosion, which got taken care of by pulling the front out and re-seating… give it a shot if the cable doesn’t do the trick.
I have an additional thermal probe being delivered on Monday, I'll see if jiggling the connector causes jumpy readings which would narrow it down to the cable. Connectors look clean so I suspect its a bad solder joint.
I BIAB, and the kettle probe is situated below the false bottom which works fine for heating strike water, but after mashing in, there is a considerable difference between what that probe reads and the actual temperature of the mash inside the bag. Up to now, I crank up the target temp several degrees to hit my target mash temp, measuring with a dial thermometer dropped through the lid, but its always a gamble depending on ambient temp and how much stirring I do.
The new sensor is 8" long, my plan is to drop it down through a hole in the lid while mashing, then switch back to the kettle probe during the boil.
On a side note, my probes and cables from the electric brewery all have three pins, those I see on amazon and elsewhere have 4 pins; which is the standard and is there a benefit of one over the other?
Edit: mailman just delivered the new probe, yay!
Last edited:
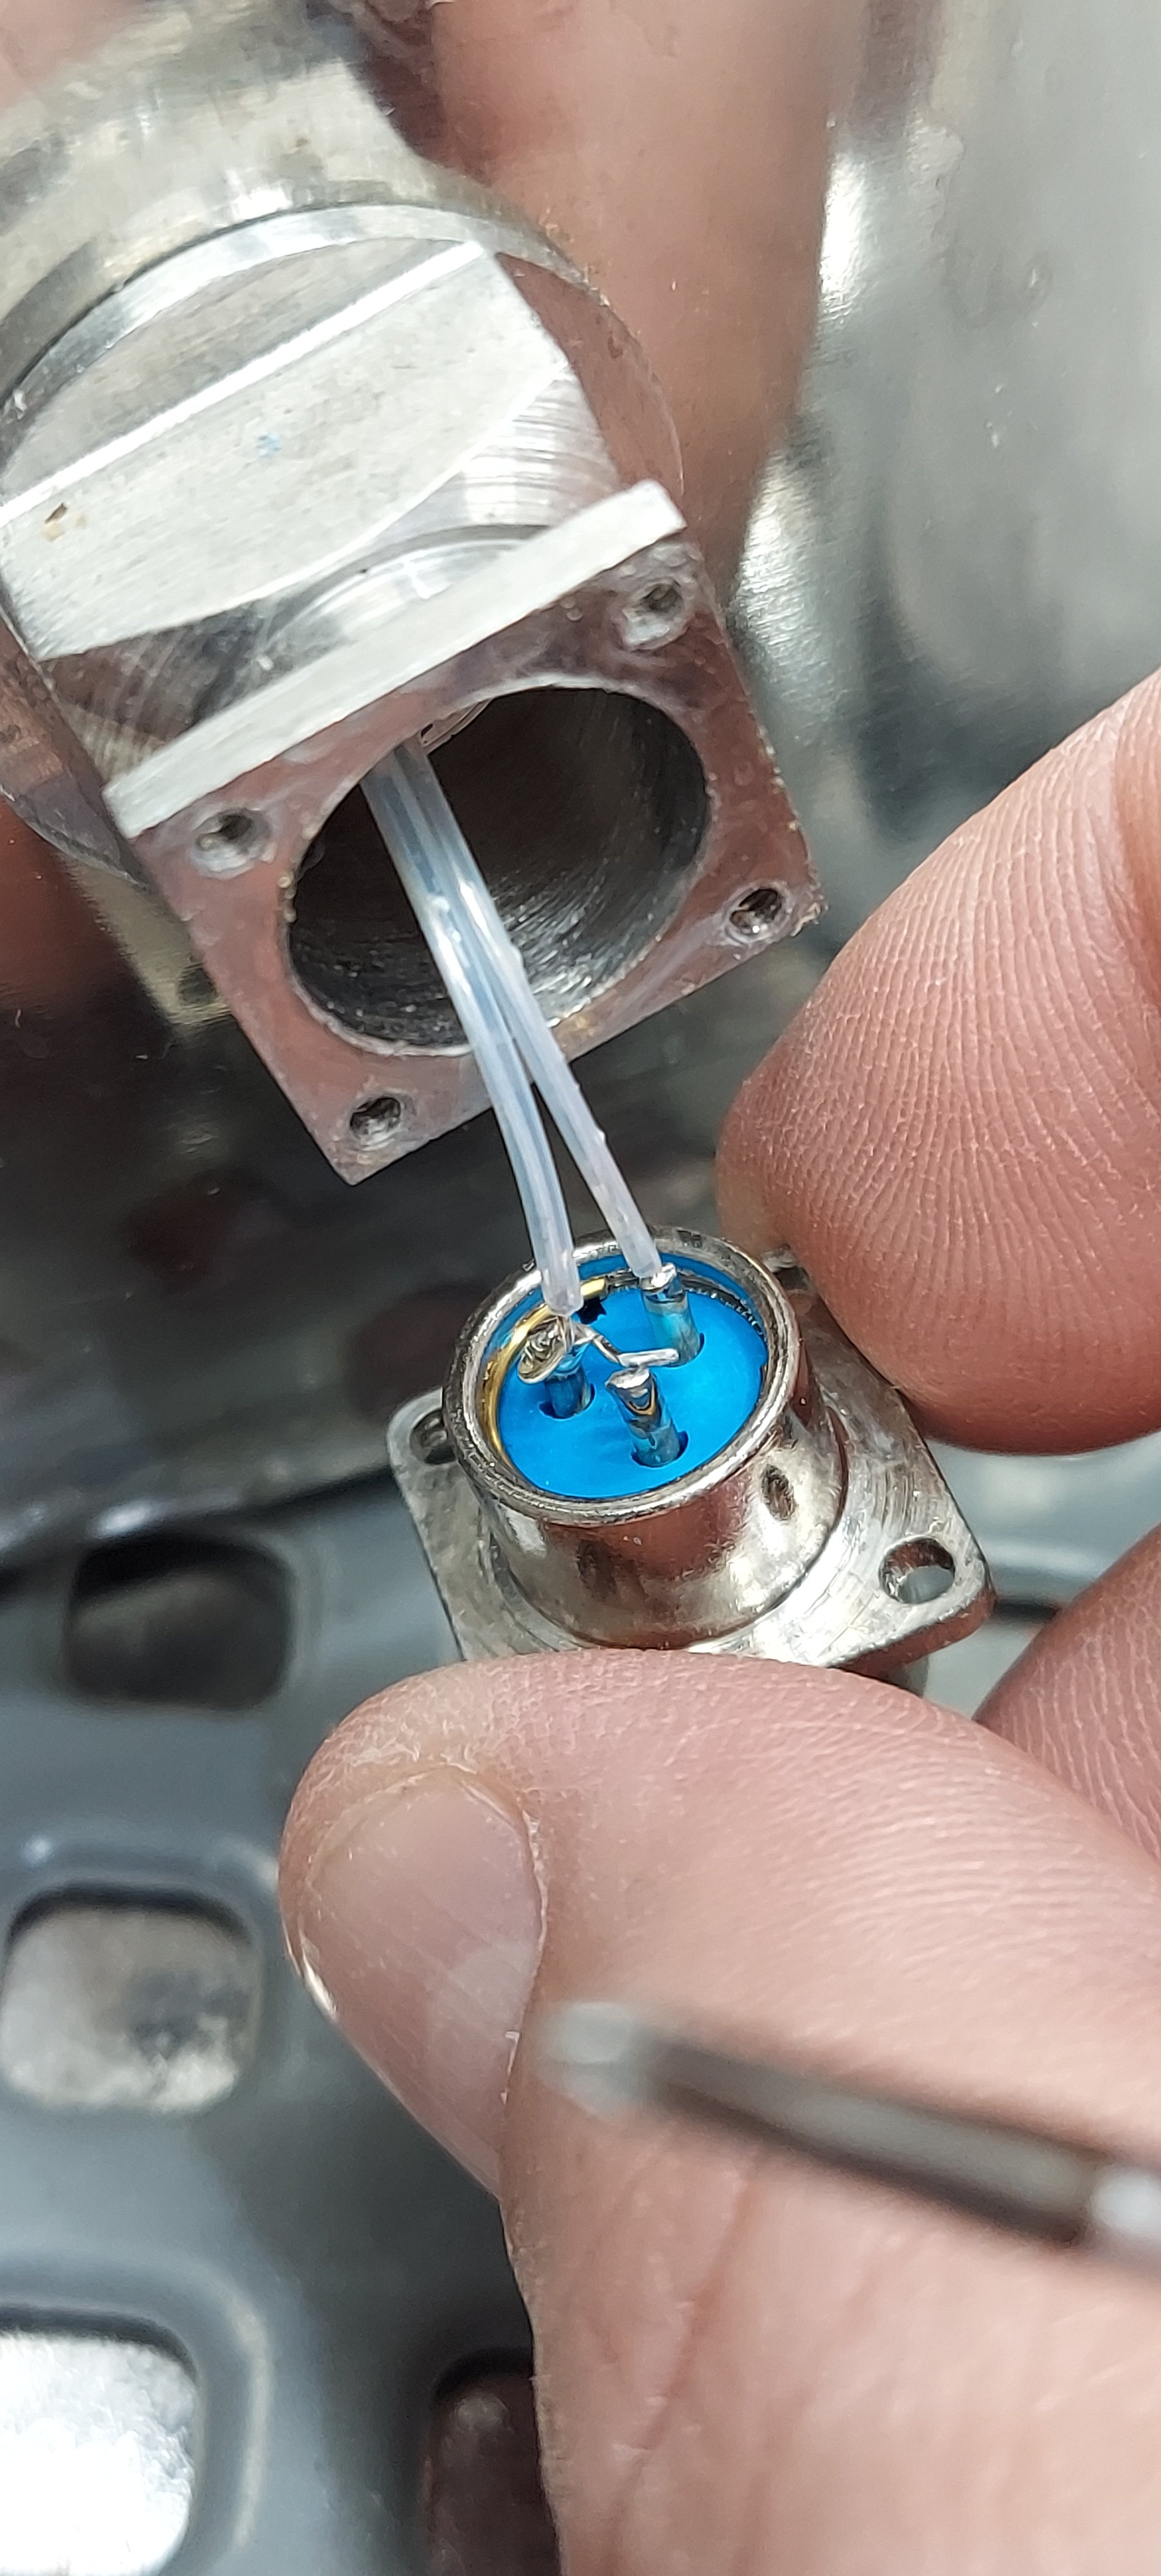
Just tested the new probe to see if there is a problem with the cable, it was reading steady so I cleaned the pins on the kettle probe and tested that out again. A bit of jiggling had it jumping all over the place again, so the problem must be in the probe. I took out the 4 little screws and sure enough, one of the solder joints had failed.


Time to bust out the soldering iron.


bruce_the_loon
Well-Known Member
*beats head against desk*
The wire goes in the solder bucket pin, not on top of the pin, for three reasons.
1 - better structural support against flexing damage.
2 - better thermal capacity against ambient heat damage to the solder joint.
3 - better signal integrity with a lower resistance joint.
And there is an assembly benefit too with the wire in the solder bucket, it can't flex away as the solder cools.
Well, if I find the guy who assembled it, I'll be sure to give him a wedgie for you.*beats head against desk*
The wire goes in the solder bucket pin, not on top of the pin, for three reasons.
1 - better structural support against flexing damage.
2 - better thermal capacity against ambient heat damage to the solder joint.
3 - better signal integrity with a lower resistance joint.
And there is an assembly benefit too with the wire in the solder bucket, it can't flex away as the solder cools.
I'll do my best to insert the wire down into the pin when I re-solder it, otherwise I might try to bridge these two pins with a bit of copper just to increase the surface area for soldering. I did notice that the blue pin block has a bit of wiggle in the housing, both probes have this as well as the mating component in the plug end. I can feel resistance though when the pins slide into the sockets so hopefully its making solid contact.
It was tiny, I did a sloppy job hoping extra solder would help. The road blah blah to blah blah paved with blah blah precarious intentions blah blah. Let's see if it holds another 60 batches. By then I hope to be brewing on a 6 barrel system in my own brewpub. Or not. Michael the archangel and all.
Last edited:
bruce_the_loon
Well-Known Member
Didn't mean for that to come across as disparaging your soldering skills, the cable you built is working 100%. My frustration with cheaply assembled items that fail and cost us money is infinite in nature. How many of these don't get repaired. And the correct process doesn't cost any extra money or time in the factory either, just a few seconds of training.Well, if I find the guy who assembled it, I'll be sure to give him a wedgie for you.
I'll do my best to insert the wire down into the pin when I re-solder it, otherwise I might try to bridge these two pins with a bit of copper just to increase the surface area for soldering. I did notice that the blue pin block has a bit of wiggle in the housing, both probes have this as well as the mating component in the plug end. I can feel resistance though when the pins slide into the sockets so hopefully its making solid contact.
The wriggle in the sockets is pretty standard, helps make it a bit easier to insert although I don't know if that is intended. As long as it doesn't push backwards the length of the pins, it should be fine.
RufusBrewer
Well-Known Member
The connector you are is an XLR connector. They are a tried and true and hardy connection system. Virtually every professional microphone connection is an XLR After 50-60 years, they are still popular for line level audio.
Their weakness is the solder connection requires A good strain relief. Pulling, tugging or bending the cable can cause the solder joint to fail. Anything you can do to prevent when moving the cable to not be transmitted to the solder joint is worth doing.
Their weakness is the solder connection requires A good strain relief. Pulling, tugging or bending the cable can cause the solder joint to fail. Anything you can do to prevent when moving the cable to not be transmitted to the solder joint is worth doing.
The original soldering job was *****....
Similar threads
- Replies
- 53
- Views
- 9K
- Replies
- 41
- Views
- 24K
- Replies
- 13
- Views
- 2K


![Craft A Brew - Safale BE-256 Yeast - Fermentis - Belgian Ale Dry Yeast - For Belgian & Strong Ales - Ingredients for Home Brewing - Beer Making Supplies - [3 Pack]](https://m.media-amazon.com/images/I/51bcKEwQmWL._SL500_.jpg)


