The No-Leak MLT bulkhead design

Homebrew Talk - Beer, Wine, Mead, & Cider Brewing Discussion Forum

Help Support Homebrew Talk - Beer, Wine, Mead, & Cider Brewing Discussion Forum:

This site may earn a commission from merchant affiliate links, including eBay, Amazon, and others.
As another question, does anyone know of why I wouldn't be able to just use a true bulkhead made from ABS plastic?

Bulkhead10.jpg


They have good ratings for most acids up to 50% and 24hr. Temp rated for -40°F to 180°F....the only thing they have a poor rating for is alcohols and some agents that people might use (chlorine and iodine), but the wort would be just sugar at the time of contact and I don't use those chemicals, or diesel or gasoline in my process (Chemical Resistance Data | LATI S.p.A.)

I have these laying around from all my fish stuff, just haven't seen anyone use or mention them.....or mention why not to use them.

Thanks, MT
 
Pretty slick. I didn't even know about those fittings.

Found them under the cpvc sticks over a sLowes'.....they got all sorts. So far it has worked pretty good. And it's lightweight so there isn't much pressure on the walls.

Later, MT
 
Do those bulkheads have inside threads? The hole you'd have to drill in the cooler wall is pretty big but otherwise it's a good idea. You'd have to reduce the outside threads down to mate it to the ball valve unless it has inside threads from both sides.
 
Do those bulkheads have inside threads? The hole you'd have to drill in the cooler wall is pretty big but otherwise it's a good idea. You'd have to reduce the outside threads down to mate it to the ball valve unless it has inside threads from both sides.

I was going to use the bulkheads that are made to slip pvc into each side. Cpvc isn't the same diameters, but I bet it's close enough for this application. I was just wondering if anyone knows of any chemical leaching issues.....I can't find any ideas.

Thanks, MT
 
Ok, here's how I set mine up. I also noticed when I just took it aprt, that my hole is just through two layers of plastic (inside and outside). It looks like the manufacturing process for these powerade coolers sorta welds the two parts together at this point and they just punch a hole through that for the spigot.

Anyway, I was a little inaccurate on my previous post on a few details...Everything is still 1/2" cpvc, but the angles are 45's and I only used one washer on the inside and outside. I had to dremel out the hole in both washers to get it to fit easily (they must have been 3/8"), and I bent the inside washer to fit the curve of the cooler.

Here's what it looks like put together (loosely)
IMG_4997.JPG


Here's a shot of it taken apart.
IMG_4995.JPG


Here's a close up of the brass nipple...notice the curve on the right washer?
IMG_4999.JPG


The black rubber washer sits about in the middle of the smooth part of the nipple, and the stainless washer (right), is about all the way on the smooth part.

Here it is tightened down
IMG_5001.JPG


My cooler wall is maybe twice as thick as the space left over, so everything cinches down nice and snug. This configuration works well for my cooler, but I don't have to deal with the walls collapsing any. You could used the OP configuration and just sub the cpvc in for the metal part. This might save some wear and tear on the plastic cooler walls, as the whole thing only weighs just shy of 273g (~10 oz.)


I think I am going to try the 1/2" ABS bulkhead if it's not to destructive, and if I can find some around here. Of course, I see 'em all time...but when I want one, I can only find 3/4"!!!

Thanks, MT
 
I cemented mine into three parts now, not six or more...and it is a lot easier to put together now that I have more to grab and twist on the outside!

I also measured the waste on mine so I can start accounting for it. When left flat, right at 2qt and fairly slow draining. When dipped it's just over 2qt, but much much faster draining. I think I'll just let it sit flat.
 
Ok, so I've spent the last week putting this thing together. Just tested it out tonight and ... it leaks. A fair amount (i.e. a slow but steady dribble). Anyone have any suggestions?

Here's what I did: my cooler didn't have a drain, so I drilled out a 7/8" hole. I dug about 1.5" of insulation out around the hole, and replaced it with Bondo. I forgot how stinky that stuff is! But that gets rid of the "weak inner cooler wall" problem people have.

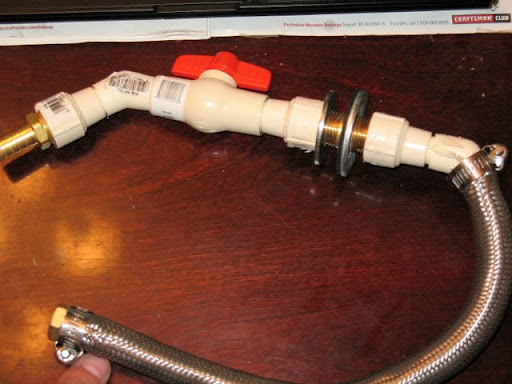
I then put the bulkhead together, pretty much as per Bobby's initial instructions. Since there was Bondo on the inside wall, I even tried to squeeze some silicone in behind the o-ring, just inside the cooler, and put some more between the inside washer closest to the inner wall and the wall itself (basically on the same vertical layer the o-ring is on, according to the diagram at the beginning of the thread.

The one difference (and this may be the problem, though I'm not sure) is that on the inside, I didn't want to put 7-8 washers between the hose barb and the o-ring/inner wall. That's probably about how many I'd need, and I figured it'd be better if I could just put some sort of lock nut in there to squeeze the washers/o-ring against the inner wall. I had trouble finding a stainless or brass locknut, so I basically cut off the top of a plastic electrical conduit nut (or maybe it's a reducer? I'm not sure what it's called) and used that as a lock nut. It might not have been able to squeeze the washers as tightly as a real lock not would, so that may be my problem. Anyway, from inside to outside, here's basically what I have over the nipple:

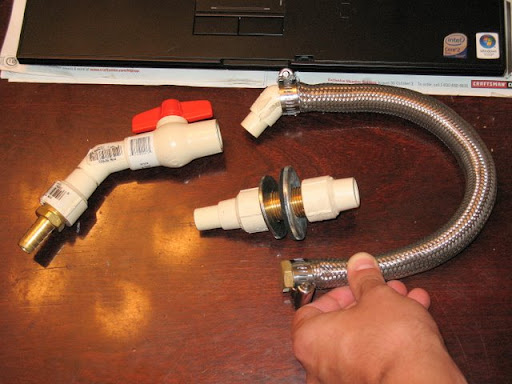
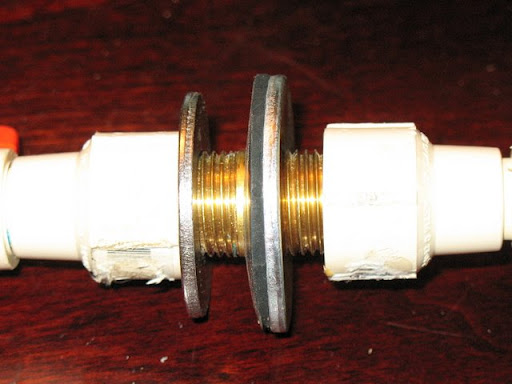
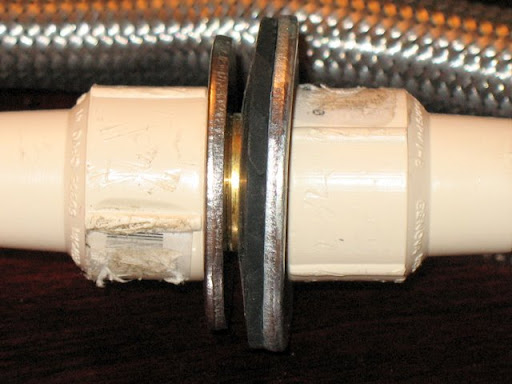
female hose barb - plastic lock nut thing - 2 SS washers - O-ring (definitely over the non-threaded part of the nipple) - inner cooler wall - Bondo - outer cooler wall - 3 washers - electrical conduit nut - ball valve - male hose barb

If it's that inner lock-nut issue, anyone have luck getting ahold of a SS or brass locknut? I've been to 3 hardware places around here, and nobody's had anything like that. As I said, that may be the problem, since I may not be squeezing the O-ring enough. But does anyone else have any other ideas? Apologies for the long post ... I'm a little frustrated, since I was hoping to do my first AG this weekend. :( Maybe it's better to look at it as my last PM? :eek:

Thanks in advance for any help.
 
The only thing I can figure is that your Oring isn't small enough diameter to apply sealing pressure against the nipple? You can fix that by putting teflon tape on the threads where the locknut ends up. That will stop liquid from getting through and the oring will just have to seal between the locknut face and cooler wall.
 
Ok, I'll try a smaller, super-tight O-ring. And put more teflon tape on the nipple. Good ideas.

And I guess I might as well look harder for a brass or SS locknut to hold the SS washers against the O-ring. Maybe that'll help me get a tighter fit? As is, the ball valve does spin around pretty easily, which makes me think there just may not be enough pressure on it.

Just to make sure, when you say
That will stop liquid from getting through and the oring will just have to seal between the locknut face and cooler wall.
you're including the SS washers in that space between the locknut and cooler wall, right? It seems like water could also drip in behind the o-ring where it's pressed against the cooler (space #3 in your diagram), especially if it's not squeezed tightly enough against the wall.

Thanks as always for your help. You da man!:rockin:
 
I'm currently putting some valves/bulkheads together too, having a real tough time finding 1/2" NPT nuts. Does the big orange store hide them somewhere less obvious than the plumbing section? My alternative is to just use more washers and use the valve body and female sleeve on the inside to load everything up. Not ideal, but I'm sure I can make it work.
 
Ok, I finally got around to putting this together again. So yesterday I assembled everything, screwed it in super tightly, and ... filled it with hot tap water, left it for 2 hours, and it didn't leak a drop! Haven't put the inner hose barb and braid on yet, but now that I know it doesn't leak, I'm stoked.

The key was really using locknuts on both the inside and outside (brass on the inside, whatever on the outside - they're cheap at McMaster Carr). Locknuts are the only thing I found that could screw all the way up the threaded portion of the nipple, so you can really put as much pressure as possible on the washers / o-ring. I tried to use an electrical conduit nut on the outside, but even that only screws about halfway up the threads, so unless you use a lot of washers, it isn't as effective.

Thanks Bobby - seriously, your posts, your videos, your website, and your willingness to give advice to people at all levels of the process are a huge asset to the community. You rock! :mug:
 
Locknuts are the only thing I found that could screw all the way up the threaded portion of the nipple...

That's not entirely true, the female cpvc adapters get damn near all the way, and with one washer on each side, I get a good seal.

IMG_5001.JPG


Of course, this may also depend on the thickness of the wall you are putting this thing through...which would also increase the length of the nipple. But, the length of the threads should be about the same, with just the smooth section being longer (I think),

Any way, glad you got a non-leaking set-up....I know how frustrating leaks are; I can't get my shower to stop, and new seats and stems only last a few weeks before dripping again!!!! :mad:

Later,
 
Hmmm, interesting. I must admit, I didn't check out your setup too much because I was so committed to getting the original idea to work. But it looks great! CPVC was one of the things I tried to find to use instead of a locknut (cause I didn't want to go through the hassle or expense of ordering one on-line; in retrospect, I would have saved tons of time and money if I had just done that first!). But I couldn't find a female adaptor that screwed more than halfway up the threads. Guess I just didn't look hard enough. :cross: Right on for finding your own way to solve the problem!
 
Just want to report that I've done 2 AG brews with this setup now, and it hasn't even come close to leaking. This bulkhead is super water-tight. So kudos on the design!

Of course, it turns out that the guy at the local hardware store who swore up and down that the washers he was selling me were stainless steel was totally full of it, since the washers inside the cooler are already starting to get a layer of rust. So now I have to go back on the search for SS washers, drill them out again and take most of the assembly apart to replace the rusty ones. Awesome.

Still, excellent design.
 
You could probably put the assembly in the oven for a few minutes and get it to thread on even further as the CPVC heats up.

I noticed on your video with the sight glass that you said you weren't a fan of weldless installations.

Did something happen with this since you put it in?

Thanks!
 
When given the option of welding, I'd always recommend it over weldless. It's just that if you have to go weldless, some designs are better than others in my humble opinion.
 
I was just working last night on setting up the rev 3 MLT. This one and the last one will both be Coleman Xtreame's. The spigot that comes on this cooler unscrews leaving you with a threaded piece, a "nut", and a white piece that held it all in place. This white piece is what is actually up against the cooler wall and goes inside wall. It goes about half way through the wall and is probably an inch around against the wall. The 1/2 inch nipple fits perfectly through it. Since this is now my second Xtreame cooler I now have one on the inside and outside. If you only had the one you should probably just put it on the inside. Works perfectly.

Does this make any since?
 
Would it be of benefit to apply some super glue or silicone caulk to the insulation portion of the cooler prior to inserting the 3/4" PVC reinforcement?

I see this as sort of waterproofing the interior of the cooler such that if the design did leak, there would be no wort seeping into the insulation of the cooler. Thoughts?

Yes I did exactly that. I used cpvc cement.
 
This has probably come up before but what about this variation:
bulkhead1.jpg


Then you wouldn't have to worry about the threads in the nipple because the liquid would never come in contact with the nipple at all (well except for the interior surface of course). I wonder if this would seal better because any leakage would have to seep through a directly clamped surface, unlike the OP diagram where you are blocking leakage that would flow perp to clamping surface, ie along the outer surface of the nipple "under" the o ring.

Not that I've heard of any problems with the orig design but I was just wondering...

In theory, that extra o-ring would fix the problem but there's not enough flat surface on the end of a coupling to tighten against the oring without squeezing it out of place. If that were possible, there'd be no need for the interior flat washer.
 
I have mine set up with an thin 'o-ring' I made out of a baby nipple between the coupling and washer. Works like a champ.
 
Today I kicked it up notch and made the step toward AG. I used a ten gallon Rubbermaid water cooler, a "cooler conversion kit" from Rebel Brewer, a false bottom and a Blichmann Auto Sparge to complete the MLT.

The "cooler conversion kit" (http://www.rebelbrewer.com/shoppingcart/categories/Brewing-Equipment/Brewing/DIY-All-Grain/Cooler-Conversion/) included one o-ring and three SS washers. The picture on their website is not what is included currently. Moreover, the new kit is improved and is all SS. With all three washers and the o-ring on the inside, I still encountered leaks when I got more than five gallons of water inside. Also, the fit was loose overall and not really acceptable to use. So, at the beginning of brew day I took everything apart and instead of the included o-ring I used the original gasket that was on the cooler with the plastic nozzle. I turned the gasket around so that the part that previously went INTO the cooler wall was facing toward the SS washers and the bigger flat part of the gasket now faced toward the white plastic wall. I made sure the gasket was on the smooth part of the SS male to male connector and not over threads. The included o-ring was not quite large enough to cover the entire OEM hole whereas the OEM washer was just the trick...no more leaks! :D If you are having problems and would like a picture of what I did (if it doesn't make sense), let me know and I'll post something.
 
I built this for the first time out of a Rubbermaid 10 gallon water cooler and she's watertight! One question though. When I added the 156 degree water, I heard a whole bunch of cracking coming from the internal insulation of the cooler, should I be concerned, or is that normal? Thanks.:confused:
 
Yea, I heard the same from mine; however, I've had no issues.

However, once I used water that was too hot and it slightly warped the plastic inside. Note to self, don't use 200F water for preheating anymore. lol
 
My cooler is leaking with the bargain fittings kit and I think it's due to cooler wall flex. I should note it did not have it's own spigot, I drilled the hole (which is tight around the nipple). I'm going to pick up a piece of 3/4" pvc tonight as well as some more o-rings (trashed mine overtightening) and possibly a flat silicone washer. Will report back.
 
Even if you can't get the PVC ring to work, you can carve out some insulation and pack it with epoxy, JB weld, whatever. Something needs to keep the walls from getting clamped.

The design in the first post uses that pvc spacer to have the assembly actually clamp down completely on the inner wall. The hole in the outer wall just serves to keep everything from moving around.
 
if I can find some flat flexible washers that are food safe and high temp safe are those preferrable to an o-ring?
 
Tried this tonight, still leaked. Tried then putting ss washer against inner wall to make flat contact point for o-ring, still leaked but better. Def is leaking into cooler walls. Cooler has tiny holes in bottom of outer casing and water/bubbles coming from there.

Thinking of removing a section of outer wall, insulation, and cleaning up outer surface of inner wall, then installing silicone gaskets on both sides of inner wall, with ss washers behind each, then put all back together.

What sealant/adhesive is high temp and food safe that I could back the gaskets with as added sealing?

Saga continues.
 
Back
Top