temp controller for chest freezer

Homebrew Talk - Beer, Wine, Mead, & Cider Brewing Discussion Forum

Help Support Homebrew Talk - Beer, Wine, Mead, & Cider Brewing Discussion Forum:

This site may earn a commission from merchant affiliate links, including eBay, Amazon, and others.

nyer

Well-Known Member
Joined
Dec 18, 2007
Messages
941
Reaction score
32
Location
Merritt Island
I finally found a good deal on a used chest freezer (for fermentation) and just picked it up. I need a controller that only cools, no need for heat in Florida. Can someone recommend a good unit that is easy to use and accurate? I think I might prefer a plug and play model but I'm not opposed to doing some wiring.
 
Ranco makes a decent one, with a little wiring involved, and there is a YouTube video showing the wiring of one.

I think the model # is 111000, or something of that nature.
I have and use 2 of them, so you think I would remember!
 
stc-1000 and just hook up the cool side, less than 20$ on amazon... hard to beat...
 
I just recently bought a chest freezer and instead of using a temp controller, I followed this thread: https://www.homebrewtalk.com/f51/guide-set-internal-chest-freezer-thermostat-32f-eliminate-external-control-249612/

I was able to set the coarse adjusting screw on the freezer's thermostat so that it raises temp above 32 degrees Fahrenheit. The internal temperature of the freezer varies a few degrees due to what is called the hysteresis of the freezer, but the average temperature is 38. My kegs stay at 38 degrees and do not vary in temperature due to the mass of the liquid. It takes a long time for that amount of beer to change in temperature.

I turned the coarse adjustment screw clockwise until it wouldn't let me turn it anymore. I then turned the plastic adjustment dial (usually located on the outside) to the warmest setting. My dial is located in the lower right corner. See my attached picture.

I would try this first. It would save you money.

WP_20140409_002.jpg
 
Order you up a controller from Amazon. You can build it with a project box in less than a hour. Just can't get any simpler than a STC100 and when you have a cold snap come through, you'll be set to go. Save your money for brewing supplies.

i-TGgP7wF-L.jpg

i-ntf6cJP-L.jpg
 
I have owned a Johnson Controls analog temperature controller for over 15 years so I can attest to its durability. Currently I use it on my fermentation chest freezer and it is still rock solid.
uvzp.jpg

I have also used a digital Johnson Controls A419 controller on my keezer since last July and it is similarly reliable and a bit more flexible. I would recommend it if you are looking for plug and play and don't mind spending about $85.
cjjv.jpg


I want to buy a small chest freezer for long term wine aging so in preparation for that I built a controller using a project box and STC-1000 I bought on Amazon for less than $19. It wasn't difficult to do, cost maybe $25 total, and worked fine when I tested it on my fermentation freezer.

It is not a big deal but the STC displays in Celsius and since I think in Fahrenheit I had to print and tape a conversion chart to my project box like it appears bigken did.
 
I thought I saw that they make the STC 1000 that does Fahrenheit now. I hope that's true. Having it read in Celsius would annoy me.
 
+1 on the STC-1000. I use 3 to control a fermenter fridge, a lagering freezer and a keezer and have put together a couple more for guys in our club.

Don't worry about the Celsius thing. A simple cheat sheet on the side of the controller box makes it a non-issue. Also, you never know when the ability to apply controlled heat will come in handy. If you start brewing lagers, taking it from 50*F to 64*F for a diacetyl rest is easy if you have a small heat source inside the chamber and a dual controller like the STC-1000. I've used that feature several times here in TX.
 
I thought I saw that they make the STC 1000 that does Fahrenheit now. I hope that's true. Having it read in Celsius would annoy me.


That one only does heat or cool, so it would probably work for you in Florida, although I'd still recommend the dual controller.
 
For the price, I would definitely go with the dual control. It's better to have the option to heat and never use it than to not have it and need it.
 
Now you guys got me thinking. My kegerator is outside and I'm having a hard time keeping it under 40 degrees on the coldest setting. Could I use one of these things to get my beer fridge a little cooler?
 
Now you guys got me thinking. My kegerator is outside and I'm having a hard time keeping it under 40 degrees on the coldest setting. Could I use one of these things to get my beer fridge a little cooler?

Yes but it would take a little work. You would need to bypass the internal thermostat and let the temperature controller handle it that way. The one problem with this is on some models, if you "disable" the thermostat, this would also disable the anti frost/freeze switch. This would cause a freezer to accumulate ice inside the unit and a fridge to sweat all over the place.

You could also search the internet on your model of fridge being used and find how to adjust the limit settings. These are calibrated by the mfgr, but sometimes can be adjusted to achieve lower temps.

Another option would be to insulate the kegerator a little better. Depending on craftsmanship skills, this could get a little difficult as well. To make it even simpler, wrapping it with a blanket on hot days will help too. Just a few options that come to mind.
 
Now you guys got me thinking. My kegerator is outside and I'm having a hard time keeping it under 40 degrees on the coldest setting. Could I use one of these things to get my beer fridge a little cooler?

Well, these nifty controllers basically work as thermostatically-governed on/off power switches. As said above, you'd have to modify the kegerator to get it to go cooler than it already does at the lowest setting.
 
I'd go with something you can build into the freezer, instead of having loose boxes with the controller laying around.

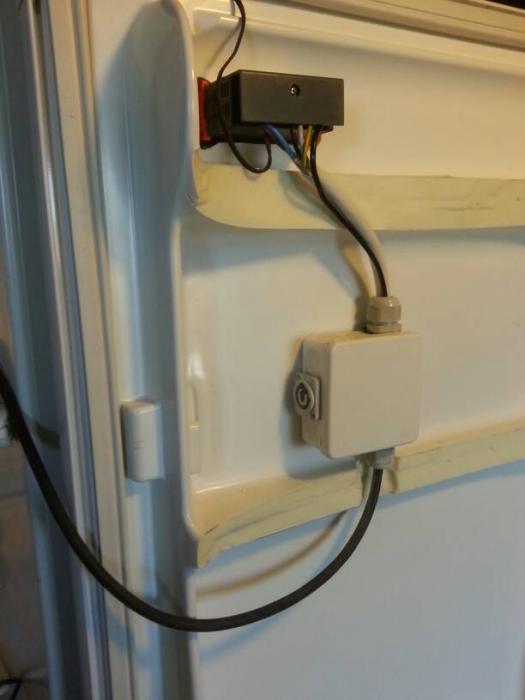
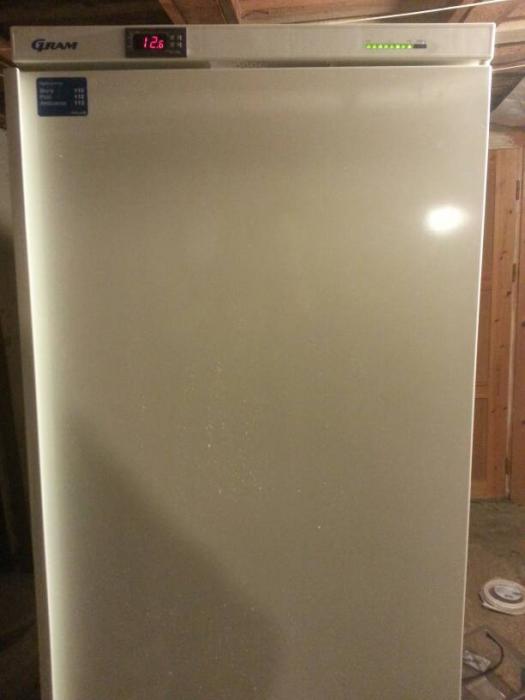
Here's my two builds. I just have to spray some insulating plastic in the terminals of the one which is built into the actual fridge:

1.jpg


2.jpg


3.jpg
 
I'd go with something you can build into the freezer, instead of having loose boxes with the controller laying around
I would agree as well. It may take a little more work and thought, but the finished product is well worth it in my opinion. Besides, that's what the group is here for.
 
I have also used a digital Johnson Controls A419 controller on my keezer since last July and it is similarly reliable and a bit more flexible. I would recommend it if you are looking for plug and play and don't mind spending about $85.

+1 on the Johnson A419. I have two; one for my kegerator, and one for my ferm chamber. Both have been great so far for over a year now.

You can certainly do it cheaper with some of the DIY options. But if you're lazy (like me), are hesitant about your wiring skills (like me), or just looking for something that's ready to go right out of the box, it's hard to beat.
 
It's over here. Although it's not exactly an STC-1000, it is a temp controller with heat and cool displaying in degrees Fahrenheit. I'v had one running my ferm chamber for about a month now with no problems.
https://www.homebrewtalk.com/f51/eb...roller-build-163849/index405.html#post6024764

I was just about to order the Fahrenheit version until I looked at the specs. Is it definitely 110 volt? Also the wiring diagram looks confusing compared to the stc 1000. Is it easy to wire this one???
 
I was just about to order the Fahrenheit version until I looked at the specs. Is it definitely 110 volt? Also the wiring diagram looks confusing compared to the stc 1000. Is it easy to wire this one???

Yes, it's definitely 110V. The wiring is a bit different. But only in that the power for both heat and cool are connected internally. I'll see if I can put a wiring diagram together in the next few days.
 
Yes, it's definitely 110V. The wiring is a bit different. But only in that the power for both heat and cool are connected internally. I'll see if I can put a wiring diagram together in the next few days.

That would be awesome. I'm going to order it up tonight. Thanks a lot for the help.
 
Unlike what's printed on the actual controller, the diagram shows the hot feed hitting one side of the three relays (internally) and the other side of each relay connected directly to the neutral return. Now, someone taking that literally would have three potential dead short circuits and as soon as any of those relays closed the magic smoke would escape before a breaker could trip.

If you think that's a far fetched scenario you haven't been around long enough ;)

Cheers!
 
Unlike what's printed on the actual controller, the diagram shows the hot feed hitting one side of the three relays (internally) and the other side of each relay connected directly to the neutral return. Now, someone taking that literally would have three potential dead short circuits and as soon as any of those relays closed the magic smoke would escape before a breaker could trip.

Cheers!

Ah, I'm following you now! Instead of placing a load between the relay and the neutral return, your saying that there is the potential for someone to wire it directly with no load. Yes, that would kinda ruin someones day.

Thanks for making that clear! I'm going to put together a typical wiring diagram together either tonight or tomorrow for people to follow along.
:mug:

I ordered the controller last night and I should have all the parts needed for assembly today
 
I have my controller but the wiring directions that came with it are a little confusing. Does anyone have a simple diagram for the Fahrenheit controller?
 
Maybe this is easier than I thought. Do I just hook the black to 1,4 and the gold side of the outlet. Then white to 5 and then both silver sides of the outlet and break the tab in the middle?
 
Maybe this is easier than I thought. Do I just hook the black to 1,4 and the gold side of the outlet. Then white to 5 and then both silver sides of the outlet and break the tab in the middle?

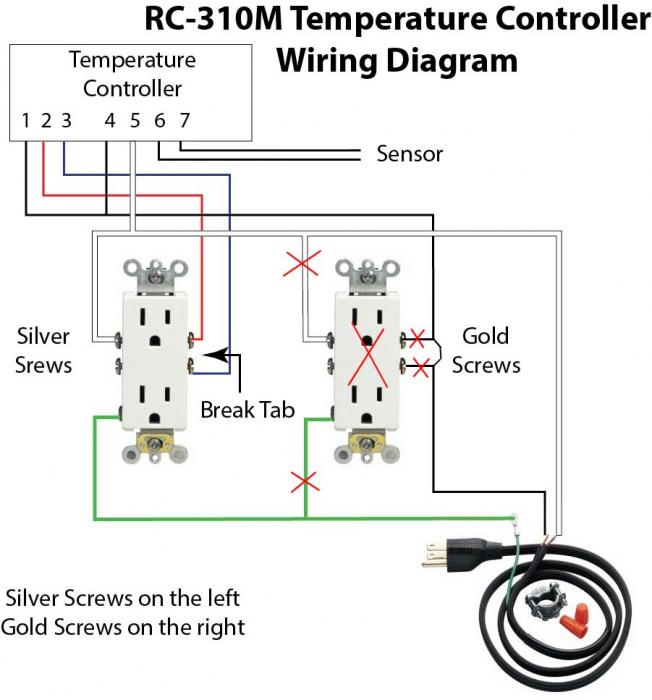
Sorry about the delayed wiring diagram. Yes, hook the hot/black wire to 1 & 4 and the brass/gold side of the outlet you want on all the time. Connectors 2 & 3 would go to your switched outlet where you break off the tab on the brass side of the outlet you want switched. White is connected to all silver sides of the outlet(s) and to connector 5 on the controller
 
Sorry about the delayed wiring diagram. Yes, hook the hot/black wire to 1 & 4 and the brass/gold side of the outlet you want on all the time. Connectors 2 & 3 would go to your switched outlet where you break off the tab on the brass side of the outlet you want switched. White is connected to all silver sides of the outlet(s) and to connector 5 on the controller

This makes complete sense to me.
 
How many wiring terminals are there on the back of the "RC-310M" controller?

The wiring diagram shown on the seller's web page shows 8 terminals, but the wiring diagram shown on top of the actual unit only shows 7 terminals.

Obviously only one is correct - and I'd go with what's on the unit over the alternative. Which validates member sdgenxr's diagram nicely...

Cheers!
 
I'm only using one outlet. I'm not sure what or is about the diagram but something seems wrong to me.

If you're only going to use one outlet, then you can delete the one on the right and connect a black wire directly to terminals 1 & 4.

How many wiring terminals are there on the back of the "RC-310M" controller?

The wiring diagram shown on the seller's web page shows 8 terminals, but the wiring diagram shown on top of the actual unit only shows 7 terminals.

Obviously only one is correct - and I'd go with what's on the unit over the alternative. Which validates member sdgenxr's diagram nicely...

Cheers!

I'll update that wiring diagram with one directly from the manual shortly.
 
I only want one outlet with one side for heat and one for cool. I thought I understood it until I saw the diagram now I'm confused.
 
I only want one outlet with one side for heat and one for cool. I thought I understood it until I saw the diagram now I'm confused.

Remove the duplex outlet on the right side and its connections while connecting the incoming black/hot wire as shown.

Took the liberty of hacking the diagram for simplicity...

Cheers!

rc310m_single_duplex_wiring.jpg
 
I just test wired it and it works perfect! On the diagram(that comes with it) it makes it look like the wires for 2 and3 should be hooked to the white wire and 5. Now it makes sense that they go to each gold. Thank you very much for the help.
 
Back
Top