Spike Conical- observations and best practices

Homebrew Talk - Beer, Wine, Mead, & Cider Brewing Discussion Forum

Help Support Homebrew Talk - Beer, Wine, Mead, & Cider Brewing Discussion Forum:

This site may earn a commission from merchant affiliate links, including eBay, Amazon, and others.
The first thing I did before every fermenting a beer in my CF15 was to purchase an additional butter fly valve which I installed in line with the sampling port, this allows me to keep gunk out of the port as well as be able to swap stuff out and not leave them to the elements inside.

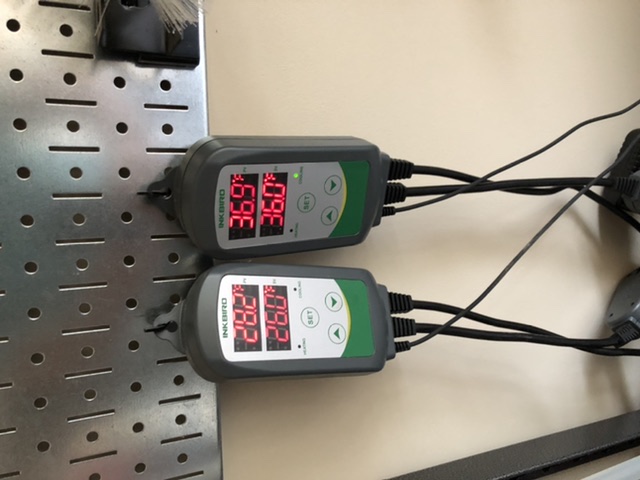
I am currently crashing my first beer in it, an Oktoberfest and I am noticing a 5 degree difference between what the calibrated Tilt hydrometer (colder) and the thermowell is reading with a inkbird in it. Anyone else notice a difference between the thermowell reading and actual temp?
No, but this has always been a curiousity/worry of mine.
Question- did you notice a difference between tempa during regular fermenting? If so, how much?
Thanks
 
No, but this has always been a curiousity/worry of mine.
Question- did you notice a difference between tempa during regular fermenting? If so, how much?
Thanks
I would say during fermentation there was not a noticeable difference and when there was I drummed it up to simply one catching up to the other, since the changes were faster. But now that fermentation has stopped and I've been crashing for the better part of 5 days now, the temp in the conical keeps falling regardless of what the circulator temp is set at. The circulator is set at 31, has been for days and has been struggling (im talking within tenths) to get there but the tilt is reporting 28. I just moved the circulator to 33 to see what happens, but over night the tilt measured as high as 35 with the circulator still being set at 31.
I don't want to open it up but im wodering if there is a icing issue around the coil and its throwing off the tilt.

*Shrug*
 
The first thing I did before every fermenting a beer in my CF15 was to purchase an additional butter fly valve which I installed in line with the sampling port, this allows me to keep gunk out of the port as well as be able to swap stuff out and not leave them to the elements inside.

I am currently crashing my first beer in it, an Oktoberfest and I am noticing a 5 degree difference between what the calibrated Tilt hydrometer (colder) and the thermowell is reading with a inkbird in it. Anyone else notice a difference between the thermowell reading and actual temp?

you can easily check the calibraion on your inkbird with a glass of icewater. Assuming it is also reading correctly or at least close you appear to have temperature gradient. The Spike documentation talks about temperature inversion in this document
https://www.greatfermentations.com/wp-content/uploads/TC-100_Product_Guide_FINAL.pdf
Please do check your Inkbird I am surprised it is that big if a difference.
yeah, I bumped the inkbird from 31 to 33 and the tilt went from reading 27 to 39
 
Thank you all for the input on racking the beer from the conical to the keg!

@specialkayme / @eric19312 - you mentioned about how I do the trub dump. Based on your input I must be doing it wrong. I open up the valve until it starts to come out, which got me to wide open with the thickness of the hop trub for this beer. Do you guys do multiple dumps before racking? Typically how far do you space the dumpings? After you dump the trub, do you let the beer rest further to make sure it settles? If and when the beer channels around the trub, is just a matter of closing, letting it sit, and starting again to get trub to dump again? Any other tips/tricks for the trub dump is appreciated.

It seems like more patience with the trub dump is needed on my end.

For me, and i am pretty sure i read this here, too:
Anytime you dump, you may rouse up gunk. So, chill. Dump. Wait and chill again. Then rack.
 
yeah, I bumped the inkbird from 31 to 33 and the tilt went from reading 27 to 39

I mean get a glass of ice water, very icy, stirred up. Pull the inkbird probe out of the thermowell and put it in the ice water. Is it reading 32F?

Yes - inkbird is calibrated fine and the temp in your thermowell is accurate
No - adjust the reading in your thermowell to allow for the inkbird being out of callibration
 
For me, and i am pretty sure i read this here, too:
Anytime you dump, you may rouse up gunk. So, chill. Dump. Wait and chill again. Then rack.

I just posed that as a question a few posts back so hopefully you're not just thinking of that.

If not, how long do you wait between dumps normally? A few hours?or another day?
 
Thank you all for the input on racking the beer from the conical to the keg!

@specialkayme / @eric19312 - you mentioned about how I do the trub dump. Based on your input I must be doing it wrong. I open up the valve until it starts to come out, which got me to wide open with the thickness of the hop trub for this beer. Do you guys do multiple dumps before racking? Typically how far do you space the dumpings? After you dump the trub, do you let the beer rest further to make sure it settles? If and when the beer channels around the trub, is just a matter of closing, letting it sit, and starting again to get trub to dump again? Any other tips/tricks for the trub dump is appreciated.

It seems like more patience with the trub dump is needed on my end.

If you had to go to wide open to get the trub to move I think you can do it better. With the 2" butterfly on the CF series 1 or two notches open should be plenty to get trub to move. If you have dense hop trub I am guessing your issue is the one I struggled with....dry hop pellets sinking into the plumbing before expanding. I've also had to fully open the valve and even dig out hop material to get flow. Found intact hop pellets embedded in very thick hop trub.

I've had pretty good luck with blowing them out of the plumbing with CO2 and have posted video in this thread a few times. It is hard to see but imagine the pellets fall into the plumbing and the situation is 10% beer and 90% dry pellets. Pellets absorb beer and expand, and no more beer can get in. Use a puff of CO2 to break up the clog, push a few of the pellets into the cone, then stop the CO2 and a little beer gets down into the pellets. Wait for that beer to get absorbed and repeat. 3-4 cycles and the hops in the plumbing will have absorbed all the beer they can and will now mix easily with the beer.

Another solution to this problem would be the Norcal yeast brink used for adding dry hops. @Jaybird has a nice video on this site I think that solves the problem however not clear how many cycles would be required to dose a pound of hop pellets with the thing and each cycle takes some time.

I am going to try running my pellets through a blender before adding if I remember to do so when I dry hop tomorrow.

Wish I could find cryohops at reasonable prices as they might be another answer.


Edited to add a link to the post where Jaybird says how many hop pellets each brink will hold. Looks like I'd need his 4" sight glass version.
 
Last edited:
I just posed that as a question a few posts back so hopefully you're not just thinking of that.

If not, how long do you wait between dumps normally? A few hours?or another day?
If i can, a day- 24 hours.
But even 12 hours is probably ok.
I think a few hours at crash temp may help, too. For sure a few hours is better than nothing.

To piggyback on eric's comments above... i sometimes go the super el cheapo route and just shake the sh*t out the cf5 to help distribute pellets.
Easy for me on a cf5 on a cart 3 feet off the ground. I dont blow up C02.
This shake method is much harder on a full cf10 or cf15 in a ferm fridge!!

Finally- i only recently got the racking arm. On my last batch i had about 6 ounce pellets and did NO dumps at all. Nada. Just a 36 hour crash.
I still pulled the cleanest clearest beer ever.
I did ask like a dozen stupid questions of the folks here as to how to use the racking arm. It is sweet!! But you gotta use it right.

Finally- if you are not using a 2" cap to a barbed fitting onto at least 1foot or longer of hose when you dump then that will be a problem.
By using a barb and hose there is some sort of magic created that creates a sort of pressure that allows you to open the valve a few clicks and the material comes out at a better pace vs. just blowing out.
Finally, i started putting my bottom valve in the uo and down vs. side to side position. I found tha lt help a bit, too.

(All the above is based on my experience and nothing to do with fact. So.... all IMO and YMMV.)
 
Another solution to this problem would be the Norcal yeast brink used for adding dry hops. @Jaybird has a nice video on this site I think that solves the problem however not clear how many cycles would be required to dose a pound of hop pellets with the thing and each cycle takes some time.

Not to open up an old debate, but I have been considering buying a Norcal yeast brink and I realized that it requires the butterfly valve to be mounted above the sight glass (directly to the underside of the conical) unless you have clearance for a huge stackup height under your fermenter. So is that really a big disadvantage in your opinion? I know this sparked an argument earlier and I definitely don't want that again, just looking at options and what others have experienced
 
Not to open up an old debate, but I have been considering buying a Norcal yeast brink and I realized that it requires the butterfly valve to be mounted above the sight glass (directly to the underside of the conical) unless you have clearance for a huge stackup height under your fermenter. So is that really a big disadvantage in your opinion? I know this sparked an argument earlier and I definitely don't want that again, just looking at options and what others have experienced


Here's one from Ss Brewtech:
<img src="//cdn.shopify.com/s/files/1/0239/5187/products/DSC01294_2000x.jpg?v=1513712056" alt="Sight Glass | 2.25”" class="">

Can't remember if your gear is a CF with 2" TC dump port or not. Unfortunately this mini-sight glass is a 1.5" TC mount. It works great and has never clogged on me while dumping trub or harvesting yeast. Got one mounted on each of my ss conical fermenters above the butterfly valve.

Broo Brother
Mine is a CF5 with a 2" port unfortunately
 
Just saying, you do not need a bunch of shiny **** to make great beer.


LOL! Ok.

iu
 
Not to open up an old debate, but I have been considering buying a Norcal yeast brink and I realized that it requires the butterfly valve to be mounted above the sight glass (directly to the underside of the conical) unless you have clearance for a huge stackup height under your fermenter. So is that really a big disadvantage in your opinion? I know this sparked an argument earlier and I definitely don't want that again, just looking at options and what others have experienced


That was the first observation I noticed when I moved my BF valve between my sight glass an elbow. I did the co2 trick that @eric19312 posted a couple of pages back. Pretty neat but a bit more cumbersome with the valve above the elbow instead of below it. So now, I'm thinking do a really "need" a yeast brink, because I'm thinking the valve has to be in one spot for the brink, but when co2 is blown into the dump valve to dislodge a trub clog, well it's much easier with the valve below the elbow.

Right now, after seeing the amount of hops each brink can hold, I think I may stay with dumping the hops in from the top and move the dump valve below the elbow. A 3 or 4" sight glass yeast brink is more $$$, dump valve placement is an issue as you noted, and plus I already have a 2" sight glass which is a bit on the small side for more my CF10.

Can't you just bubble CO2 through the fermenter using the yeast brink? I.e hook up a CO2 purged yeast brink, hook up CO2 to the keg post on it at a higher pressure than what's in your fermenter, open the butterfly valve and watch the bubbles

Seems like that would solve that issue
 
@mongoose33

I was able to get my CF5 down below 38 in my garage which is currently 85F. I have a DIY chiller with a 4 gallon reservoir, and I used doughnuts of 2" pipe insulation around all the projections, and a piece of elbow insulation.

I have a 4 degree gain between the coil in and coil out.

I have a 4 degree gain through the hoses between reservoir and chiller coil

I have my glycol set at 26F, and I have a small second pump recirculating my glycol.

82C808A7-22EA-4F67-AE83-CFD99EA1722E.jpeg
E0E9F204-CF0A-4B55-9D6C-C73F6CD29364.jpeg
 
Just kegged my 3rd batch last night and the first keg fill, like last time, wasn't what I was hoping. The disconnect kept getting clogged and I spent times switching between taking the disconnect apart to clean it out or use a disconnect jumper to flush it back into the conical to clear it out. I did make sure to keep the lines purged with beer/co2 when doing one or the other, so who knows. the second keg filled with no issues. Unlike last time, I did remember to dump the trub first and flush the transfer line until it ran clear before connecting it to my keg.

My transfer line is the EVA Barrier 5MM line with a beer disconnect for the keg on one end and a MFL 1.5" TC on the other end that connects to the conical. Before transferring, I connect it to the conical, take the beer disconnect end off, and flush the line into a pitcher until I see clear beer. Then I reconnect the disconnect, connect the end to my keg, and go from there.

I'm open to better ideas if you all have any.

What was clogging it ? I've never had any issues with clogging except when dry hopping commando. My normal routine is dumping on day 7 then kegging on day 21 .
 
I dry hopped commando. The first batch I bagged and the second I went commando. I felt like I got better hop aroma going commando, so did the same with this round.

Do you still dry hop commando or did that make you go back to bagging them?
 
I dry hopped commando. The first batch I bagged and the second I went commando. I felt like I got better hop aroma going commando, so did the same with this round.

Do you still dry hop commando or did that make you go back to bagging them?
How many ounces dry hops?
How many gallons?
Cf5, cf10, cf15?
Do you use racking arm?
What temp did you crash to?
How long did you crash before you dumped trub?
How long did you wait from trub dump to racking?

I think the only way to dry hop is commando. I hate finding dry intact pellets in the middle when using a bag.
 
I dry hopped commando. The first batch I bagged and the second I went commando. I felt like I got better hop aroma going commando, so did the same with this round.

Do you still dry hop commando or did that make you go back to bagging them?

Bagged , commando isnt worth it imo. The flavor isnt better imo . Maybe a tad bit more aroma but other then that it isnt worth it to me. I've got really good feedback on my IPAs and was asked to brew it in our local brewery.
 
How many ounces dry hops? 6 oz
How many gallons? 11 gallons
Cf5, cf10, cf15? CF10
Do you use racking arm? Yes
What temp did you crash to? room temp (68F), unable to cold crash at this time
How long did you crash before you dumped trub? see above
How long did you wait from trub dump to racking? about 2-3 days

I think the only way to dry hop is commando. I hate finding dry intact pellets in the middle when using a bag.


I found a few dry pellets in the first batch I did, plus a bag was one more thing to clean. I've thought about a hop screen of some sort to put on the end of the racking arm, but worry if it will interfere with the arms rotation or clog up like a bazooka screen does.

I've also thought about just using several small hop bags, or another larger bag, opposed to the large one I have. I liked going commando as it was one less thing to clean, but if I'm spending more time clearing clogs vs cleaning a hop bag....well.
 
Bagged , commando isnt worth it imo. The flavor isnt better imo . Maybe a tad bit more aroma but other then that it isnt worth it to me. I've got really good feedback on my IPAs and was asked to brew it in our local brewery.


That just may happen on my next batch.
 
I found a few dry pellets in the first batch I did, plus a bag was one more thing to clean. I've thought about a hop screen of some sort to put on the end of the racking arm, but worry if it will interfere with the arms rotation or clog up like a bazooka screen does.

I've also thought about just using several small hop bags, or another larger bag, opposed to the large one I have. I liked going commando as it was one less thing to clean, but if I'm spending more time clearing clogs vs cleaning a hop bag....well.
I think the lack of a crash is what is holding you up, IMO. It amazes me what a difference it made for me. Although- with 6 ounces in a cf10, I would think your racking arm would help. Although it only takes a little speck to clog a poppet. Sorry, wish I had a better answer for you than- buy more gear! (but you know you wanna.... lol)
 
I kegged today out of CF15. 1.0 pound dry hops commando. Actually tried hitting them with a blender before adding this time. Dumped yesterday and today about 2 hours before kegging. No issues with racking arm all the way down. I cold crashed at 29 for a couple days before Kegging. Carbed with stone for about 24 hours.

I’m using exact same transfer line @Yesfan described. I took the ball lock disconnect apart after I was done. Bit of hop crud in there but not enough to Interfere with the transfer.

brewing a riff on other half’s all together recipe today. Will have 2 pounds of dry hops. Probably not going to get 3 full kegs lol.


I've wondered about using a blender or similar. Could you use a french press to make a hop tea, or soak them in vodka like with cocoa nibs, then strain them?

I've also seen where some use a hop filter in their kegs where the dip tube sits in it so they can dry hop in a keg. I've thought about something similar with the racking arm of the conical but remembered the nightmares I had in my early brew days of using a bazooka screen as a filter in my boil kettle.
 
I kegged today out of CF15. 1.0 pound dry hops commando. Actually tried hitting them with a blender before adding this time. Dumped yesterday and today about 2 hours before kegging. No issues with racking arm all the way down. I cold crashed at 29 for a couple days before Kegging. Carbed with stone for about 24 hours.

I’m using exact same transfer line @Yesfan described. I took the ball lock disconnect apart after I was done. Bit of hop crud in there but not enough to Interfere with the transfer.

brewing a riff on other half’s all together recipe today. Will have 2 pounds of dry hops. Probably not going to get 3 full kegs lol.

I kegged a NEIPA with 6oz of commando dry hops yesterday and got only clear beer into my keg, no sign of a clog at all.

My process was:

dry hop on day 3 of fermentation (just dumped in through the 1.5" TC opening at the top, quickly and with very active fermentation still ongoing)
wait 4 days
take a gravity sample (it was done, 1.009)
perform a small trub dump
Cold crash to 36 for 24 hours
perform another trub dump
cold crash for an additional 24 hours
transfer to the keg through a TC to Keg Post, then into the keg post (so using two poppets)

My racking arm was at horizontal during the main fermentation, and JUST before hooking up my transfer rig, I held a 5-gallon bucket under it and BARELY cracked it for a split second to blow any trub/hops out of the racking arm, and it worked like a charm. From there, I re-sanitized the TC, hooked up my transfer rig and started the transfer under 12 PSI into my liquid purged keg. I rotated the racking arm to fully down.

I did only get 4 gallons of beer though - so I need to dial in those losses on a very hoppy beer.
I bet if you did that again with ONLY one trub dump, or even none at all, you might fraw closer to 5 gallons.
I have found with a proper crash and the racking arm all the gunk just sits at the bottom anyways.
 
I bet if you did that again with ONLY one trub dump, or even none at all, you might fraw closer to 5 gallons.
I have found with a proper crash and the racking arm all the gunk just sits at the bottom anyways.
I wondered that as well, I was thinking I would do a single smaller dump after cold crashing next time.

Thanks for the tip!

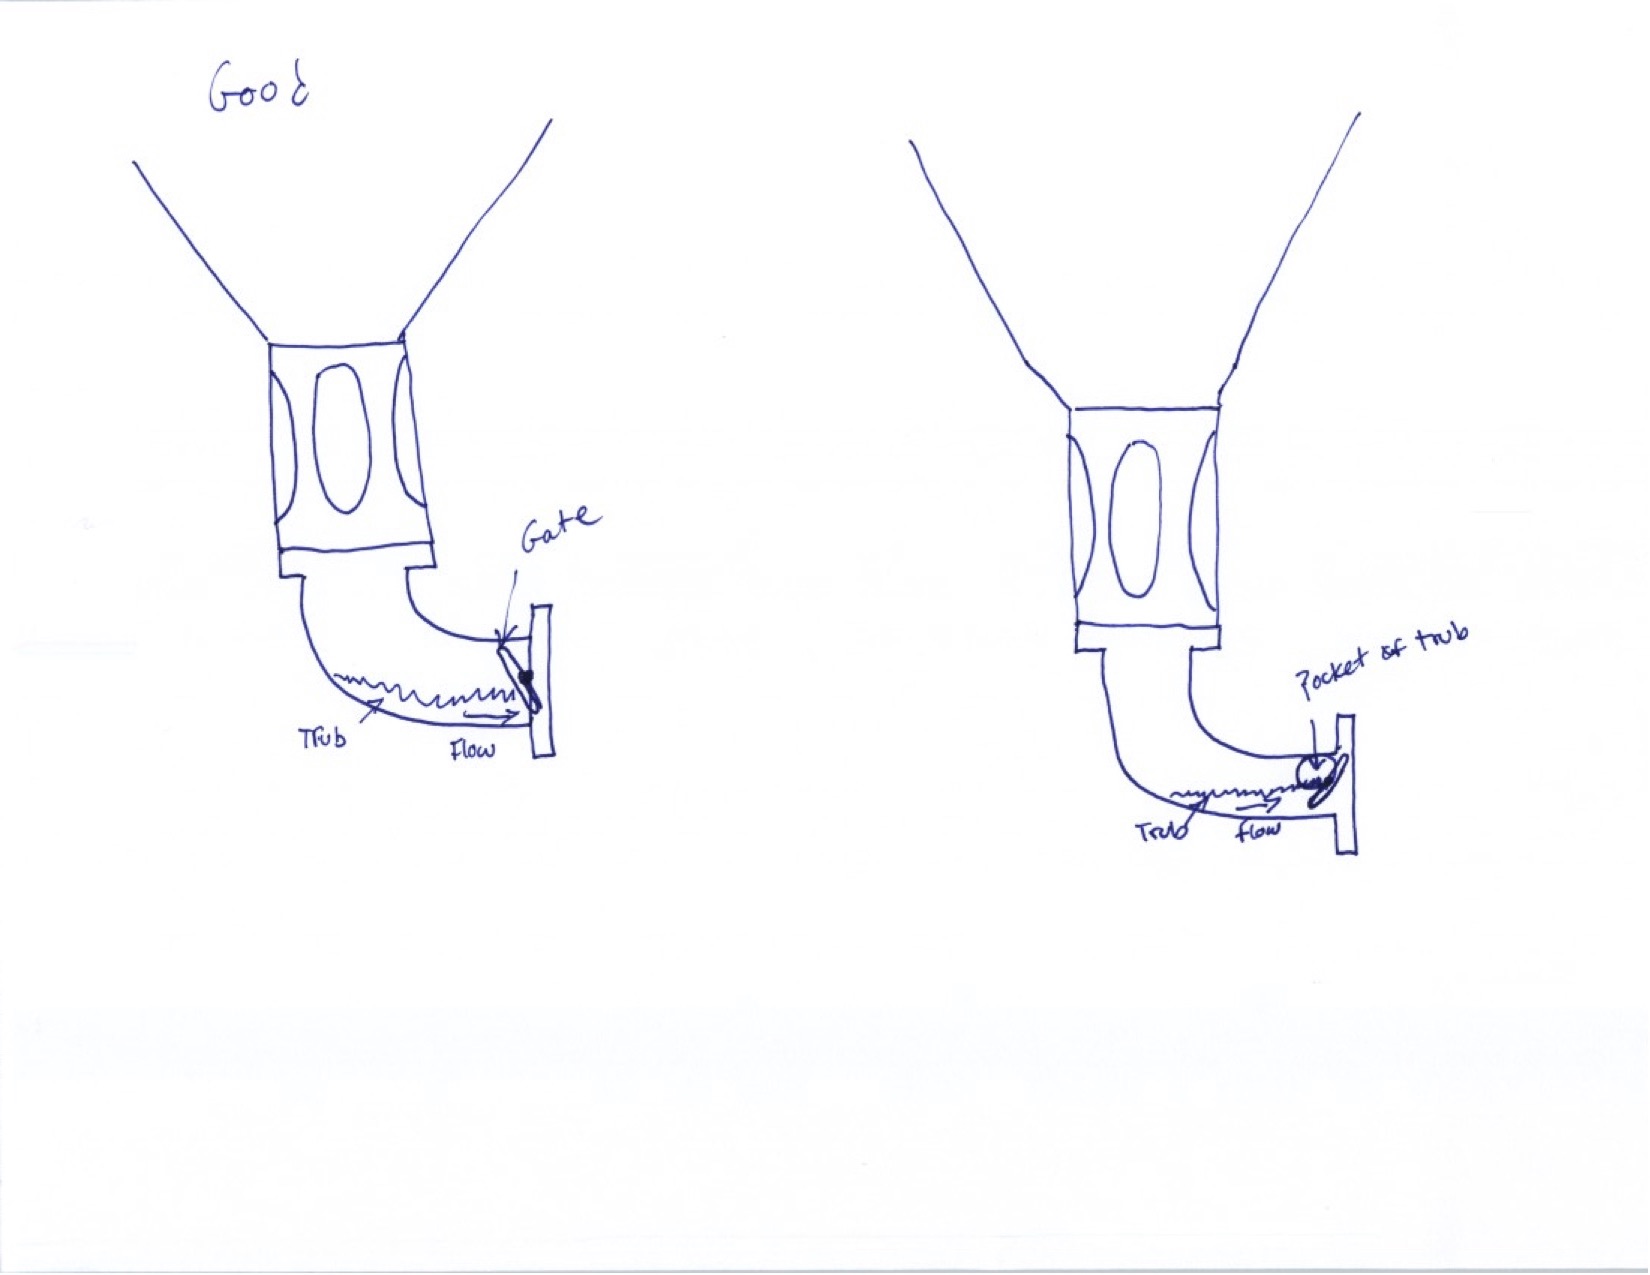
Edit: one other thing that I've quickly noticed with the butterfly valves. They should always be closed so that the handle faces down toward the ground. That way when they open, the gate at the bottom of the piping (where trub will settle) flips out away from the direction of flow, rather than pushes the trub up into the direction of flow. It seems to make for a much cleaner dump. I tested it with PBW during cleaning after this last batch, and the gate does indeed seem to act like a dam when opened with the handle facing toward the sky, rather than releasing the trub first when opened with the handle facing toward the ground.

Please excuse my ridiculous drawing
1-1-2020 through 1-18-2020.jpg
 
Last edited:
I wondered that as well, I was thinking I would do a single smaller dump after cold crashing next time.

Thanks for the tip!

I'm coming to the conclusion that I'm overthinking this whole thing. I get really clear beer, but usually only after conditioning in the keg for 2-3 weeks or more. I ferment to 5 pts of completion, spund to FG, crash for 3-4 days, all with the racking arm at horizontal or slightly below. Then I rotate the arm to vertical to pressure transfer. A sample taken from the keg is carbonated, at serving temperature following the crash, but still in need of clearing. After conditioning for a few weeks it has smoothed and cleared significantly. If it needs to be Brilliant or Near Brilliant, there's always gelatin or chitosan.

So Nate and Mad King, what yeasts are you using and what angle are your racking arms positioned during fermentation? I'm getting good beer, but would like to streamline my processes a d shorten the timeline.

Brooo Brother
 
I'm coming to the conclusion that I'm overthinking this whole thing. I get really clear beer, but usually only after conditioning in the keg for 2-3 weeks or more. I ferment to 5 pts of completion, spund to FG, crash for 3-4 days, all with the racking arm at horizontal or slightly below. Then I rotate the arm to vertical to pressure transfer. A sample taken from the keg is carbonated, at serving temperature following the crash, but still in need of clearing. After conditioning for a few weeks it has smoothed and cleared significantly. If it needs to be Brilliant or Near Brilliant, there's always gelatin or chitchat.

So Nate and Mad King, what yeasts are you using and what angle are your racking arms positioned during fermentation? I'm getting good beer, but would like to streamline my processes a d shorten the timeliness.

Brooo Brother

I should clarify, I apologize - by "clear beer" I meant clear of trub and debris. It was still very hazy because it is a NEIPA. I have not yet gotten bright clarity from a beer at transfer, but that's not really something I'm going for. My last kolsch was only slightly hazy at transfer, and had dropped to "clear" within 1 week in the keg without gelatin. I expect it to end up brilliant in another 2-3 weeks in the keg.
 
I wondered that as well, I was thinking I would do a single smaller dump after cold crashing next time.

Thanks for the tip!

Edit: one other thing that I've quickly noticed with the butterfly valves. They should always be closed so that the handle faces down toward the ground. That way when they open, the gate at the bottom of the piping (where trub will settle) flips out away from the direction of flow, rather than pushes the trub up into the direction of flow. It seems to make for a much cleaner dump. I tested it with PBW during cleaning after this last batch, and the gate does indeed seem to act like a dam when opened with the handle facing toward the sky, rather than releasing the trub first when opened with the handle facing toward the ground.

Please excuse my ridiculous drawingView attachment 686166
Your drawing is fine!!!
Up and down for the 2" valve is a must i have come to learn. However- i think one must have extension legs to start with the handle down. I do OK with it up, but down would be best!
 
I should clarify, I apologize - by "clear beer" I meant clear of trub and debris. It was still very hazy because it is a NEIPA. I have not yet gotten bright clarity from a beer at transfer, but that's not really something I'm going for. My last kolsch was only slightly hazy at transfer, and had dropped to "clear" within 1 week in the keg without gelatin. I expect it to end up brilliant in another 2-3 weeks in the keg.
+1 to this. Most of my styles don't call for clear beer (and none of them enter competitions) so clear beer is not the goal. Instead, i look to have clean enough beer so it doesn't clog the liquid ball lock poppett during transfer.
As madking mentions above, it will clear more once kegged in my keezer.
If extra clear beer was the goal, i would imagine a fining agent/gelatin would help.

I think a great thing that has come of this hazy beer craze is that beer does not have to be crystal clear to taste good.

To Broothru question- i do ipa, hazy ipa for the most part. However, i did a Kolsch style (used Dieter yeast with a pils/2 row base) that came out very clear. Also a pilsner (but my mash/ wort/watet was off).

If you are using a cf conical with a glycol chiller and not dry hopping you will get VERY clear beer very easily, imo

Edit- i have a Mexican Beer Lager going right now. It is murky like a hazy. But after a crash, and conditionig at 30 for a few weeks, it will probably clear like magic.
 
Yeah, that's pretty much what I've been doing. I was hoping there'd be a short cut to brilliant clarity. Of my last six beers (all since the New Year and lockdown), 5 have been lagers which all cleared with enough time in the keg, and one hoppy 75 IBU IPA which was not a hazy NEIPA and has the standard "light translucence" that you'd expect from an APA or West Coast IPA. I used Chico yeast for the IPA and mostly German lager yeast (WLP-830) and Wyeast 2105 and 2117 for the lagers. All are anywhere from 'moderately flocculent' to 'very flocculent' yeast and drop fairly quickly during cold crashing. I guess I'll just keep on keepin' on.
 
I havent ever wanted to fine, but my understanding is one could do it in the conical, right? Morebeer just released a few new products under their cellar science brand. (Link below).
I am so happy with cold crash and trub dump results as-is. I just dont see the need to add products, but thats me.

https://www.morebeer.com/products/cellarscience-silafine-placeholder.html

Thanks. I'll take a look at that. I've used gelatin, chitosan and most recently Biofine as clearing agents. I tend not to use clarifiers in beer but use them nearly all the time in wine making. Gelatin always works, Biofine was mostly a disappointment, but keiselsol in combination with chitosan will bring wine (and beer) to true brilliant clarity within a few days. The downside however can be a loss of flavor and aroma, but mostly a loss of mouthfeel and body. Those affects are more noticeable to me in beer than in winemaking. I demand that my wines be crystal clear while only 'prefer' that my beers (except light lagers) be "clear-ish".
 
Your drawing is fine!!!
Up and down for the 2" valve is a must i have come to learn. However- i think one must have extension legs to start with the handle down. I do OK with it up, but down would be best!


What about the valve being right under the cone? Does it matter?

That's where I had mine for the last two batches, above the elbow. I had it cone>sight glass>valve>elbow. I may move the valve back to below the elbow. Maybe the added real estate of the elbow will help with my hop clogging.
 
What about the valve being right under the cone? Does it matter?

That's where I had mine for the last two batches, above the elbow. I had it cone>sight glass>valve>elbow. I may move the valve back to below the elbow. Maybe the added real estate of the elbow will help with my hop clogging.
Ooooo... did not think about that! Yeah, that would work.

For me, I do not like the idea of the valve being above the elbow- it scares me that I cannot easily spray Star San up in there to sanitize after a dump. Without a clear sight, I would not know for sure if a little bit of gunk got stuck on the valve. I think this got argued (heatedly!) over already above-no need for me to drag it out again... I am sure all would be fine, but to me- why risk it?

I am paranoid, but I keep a cap on the end of both my butterfly valves. Also, they get sprayed with starsan before and after they get opened up each time.

I am trying it now for first time with the valve directly on the cone. I am doing it to try out the yeast brink from Norcal but for your issue just take off the elbow and spray the bottom of the valve till its clean. If you need the elbow later spray the valve again and then attach the elbow.
 
Back
Top