Spike Conical- observations and best practices

Homebrew Talk - Beer, Wine, Mead, & Cider Brewing Discussion Forum

Help Support Homebrew Talk - Beer, Wine, Mead, & Cider Brewing Discussion Forum:

This site may earn a commission from merchant affiliate links, including eBay, Amazon, and others.
I am curious about a couple ideas you mention. What do you mean hang the carb stone from the lid? I guess not going with the Spike unit...still I don't see how you can do that without compromising the PRV on the manifold. Really don't want to do that especially in conjunction with pressurizing the vessel.

I'll use this.

Screenshot_20200317-014247_Chrome.jpg


Attach the PRV/manifold on one side port and a TC ball lock post on the top port. I'll put in a liquid dip tube from a keg and attach a piece of 3/16" Bevlex to the end of it. Then attach a barb x MFL fitting on the other end of the tube and a MFL x carb stone to that.
 
I'll use this.

...

Attach the PRV/manifold on one side port and a TC ball lock post on the top port. I'll put in a liquid dip tube from a keg and attach a piece of 3/16" Bevlex to the end of it. Then attach a barb x MFL fitting on the other end of the tube and a MFL x carb stone to that.

OK sounds like you got the safety issue covered but what is advantage of doing this vs using Spike's carb stone? Also the PRV manifold has a ball lock port on it why would you need a second one on the top port of that cross?
 
OK sounds like you got the safety issue covered but what is advantage of doing this vs using Spike's carb stone? Also the PRV manifold has a ball lock port on it why would you need a second one on the top port of that cross?

The ball lock on top will be what is connected to the carb stone. The ball lock on the manifold could be used to connect a spunding valve.

Having the carb stone hanging down will let me keep the sample port, the thermowell port and the racking port free for their intended purposes. I won't need to put the carb stone on the racking port valve.
 
got it. I don't think you need a cross for the TC fitting a tee should be enough. Spike Manifold on one side and your custom carb stone on the other. Or do the cross and get a butterfly valve and a spool or sight glass for the top and rig up a @mongoose33 oxygen free dry hopper.

FWIW the Spike design has a few advantages that may or may not be of interest to you.

I really like having mine mounted to the sample port. I then put the sample valve on the racking valve until ready to rack. Then I can close the racking valve, and replace the sample valve with a TC-camlock and I'm good to transfer. I tested it and visually it looked like the stone did a better job (smaller bubbles) in the sample port then behind the racking arm but both ways clearly work.

The advantage of using it the way Spike designed it is that if you get more than one fermentor you can use the same stone on each one since it is only attached to the fermentor when in use for carbing or oxygenating. With racking arm pointed up it works fine, and with a teflon gasket the racking arm is not hard to turn (up with the stone, down for transfering).
 
I figure I will just have a cap on top until I dry hop. Then replace the cap with the carb stone assembly.

I put the carb stone on the sample port on my last batch and it was fine but when I hooked up the CO2, the head pressure exceeded what I was pushing in and the beer got into the gas line. It didn't make it back to the regulator so no harm was done. My goal is to reduce the amount of swapping out fittings I need to do through the course of the fermentation.
 
Don't confuse business agreements with functionality. There are a lot of threads on HBT that you can research to help you make a better decision. However, you may have already read those threads and discovered the "one stop shopping" is more important to you...who knows.

Here are a few threads that you might find useful.....

https://www.homebrewtalk.com/forum/threads/icemaster-max-4-glycol-chiller.676075/#post-8803532

https://www.homebrewtalk.com/forum/threads/ss-brewtech-1-5-hp-glycol-chiller.672532/

https://www.homebrewtalk.com/forum/...for-homebrewers-pre-order-now-for-599.668108/

https://www.homebrewtalk.com/forum/...ycol-chiller-with-stainless-bulkheads.667259/

EDIT: Here are a couple more threads....

https://www.homebrewtalk.com/forum/threads/is-anyone-using-a-penguin-glycol-chiller.647976/

https://www.homebrewtalk.com/forum/...in-vs-any-others-not-diy.668671/#post-8646863

Thanks for the links. yes, I read those threads. My impression was that the Penguin seems to get the better reviews overall and I was wondering if anything had changed in the short interim. The Max 2 might be great for me, but I am not a fan of a pre-order with no idea as to when it will be available. Anyway, I don't mean to hijack this thread, as it is super useful for the Spike CF users. I cannot wait to try it out!
 
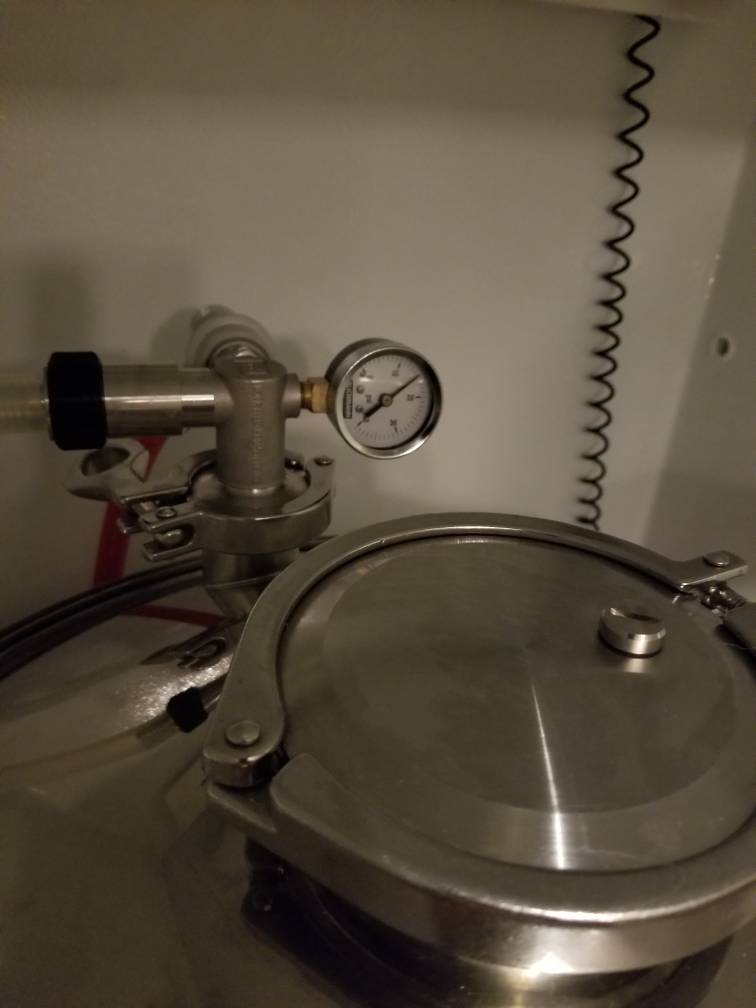
With all the free time I decided to install a PRV and do a pressure ferment with my spunding valve.

Drilling 4" TC cap is not something I ever want to do again, but it came out nice.

Cheers!
20200319_082701.jpeg
 

What I'm using is the SS Brewtech PRV here: https://www.morebeer.com/products/ss-weldless-pressure-relief-valve-wider-2015-model.html with a custom SS spring.

Are you suggesting that cap to give another port for dry-hopping? That might be a good idea.

I've got it set to release if it hits 16PSI, but the spunding valve is rock solid and never moved past 15psi.

No idea if fermenting under pressure will make any difference, but it was fun to play with!
 
Hey all. Figured i'd be lazy and just re-post, but i am sure the answer is already out there.

Using a cf5, with chiller coil, pressure kit. Have the carb stone with oxygen tank.

So my last batch had 4 oz dry hop pellets. Did a cold crash & a pressure dump, but still just so much hop material. Had to clean my transfer connection 3x. Ugh.
Decided to (finally) pull the trigger on a racking arm. Should have bought it all together initially but oh well.
Anyways- this is my first time using a racking arm. This is how i think it goes, but any tips/ advice would be much appreciated.

#1: install with arm pointed straight down.

#2: leave it alone during oxygenating with carb stone, leave it alone during dry hopping, leave it alone during cold crashing. (This is a main question- do i leave it alone during all these stages?).

#3: when ready to rack, turn arm up (so 180° from where it was if it was straight down. Or another way of saying it- point it staight up).

#4: after the flow of beer stops, slowly turn the arm down until clear beer stops flowing.

Is this it, or am i missing something?

Thanks all!

I would advise against leaving the racking arm pointing up after oxygenating as you do not want any yeast or hops to fall into it while fermenting and cold crashing. I would suggest you turn it to the side plus another 45 degrees downward after oxygenating.

Then when you are ready to rack, rotate the arm slightly upward and see if clear beer flows. Keep rotating up until you find the spot where you are racking clear beer.

Here is Spike's recommendation that you might find helpful....

http://help.spikebrewing.com/support/solutions/articles/35000043191-positioning-of-the-racking-arm

Thanks. My plan was to leave the arm down until the very end when i racked.
Arm down for oxygen, cold crash, etc.
But it sounds like down is not best.
Best would be a 45° angle, or parrell (spelling!) With the ground.
 
Thanks. My plan was to leave the arm down until the very end when i racked.
Arm down for oxygen, cold crash, etc.
But it sounds like down is not best.
Best would be a 45° angle, or parrell (spelling!) With the ground.

Geez, I haven't had much sleep for a few days and my mind just completed your #1 sentence with the word "up"....

Many brewers have the racking arm pointed down....it really depends upon the recipe (yeast, hops, etc.) that will influence the height of the yeast cake. For me, I have the racking arm 45 degrees downward.

Obviously, another factor to when you are actually racking will be if you dump the yeast/trub prior to cold crashing, 24 hours later, and then at the end. If you are doing multiple dumps, your yeast/trub is probably well below the racking arm. So, you could rack with the arm pointed completely downward.
 
@Nate R
Are you oxygenating through the racking valve?

Wouldn't it make sense to have the arm pointed up during oxygenation to ensure all the O2 makes its way into the beer and is not stuck in the racking arm? Once oxygenation is done and the beer pushes the O2 out of the racking arm, then rotate it downward.

Yes it does. Although i figured gas is gas- the pressure should push the bubbles into the wort either way right?
I agree tho- arm up to oxygenate seems better.
But the idea of lossinging the clamp to rotate this thing scares me- so i was trying to minimize the times of doing that.
I have a "rotatable" gasket in my morebeer shopping cart, but am waiting to get to $59 for free shipping. (Mr. Cheapo here).
 
Yeah, up to oxygenate, then down or mostly down through out fermentation and dumps. then turn it up to rack. i also get a little nervous when i loosen the clamp but have never had an issue even after carbonating in the fermentor and having that extra pressure there.
 
Yes it does. Although i figured gas is gas- the pressure should push the bubbles into the wort either way right?
I agree tho- arm up to oxygenate seems better.
But the idea of lossinging the clamp to rotate this thing scares me- so i was trying to minimize the times of doing that.
I have a "rotatable" gasket in my morebeer shopping cart, but am waiting to get to $59 for free shipping. (Mr. Cheapo here).

My concern would be the oxygen left over in the racking arm with no way to escape if you have it pointed down. Anything to limit oxygen exposure is good in my books. If you point it up, at least all the O2 should float up into the beer.

Or alternatively, I guess you could blast in some CO2 after the O2 to purge out all the O2 from the arm.

Yeah... didnt consider that! Great points all- thanks!!
I am gonna pull the trigger on the rotable gasket today, too.

Much appreciated all!
 
I'm really happy with mounting the carb stone on the sample valve port, That way I can leave my racking arm pointed down during entire fermentation process. I've gotten better at dumping yeast/hops/trub and last couple batches been able to rack with arm pointed down.
 
Just wanted to share my recent dry hop mixing experience. Here I am blowing CO2 through the dump valve while releasing pressure on the PRV. Does a great job resuspending dry hops that have clumped up in the sight glass and 90 degree elbow. Notice you can see a few dry hop pellets still mostly formed, that is due to my doing a second dry hop addition. I find it is necessary to mix these hops with the beer else the pellets fall into the tube, get just wet enough to expand and then never contribute anything to the beer. Also a PITA when time comes to dump them.

 
Just wanted to share my recent dry hop mixing experience. Here I am blowing CO2 through the dump valve while releasing pressure on the PRV. Does a great job resuspending dry hops that have clumped up in the sight glass and 90 degree elbow. Notice you can see a few dry hop pellets still mostly formed, that is due to my doing a second dry hop addition. I find it is necessary to mix these hops with the beer else the pellets fall into the tube, get just wet enough to expand and then never contribute anything to the beer. Also a PITA when time comes to dump them.


I can't use my sight glass in my setup so I only hear what is happening. It is nice to see something that resembles what I'm hearing. Thanks for sharing!
 
Yes it does. Although i figured gas is gas- the pressure should push the bubbles into the wort either way right?
I agree tho- arm up to oxygenate seems better.
But the idea of lossinging the clamp to rotate this thing scares me- so i was trying to minimize the times of doing that.
I have a "rotatable" gasket in my morebeer shopping cart, but am waiting to get to $59 for free shipping. (Mr. Cheapo here).

I have had issues oxygenating and carbonating with the Spike stone and this is what I have discovered. The Spike stone only works when it is surrounded by liquid. The racking arm must be up or at least horizontal to allow liquid to flow through the racking arm down to the stone. In addition, I find it helpful to purge the stone by pressing the check valve button on the stone gas post before connecting oxygen or CO2. If the stone is not totally wet the little bubbles produced will become big bubbles before exiting the racking arm which makes oxygenating or carbonating less efficient. You can tell if the stone was totally wet after removing and dumping liquid from the housing. If there is only foam in the housing, little or no liquid, the stone probably was not wet enough. So I oxygenate and carbonate with racking arm pointing up and ferment with the arm pointing down.
 
Just wanted to share my recent dry hop mixing experience. Here I am blowing CO2 through the dump valve while releasing pressure on the PRV. Does a great job resuspending dry hops that have clumped up in the sight glass and 90 degree elbow. Notice you can see a few dry hop pellets still mostly formed, that is due to my doing a second dry hop addition. I find it is necessary to mix these hops with the beer else the pellets fall into the tube, get just wet enough to expand and then never contribute anything to the beer. Also a PITA when time comes to dump them.


This is very clever!!
Are you worried about "blowing off" or "blowing away" and precious hop aroma this way?
Would you do this for a NE Hazy?
 
Just wanted to share my recent dry hop mixing experience. Here I am blowing CO2 through the dump valve while releasing pressure on the PRV. Does a great job resuspending dry hops that have clumped up in the sight glass and 90 degree elbow. Notice you can see a few dry hop pellets still mostly formed, that is due to my doing a second dry hop addition. I find it is necessary to mix these hops with the beer else the pellets fall into the tube, get just wet enough to expand and then never contribute anything to the beer. Also a PITA when time comes to dump them.


Do you happen to have a picture of your setup? Also, how are you adding the hops?
 
I'm only on my 5th brew (currently in fermentor) with my CF5, but have done 4 complete in it so far. I was debating getting the carb stone originally but really don't find much need for it anymore if you can time things right. I've got the spike manifold, and decided to put that to use that probably goes against their recommendations. After 24-30 hours of active fermentation, I remove my blow off and replace it with the manifold (no spunding valve, just the PRV, gas post, and gauge on the manifold). I've been able to get 2 beers almost fully carbonated this way (one saison, one pale ale). Upon replacing the blow-off, I pressurize and purge a few times and let it settle around a very low 2-3 PSI. Max pressure I've seen it reach is around 12 after a couple days and eventually equalizes around 8-9.

Wondering if anyone else is doing anything similar.

I've also got a butterfly valve on the 1.5" opening with a 6" extension tube before the PRV. This is allowing me to dry-hop by closing the valve, dumping the hops in the tube, putting the manifold back on, pressurize and purge a couple times, then pressurize more than was it was before and opening the valve back up to limit oxygen.

Cheers.
 
Do you happen to have a picture of your setup? Also, how are you adding the hops?

here is my system now
upload_2020-3-26_11-20-50.png


And I use this to blow CO2 in through the 2" bottom valve
upload_2020-3-26_11-27-52.png


My dry hop technique is to hook up the CO2 to bottom valve. Set my CO2 regulator to about 7 PSI, start the flow and loosen the TC clamp to flush the gas line, then tighten the TC clamp and open the dump valve. Then with gas flowing I open the 4" TC port on top and dump in my hops. Replace the lid and hold it with finger pressure while some more CO2 flows out, then clamp it down. Keep gas flowing another 30 seconds or so purging the headspace with the PRV valve 2-3 times. Close the dump valve, disconnect the gas and I'm done.
 
I like the seeming longevity of Spike gear save for the anomalies in this thread... I'm now considering a mix of high tech and low tech for my all-grain setup. One I won't really have to upgrade at all in the future.

A couple of 10 gallon Igloos for HLT and mash tun alongside a Spike+ brew kettle and conical fermenter. Seems pretty ideal to me. Also lets me avoid the most problematic thing to me which is no space for a large chest freezer or another regular sized fridge by using the TC-100 temperature control...
 
Needs a one way check valve so you don’t have beer coming back into the gas line. I just tried this using water and made a mess. Granted I don’t have the correct fittings.
 
here is my system now
View attachment 672792

And I use this to blow CO2 in through the 2" bottom valve
View attachment 672793

My dry hop technique is to hook up the CO2 to bottom valve. Set my CO2 regulator to about 7 PSI, start the flow and loosen the TC clamp to flush the gas line, then tighten the TC clamp and open the dump valve. Then with gas flowing I open the 4" TC port on top and dump in my hops. Replace the lid and hold it with finger pressure while some more CO2 flows out, then clamp it down. Keep gas flowing another 30 seconds or so purging the headspace with the PRV valve 2-3 times. Close the dump valve, disconnect the gas and I'm done.

I have seen a number of people dry hop that way (bottom up) with the norcal yeast brink. I assumed it was just a benefit of their design. Do you know if there's an advantage doing it that way compared to dry hopping from the top? Would trub re-settling on top of the hops impact the extraction?

I load dry hops into a sight glass attached to the lid TC and put the gas manifold on top. I then add co2, purge from the PRV and drop em in.
 
Needs a one way check valve so you don’t have beer coming back into the gas line. I just tried this using water and made a mess. Granted I don’t have the correct fittings.
I was thinking the same thing. I wouldn’t think there enough CO2 pressure to overcome the head pressure of the beer.
 
Has anyone carbonated a finished beer in this conical (with the proper accessories) and drank the batch from it? That's what I'm interested in. Coupled with the TC-100 for temp control, this looks like it could be the perfect setup for someone that has too much family to build anything substantially sized for kegging; bottling is my go-to and will be for the foreseeable future. But if I can ferment, carbonate, then drink straight from the sampling valve, it would be a very cool piece of kit...
 
Last edited:
Has anyone carbonated a finished beer in this conical (with the proper accessories) and drank the batch from it? That's what I'm interested in. Coupled with the TC-100 for temp control, this looks like it could be the perfect setup for someone that has too much family to build anything substantially sized for kegging; bottling is my go-to and will be for the foreseeable future. But if I can ferment, carbonate, then drink straight from the sampling valve, it would be very cool a very cool piece of kit...

Yes i have. It is almoat too easy- just pour a "sample" when you come home.... it is very easy. You can get it chilled and carbonated in like 24 hours.
You can also bottle right from it if you want- add a beergun or some such thing.
 
Yes i have. It is almoat too easy- just pour a "sample" when you come home.... it is very easy. You can get it chilled and carbonated in like 24 hours.
You can also bottle right from it if you want- add a beergun or some such thing.

That's awesome. I think this is what I want! Alright, one more question. When I've bottled so far, most people say it's done carbonating in 1 week, but I have been following a 3 week rule to get rid of "green beer" flavors and letting the yeast "clean up". So if you carb and chill it in 24 hours once fermentation is complete, what's the deal with getting rid of those green beer flavors and why don't the yeast continue to affect the taste? Or do they?
 
That's awesome. I think this is what I want! Alright, one more question. When I've bottled so far, most people say it's done carbonating in 1 week, but I have been following a 3 week rule to get rid of "green beer" flavors and letting the yeast "clean up". So if you carb and chill it in 24 hours once fermentation is complete, what's the deal with getting rid of those green beer flavors and why don't the yeast continue to affect the taste? Or do they?

Hmmm... great point.
I can only speak for me:
I dump the trub/yeast/dry hop material before i carbonate. Cold crash it, dump. Then hook up carb stone for 24 hours or so.
You are probably right- best to transfer to keg and let it condition maybe?
Although with a NE Hazy, it always tastes best from the sample port.

These are just my thoughts- let's see what what others say
 
Needs a one way check valve so you don’t have beer coming back into the gas line. I just tried this using water and made a mess. Granted I don’t have the correct fittings.

5-7 PSI is enough to not have any beer come into the gas line in a very full CF15 (maybe 17 gallons of beer above the valve)
 
Hmmm... great point.
I can only speak for me:
I dump the trub/yeast/dry hop material before i carbonate. Cold crash it, dump. Then hook up carb stone for 24 hours or so.
You are probably right- best to transfer to keg and let it condition maybe?
Although with a NE Hazy, it always tastes best from the sample port.

These are just my thoughts- let's see what what others say

I think I'll perhaps stick to what I'm doing for now as I learn the nuances of the CF10 whenever I get one... It should be easy enough to transfer it to a bottling bucket and just bottle as I've always done. The interesting thing will be how much priming sugar I need to use if I ever decide to ferment under pressure, if that affects the amount of sugar at all.
 
I have seen a number of people dry hop that way (bottom up) with the norcal yeast brink. I assumed it was just a benefit of their design. Do you know if there's an advantage doing it that way compared to dry hopping from the top? Would trub re-settling on top of the hops impact the extraction?

I load dry hops into a sight glass attached to the lid TC and put the gas manifold on top. I then add co2, purge from the PRV and drop em in.

I’m not dry hopping bottom up...I put the dry hop pellets in the top. Those little bastards sink and get into the plumbing before they can get wet enough to dissolve into the beer. I think NorCal may be on to something getting the pellets fully wetted before injecting them as a slurry into the beer.


All I’m showing in my video is overcoming that log jam of hops in the lower conical plumbing by pushing them back up into the conical with CO2. All those hops went into the conical via the 4” TC port at the top.
 
Back
Top